background image

Doorphone

23

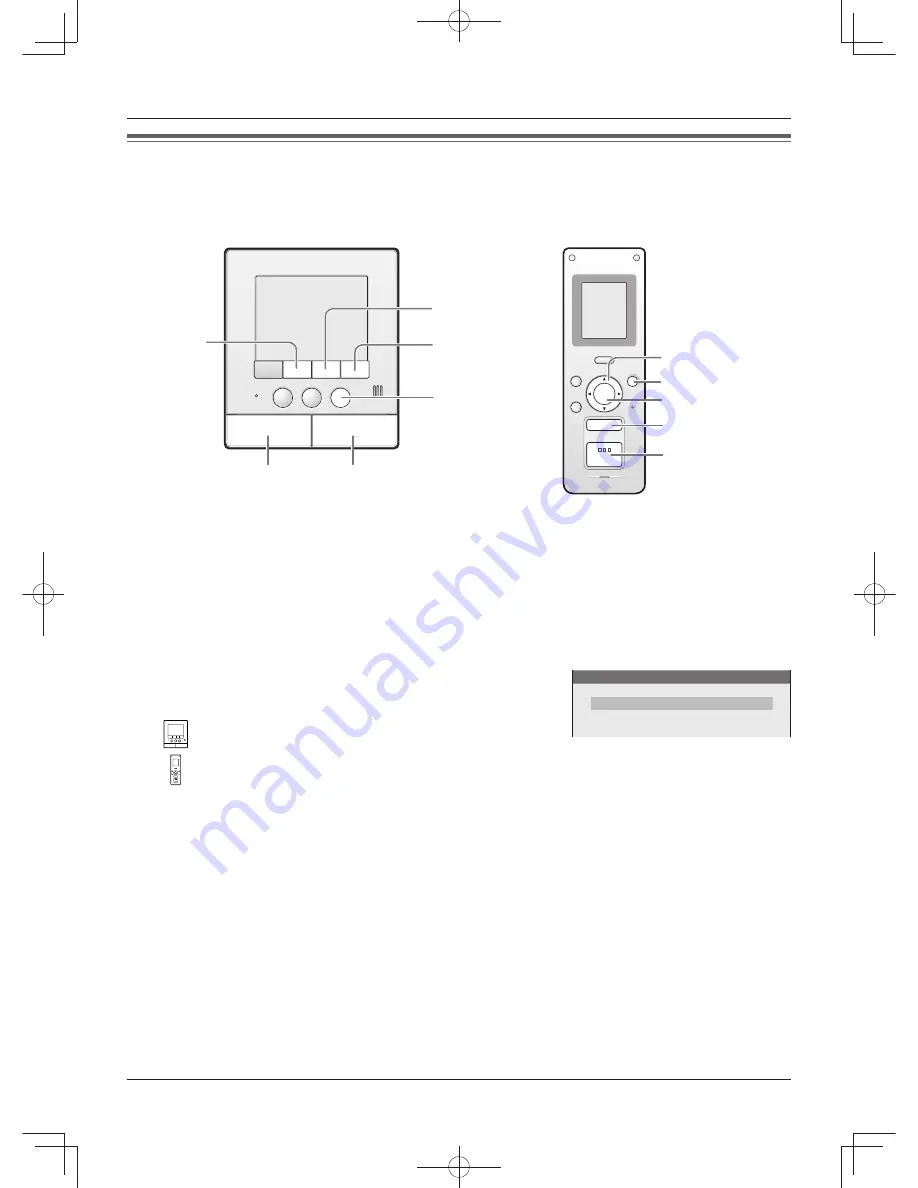
Monitoring the outside (Door station monitor)

You can monitor the sound and image taken by the door station. 

L

If an optional lobby station is connected to the main monitor station (page 4), you cannot monitor outside 
where the lobby station is located.

XX

{

TALK

}

{

OFF

}

{

PAGE

}

{

MENU

}

{

VOLUME

}

{

MONITOR

}


{

D

}


{

OFF

}


{

TALK

}


{

}


{

}

{

MONITOR

}


Press 

{

MONITOR

}

.

L

The outside image will be shown on the display, and you will hear the sound from outside.
(The sound from your end will not be heard at the door station.)

L

To speak to the other party at the door station, press 

{

TALK

}

.


To end monitoring, press 

{

OFF

}

.

N

  When installing 2 door stations

When you press 

{

MONITOR

}

 in step 1, the following is displayed.

Select the desired door station:

:  

Press 

{

VOLUME

}

 (

)

 or


{

PAGE

}

 (

)

, then 

press 

{

MENU

}

 (OK)

.

Press 

{

}


or 

{

}

, then press 

{

D

}

 (OK)

.

Note:

L

Monitoring will automatically end in about 90 seconds.

L

You can perform the following operations during monitoring. For more details, see page 19.

– Scrolling an image right or left on the sub monitor station
– Adjusting the display brightness
– Hiding the operation guidance
– Adjusting the speaker volume

When using an additional door station:

L

When you receive another call from the other door station while monitoring, see page 22.

(Example: Main monitor station)

      SELECT DOOR STATION

DOOR STATION 1

DOOR STATION 2

SW250BX̲OI.indb   23

SW250BX̲OI.indb   23

2010/08/25   15:58:33

2010/08/25   15:58:33

Содержание VL-MW250BX

Страница 1: ...Wireless Video Intercom System Main Monitor Model No VL SW250BX Including VL MW250BX VL W605BX VL V566BX VL MW250BX 1 62 4 chome Minoshima Hakata ku Fukuoka 812 8531 Japan Panasonic System Networks Co Ltd 2010 PNQX2912YA SV0910SN1090 VL MW250BX VL W605BX VL V566BX Attached Installation Guide 01 VL SW250BX indd 1 01 VL SW250BX indd 1 2010 09 14 11 58 28 2010 09 14 11 58 28 ...

Страница 2: ...ceiving another call during a call or while monitoring 22 Monitoring the outside Door station monitor 23 Recording Recording an image 24 L Auto recording 24 L Manual recording 25 Viewing recorded images using the main monitor station 26 Viewing recorded images using the sub monitor station 28 Protecting the recorded images 30 Erasing an image 31 Intercom Talking between the main monitor station an...

Страница 3: ...tion in these Operating Instructions Product name Main monitor station Main monitor Sub monitor station Wireless monitor Door station Door station Accessory information Included items For the sub monitor station 1 2 3 4 5 No Item Quantity Notes 1 AC adaptor 1 Cord length Approx 1 8 m 2 Battery 1 3 Battery cover 1 4 Charger 1 5 Charger stand 1 LAccessories for installing the main monitor station an...

Страница 4: ...es Please contact the dealer where you purchased VL SW250BX or VL MW250BX N When using with a lobby station LConnection Connect the lobby station to terminal D1 D2 on the rear of the main monitor station Refer to the Installation Guide for details The lobby station connected to terminal D1 D2 works as door station 1 LOperation You cannot monitor outside where the lobby station is located page 23 F...

Страница 5: ...aptor or power cord to be excessively pulled bent or placed under heavy objects Operating safeguards LTo reduce the risk of electric shock do not disassemble this unit Refer servicing to an authorized service center when service is required Opening or removing covers may expose you to dangerous voltages or other risks Incorrect reassembly can cause electric shock when the unit is subsequently used...

Страница 6: ...tive material to overheat and cause burns LCharge the battery ies provided or identified for use with the product only in accordance with the instructions and limitations specified in this manual LOnly use the compatible charger to charge the battery ies Do not tamper with the charger Failure to follow these instructions may cause the battery ies to swell or explode Important safety instructions W...

Страница 7: ...itions Environment LKeep the unit away from electrical noise generating devices such as fluorescent lamps and motors LThe unit should be kept away from excessive smoke dust high temperature and vibration LThe unit should not be exposed to direct sunlight LWhen you leave the unit unused for a long period of time unplug it from the power outlet LThe unit should be kept away from heat sources such as...

Страница 8: ...ng your own image taken and used indiscriminately without consent Others LPanasonic assumes no responsibility for injuries or property damage resulting from failures arising out of improper installation or operation inconsistent with both the Installation Guide and Operating Instructions LIf you stop using the main monitor station and the door station remove the main monitor station and the door s...

Страница 9: ...nd the sub monitor station D Water drain holes LThese holes allow rain water to drain Do not cover them E Panel F Speaker G Microphone A B C D E F G N Door station image quality The following phenomena may occur They are not malfunctions LIf the sun can be seen its center appears as a black dot LAt night or when there is poor lighting in the doorway the image colors become unclear If there is a li...

Страница 10: ... LAllows you to open the door when connecting the door opener sold separately to the main monitor station page 20 H PLAY REC button LViews the recorded image page 26 LRecords the image page 24 I MONITOR button LPress to monitor the sound and image taken by the door station page 23 J TALK button and indicator LPress to answer a call and or speak to a visitor page 18 LThe indicator flashes while the...

Страница 11: ...splay LThe monitor display is turned off during standby Display during operation A B E F C D The displayed function is not stated when the corresponding button name means the same as the displayed function A Indicates which door station or sub monitor station is calling monitoring or in a call Also indicates which door station took the image while viewing it Example Door station 1 Sub monitor stat...

Страница 12: ...LFlashes while the door station or the main monitor station is calling Lights up solid while talking H CHARGE indicator LLights up while charging Turns off when charging is complete I Navigator key It is also used for operating the features shown on the display page 15 LAdjusts the volume page 19 33 LSelects the desired item or image LPress to scroll the displayed image slightly to the right or le...

Страница 13: ... Metallic parts Charger stand Charge contacts Metallic parts Antenna built in LDo not cover the antenna with your hand when using the sub monitor station Radio waves may weaken Battery cover LOpen to replace the battery Speaker SW250BX OI indb 13 SW250BX OI indb 13 2010 08 25 15 58 28 2010 08 25 15 58 28 ...

Страница 14: ...rtened Recharge the battery immediately L2 beeps sound every 4 seconds and a call is disconnected within about 60 seconds L RECHARGE BATTERY is displayed The battery needs to be recharged While in use During standby flashing B Indicates which door station is calling monitoring or in a call Also indicates which door station took the image while viewing it Example Door station 1 C Indicates which do...

Страница 15: ...center of the navigator key D button J Indicates that the ringer volume for the door station is set to OFF K Appears when unviewed images from the door station remain in memory Note LImages on the monitor display A refreshed image taken by the door station is displayed every 3 seconds The displayed image is not a moving picture L Indicates the operation of the navigator key The display varies depe...

Страница 16: ... after battery replacement it takes about 7 hours to complete charging LIf you use the sub monitor station while charging the charging time becomes longer LLocate the charger where OUT OF RANGE is not displayed on the sub monitor station The charging time becomes longer where the sub monitor station is out of range of the main monitor station LEven after the sub monitor station is fully charged th...

Страница 17: ...ING TONE SETTINGS ANSWERING SETTINGS RECORDING PLAY SETTINGS 2 Press MENU OK then set the current date and time VOICE CHANGER NEXT Select the location for day month year hour minute VOLUME or PAGE Select numbers LYou can scroll numbers quickly by pressing and holding VOLUME or PAGE Example TIME AND DATE 11 NOV 2010 23 45 3 Press MENU OK after finishing the setting LThe screen in step 1 is displaye...

Страница 18: ...ther door station during a conversation see page 22 Answering a call by voice sensor Voice answer mode This mode allows you to answer a call by voice without pressing TALK You can operate this feature in the same way by using either the main monitor station or the sub monitor station Voice answer must be set ON beforehand page 37 41 1 When a ringer tone is heard answer with a clear voice such as Y...

Страница 19: ... your voice heard at the door station You can adjust the volume of your voice heard at the door station by setting the main monitor station Main monitor station only 1 Press VOLUME then select OUTGOING VOL by pressing VOLUME SELECT 2 Adjust the volume by pressing PAGE or MENU Adjusting the speaker volume Main monitor station 1 Press VOLUME then select INCOMING VOL by pressing VOLUME SELECT 2 Adjus...

Страница 20: ...ersation ends Using DOOR KEY button When a separate door opener is connected to the main monitor station you can open the door using the main monitor station or the sub monitor station 1 To open the door press DOOR KEY after answering a call from the door station or while monitoring images taken by the door station LWhen the door is opened is displayed LDoor opener allows you to open the door for ...

Страница 21: ...press TALK and talk to the paging party 2 Tell the paged party to receive the door call Press OFF LThe paged call is disconnected and the paged party can talk to the visitor 2 When the image taken by the door station is displayed talk to the visitor LPress OFF to end the call N When using multiple sub monitor stations When you press PAGE in step 1 the following is displayed Select the party that y...

Страница 22: ... monitor station During a call While monitoring Sub monitor station Main monitor station XX or XX MONITOR TALK OFF OFF TALK MONITOR When answering a call 1 Press the flashing MONITOR button LThe previous call or monitoring is terminated LYou can monitor the sound and image taken by the other door station The other party cannot hear your voice NTo speak to the other party Press TALK 2 To end monito...

Страница 23: ...N When installing 2 door stations When you press MONITOR in step 1 the following is displayed Select the desired door station Press VOLUME or PAGE then press MENU OK Press or then press D OK Note LMonitoring will automatically end in about 90 seconds LYou can perform the following operations during monitoring For more details see page 19 Scrolling an image right or left on the sub monitor station ...

Страница 24: ...lash when there are unviewed images PLAY LAMP FLASHING on page 37 LWhen you answer a call the recorded images will be treated as viewed images LIf you receive a call from the other door station while monitoring or during a conversation page 22 the images for the call are not recorded unless you answer it LYou can change the number of images to be recorded from 8 PICTURES to 1 PICTURE DOOR STATION ...

Страница 25: ...disappears when recording ends Note LWhen DOOR STATION PIC REC NUMBER is set to 8 PICTURES an image is recorded every second for 8 seconds LManually recorded images will be treated as viewed images To view the recorded images see page 26 28 LWhen recording using the sub monitor station Recording starts a short while after pressing D REC Therefore the recorded image may be different from the image ...

Страница 26: ...layed When DOOR STATION PIC REC NUMBER is set to 8 PICTURES the 1st image out of 8 images is displayed NTo view a series of 8 continuous images automatically auto playback Press PLAY REC LThe 8 images are displayed one by one After viewing the 8th image the display switches back to the 1st image NTo view the next image Press VOLUME LEach time you press the button images from other calls or monitor...

Страница 27: ...different call or monitoring LIf you press and hold VOLUME or PAGE you can switch images quickly and when you release your finger the image is displayed PAGE VOLUME Switches to the next or previous image of the 8 continuous images when auto playback is stopped temporarily PAGE MENU PAUSE Stops auto playback temporarily MENU PLAY Restarts auto playback MENU MENU LSets to adjust the display brightne...

Страница 28: ...e image LThe most recently recorded image is displayed When DOOR STATION PIC REC NUMBER is set to 8 PICTURES the 1st image out of 8 images is displayed NTo view a series of 8 continuous images Press LEach time you press the button the 8 images are displayed one by one NTo view the next image Press NEXT LEach time you press the button images from other calls or monitoring are displayed in chronolog...

Страница 29: ... the 8 continuous images Switches to the next or previous image of the 8 continuous images LIf you press and hold or you can switch images quickly and when you release your finger the image is displayed MENU You can adjust the display brightness LPress or to adjust the brightness Note LIf the display shows NOT RECORDED NEXT PIC while viewing images 8 images have not been recorded even when DOOR ST...

Страница 30: ...om the display Sub monitor station 1 While viewing the image press D MENU then select PROTECT by pressing or PICTURE MENU PROTECT DELETE 2 Press D OK L appears on the display 3 To end the operation press OFF N To release protection 1 While viewing the protected image press D MENU then select PROTECT by pressing or 2 Press D OK L disappears from the display Note LIf you protect one of a sequence of...

Страница 31: ...ess VOLUME YES 4 To end the operation press OFF Sub monitor station 1 While viewing the image press D MENU then select DELETE by pressing or PICTURE MENU PROTECT DELETE 2 Press D OK L DELETE or SERIES OF PICS DELETE appears on the display LIf you erase one of 8 continuous images all 8 images are erased together 3 Select YES by pressing or then press D OK 4 To end the operation press OFF Note LYou ...

Страница 32: ...l is heard press TALK 2 When the paged party answers the call talk with the paged party 2 Talk with the other party 3 To end the intercom call press OFF LThe intercom call is disconnected N When using multiple sub monitor stations When you press PAGE in step 1 the following is displayed Select the party that you want to page Press VOLUME or PAGE then press MENU OK Press or then press D OK Note LAn...

Страница 33: ... also adjust the ringer volume while receiving a call 1 Press VOLUME RING VOLUME 2 Press PAGE or MENU 1 LYou can also adjust the ringer volume for calls from the door station during standby Press VOLUME Ä Press PAGE or MENU 1 1 To turn off the ringer volume for calls from the door station press and hold PAGE until 2 short beeps sound To turn the ringer on press MENU Sub monitor station 1 Press MEN...

Страница 34: ...OK L r moves to the selected item 6 To end the operation press OFF Sub monitor station 1 Press MENU then select RING TONE by pressing or 2 Press D OK then select the desired door station by pressing or DOOR 1 DOOR 2 3 Press D OK then select the desired ringer tone by pressing or TONE DOOR1 1 6 SOUND1 SOUND1 REPEAT SOUND2 SOUND2 REPEAT Current setting LThe selected ringer tone sounds LThe ringer to...

Страница 35: ...ETTINGS TIME AND DATE SETTINGS RING TONE SETTINGS RECORDING PLAY SETTINGS CONNECTED DEVICE SETTINGS 2 Press MENU OK then select DOOR KEY by pressing VOLUME or PAGE CONNECTED DEVICE SETTINGS DOOR STATION CONNECTION LOBBY CONNECTION DOOR KEY EXTERNAL DEVICE 3 Press MENU OK then select the door opener to be set by pressing VOLUME or PAGE DOOR KEY DOOR KEY 1 DOOR KEY 2 4 Press MENU OK then select the ...

Страница 36: ...LWhen receiving a call while setting or no operation is done for about 90 seconds the setting function screen automatically quits Function list of the main monitor station The default setting is indicated in bold Item function Setting TIME AND DATE SETTINGS LYou can set the current date and time page 17 RING TONE SETTINGS RING VOLUME DOOR STATION HIGH MEDIUM LOW OFF PAGE HIGH MEDIUM LOW LYou can s...

Страница 37: ...AUTO PLAY 5 16 NOV 20 00 UNPLAYED DOOR STATION PIC REC NUMBER 8 PICTURES 1 PICTURE LYou can select the number of images to be recorded when receiving a call from the door station or monitoring 1 PICTURE A maximum of 100 images can be recorded 8 PICTURES The quality of the recorded images will be lower compared to 1 PICTURE PICTURE RECORD TIMING NORMAL about 2 seconds DELAYED about 3 seconds LSelec...

Страница 38: ...CONNECTED DEVICE SETTINGS DOOR STATION CONNECTION DOOR STATION 1 YES AUTO NO DOOR STATION 2 YES AUTO NO LYou can select the setting of the door station LSelect NO for the door station that is not in use LOBBY CONNECTION Generally it is unnecessary to change this setting This is for apartment complexes Only if an optional lobby station is connected to the main monitor station page 4 change the sett...

Страница 39: ...ETTINGS INITIALIZE SETTINGS INIT DEL ALL PICTURES ONLY INITIALIZE SETTINGS BACK LThis function resets the settings of the main monitor station to the default settings LThe following settings are not affected Registration of the sub monitor station and the repeater Lobby connection settings DEMO MODE Do not use this setting unless the device is being used in a sales display ON OFF SW250BX OI indb 3...

Страница 40: ... is done for about 90 seconds the setting function screen automatically quits Function list of the sub monitor station The default setting is indicated in bold Item function Setting RING VOLUME DOOR HIGH MEDIUM LOW OFF PAGE HIGH MEDIUM LOW LYou can select the ringer volume of the sub monitor station page 33 RING TONE DOOR 1 SOUND1 SOUND1 REPEAT SOUND2 SOUND2 REPEAT SOUND3 SOUND3 REPEAT DOOR 2 SOUN...

Страница 41: ...he recording time and date to be displayed while viewing the recorded image LWhen 3 SEC is selected Directly after being displayed About 3 seconds later 5 16 NOV 20 00 30 11 16 20 00 CONTRAST LWhen it is difficult to see the monitor display of the sub monitor station you can adjust the display contrast 5 levels are available Default setting Level 3 REGISTRATION LYou can register the sub monitor st...

Страница 42: ...g or using the optional units refer to their separate Operating Instructions For wiring between the optional units and the main monitor station refer to the Installation Guide included separately System components as of September 2010 VL W605BX Expanding the range of the system radio wave range Repeater up to 2 units page 45 VL FAN1BX Units required to be registered to the main monitor station Wir...

Страница 43: ...page 11 While is displayed you cannot answer the call using the main monitor station The display will turn off when the conversation between the door station and the PBX extension ends or if the call duration time is longer than 3 minutes If you answer a call from the door station with the main monitor station or the sub monitor station the call will continue to ring at the extension for about 15 ...

Страница 44: ...ng VOLUME or PAGE FUNCTION SETTINGS TIME AND DATE SETTINGS RING TONE SETTINGS CONNECTED DEVICE SETTINGS REGISTRATION CANCELLATION 2 Press MENU OK then select REGISTRATION by pressing VOLUME or PAGE 3 Press MENU OK then select SUB MONITOR STATION by pressing VOLUME or PAGE 4 Press MENU OK then select the sub monitor station to be registered by pressing VOLUME or PAGE 5 Press MENU OK Using the sub m...

Страница 45: ...nitor station XX OFF PAGE MENU VOLUME 1 Press MENU then select REGISTRATION CANCELLATION by pressing VOLUME or PAGE FUNCTION SETTINGS TIME AND DATE SETTINGS RING TONE SETTINGS CONNECTED DEVICE SETTINGS REGISTRATION CANCELLATION 2 Press MENU OK then select REGISTRATION by pressing VOLUME or PAGE 3 Press MENU OK then select REPEATER by pressing VOLUME or PAGE 4 Press MENU OK then select the repeater...

Страница 46: ...ION REGISTRATION CANCELLATION 3 Press MENU OK then select the device to be canceled by pressing VOLUME or PAGE CANCELLATION CANCEL SUB MONITOR STATION CANCEL REPEATER 4 Press MENU OK then select the device number to be canceled by pressing VOLUME or PAGE Example Sub monitor station 2 CANCEL SUB MONITOR STATION SUB MONITOR STATION 1 SUB MONITOR STATION 2 SUB MONITOR STATION 3 5 Press MENU OK 6 To e...

Страница 47: ...Strong light such as sunlight is shining into the lens of the door station Though this may cause the display image to become difficult to see this is not a malfunction Locate the door station away from direct sunlight The image quality may be better if the angle of the door station is changed There is a small black dot in the background LIf the sun can be seen its center appears as a black dot Thi...

Страница 48: ...nstall a repeater optional the sound may be improved LThere is an object such as a concrete wall obstructing the signal Move to a place without an obstacle If you install a repeater optional the sound may be improved LA microwave or wireless LAN appliance is in use Move closer to the main monitor station or use a sub monitor station located away from those appliances Try again 20 7 45 7 45 7 A how...

Страница 49: ...ation has been charged flashes after using it a few times LThe battery is at the end of its life Replace the battery with a new one 52 The sub monitor station the AC adaptor or the charger is warm LThis is normal It may feel a little warmer in summer than in winter If it feels very hot disconnect the AC adapter from the power outlet and contact our service personnel N Others Problem Cause Solution...

Страница 50: ...e ringer tone does not sound LNo voices can be heard LThe plug is disconnected from the power outlet or it is about to be disconnected Disconnect the plug and connect it securely again If this does not solve the problem contact our service personnel SW250BX OI indb 50 SW250BX OI indb 50 2010 08 25 15 58 39 2010 08 25 15 58 39 ...

Страница 51: ...Sub monitor station only Problem Cause Solution Page CAN NOT CONNECT LThe sub monitor station is too far from the main monitor station Move closer to the main monitor station If you install a repeater optional the problem may be solved LThere is an object such as a concrete wall obstructing the signal Move to a place without an obstacle If you install a repeater optional the problem may be solved ...

Страница 52: ...art When the battery level flashes after a few calls even if the battery has been charged for about 7 hours replace the battery with a new one 1 Open the battery cover 2 Remove the old battery 3 Insert the new battery and charge it page 16 LThe battery level shows when replacing a new battery Important LUse only the rechargeable Panasonic battery HHR P103 Battery specifications Rechargeable nickel...

Страница 53: ...tor station Dimensions Approx height 131 mm x width 99 mm x depth 36 5 mm Excluding protruding sections Mass Weight Approx 200 g Operating environment 10 C to 50 C Up to 90 RH Relative Humidity non condensing Installation method Wall mount Wall mount base included External material Flame retardant ABS resin Charger Power supply AC adaptor PQLV219BX 100 240 V AC 50 60 Hz Dimensions Approx height 11...

Страница 54: ...ION PIC REC NUMBER 37 LPICTURE RECORD TIMING 37 LDOOR STATION AUTO RECORDING 37 LDELETE ALL PICTURES 37 LDOOR STATION CONNECTION 38 LLOBBY CONNECTION 38 LDOOR KEY 35 38 LEXTERNAL DEVICE 38 LINITIALIZE SETTINGS 39 LDEMO MODE 39 F FUNCTION SETTINGS Sub monitor station LRING VOLUME 33 40 LRING TONE 34 40 LVOICE ANSWER 41 LVOICE CHANGER 41 LDISP REC DATE 41 LCONTRAST 41 LREGISTRATION 41 44 LINIT SETTI...

Страница 55: ...on 13 Speaker volume 19 Specifications 53 Sub monitor station 3 12 LCharging 16 LRegistration 44 LCancellation 46 System components 42 T TALK indicator LMain monitor station 10 LSub monitor station 12 Transferring a call 21 Troubleshooting 47 50 V Viewing recorded images LMain monitor station 26 LSub monitor station 28 Voice answer mode 18 37 41 Voice changer 19 37 41 Volume LOUTGOING VOL 19 LSpea...

Страница 56: ...of purchase Serial number found on the rear of the main monitor station Dealer s name and address Dealer s telephone number Attach your sales receipt here SW250BX OI indb 56 SW250BX OI indb 56 2010 08 25 15 58 40 2010 08 25 15 58 40 ...

Отзывы: