background image

6

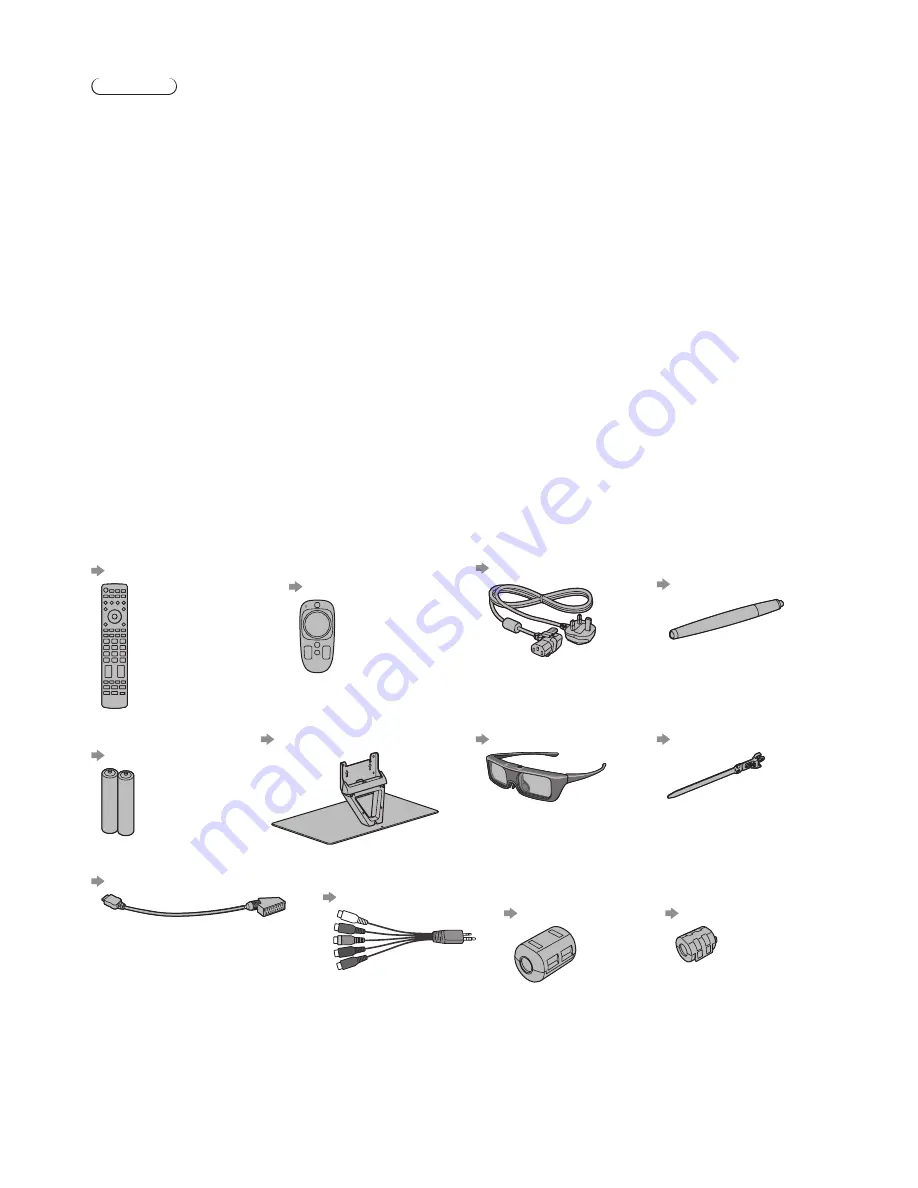
  Accessories

 Remote Control
   (p. 14)


 N2QAYB000895

 VIERA Touch Pad 
Controller
   (p. 15)


 N2QBYB000026

 Mains lead
   (p. 9)


 Electronic Touch Pen

 (with R03 battery)

   (p. 16)


 Batteries (4)


 R6

   (p. 8)


 Pedestal
   (p. 7)


 3D Eyewear (2)
   (p. 21)


 Cable tie
   (p. 13)


 AV1 (SCART) adaptor
   (p. 9, 10)


 AV2 (COMPONENT / 
VIDEO) adaptor
   (p. 11)


 Ferrite core for 
LAN cable (2)

 (Large size)

   (p. 10)


 Ferrite core for 
headphones

 (Small size)

   (p. 12)


 Use the Ferrite cores to comply with the EMC 
standard.

 Operating Instructions

 Production Registration Leaflet


 Accessories may not be placed all together. Take care not to throw them away unintentionally.


 For the information of optional accessories, refer to [eHELP] (Support > Optional accessories).


 Viewing 3D Images

 Caution


 Pay special attention when children are viewing 3D 
images. 3D images should not be viewed by children 
younger than about 6 years old, as a guideline. 
All children must be fully supervised by parents or 
guardians who must ensure their safety and health 
while they are viewing 3D images.


 Stop viewing 3D images immediately if you feel tired, 
feel unwell, experience any other uncomfortable 
sensation or clearly see double images. Take an 
appropriate break before continuing to view. When you 
set the 3D effect by using [3D Adjustment], take into 
account that the vision of 3D images varies among 
different individuals.


 Do not view 3D images if you have a history of 
oversensitivity to light, heart problems or any other 
medical conditions.


 When viewing 3D images, your sense of distance may 
be tricked or go wrong. Be careful not to hit the TV 
screen or other people unintentionally. Ensure there 
are no breakable objects around you to avoid any 
accidental damage or injury.


 Do not view 3D images from a distance shorter than 
recommended. The recommended viewing distance is 
at least 3 times of the image height.

 TX-P60ZT65B: 2.3 m or more

 When black bands at the top and bottom of the screen 
are displayed, such as movies, view the screen from 
a distance at least 3 times the height of the actual 
image. (That makes the distance shorter than the 
recommended values above.)

Содержание Viera TX-P60ZT65B

Страница 1: ...re for illustrative purposes only For more detailed instructions refer to eHELP Built in Operating Instructions How to use eHELP p 20 Contents Be Sure to Read Important Notice 2 Safety Precautions 3 Quick Start Guide Accessories 6 Connections 8 Identifying Controls 14 First time Auto Setup 18 Using your VIERA Operations 19 How to Use eHELP 20 Viewing 3D images 21 Others FAQs 22 Maintenance 23 Spec...

Страница 2: ...nic net viera support Panasonic does not guarantee operation and performance of peripheral devices made by other manufacturers and we disclaim any liability or damage arising from operation and or performance from usage of such other maker s peripheral devices Full HD 3D Glasses Logo indicates compatibility between TV products and 3D Eyewear which are compliant with the Full HD 3D Glasses format a...

Страница 3: ...side Do not expose the TV to rain or excessive moisture This TV must not be exposed to dripping or splashing water and objects filled with liquid such as vases must not be placed on top of or above the TV Do not insert foreign objects into the TV through the air vents This product is licensed under the AVC patent portfolio license for the personal and non commercial use of a consumer to i encode v...

Страница 4: ...ewear Electronic Touch Pen and VIERA Touch Pad Controller near any automatic control equipment such as automatic doors or fire alarms Radio waves may interfere with the automatic control equipment and cause accidents due to the malfunction Keep the distance at least 22 cm from the TV 3D Eyewear Electronic Touch Pen and VIERA Touch Pad Controller when you have a cardiac pacemaker Radio waves may in...

Страница 5: ...e the battery from the unit when not using for a prolonged period of time to prevent battery leakage corrosion and explosion Electronic Touch Pen Use Warning The TV may be hot Do not touch it continuously to prevent low temperature burn Caution Do not forcibly hit or pick the TV screen with the Electronic Touch Pen to prevent the TV from falling over Touch the TV screen only with the tip of the El...

Страница 6: ...fety and health while they are viewing 3D images Stop viewing 3D images immediately if you feel tired feel unwell experience any other uncomfortable sensation or clearly see double images Take an appropriate break before continuing to view When you set the 3D effect by using 3D Adjustment take into account that the vision of 3D images varies among different individuals Do not view 3D images if you...

Страница 7: ...B E C 2 3 D 4 5 A Removing the pedestal from the TV Be sure to remove the pedestal in the following way when using the wall hanging bracket or repacking the TV 1 Remove the assembly screws from the TV 2 Pull out the pedestal from the TV 3 Remove the assembly screw from the cover 4 Pull out the cover 5 Remove the assembly screws from the bracket ...

Страница 8: ...se a fully wired SCART or HDMI cable Keep the TV away from electronic equipment video equipment etc or equipment with an infrared sensor Otherwise distortion of image sound may occur or operation of other equipment may be interfered Also read the manual of the equipment being connected Terminals 8 7 9 4 6 5 2 1 3 10 11 12 1 CI slot p 12 2 SD Card slot 3 Headphone jack p 12 4 USB 1 3 port 5 HDMI1 3...

Страница 9: ...ogue AC 220 240 V 50 60 Hz Mains lead supplied Terrestrial aerial RF cable freesat Other Sat Satellite Satellite dish Satellite cable Mains lead Push until both side tabs click Make sure that the mains lead is securely fixed To remove from the TV tabs Press both tabs and pull on mains connector to release AV devices DVD Recorder VCR TV DVD Recorder VCR RF cable SCART cable RF cable Terrestrial aer...

Страница 10: ...dband network services please consult your retailer for assistance Prepare the internet environment for wired connection or wireless connection Setup of the network connection will start when first using the TV p 18 Wired connection TV Internet environment Less than 10 cm LAN cable Unshielded Use the Unshielded Twist Pair UTP LAN cable Ferrite core Large size supplied Installing the Ferrite core P...

Страница 11: ...ers TV HDMI cable Amplifier with speaker system External equipment DVD Player etc Use HDMI2 for connecting an amplifier This connection is applicable when using an amplifier that has ARC Audio Return Channel function As for an amplifier without ARC function use DIGITAL AUDIO To enjoy the sound from the external equipment in multi channel sound e g Dolby Digital 5 1ch connect the equipment to the a...

Страница 12: ...AL AUDIO ETHERNET HDMI 1 3 USB 1 3 COMPONENT VIDEO To record play back videocassettes DVDs VCR DVD Recorder To watch 3D contents Blu ray Disc Player To watch cable broadcasts Cable TV box To watch DVDs DVD Player To watch camcorder images Video camera To play games Game equipment To use amplifier with speaker system 2 To use network services 3 USB HDD Recording 4 VIERA Link Recommended Connection ...

Страница 13: ...ssory follow the option s assembly manual to fix cables Attach the cable tie Bundle the cables hole Insert the cable tie in a hole hooks Set the tip in the hooks To remove from the TV To loosen Keep pushing both side snaps snaps knob Keep pushing the knob Attach the cable clamp hole Insert the cable clamp in a hole Bundle the cables Set To release Tab Keep pushing the tab To remove from the TV Kee...

Страница 14: ...and operation of various functions 11 Text service button 12 Subtitles Displays subtitles 13 Numeric buttons Changes channel and teletext pages Sets characters When in Standby mode switches TV on 14 Sound Mute On Off 15 Volume Up Down 16 Input mode selection TV switches to freesat DVB Analogue Other Sat Satellite mode AV switches to AV input mode from Input Selection list 17 Off Timer Sets the tim...

Страница 15: ...ophone 3 Microphone button 4 Touch pad see below 5 Option Menu 6 HOME Same function of the remote control button 20 p 14 7 Volume Up Down Same function of the remote control button 15 p 14 8 APPS Same function of the remote control button 6 p 14 9 On screen remote control Press to display the remote control GUI Graphical User Interface Press again to move the position of GUI To change the page of ...

Страница 16: ...the pen tip on this side of the Electronic Touch Pen against the TV screen for use 1 Power button To turn on Press once To turn off Press and hold 2 seconds or longer Automatically turned off if unused for 5 minutes Inserting the battery 1 Turn and slide the unit cover until the entire shape of the battery is visible 2 Insert the R03 battery and then slide and turn the unit cover to close until it...

Страница 17: ...ange of options select the menu item up and down only adjust levels left and right only Access the menu store settings after adjustments have been made or options have been set Return to the previous menu Exit the menu system and return to Home Screen 1 Input mode selection Press repeatedly until you reach the desired mode Main Menu Press and hold for about 3 seconds to display main menu OK when i...

Страница 18: ... Register the VIERA Touch Pad Controller to this TV Select Pairing and follow the on screen instructions to use the touch pad controller supplied Register the Electronic Touch Pen to this TV Select Pairing and follow the on screen instructions to use the Electronic Touch Pen supplied 3 Select the type of Home Screen The demonstration to explain how to use my Home Screen is displayed Confirm the de...

Страница 19: ...ect the TV viewer from Home Screen select access 2 Select the mode Selectable modes vary depending on the tuned channels TV Selection freesat DVB Analogue Other Sat Satellite select access You can also select the mode by pressing the TV button repeatedly If TV Selection menu is not displayed press the TV button to switch the mode 3 Select a channel up down or To select 2 or more digit channel posi...

Страница 20: ...ation in eHELP If this is not the first time to view eHELP from when the TV is turned on the confirmation screen is displayed to select whether First Page or Last Page 2 Select the category and item Category field Item field Sub item field Description select category access select item access select sub item access To return to the previous field To scroll the description if more than 1 page While...

Страница 21: ... with this TV 1 Turn the TV on 2 Press Power button for about 1 second to turn the 3D Eyewear on The lamp lights for about 2 seconds and then flashes The 3D Eyewear will be turned on and start registration Place the 3D Eyewear within 50 cm from the TV while registration in progress 3 After the registration is successfully completed the 3D Eyewear will reconnect with TV automatically when the 3D Ey...

Страница 22: ...ns lead is plugged into the TV and the socket outlet The fuse in the mains plug may have blown Replace it with one of an identical rating p 3 The TV goes into Standby mode Auto power standby function is activated The remote control does not work or is intermittent Are the batteries installed correctly p 8 Has the TV been switched on The batteries may be running low Replace them with new ones Point...

Страница 23: ... menu 3 Setup DVB Tuning Menu Auto Setup Please note most digital TV recorders will keep your original recordings after running a re tune but you will need to reset any future recordings Maintenance First remove the mains plug from the socket outlet Display panel Cabinet Pedestal Regular care Gently wipe the surface of the display panel cabinet or pedestal by using a soft cloth to clean the dirt o...

Страница 24: ...DVB T T2 Digital terrestrial services PAL I UHF E21 68 PAL 525 60 Playback of NTSC tape from some PAL Video recorders VCR or NTSC disc playback from DVD player and recorder M NTSC Playback from M NTSC Video recorders VCR NTSC AV input only Playback from NTSC Video recorders VCR DVB S S2 Receiver frequency range 950 MHz to 2 150 MHz Not available for DiSEqC control DVB T Digital terrestrial service...

Страница 25: ...n wireless LAN Standard compliance and Frequency range 1 IEEE802 11a n 5 180 GHz 5 320 GHz 5 500 GHz 5 580 GHz 5 660 GHz 5 700 GHz IEEE802 11b g n 2 412 GHz 2 472 GHz Security WPA2 PSK TKIP AES WPA PSK TKIP AES WEP 64 bit 128 bit Bluetooth wireless technology 2 Standard Compliance Bluetooth 3 0 Frequency Range 2 402 GHz 2 480 GHz 1 The frequency and channel differ depending on the country 2 Not al...

Страница 26: ... and Dimensions shown are approximate For the information of power consumption display resolution etc please refer to Product fiche For the information of the open source software refer to eHELP Support Licence This equipment complies with the EMC standards listed below EN55013 EN61000 3 2 EN61000 3 3 EN55020 EN55022 EN55024 When using the wall hanging bracket For the recommended wall hanging brac...

Страница 27: ... 5 EC If you want to get a copy of the original DoC of this TV please visit the following website http www doc panasonic de Authorized Representative Panasonic Testing Centre Panasonic Marketing Europe GmbH Winsbergring 15 22525 Hamburg Germany This TV is intended to be used in the following countries Ireland United Kingdom The wireless LAN feature of this TV shall exclusively be used inside build...

Страница 28: ...correct method of disposal Note for the battery symbol bottom two symbol examples This symbol might be used in combination with a chemical symbol In this case it complies with the requirement set by the Directive for the chemical involved Customer s Record The model number and serial number of this product may be found on its rear panel You should note this serial number in the space provided belo...

Отзывы: