background image

English

8

Basic Connection

External equipment and cables shown are not supplied with this TV.
Please ensure that the unit is disconnected from the mains socket before attaching or disconnecting any leads.
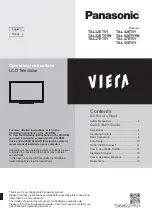
Terminals

6

7

8

1

9

10

11

3

5

2

4

1

CI slot

2

SD Card slot

3

USB 1 - 3 port

4

HDMI1 - 4

5

Headphone jack

6

ETHERNET

7

Terrestrial / cable terminal

8

DIGITAL AUDIO OUT

9

PC terminal

10

AV1 (SCART)

11

AV2 (COMPONENT / 
VIDEO)

Connections

Mains lead and aerial

Cable


DVB-C, DVB-T, Analogue

AC 220-240 V
50 / 60 Hz

Mains lead

Terrestrial aerial

RF cable


Mains lead

Insert the mains plug (supplied) firmly into place.

When disconnecting the mains lead, be absolutely sure to 
disconnect the mains plug at the socket outlet first.

AV devices


DVD Recorder / VCR

TV

DVD Recorder / VCR

Cable

AV1 (SCART) 

adaptor

SCART cable

RF cable

Terrestrial 
aerial

RF cable

Supplied with this TV

Содержание Viera TX-L47ET5Y

Страница 1: ...nstructions refer to the Operating Instructions on the CD ROM To view the Operating Instructions on the CD ROM you need a computer equipped with a CD ROM drive and Adobe Reader Version 8 0 or later is recommended installed on your computer Depending on the operating system or settings on your computer the Operating Instructions may not start automatically In this case open the PDF file under the M...

Страница 2: ...aired at your local Panasonic dealer Do not expose the TV to direct sunlight and other sources of heat Avoid exposing the TV to direct sunlight and other sources of heat To prevent the spread of fire keep candles or other open flames away from this product at all times Do not expose to rain or excessive moisture To prevent damage which might result in electric shock or fire do not expose this TV t...

Страница 3: ...e cloths and curtains We recommend that a gap of at least 10 cm is left all around this TV even when placed inside a cabinet or between shelves When using the pedestal keep the space between the bottom of the TV and the surface where the TV is set If pedestal is not used ensure the vents in the bottom of the TV are not blocked Minimum distance 10 10 10 10 cm Built in wireless LAN To use the built ...

Страница 4: ...batteries Do not use rechargeable Ni Cd batteries Do not burn or break up batteries Do not expose batteries to excessive heat such as sunshine fire or the like Make sure you dispose of batteries correctly Ensure batteries are replaced correctly there is danger of explosion and fire if battery is reversed Do not disassemble or modify the remote control 2 Note the correct polarity or Close Attaching...

Страница 5: ...sten the bracket to the base securely Make sure that the screws are securely tightened Forcing the assembly screws the wrong way will strip the threads D C A Front Tab top 2 Securing the TV Use the assembly screws to fasten securely Tighten the four assembly screws loosely at first then tighten them firmly to fix securely Carry out the work on a horizontal and level surface B Arrow mark Hole for p...

Страница 6: ... navigation and operation of various functions 11 Teletext Switches to teletext mode 12 Subtitles Displays subtitles 13 Numeric buttons Changes channel and teletext pages Sets characters When in Standby mode switches TV on Press for about 1 second 14 Sound Mute Switches sound mute on or off 15 Volume Up Down 16 Input mode selection TV switches DVB C DVB T Analogue mode AV switches to AV input mode...

Страница 7: ... operation is performed for the period selected in Auto Standby This function does not affect the recording of Timer Programming and Direct TV Recording 1 Function select Volume Contrast Brightness Colour Sharpness Tint NTSC signal Bass Treble Balance Auto Setup Music or Speech mode in the Sound Menu 2 Channel Up Down Value change when using the F button Switching the TV on press either button for...

Страница 8: ...trial cable terminal 8 DIGITAL AUDIO OUT 9 PC terminal 10 AV1 SCART 11 AV2 COMPONENT VIDEO Connections Mains lead and aerial Cable DVB C DVB T Analogue AC 220 240 V 50 60 Hz Mains lead Terrestrial aerial RF cable Mains lead Insert the mains plug supplied firmly into place When disconnecting the mains lead be absolutely sure to disconnect the mains plug at the socket outlet first AV devices DVD Rec...

Страница 9: ...peration of other equipment may be interfered When using a SCART or HDMI cable use the fully wired one Check the type of terminals and cable plugs are correct when connecting Network To enable the network service functions VIERA Connect etc you need to connect the TV to a broadband network environment If you do not have any broadband network services please consult your retailer for assistance Pre...

Страница 10: ...starting Auto Setup For details of settings for the connected equipment read the manual of the equipment 1 Plug the TV into mains socket and switch on Takes a few seconds to be displayed If the red LED shows on the TV press the Standby On Off switch on the remote control for about 1 second 2 Select the language Menüsprache Deutsch Dansk Polski Srpski English Svenska Hrvatski Français Norsk Magyar ...

Страница 11: ... DVB T Auto Setup 0 100 1 2 3 100 100 CBBC Channel BBC Radio Wales E4 100 Searching DVB C Auto Setup Progress This will take about 3 minutes No Channel Name Type Free TV Free TV Free TV Quality Free TV 3 Pay TV 0 Radio 0 CH 5 69 62 62 62 100 100 CBBC Channel BBC Radio Wales E4 100 62 100 Cartoon Nwk Searching CH Channel Name Type Free TV Free TV Free TV Free TV Quality Free TV 4 Pay TV 0 Radio 0 D...

Страница 12: ... set manually select Manual and set each item 2 Go to the next step Press twice Wireless Access points found automatically are listed 1 Select your desired access point 1 2 3 Access Point A Access Point B Access Point C 11n 2 4GHz 11n 5GHz 11n 5GHz Available Wireless Networks No Network Name SSID Status Wireless type select access For WPS Push button p 13 red Encrypted access point To search acces...

Страница 13: ...s Check for devices using same IP address Check gateway connection Check server connection Connection Test 4 Go to the next step Press twice succeeded The test is successful and the TV is connected to the network failed Check the settings and connections And then select Retry To set manually select Manual and set each item 7 Select Home Select Home viewing environment to use in your home environme...

Страница 14: ...VIERA Connect Simply press the OK INTERNET button 2 Access VIERA Connect While the banner is displayed or Depending on the usage conditions it may take a while to read all the data Messages might be displayed before VIERA Connect home screen Please read these instructions carefully and follow the on screen instructions Example VIERA Connect home screen MORE BACK To go to the next level select MORE...

Страница 15: ...er people by mistake As the images are in 3D the distance between the user and screen may be mistaken causing the user to strike the screen which may result in injury When using the 3D Eyewear make sure your eyes are on an approximately horizontal level and keep a position where you do not see double images If you suffer from myopia short sightedness hyperopia far sightedness astigmatism or have e...

Страница 16: ...upported broadcast Please consult the suppliers of contents or programmes for availability of this service 3D photos and 3D videos taken by 3D compatible Panasonic products Available in Media Player and Network services 2D images converted to 3D Set to 2D 3D mode in 3D Mode Selection 1 Put on the 3D Eyewear 2 View the 3D images Safety precautions will be displayed when you first watch the 3D image...

Страница 17: ...tion Manual and the source image format If the picture appears to be abnormal refer to the table below to choose the correct 3D mode 3D Mode Selection Source image format Original Frame Sequential 3D Side by Side 3D Top and Bottom 3D 2D 3D Frame Sequential Normal 3D 1 Side by Side Full Normal 3D 1 Side by Side Normal 3D 1 Top and Bottom Normal 3D 1 Normal format 2D Normal 3D 1 When selecting Frame...

Страница 18: ...e bar 5 Sharpness Moved change store Go to the next screen Child Lock Access Displays the next screen access To return to TV at any time To return to the previous screen To change menu pages up down Enter characters by free input menu You can enter names or numbers freely for some items A B C D E F G H I J K L M N O P Q R S T U V W X Y Z 0 1 2 3 4 5 6 7 8 9 a b c d e f g h i j k l m n o p q r s t ...

Страница 19: ...ake care not to tap or scratch the surface with your fingernail or other hard objects Do not allow the cabinet and pedestal to make contact with a rubber or PVC substance for a long time This may degrade surface quality Mains plug Wipe the mains plug with a dry cloth at regular intervals Moisture and dust may lead to fire or electrical shock LCD Television Declaration of Conformity DoC Hereby Pana...

Страница 20: ...n Disposal in other Countries outside the European Union These symbols are only valid in the European Union If you wish to discard these items please contact your local authorities or dealer and ask for the correct method of disposal Note for the battery symbol bottom two symbol examples This symbol might be used in combination with a chemical symbol In this case it complies with the requirement s...

Страница 21: ...D ROM en for mere udførlige oplysninger For at se brugsanvisningen på CD ROM en skal du anvende en computer som er udstyret med et CD ROM drev og Adobe Reader version 8 0 eller nyere anbefales installeret på din computer Afhængigt af operativsystemet eller indstillingerne på din computer er det ikke sikkert at betjeningsvejledningen starter automatisk Åbn i dette tilfælde PDF filen under mappen MA...

Страница 22: ...ller repareret hos den lokale Panasonic forhandler Udsæt ikke fjernsynet for direkte sollys og andre varmekilder Undgå at udsætte TV apparatet for direkte sollys og andre varmekilder For at forhindre brand skal stearinlys og anden åben ild altid holdes væk fra produktet Udsæt ikke for regn eller overdreven fugtighed For at forhindre en beskadigelse der kan føre til elektrisk stød eller brand undgå...

Страница 23: ...ner Vi anbefaler at der afsættes mindst 10 cm fri afstand hele vejen rundt om fjernsynet også når det er placeret i et skab eller mellem hylder Ved anvendelse af hylden skal mellemrummet bevares mellem bunden af fjernsynet og gulvets overflade Hvis der ikke anvendes sokkel skal du sørge for at ventilerne i bunden af fjernsynet ikke er blokerede Mindste afstand 10 10 10 10 cm Indbygget trådløst LAN...

Страница 24: ...opladelige Ni Cd batterier Batterier må ikke brændes eller brydes op Udsæt ikke batterierne for ekstrem varme som direkte sollys ild eller lignende Sørg for at bortskaffe batterier på den korrekte måde Sørg for at batterierne isættes rigtigt Der er eksplosions og brandfare hvis batterierne vender forkert Fjernbetjeningen må ikke demonteres eller ændres 2 Bemærk den korrekte polaritet eller Luk Mon...

Страница 25: ...nteringsskruerne til forsvarligt at fastgøre beslaget til foden Sørg for at skruerne er forsvarligt strammet Hvis du skruer monteringsskruerne den forkerte vej vil gevindene blive ødelagt D C A Forside Tappen top 2 Fastgøring af fjernsynet Anvend monteringsskruerne til at fastgøre skærmen ordentligt Stram først de fire monteringsskruer løst og stram dem derefter godt for at fastholde korrekt Udfør...

Страница 26: ...kellige funktioner 11 Tekst TV Skifter til tekst tv tilstand 12 Undertekster Viser undertekster 13 Taltaster Skifter kanal og tekst tv sider Vælger tegn Tænder fjernsynet Til når i standby tilstand Tryk i ca 1 sekund 14 Lyd mute Slår lyden til eller fra 15 Lydstyrke op ned 16 Valg af indgangsindstilling TV skifter til DVB C DVB T Analog tilstand AV skifter til AV indgangstilstand fra listen over i...

Страница 27: ...res ingen betjening i perioden som er valgt i Automatisk standby Denne funktion påvirker ikke optagelsen af Timer programmering og Direkte tv optagelse 1 Funktionsvalg Lydstyrke Kontrast Lys Farve Skarphed Nuance NTSC signal Bas Diskant Balance Autosøgning indstillingerne Musik eller Tale i lydmenuen 2 Kanal op ned Værdiændring ved anvendelse af F knappen tænd for fjernsynet tryk på en af knappern...

Страница 28: ... kabel terminal 8 DIGITAL AUDIO OUT 9 PC terminal 10 AV1 SCART 11 AV2 COMPONENT VIDEO Forbindelser Netledning og antenne Kabel DVB C DVB T Analog Vekselstrøm 220 240 V 50 60 Hz Netledning Jordbaseret antenne RF kabel Netledning Tilslut netstikket medfølger sikkert på plads Når du tager netledningen ud af forbindelse skal du være absolut sikker på at du tager netledningsstikket ud af kontakten førs...

Страница 29: ...billede lyd eller betjening af andet udstyr kan påvirkes Ved brug af SCART eller HDMI kabel skal den fuldt ledningsførte udgave bruges Kontroller at terminaltypen og kabelstikkene er korrekte ved tilslutning Netværk For at aktivere netværkstjenestens funktioner VIERA Connect osv skal du tilslutte fjernsynet til et netværksmiljø med bredbånd Hvis du ikke har bredbåndsnetværkstjenester skal du henve...

Страница 30: ...et tilsluttede udstyr før du starter Autosøgning For detaljer om det tilsluttede udstyr henvises der til brugsvejledningen for udstyret 1 Slut fjernsynet til stikkontakten i væggen og tænd Det varer et par sekunder inden visningen kommer frem Tryk på tænd sluk knappen på fjernbetjeningen i ca 1 sekund hvis den røde LED vises på fjernsynet 2 Vælg sproget Menüsprache Deutsch Dansk Polski Srpski Engl...

Страница 31: ...r 2 DVB C autosøgning 3 DVB T autosøgning 0 100 1 2 3 100 100 CBBC Channel BBC Radio Wales E4 100 Søger DVB C autosøgning Status Dette tager cirka 3 minutter Nr Kanalnavn Type Gratis TV Gratis TV Gratis TV Kvalitet Gratis TV 3 Betal TV 0 Radio 0 CH 5 69 62 62 62 100 100 CBBC Channel BBC Radio Wales E4 100 62 100 Cartoon Nwk Søger Kanal Kanalnavn Type Gratis TV Gratis TV Gratis TV Gratis TV Kvalite...

Страница 32: ... og testen af netværksforbindelsen starter For manuel indstilling skal du vælge Manuel og indstille hvert punkt 2 Gå videre til næste trin Tryk to gange Trådløs De access points der blev fundet automatisk er listet 1 Vælg dit ønskede access point 1 2 3 Access Point A Access Point B Access Point C 11n 2 4GHz 11n 5GHz 11n 5GHz Tilgængelige trådløse netværk Nr Netværksnavn SSID Status Trådløs type væ...

Страница 33: ...ruger samme IP adresse Kontrol af forbindelse til port Kontrol af kommunikation med server Test af forbindelse 4 Gå videre til næste trin Tryk to gange vellykket Testen er vellykket og fjernsynet er forbundet til netværket mislykket Kontrollér indstillingerne og forbindelserne Og vælg derefter Prøv igen For manuel indstilling skal du vælge Manuel og indstille hvert punkt 7 Vælg Hjemme Vælg visning...

Страница 34: ...onnect Tryk blot på OK INTERNET knappen 2 Åbn VIERA Connect Mens banneret vises eller Afhængigt af brugerbetingelserne kan det tage et stykke tid at læse alle dataene Der vises muligvis meddelelser før du når VIERA Connects startskærm Læs disse instruktioner omhyggeligt og følg instrukserne på skærmen Eksempel VIERA Connects startskærm MERE TILB For at gå til næste niveau vælg MERE For at gå tilba...

Страница 35: ...soner utilsigtet når du bruger 3D brillerne Da billederne er i 3D vil afstanden imellem brugeren og skærmen være misvisende hvilket kan resultere i personskade hvis brugeren utilsigtet rammer skærmen Ved brug af 3D briller skal du holde øjnene nogenlunde vandret samt holde en position hvor du ikke ser dobbeltbilleder Hvis du er kortsynet langsynet eller har forskelligt syn på hvert øje bør du brug...

Страница 36: ...derstøttet udsendelse Kontakt venligst udbyderne af programindholdet for information om tilgængeligheden af denne service 3D billeder og 3D videoer der er optaget vha 3D kompatible Panasonic produkter Tilgængeligt i Medieafspiller og netværkstjenester 2D billeder der er konverteret til 3D Stil på 2D 3D tilstand i Valg af 3D tilstand 1 Tag 3D brillerne på 2 Visning af 3D billederne Der vil blive vi...

Страница 37: ...af 3D tilstand Manuel og kildebilledformatet Hvis billedet ser unormalt ud kan du se nedenstående tabel for at vælge den korrekte 3D tilstand Valg af 3D tilstand Kildebilledformat Original Frame Sequential 3D Side om side 3D Top og bund 3D 2D 3D Frame Sequential Normal 3D 1 Side om side Fuld Normal 3D 1 Side om side Normal 3D 1 Top og bund Normal 3D 1 Normalt format 2D Normal 3D 1 Når der vælges F...

Страница 38: ...å til den næste skærm Børnelås For adgang Viser den næste skærm adgang For til enhver tid at gå tilbage til fjernsynet For at gå tilbage til den foregående skærm For at ændre menusider op ned Indtast tegn ved fri indtastningsmenu Du kan frit indtaste navne eller tal for visse poster A B C D E F G H I J K L M N U V W X Y Z Ä Ö Ü ß a b c d e f g h i j k l m n u v w x y z ä ö ü 0 1 2 3 O P Q R S T o ...

Страница 39: ...ling og kan nemt lide skade Vær påpasselig med ikke at banke på eller ridse overfladen med en fingernegl eller andre hårde objekter Lad ikke kabinettet eller hylden være i kontakt med gummi eller PVC substanser i længere tid Dette kan forringe kvaliteten af overfladen Netstik Tør jævnligt netstikket af med en tør klud Fugt og støv kan føre til brand eller elektrisk stød LCD fjernsyn Overensstemmel...

Страница 40: ...en Europæiske Union Ønsker du at kassere sådanne produkter bedes du forhøre dig hos din forhandler eller kommune med henblik på en hensigtsmæssig bortskaffelse Information om batterisymbol to eksempler nedenfor Dette symbol kan optræde sammen med et kemisk symbol I så fald opfylder det kravene for det direktiv som er blevet fastlagt for det pågældende kemikalie Bemærkning vedrørende DVB Data udsen...

Отзывы:

Похожие инструкции для Viera TX-L47ET5Y