background image

W

atching External inputs


V

iewing

25

Screen display

Terminal

AV1

AV2

AV3

COMPONENT

PC

HDMI1

HDMI2

HDMI3

Manual input 

(

default 
setting in 
“Input Labels”

)

AV1

AV1-RGB

AV2

AV2-S-Video

AV2-RGB

AV3

AV3-S-Video

COMPONENT

PC

HDMI1

HDMI2

HDMI3

Auto input 

(

EC mode or 
VIERA Link

)

EC/AV1

EC/AV1-RGB

EC/AV2

EC/AV2-S-Video

EC/AV2-RGB

EC/HDMI1

Applicable for 


EC mode and 
VIERA Link

EC/HDMI2

Applicable for 


VIERA Link

EC/HDMI3

Applicable for 


VIERA Link

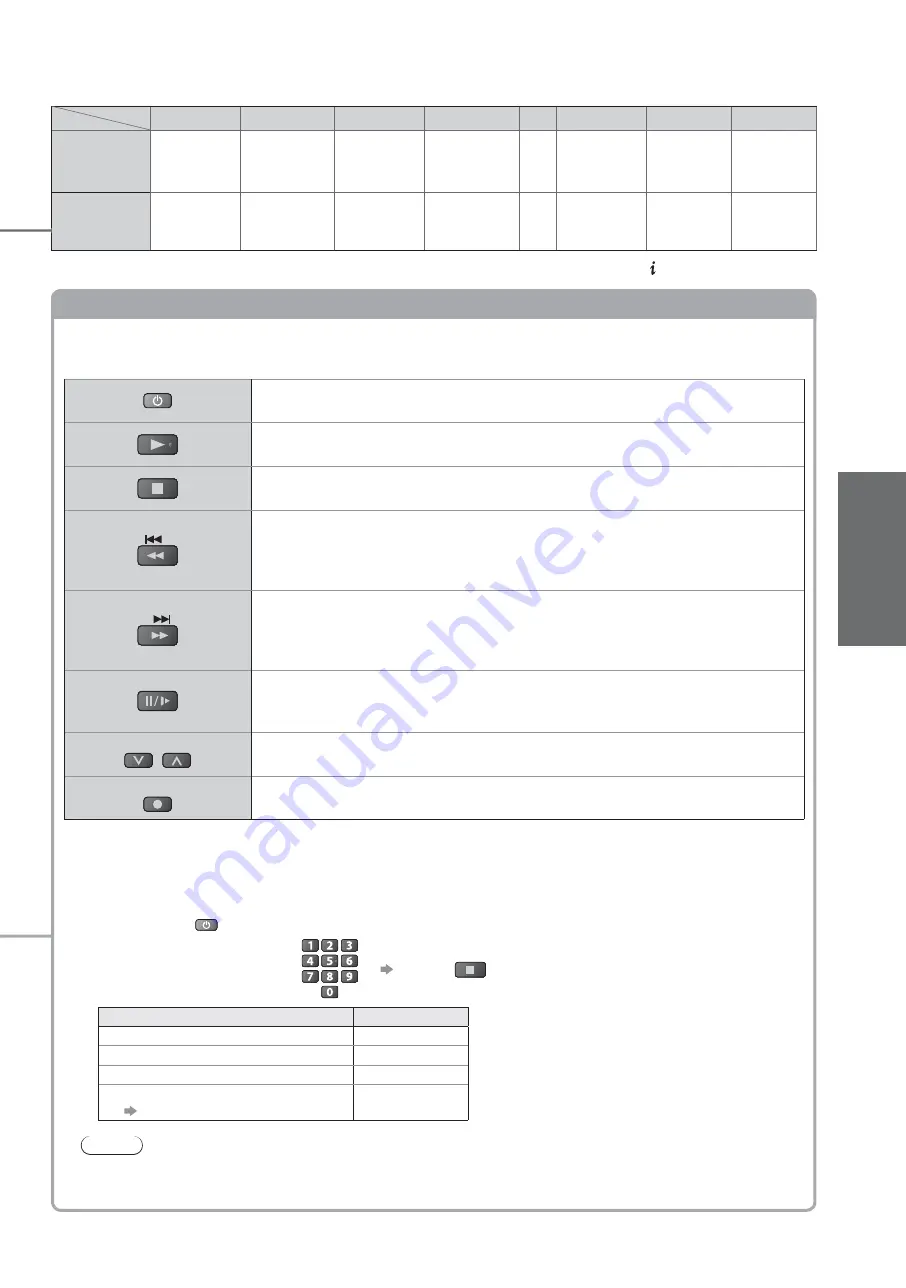
Operating the equipment with the TV remote control

The equipment connected to the TV can be directly operated with the below buttons of this TV 
remote control.

Standby

Set to Standby mode / Turn on

Play

Playback videocassette / DVD

Stop

Stop the operations

Rewind / Skip / Search

VCR: Rewind, view the picture rapidly in reverse
DVD:  Skip to the previous track or title

Press and hold to search backward

Fast-forward / Skip / Search

VCR: Fast-forward, view the picture rapidly forward
DVD:  Skip to the next track or title

Press and hold to search forward

Pause

Pause / Resume
DVD: Press and hold to play at slow speed

PROGRAMME

Channel Up / Down

Select channel

REC

Record

Start recording

How to change the code for the type of the equipment


Each type of the Panasonic equipment has its own remote control code.
Please change the code according to the equipment you want to operate.
If you operate the connected equipment in VIERA Link (p. 58), select the code 73.

Press and hold 

 during the following operations

Enter the appropriate code, 
see table below

Press 

Type of the equipment

Code

DVD Recorder, DVD Player

70 (default)

Player theatre, Blu-ray Disc theatre

71

VCR

72

The equipment using in VIERA Link

 “VIERA Link Control” (p. 58)

73

Note

Confirm if the remote control works correctly after changing the code.


The codes may be reset to default values if batteries are replaced.


Some operations may not be possible on some equipment models.


If the above information is permanently displayed on the top left of the screen, press the 


 button to clear.

Содержание Viera TX-L32X15BA

Страница 1: ...ns LCD Television Model No TX L32X15BA Please read these instructions before operating your set and retain them for future reference The images shown in this manual are for illustrative purposes only...

Страница 2: ...and accesses easily p 14 VIERA TOOLS is the easy way to access the special features with the VIERA TOOLS button Sharp pictures with HDMI connection p 64 Enjoy high definition digital picture and high...

Страница 3: ...ages 69 Index 70 Glossary 70 Specifications 71 Licence 72 Intelligent Frame Creation This increases the frame count and allows natural frame to frame transitions for flicker less motion images with hi...

Страница 4: ...the ASTA mark ASA or the BSI mark on the body of the fuse If the mains plug contains a removable fuse cover you must ensure that it is refitted when the fuse is replaced If you lose the fuse cover the...

Страница 5: ...pe the surface clean with a dry cloth Caution Take care not to subject the TV s surfaces to detergent A liquid inside the TV could lead to product failure Take care not to subject surfaces to insect r...

Страница 6: ...ff high heat Doing so may warp or damage plastic cabinet parts Take care when fixing wall brackets to the wall Always ensure that there are no electrical cables or pipes in the wall before hanging bra...

Страница 7: ...suf cient care is taken to ensure screws are properly tightened during assembly the pedestal will not be strong enough to support the TV and it might fall over and become damaged and personal injury m...

Страница 8: ...unction is already displayed press to increase or decrease the selected function When in Standby mode switches TV On Function select Volume Contrast Brightness Colour Sharpness Tint NTSC mode Bass Tre...

Страница 9: ...t mode Coloured buttons Used for the selection navigation and operation of various functions Exit Returns to the normal viewing screen Numeric buttons Changes channel and teletext pages Sets character...

Страница 10: ...shown are not supplied with this TV Please ensure that the unit is disconnected from the mains socket before attaching or disconnecting any leads PC COMPONENT AUDIO IN AUDIO OUT Y PB PR L R L R 2 1 R...

Страница 11: ...corder or VCR Aerial Mains lead Rear of the TV Satellite receiver AC 220 240 V 50 Hz RF cable RF cable TV DVD Recorder VCR and Satellite receiver SCART cable fully wired SCART cable fully wired RF cab...

Страница 12: ...ta 0 Analogue 2 Searching BBC1 Analogue Auto Setup will start to search for TV channels and store them in the numbered order as specified by the broadcasters Sending Preset Data Please wait Remote con...

Страница 13: ...s select set You can set characters by using numeric buttons Characters table for numeric buttons p 63 Note If tuning has failed Auto Setup p 34 and p 35 To initialize all settings Shipping Condition...

Страница 14: ...and access Pause Live TV Pause Live TV p 57 Slideshow Slideshow p 47 Slideshow will use all of the photos on the SD Card Photos Photo View p 46 Movies Movie View p 48 To return to TV EXIT To remove i...

Страница 15: ...Timer Programming select watch G U I D E select access Volume Various menus allow you to make settings for the picture sound and other functions 1 Turn power on Press for about 1 second Mains power O...

Страница 16: ...Mono NICAM Audio mode 1 90 Off Timer remaining time For settings p 17 Current time Display Information banner Also appears when changing a channel To confirm another tuned channel name To watch the ch...

Страница 17: ...lable in PC input mode Not available when the subtitle function is active Not available in teletext service Aspect mode can be memorized separately for SD Standard definition and HD High definition si...

Страница 18: ...nder DIY SOS The Bill Red Cap 19 30 Time 20 00 20 30 21 00 BBC THREE Hot Wars Horiday Program E4 Emmerdal Coronation Street The Bill BBC FOUR 10 O clock News BBC Pepsi Char Good bye BBC 2W Panorama Sp...

Страница 19: ...de Select the programme View details Wed 24 10 2007 10 46 View Timer Prog RETURN EXIT Return to list Wednesday 24 October 2007 DIY SOS BBC ONE 20 00 20 30 30 min TV Guide Landscape Details To return t...

Страница 20: ...TV Guide and the programme is a Split Programme Timer LED will turn on if Timer Programming is set Wed 15 10 08 18 50 TV Guide Landscape All Types All Channels Sat 18th 1 BBC 1 21 00 21 30 DIY SOS We...

Страница 21: ...to navigate the pages using buttons on the remote control but because the commands available must apply to all manufacturers of digital equipment some on screen commands may not correspond exactly to...

Страница 22: ...bottom of the screen Each of these numbers can be altered and stored in the TV s memory Store frequently viewed pages p 23 To change mode Teletext in the Setup Menu p 33 1 Select Analogue p 15 TV 2 Sw...

Страница 23: ...e stored pages Coloured button you want to change Enter new page number press and hold View sub page View sub page Only when teletext is more than one page Appears at top of the screen To view specifi...

Страница 24: ...on the remote control or the side panel of the TV Press the button repeatedly until the desired input is selected In order to switch between AV2 AV3 and AV2S AV3S move the indicator by pressing left a...

Страница 25: ...w the picture rapidly forward DVD Skip to the next track or title Press and hold to search forward Pause Pause Resume DVD Press and hold to play at slow speed PROGRAMME Channel Up Down Select channel...

Страница 26: ...TV at any time EXIT To return to the previous screen RETURN To change menu pages up down Choose from among alternatives To reset the settings To reset the picture settings only Reset to Defaults in t...

Страница 27: ...Management Off P NR Off Eco Mode Off Picture Menu 2 2 Advanced PC Settings Access 3D COMB Off Reset to Defaults Reset Picture Menu p 30 1 2 Mode Music Bass Treble Balance Headphone Volume Surround Of...

Страница 28: ...4 5 6 O P Q R S T 7 8 9 p 33 System Menu Owner ID Access Common Interface Access System Information Access Software Licence System Update Shipping Condition Access Access Access p 33 Overview Setup M...

Страница 29: ...al Tuning Manual Tuning 21 68 p 39 DVB Update Channel List CH Channel Name Type Quality Searching Analogue Scan 21 68 Progress CH 21 68 This will take about 3 minutes Free TV 0 Pay TV 0 Radio 0 Data 0...

Страница 30: ...ed in the top right of the screen Playing Time Display p 33 Contrast Brightness Colour Sharpness Increases or decreases the levels of these options according to your personal preference Tint With an N...

Страница 31: ...ack space between the TV and wall is within 30 cm Up to 30cm is recommended Preferred Multi Audio Selects the preferred language for digital channel multi audio depending on the broadcaster NICAM NICA...

Страница 32: ...d or non used connected equipment go into Standby mode to reduce the power consumption Off On With reminder On No reminder p 56 This function is available when VIERA Link is set to On Q Link Download...

Страница 33: ...n 24p Smooth Film Automatically compensates the picture frame rate to make the image smooth Off Mid Max 24p signal input only Set to Off if noise is generated on the screen Power on Preference Automat...

Страница 34: ...ming Link Settings Child Lock DVB Tuning Menu Access Setup Menu Off Timer Off System Menu Analogue Tuning Menu Other Settings Access Display Settings access select DVB Tuning Menu is available in DVB...

Страница 35: ...ing data will be erased DVB Auto Setup DVB DVB Auto Setup This will take about 3 minutes Progress CH 21 68 62 CH Channel Name Type Quality CBBC Channel Free TV 10 62 BBC Radio Wales Free TV 10 62 E4 F...

Страница 36: ...osition automatically to Channel List DVB Update Channel List CH Channel Name Type Quality Searching Analogue Scan 21 68 Progress CH 21 68 This will take about 3 minutes Free TV 0 Pay TV 0 Radio 0 Dat...

Страница 37: ...jkl 6 mno 7 pqrs 8 tuv 9 wxyz 0 set select You can set characters by using numeric buttons Characters table for numeric buttons p 63 RETURN To move the channel green Select the new position Confirm gr...

Страница 38: ...e Tuning Menu Access Child Lock Setup Menu Off Timer Off System Menu Display Settings Other Settings access select 5 Select one of the following functions Manual Tuning Auto Setup Analogue Tuning Menu...

Страница 39: ...annel Manual Tuning red see below To move the channel position green Select the new position Store green To rename the channel name blue Set characters one by one maximum five characters Store Edit ch...

Страница 40: ...st setting Make a note of the PIN number in case you forget it Select Child Lock List Child Lock Child Lock List Change PIN Access select access Select the channel input to be locked To cancel Select...

Страница 41: ...cess select 5 Set Resets the TV to its original condition i e no channels tuned in All settings other than Owner ID are reset channels picture sound settings etc To return to TV EXIT Restore Settings...

Страница 42: ...lect Common Interface is available in DVB mode only 6 Set Advanced Settings provide various features To return to TV EXIT Update TV s software system System Update Download new software to TV For deta...

Страница 43: ...ovides access to software contained on Common Interface CI Modules This TV receiver works only Pay TV modules complying with CI standard Caution Turn Off Mains power On Off switch whenever inserting o...

Страница 44: ...the Setup Menu p 32 to the connected terminal AV1 or AV2 and make timer programming of the recorder Read the manual of the recorder Recording is possible in composite video via SCART only including HD...

Страница 45: ...Live TV recording will be cancelled 45 Set timer programming details Timer Programming Start making the settings Repeat the operations as below and set items in the order of to select the item set an...

Страница 46: ...0008 p1010007 p1010006 p1010005 p1010012 p1010011 p1010010 p1010009 Photo View Mode Folder view 100_PANA Slideshow Sort by Month Sort by Date Select EXIT Select RETURN View Thumbnail Error display ima...

Страница 47: ...Nature 14 pictures Fruit 18 pictures ROOM 1 picture 201_PANA 7 pictures Photo View Mode Folder view Select EXIT Select RETURN All pictures View Folder view green Filename Date Pixel p1010001 1 175 23...

Страница 48: ...1 09 02 2008 11 10 Nature2 09 02 2008 11 15 Nature3 09 02 2008 11 50 09 02 2008 15 14 09 02 2008 18 16 2007 03 12 2007 10 00 2007 1 03 12 2007 12 00 File format Only AVCHD or MPEG2 are supported For d...

Страница 49: ...HDMI2 HDMI3 HDMI3 1 2 set select Input Labels DVB DVB Analogue Analogue 2 2 The labels you set will be displayed in Input Selection menu p 24 TV Selection menu p 15 or banner If Skip is selected you c...

Страница 50: ...external input AV 2 Select PC Input Selection AV1 AV2 S AV3 S COMPONENT PC HDMI1 HDMI3 HDMI2 TV access select Corresponding signals p 66 If H freq or V freq is shown in red the signals may not be supp...

Страница 51: ...WVGA 852 480 pixels XGA 1 024 768 pixels WXGA 1 280 768 pixels 1 366 768 pixels Options change depending on signals Clock Set to the minimum level if noise occurs H pos Adjusts horizontal position V p...

Страница 52: ...ion Analogue channel download Easy playback Power on link Power off link Reduce unnecessary power consumption in standby 3 3 Auto standby for unnecessary equipment 3 3 Pause Live TV programme 3 4 Dire...

Страница 53: ...e or SCART cable SCART cable HDMI cable HDMI cable Amplifier with VIERA Link function DIGA Recorder with VIERA Link function HD Video Camera LUMIX Camera with VIERA Link function Speaker system Use fu...

Страница 54: ...rnal input AV watching TV s external input AV TV monitor out When Direct TV Recording is performed the recorder is automatically turned on if it is in Standby mode Changing channel or turning off the...

Страница 55: ...RP CDHG30 3 0 m RP CDHG50 5 0 m Use fully wired SCART cable Set up the connected equipment Read the manual of the equipment For optimal recording the settings of the recorder might be required For de...

Страница 56: ...ly Unlock the tuner G U I D E Unlock Continue Tuner Locked Please stop recording to operate EXIT Features available Using VIERA Link Menu Features available Reduce unnecessary power consumption in sta...

Страница 57: ...TV Rec Speaker Selection VIERA Link Menu Home Cinema Start VIERA Link Control Speaker Selection Home Cinema Recorder Pause Live TV Access select pause The TV picture will be paused You can also pause...

Страница 58: ...displayed You can access the menu of the equipment But you cannot operate it Use its own remote control to operate the equipment 1 Display VIERA Link Menu 2 Select VIERA Link Control Direct TV Rec Spe...

Страница 59: ...the TV s signal receiver If you cannot operate check the settings and the equipment Summary of Q Link and VIERA Link features p 52 and p 53 Preparations p 55 Access and control the speaker volume TV 1...

Страница 60: ...ayback videocassettes DVDs VCR DVD recorder To watch DVDs DVD player To watch camcorder images Video camera To watch cable broadcasts Set top box To play games Game equipment To use amplifier with spe...

Страница 61: ...OUT L R 1 2 3 Terrestrial aerial Computer PC HD Satellite receiver DVD Recorder VCR SCART cable RF cable SCART cable To watch satellite broadcasts To record playback DVD Recorder Viewing Listening or...

Страница 62: ...80 60i 525 480 60p 625 576 50i 625 576 50p 750 720 60p 750 720 50p 1 125 1 080 60i 1 125 1 080 50i 1 125 1 080 60p 1 125 1 080 50p 1 125 1 080 24p Auto mode Auto mode determines the best aspect ratio...

Страница 63: ...andard established by Japan Electronics and Information Technology Industries Association JEITA Note Format the card with the recording equipment The picture may not appear correctly on this TV depend...

Страница 64: ...l audio signal only If the connected equipment has an aspect adjustment function set the aspect ratio to 16 9 These HDMI connectors are type A These HDMI connectors are compatible with HDCP High Bandw...

Страница 65: ...ng software download and update DO NOT switch off the TV SCART S VIDEO and HDMI terminal information AV1 SCART terminal RGB VIDEO Q Link Suitable inputs for AV1 include RGB Red Green Blue AV2 SCART te...

Страница 66: ...024 768 60 Hz 48 36 60 00 1 024 768 70 Hz 56 48 70 07 1 024 768 75 Hz 60 02 75 03 1 024 768 85 Hz 68 68 85 00 1 280 768 60 Hz 47 70 60 00 1 280 1 024 60 Hz 63 98 60 02 1 366 768 60 Hz 48 39 60 04 Mac...

Страница 67: ...BC Wed 24 10 2007 10 46 TV Guide Portrait All Types All Services Wed 24th Reset channels p 34 and p 35 Check the digital transmitter Adjust the direction of the aerial to another transmitter installed...

Страница 68: ...the TV Guide p 18 and p 19 Channel position numbers may be changed by broadcasters Reset channels p 34 and p 35 FAQs Other The TV does not switch On Press and hold the standby On Off switch on the rem...

Страница 69: ...s made by the broadcasters This message can be deactivated by setting New Channel Message to Off in DVB Tuning Menu Selecting OK will be performed Update Channel List No channel found Please check aer...

Страница 70: ...e three video formats depending on personal preference and equipment requirement RGB Red Green and Blue SCART 21 pin connection used for video audio and switching signals Also known as Euro SCART and...

Страница 71: ...eo out RGB in S Video in Q Link AV3 VIDEO RCA PIN Type 1 1 0 V p p 75 S VIDEO Mini DIN 4 pin Y 1 0 V p p 75 C 0 286 V p p 75 AUDIO L R RCA PIN Type 2 0 5 V rms COMPONENT VIDEO Y 1 0 V p p including sy...

Страница 72: ...ion www panasonic co uk E mail customer care panasonic co uk Direct Sales at Panasonic UK For customers 0844 844 3856 Order accessory and consumable items for your product with ease and confidence by...

Отзывы: