background image

Advanced

27

T

uning Programmes

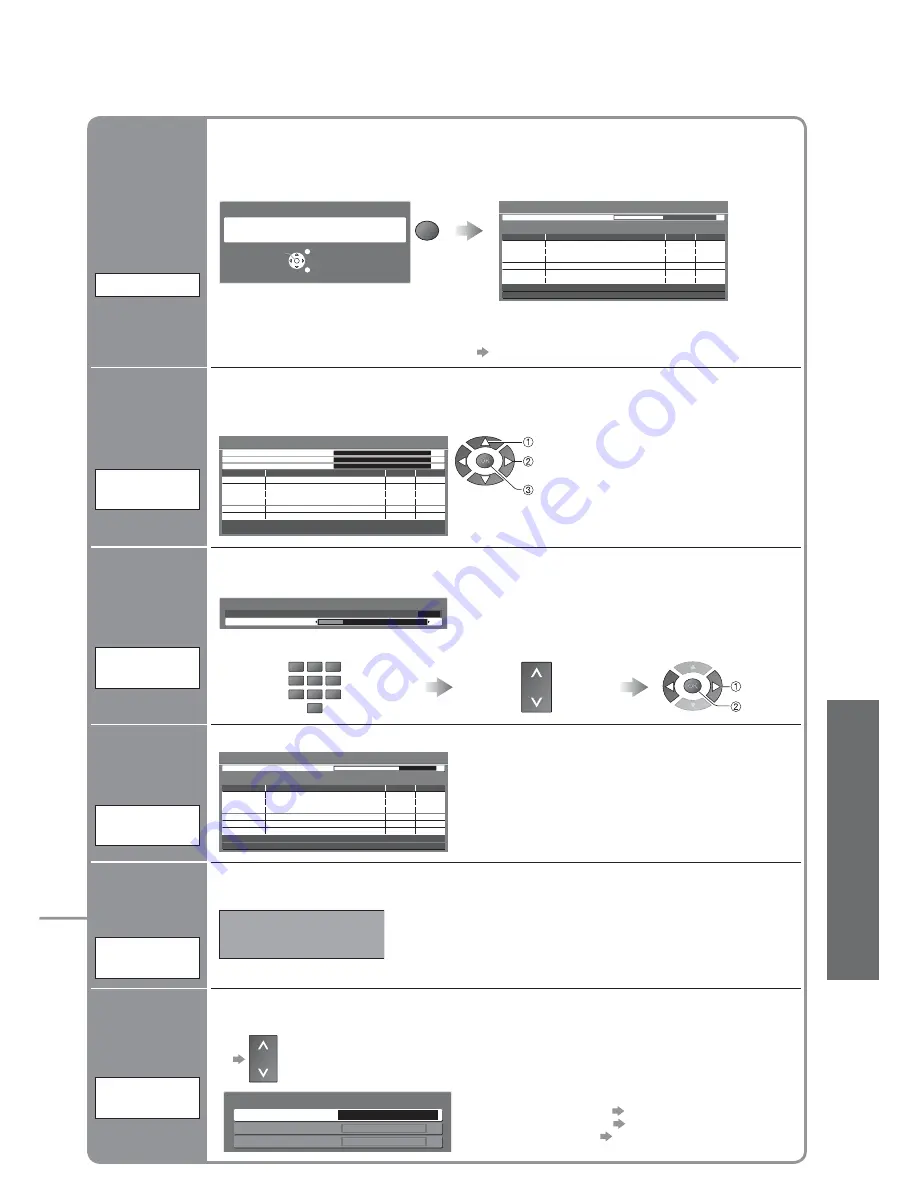
Any new services found will be added to the DVB Service List.

Add New DVB Services

RF Ch

Service Name

Type

Quality

DVB: 0

Pay TV: -

Radio: -

Data: -

Searching

Analogue Scan

21

68

Scan

6

69

This will take about 3 minutes.

• 

The new service is added with the current settings 

saved as they are.

Add DVB 

programme 

automatically

Add New 

DVB Services

New DVB service found!

Press OK to add new service.

Press EXIT to lgnore.

Selects whether to give a noti

fi

 cation message when a new DVB service is found. 

(Off / On)

Display a 

noti

fi

 cation 

message

New Service 

Message

Auto Tuning - Digital (DVB)

This will take about 3 minutes.

2

RF Ch

Service Name

Type

Quality

ABC TV Sydney

DVB

10

3

SBS DIGITAL 1

DVB

10

4

FTV guide

DVB

10

7

7 Digital

DTV

10

CH 29

Analogue

 -

CH 33

DVB: 3

Searching

Analogue

 -

Scan

6

69

EXIT

RETURN

Start Auto Tuning

All digital tuning data will be erased

Auto Tuning

OK

Start Auto Tuning

Settings are made automatically

• 

All the previous tuning settings are erased.

• 

When the operation is completed, the programme at programme position “1” will be 

displayed.

• 

If tuning has not been done completely   “DVB Manual Tuning”, “Analogue Manual Tuning”

Automatically retune all DVB or Analogue programmes received in the area.

• 

Only DVB programmes are retuned in DVB mode.

• 

Only Analogue programmes are retuned in Analogue mode.

Set all DVB 

or Analogue 

programmes

automatically

Auto Tuning

DVB Signal Display

Service Name

[CH53] 7 7 Digital

Signal Quality
Signal Strength

0
0

10
10

Selects a programme and checks the DVB signal condition.

• 

To change the programme 


CH

A good Signal Strength is not an indication of 

suitable signal for DVB reception. Please use 

the Signal Quality indicator as follows:

Signal Quality:

• 

Green bar   Good

• 

Yellow bar   Poor

• 

Red bar   Bad (Check the aerial)

Check 

DVB signal

DVB Signal 

Display

Set DVB 

programme 

manually

DVB Manual 

Tuning

Normally use “Auto Tuning” or “Add New DVB Services” to add DVB programmes to your 

service list.

If tuning has not been done completely or for adjusting the direction of the aerial, use this 

function.

 select channel

 search

DVB Manual Tuning

Analogue Scan

21

68

Physical Channel

Prog.

Service Name

Type

New

DVB: 0

Pay TV: -

Radio: -

Data: -

Signal Strength

0

10

Signal Quality

0

10

MHz

474,00

[CH21]

• 

All services found will be added to the 

DVB Service List.

 adjust frequency (set where the level of 

“Signal Quality” becomes the maximum)

Set Analogue 

programme

manually

Analogue 

Manual Tuning

1 CH33

Analogue Manual Tuning

Manual Tuning

0

75

Set Analogue programme manually after Auto Tuning.

• 

If a VCR is connected only with the RF cable, select programme position “0”.

 store

 search

Search and store

Select the programme

CH

Select the programme position

1

3

2

4

6

5

7

9

8

0

Содержание Viera TX-37LZD800A

Страница 1: ...l No TX 37LZD800A Operating Instructions LCD TV Please read these instructions before operating your set and retain them for future reference The images shown in this manual are for illustrative purposes only English ...

Страница 2: ...rvices using an integrated Digital Video Broadcasting tuner Sharp pictures with HDMI terminal Create home theatre and DVD recorder link ups with VIERA Link without complicated settings Trade Mark of the DVB Digital Video Broadcasting Project 1991 to 1996 TX 37LZD800A Declaration of Conformity No 5402 29 January 2008 ...

Страница 3: ... etc DVB Settings DVB 22 Editing Programmes 24 Tuning Programmes 26 Restore Settings 28 Input Labels 29 Displaying PC Screen on TV 30 HDMI Functions 31 Viewing from SD Card Photos 32 VIERA Link HDAVI ControlTM 34 External Equipment 38 Basic Features Watching TV 10 Using TV Guide 13 Watching Videos and DVDs 14 Viewing Teletext 16 Enjoy your TV Technical Information 40 FAQs 43 Licence 45 Specificati...

Страница 4: ...wer vase cups cosmetics etc above the TV including on shelves above etc Do not remove covers NEVER modify the TV yourself High voltage components may cause serious electrical shock Have the TV checked adjusted or repaired at your local Panasonic dealer Do not place foreign objects inside the TV Do not let metal or flammable objects drop into the TV through the air vents fire or electrical shock ma...

Страница 5: ...aint Do not allow the cabinet to make contact with a rubber or PVC substance for a long time When the TV is not going to be used for a long period of time remove the mains plug This TV will still consume some power even in the Off mode as long as the mains plug is still connected to a live socket outlet When using the pedestal keep the space between the bottom of the TV and the floor surface In ca...

Страница 6: ...er mount your unit will void your warranty Always be sure to ask a qualified technician to carry out set up Incorrect fitting may cause equipment to fall resulting in injury and product damage Do not mount the unit directly below ceiling lights such as spotlights floodlights or halogen lights which typically give off high heat Doing so may warp or damage plastic cabinet parts How to remove the TV ...

Страница 7: ...l system is used you may require the correct connection cable and plug between the wall Aerial socket and the TV Your local Television Service Centre or dealer may be able to assist you in obtaining the correct Aerial system for your particular area and the accessories required Any matters regarding Aerial installation upgrading of existing systems or accessories required and the costs incurred ar...

Страница 8: ...ink Picture Sound and Setup Menus Option Menu p 11 Easy setting for viewing and sound options Aspect p 12 Changes aspect ratio from Aspect Selection list Also possible by pressing this button repeatedly until you reach the desired aspect Subtitles p 10 Displays Subtitles Input mode selection TV switches DVB Analogue mode p 10 AV switches to AV input mode from Input Selection list p 14 Exit Returns...

Страница 9: ...e picture setting Auto Tuning Identifying Controls Plug the TV into mains socket and switch On 1 Auto Tuning Search and store TV channels automatically These steps are not necessary if the setup has been completed by your local dealer Auto Tuning is now complete and your TV is ready for viewing You can now use the remote control to turn On the TV or turn the TV to standby mode Power LED On 2 To ed...

Страница 10: ... the screen reset settings in Shipping Condition p 28 and select Home in Auto Tuning p 9 down or 1 Also possible to select the mode using the TV button on the side panel of the TV p 8 To select the two or three digit programme number e g 39 3 9 in a short time If one or two digit programme number quickly changes the programme Display Information banner if it is not displayed While the banner is di...

Страница 11: ...nt DVB mode To watch the programme listed in the banner To download new software to TV R System Update Search Now p 23 To hide EXIT To set display timeout Banner Display Timeout p 21 Extra information INFO press again to hide the banner DVB mode INFO Display Information banner Also appears when changing a programme 1 TEN Digital 10 30 am Coronation Street Rating PG Bad Signal 45 9 00 am 11 00 am N...

Страница 12: ...hout distortion Displays a 2 35 1 letterbox anamorphic image full screen without distortion At 16 9 displays the image at its maximum with slight enlargement Select Change EXIT RETURN Aspect Selection 16 9 Just 14 9 4 3 Full 4 3 Zoom1 Zoom2 Zoom3 ASPECT Change the aspect ratio Enjoy viewing the picture at its optimum size and aspect Aspect Selection list To change the mode using the ASPECT button ...

Страница 13: ... day R DVB mode To the next day G DVB mode To watch the programme Select the event or programme now on the air select watch To view details of the event DVB mode Select the event select INFO Press again to return to TV Guide To view a programme list of the selected type DVB mode Y All Types Movie News Sport Entertainment Children s Music Prog type All Types Type list select type view To view a pro...

Страница 14: ...t Select the input mode connected to the equipment Note If the external equipment has an aspect adjustment function set to 16 9 For details see the manual of the equipment or ask your local dealer To return to TV Display the Input select menu Displays the selected mode You can also select the input using the AV button on the remote control or the side panel of the TV Press the button repeatedly un...

Страница 15: ...eed PROGRAMME Programme Up Down Select programme REC Record Start recording Panasonic equipment connected to the TV can be directly operated with the remote control Setting your remote control to operate Panasonic VCR DVD etc Set the VCR DVD switch to the appropriate position VCR DVD Press and hold POWER during the following operations Enter the appropriate code for the equipment to be controlled ...

Страница 16: ...y the broadcasters What is FASTEXT mode In FASTEXT mode four differently coloured subjects are situated at the bottom of the screen To access more information about one of these subjects press the appropriately coloured button This facility enables fast access to information on the subjects shown What is TOP mode in case of TOP text broadcasting TOP is a particular improvement of the standard tele...

Страница 17: ...it number example P6 Appears at top of the screen To view specific sub page MENU B View sub page Only when teletext is more than one page Watch TV while waiting for update P108 MENU Y Y Appears when updating is completed You cannot change the programme Teletext automatically updates itself when new information becomes available The news page provides a function that indicates arrival of latest new...

Страница 18: ...menu Select the item example Picture Menu Adjust or select example Picture Menu example Picture Menu 1 select access select change store or access Required by some functions To return to TV at any time EXIT To return to the previous screen RETURN To change menu pages CH up down Changed Number and positions of alternatives Moved Choose from among alternatives Adjust using the slide bar Displays the...

Страница 19: ... Warm Colour Management Off P NR Off Picture Menu 50 50 50 100 2 2 3D COMB Off Reset Picture Defaults Reset Picture Menu p 20 1 2 Tuning Menu Off Timer Off Shipping Condition Access Access Analogue Service List Access DVB Service List Access Setup Menu Teletext TOP System Update Access DVB Favourites Edit Access On Picture Overscan Input Labels Access 24p Film On 2 2 Setup Menu 3 seconds VIERA Lin...

Страница 20: ...se sharper higher sound output Balance Adjusts volume level of right and left speakers Headphone Volume Adjusts the volume of the headphones Surround Surround sound settings Off On Volume Correction Adjusts volume of individual programme or input mode Speaker Distance to Wall Adjusts the low frequency sound Over 30cm Up to 30cm If the back space between the TV and wall is over 30 cm Over 30cm is r...

Страница 21: ...On On Enlarged the image to hide the edge of the image Off Displayed the image in the original size Set to On if noise is generated on the edge of the screen This function is available when aspect is set to 16 9 This function can be memorized separately for SD Standard definition and HD High definition signals Input Labels Labels or skips each input terminals p 29 Banner Display Timeout Sets how l...

Страница 22: ...OP System Update Access Input Labels DVB Favourites Edit 3 seconds Banner Display Timeout 2 2 Setup Menu NSW ACT Region Select VIERA Link Settings Auto Daylight Saving Time System Information Software Licence MENU 22 DVB Settings 4 3 5 Select Setup Select System Update Region Select or Daylight Saving Time Display the menu Set To return to TV EXIT DVB mode 1 If in Analogue mode Select DVB DVB Sett...

Страница 23: ...ing the TV will display a blank screen for 40 to 50 seconds Do not interrupt the TV during this procedure To update immediately System Update Auto Update Search in Standby System Update Search Now On Select Auto Update Search in Standby and then set On or Off On Automatically performs a search in standby and downloads an update if any software updates are available Download new software to TV For ...

Страница 24: ...ION DIRECTTV REC ASPECT 1 3 2 4 6 5 7 9 8 0 TV CH R G Y B EXIT MENU OK INPUT RETURN MENU 24 Editing Programmes Select Setup Select DVB Favourites Edit DVB Service List or Analogue Service List 4 3 Display the menu You can make your favourite programme lists and skip unwanted programmes etc To return to TV EXIT 1 Select DVB or Analogue 2 DVB Favourites Edit and DVB Service List are available in DVB...

Страница 25: ...st Cartoon Nwk BBCi BBC Radio Wales BBC Radio Cymru BBC ONE Wales BBC THREE 70 72 105 719 720 1 7 add delete skip To retune each programme Manual Tuning R p 27 Skip unwanted programmes DVB Service List Analogue Service List List favourite programmes DVB Favourites Edit DVB mode Favourites Edit TEN Digital All DVB Services 1 ABC TV Sydney 2 SBS DIGITAL 1 3 FTV guide 4 7 Digital 7 NINE DIGITAL 9 7 H...

Страница 26: ...ge DVB Signal Display Access On MENU 26 Tuning Programmes Select Setup 3 Select Tuning Menu 4 Display the menu Select a function 5 You can retune all the TV programmes when moving house or search for new services which may have recently started broadcasting To return to TV EXIT 2 access select access select access select 1 Select DVB or Analogue DVB Manual Tuning Add New DVB Services New Service M...

Страница 27: ...e retuned in DVB mode Only Analogue programmes are retuned in Analogue mode Set all DVB or Analogue programmes automatically Auto Tuning DVB Signal Display Service Name CH53 7 7 Digital Signal Quality Signal Strength 0 0 10 10 Selects a programme and checks the DVB signal condition To change the programme CH A good Signal Strength is not an indication of suitable signal for DVB reception Please us...

Страница 28: ...the on screen instructions Auto Tuning will automatically start when Mains power On Off switch is next turned On p 9 To retune TV programmes only e g after moving house Auto Tuning p 27 3 2 4 Select Setup Select Shipping Condition Display the menu Set To return to TV EXIT Restore Settings Resets the TV to its original condition i e no programmes tuned in All settings programmes picture sound quali...

Страница 29: ... Input Labels Display the menu Select a input terminal and set To return to TV EXIT For easier identification and selection of the input mode you can label each input terminals or skip terminal that is not connected to any equipment To select the input mode p 14 1 The labels you set will be displayed in Input Selection menu p 14 or banner If Skip is selected you cannot select the mode select acces...

Страница 30: ...he minimum level if noise occurs Sync PC sync signal type H V SOG H V Horizontal and Vertical sync from your PC Most common sync format SOG Sync on Green sync from your PC Reset PC Settings Press the OK button to reset to the default Setup settings Other items p 20 and p 21 ASPECT RETURN EXIT MENU OPTION DIRECTTV REC VCR 1 3 2 4 6 5 7 9 8 0 INPUT OK Input Selection AV1 AV2 AV3 AV4 PC HDMI1 HDMI3 H...

Страница 31: ...gital audio signal only Use with a PC is not assumed If the connected equipment has an aspect adjustment function set the aspect ratio to 16 9 These HDMI connectors are type A These HDMI connectors are compatible with HDCP High Bandwidth Digital Content Protection copyright protection An equipment having no digital output terminal may be connected to the input terminal of either COMPONENT S VIDEO ...

Страница 32: ... Displayed one at a time To the previous photo Rotate 90 anti clockwise To the next photo Rotate 90 clockwise 2 Enter SD mode Photo View Mode select view Operation guide Thumbnail Caution During the operation no signals are output from the monitor output terminals To return to TV EXIT or SDCARD Error display images that could not be loaded etc Selected photo information is displayed The maximum nu...

Страница 33: ...n step or Slide show settings operate in step or Slide show Select the photo for the first view Start Slide show Display the menu Select Viewing Setup Select the items and set access Picture Menu p 20 Menu Item Adjustments Configurations alternatives Viewing Setup Interval Select slide show interval 5 10 15 30 60 90 120 seconds Repeat Slide show repeat Off On set select To pause To return to Singl...

Страница 34: ...t are activated the TV is automatically turned on Only when TV is in Standby mode Power off link Set Power off Link Set in Setup Menu to use this function Power off Link p 18 19 21 When TV is set to Standby mode the connected equipment is also automatically set to Standby This function will work even if the TV enters standby mode automatically by Off Timer function or auto power standby function P...

Страница 35: ...e If you cancel pause or resumed playback the recorded programme will be deleted from HDD Display VIERA Link Menu select pause select resume Pause Live TV programme HDAVIControl3 and RecorderwithHDD Pause Live TV Direct TV Recording What you see is What you record HDAVI Control 3 Direct TV Rec R G B Y GUIDE POWER RETURN EXIT 1 3 2 4 6 5 7 9 8 MENU OPTION SD CARD ASPECT INPUT OK Recording the curre...

Страница 36: ...eo Camera The type of the connected equipment is displayed But you cannot access it Use its own remote control to operate the equipment Direct TV Rec Speaker Selection VIERA Link Menu Home Cinema Start VIERA Link Control Speaker Selection Home Cinema Others Pause Live TV When the equipment of other types or manufacturers is connected Others Others is displayed You cannot access it Use its own remo...

Страница 37: ...ute MUTE The sound of TV speakers is mute When the equipment is turned off TV speakers will be active TV TV speakers are active Select Speaker Selection This function may not work properly depending on the connected equipment Image or sound may not be available for the first few seconds when the playback starts Image or sound may not be available for the first few seconds when Input mode is switch...

Страница 38: ...e diagrams show our recommendations for how to connect the TV to your various equipment For other connections consult the instructions for each piece of equipment the table below and the specifi cations p 46 External Equipment VIDEO or S VIDEO AUDIO Headphones Camcorder Game equipment To adjust volume Headphone Volume in the Sound Menu p 20 M3 stereo mini plug Fully wired HDMI compliant cable Reco...

Страница 39: ...cable S VIDEO 4 pin terminal Chrominance in Chrominance earth Luminance in Luminance earth Hot Plug Detect 19 DDC CEC Ground 17 SCL 15 CEC 13 TMDS Clock Shield 11 TMDS Data0 9 TMDS Data0 7 TMDS Data1 Shield 5 TMDS Data2 3 TMDS Data2 1 18 5V Power 16 SDA 14 Reserved in cable but N C on device 12 TMDS Clock 10 TMDS Clock 8 TMDS Data0 Shield 6 TMDS Data1 4 TMDS Data1 2 TMDS Data2 Shield HDMI terminal...

Страница 40: ...by p 23 is set to On These sounds are normal Update system software regularly to ensure that you have latest version software If there is an update available a notification banner is displayed when the service has the update information To download new software press OK Downloading approx 20 mins If you choose not to download press EXIT To update automatically Set Auto Update Search in Standby to ...

Страница 41: ...rman Used in Australia Malaysia etc Data format for Card browsing Note A JPEG image modified with a PC may not be displayed Images imported from a PC must be compatible with EXIF Exchangeable Image File 2 0 2 1 and 2 2 Partly degraded files might be displayed at a reduced resolution Only JPG extension can be read by this TV The folder and file names may be different depending on the digital camera...

Страница 42: ...PC is basically compatible to VESA standard timing PC signal is magnified or compressed for display so that it may not be possible to show fine detail with sufficient clarity COMPONENT Y PB CB PR CR HDMI Mark Applicable input signal Signal name COMPONENT HDMI 480i 60 Hz 480p 60 Hz 576i 50 Hz 576p 50 Hz 720p 60 Hz 720p 50 Hz 1 080i 60 Hz 1 080i 50 Hz 1 080p 60 Hz 1 080p 50 Hz 1 080p 24 Hz PC D sub ...

Страница 43: ...lutions contain more pixels To create a colour image each pixel consists of three tiny coloured dots known as sub pixels one each of red green and blue Each one of these dots is precisely controlled by the electronics of the TV to produce the picture Whilst Panasonic maintains the highest standards in manufacturing technology and processes in the construction of these panels there are a number of ...

Страница 44: ...re regularly breaks up on some programmes or No Signal message Check Signal Display p 27 If Signal Quality or Signal Strength are displayed in red or constantly changing check aerial If problem persists consult your local TV aerial installer Check that the aerial and antenna cable are designed for DVB For your safety the aerial and cable should be inspected installed by a licenced installer that s...

Страница 45: ...tered trademarks of HDMI Licensing LLC HDAVI ControlTM is a trademark of Matsushita Electric Industrial Co Ltd Manufactured under license from Dolby Laboratories Dolby and the double D symbol are trademarks of Dolby Laboratories Problem Actions Other The remote control does not work Are the batteries installed correctly p 6 Has the TV been switched On TV goes into Standby mode Off Timer function i...

Страница 46: ... 1 1 0 V p p 75 Ω COMPONENT Y 1 0 V p p including synchronization PB CB PR CR 0 35 V p p AV2 Input AUDIO L R RCA PIN Type 2 0 5 V rms VIDEO RCA PIN Type 1 1 0 V p p 75 Ω COMPONENT Y 1 0 V p p including synchronization PB CB PR CR 0 35 V p p AV3 Input AUDIO L R RCA PIN Type 2 0 5 V rms VIDEO RCA PIN Type 1 1 0 V p p 75 Ω S VIDEO Mini DIN 4 pin Y 1 0 V p p 75 Ω C 0 286 V p p 75 Ω AV4 Input AUDIO L R...

Страница 47: ...hat freight and insurance to and or from your nearest Authorised Service Centre must be arranged by you Note that home or pick up delivery service is available for the following products in the major metropolitan areas of Australia or the normal operating areas of the nearest Authorised Service Centres a Picture tube CRT based Television Receivers screen b Convection Combination Microwave Ovens si...

Страница 48: ... number and serial number of this product may be found on its rear panel You should note this serial number in the space provided below and retain this book plus your purchase receipt as a permanent record of your purchase to aid in identification in the event of theft or loss and for Warranty Service purposes Model Number Serial Number Printed in Malaysia ...

Отзывы: