


26
Advanced
27
M a i n m e n u
P i c t u r e m e n u
S o u n d m e n u
S e t u p m e n u
Setup menu
AV2
Q-Link
Off
Control with HDMI
On
AV2 out
Monitor
TV
Access
Power on preference
DVB Setup Menu
Owner ID
Shipping condition
Off timer
Timer Programming
Child Lock
DVB Setup menu
Multi Audio
Access
DVB System Setup
eng
DVB Tuning Menu
Profile Edit
IDTV
Commom Interface
English
3 seconds
Common Interface Module
System Update
DVB System Setup
Access
Display Timeout
Preferred Subtitles
English
3 seconds
Common Interface Module
System Update
DVB System Setup
Display Timeout
Preferred Subtitles
English
3 seconds
Common Interface Module
System Update
DVB System Setup
Display Timeout
Preferred Subtitles
English
3 seconds
Common Interface Module
System Update
DVB System Setup
Access
Display Timeout
Preferred Subtitles
Auto Update Search in Standby
Software Licence
System Update
On
System Update Search Now
DVB Settings
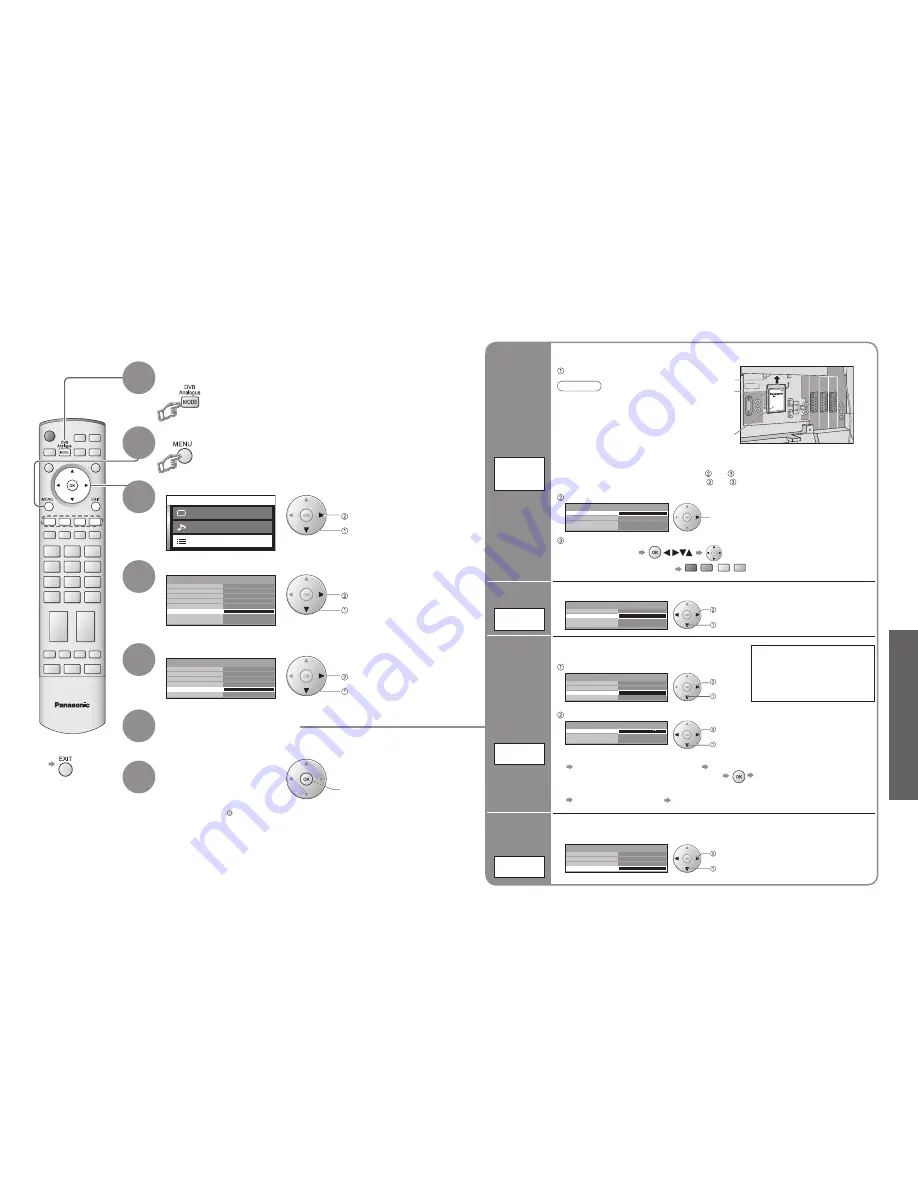
4
3
5
6
7
Select "Setup menu"
Select "DVB Setup Menu"
Select "DVB System Setup"
Display the menu
Select a function and set
Store
•
If you exit after , the setting is not stored after
turning off the TV.
■
To return to TV
(DVB mode)
access
select
1
If in Analogue mode
Select DVB
The "DVB Setup Menu" provides access to various advanced features.
•
DVB Settings (DVB)
(pay-TV
, subtitles, etc.)
Pay-TV
Common
Interface
Module
System
Update
Update
TV's
software
system
select, go
Coloured characters
red
green
yellow
blue
Select "Common Interface Module"
The Common Interface Module menu provides access to software contained on Common
Interface (CI) Modules.
Insert the CI module (optional)
(Rear of the TV)
CI slot
Insert or
remove
straightly
and
completely
CI module
access
Follow the on-screen instructions
example:
•
The features that appear on
screen are dependent on the
contents of the selected CI
module.
•
For more details, see the
manual of the CI module, or
check with the broadcaster.
•
On-screen operation guide
may not correspond to the
remote control buttons.
Caution
•
Turn Off MAINS power On / Off switch
whenever inserting or removing the CI
module.
•
If a view card and a card reader
come as a set, first insert the card
reader, then insert the view
card into the card reader.
•
Do not insert the module up side down.
Information
banner
display time
Display
Timeout
Select "Display Timeout" and set the time
•
0 (No display) to 10 sec. in
1-sec. increments
set
select
Language
of subtitles
Preferred
Subtitles
Select "Preferred Subtitles" and set the language
■
To display subtitles
(p. 13)
set
select
■
To update immediately
Select "System Update Search Now" Searches for an update (for several min.)
and displays a corresponding message if any
Downloads (for about 20 min.)
Select "System Update"
Select "Auto Update Search in Standby" and then select "On" or "Off"
•
On: Automatically performs
a search in standby and
downloads an update, if any
software updates are available
set
select
access
select
■
To view software licence information
Select "Software Licence" Display
•
Normally pay-TV services will appear without and .
If pay-TV services does not appear, perform and .
Download new software to TV.
•
For details (p. 48)
Set how long the information banner (p. 13) stays on screen
access
select
access
select
2
If System Update is performed,
the software will be updated (it
may change TV functions). If you
do not wish to do so, set "Auto
Update Search in Standby" to
Off.
OK


