background image

PROGRAMME

REC

POWER

MUTE

TEXT

F.P.

INDEX HOLD

R

G

B

OPTION

MENU

SURROUND

ASPECT

TV

PC

AV

INPUT

POWER

RETURN

EXIT

Y

RECALL

12

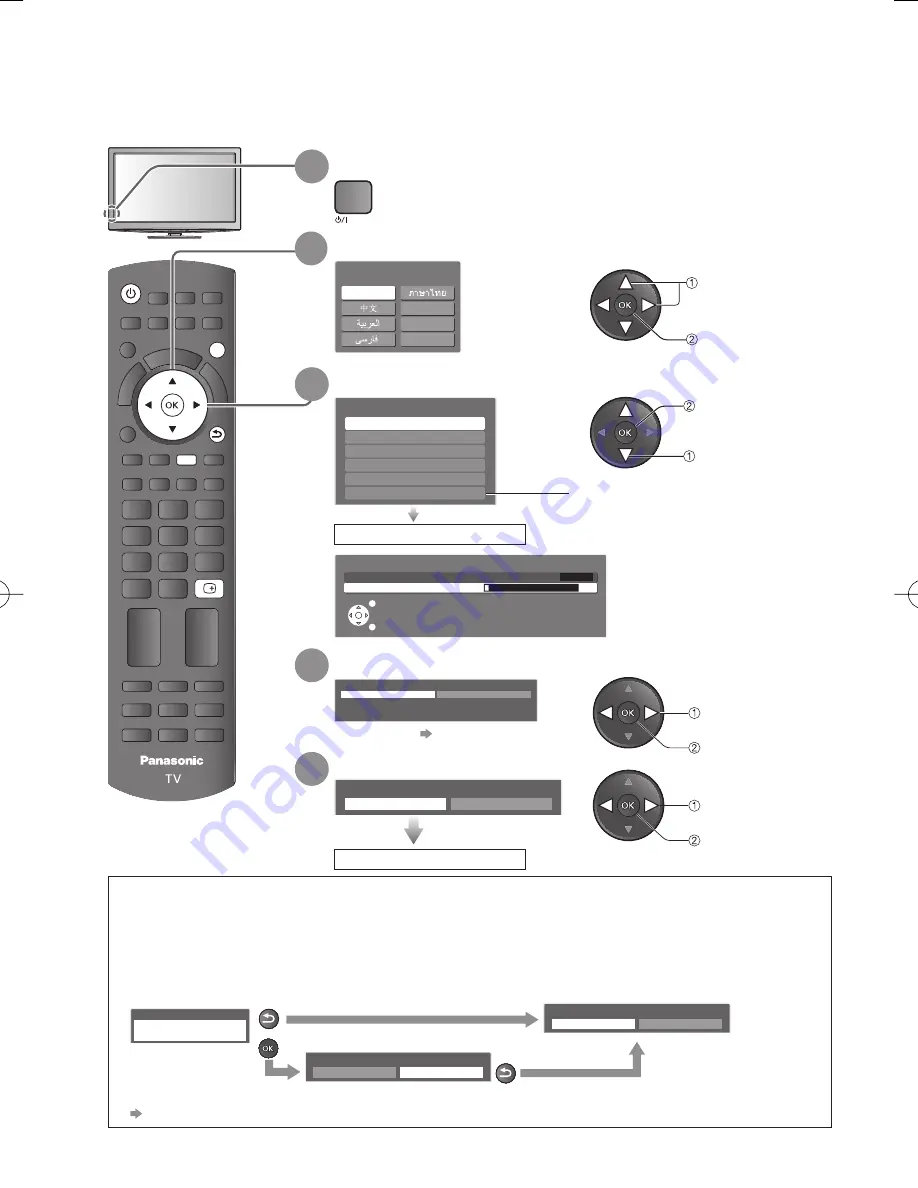
Auto Tuning

Search and store TV channels automatically.

These steps are not necessary if the setup has been completed by your local dealer.


You can now use the remote control to turn On the TV or 


switch the TV to standby mode. (Power LED: On)

5

 Select “Home”

Please select your viewing environment.

Home

Shop

 change

 confirm

 select

 confirm

Auto Tuning is complete

Viewing environment mode 

Home           :  Recommended mode for viewing at home. Select “Home” for optimal picture / power 

consumption. “Viewing Mode” is set as “Normal” (p. 32).

Shop            :  Demonstration mode to explain main features of this TV (for in-store display). 

“Viewing Mode” is set as “Dynamic” (p. 32).

To return to viewing environment selection mode if you selected “Shop”

Shop

You have selected shop mode

Automatic Demo

Off

On

RETURN

Please select your viewing environment.

Home

Shop

RETURN

To change viewing environment mode later on, reset all settings by accessing Shipping Condition.


 “Shipping Condition” (p. 43)

For details 


 p. 13

1

 Plug the TV into mains socket and switch On

2

 Select your language


Auto Tuning will start to search 

for TV channels and store them.

The sorted channel order 

depends upon the TV signal, 

the broadcasting system and 

reception conditions.

3

 Select your area

Channel Plan

Hong Kong

CIS/E.Europe

China

Asia/W.Europe

NZ/Indonesia

CATV/Other

 select

 start Auto Tuning

When selecting CATV / Other, press the OK 

button, and then select the Channel Plan 

from Indian CATV, South Africa, American 

System, American CATV or Japan.

Auto Tuning starts

Chinese

OSD Language

English

Chinese

Français

Indonesia

Ti

ế

ng Vi

t

Auto Tuning

2

0

2

1

1

n

a

c

S

CH4

EXIT

RETURN

 store

 select

4

 Setup the wireless LAN connection

Start wireless LAN connection setup?

Please connect the wireless LAN adaptor to a USB terminal.

Yes

No

Содержание Viera TH-P50VT20M

Страница 1: ...and the serial number in the space provided below and retain this book plus your purchase receipt as a permanent record of your purchase to aid in identification in the event of theft or loss and for...

Страница 2: ...M TH P50VT20P TH P50VT20T English TQBC2544 Thank you for purchasing this Panasonic product Please read these instructions before operating your set and retain them for future reference The images show...

Страница 3: ...s plastic bags which can be breathed in or swallowed by young children accidentally Keep these parts out of reach of young children EXIT TEXT F P INDEX HOLD PROGRAMME REC MENU SURROUND TV PC AV OPTION...

Страница 4: ...Features How to Use VIERA TOOLS 29 How to Use Menu Functions 30 Tuning and Editing Channels 37 Advanced Picture Settings 39 Child Lock 41 Input Labels 42 Shipping Condition Reset settings 43 Using Me...

Страница 5: ...g equipment Using an unapproved pedestal or other fixtures may make the TV unstable risking injury Be sure to ask your local Panasonic dealer to perform setup Use approved pedestals p 6 wall hanging b...

Страница 6: ...the display panel This may cause damage resulting in injury Do not expose your ears to excessive volume from the headphones Irreversible damage can be caused The TV is heavy Handle the TV by 2 or more...

Страница 7: ...install and remove the TV If two or more people are not present the TV may be dropped and personal injury may result When removing the pedestal from the TV do not remove the pedestal by any methods o...

Страница 8: ...supplied with the TV 400mm 300mm TY WK4P1RW Please contact your nearest Panasonic dealer to purchase the recommended optional accessories For additional details please refer to the manual of the optio...

Страница 9: ...ial the correct cable 75 coaxial and the correct terminating plug are required If a communal aerial system is used you may require the correct connection cable and plug between the wall aerial socket...

Страница 10: ...0 Hz AC 220 240 V 50 60 Hz TH P50VT20P AC 110 240 V 50 60 Hz Rear of the TV Rear of the TV Mains lead supplied Mains lead supplied Fully wired HDMI compliant cable Fully wired HDMI compliant cable Aer...

Страница 11: ...und setting 20 Return Returns to the previous menu page 22 Hold Freeze unfreeze picture p 14 Holds the current teletext page teletext mode p 17 18 Media Player p 44 Switches to SD Card and USB device...

Страница 12: ...ceiver Do not place any objects between the TV remote control signal receiver and remote control 2 C A T S Contrast Automatic Tracking System sensor Senses brightness to adjust picture quality when Ec...

Страница 13: ...selected shop mode Automatic Demo Off On RETURN Please select your viewing environment Home Shop RETURN To change viewing environment mode later on reset all settings by accessing Shipping Condition...

Страница 14: ...ad the manual of the access point If connection to the access point is successful we recommend you perform the Connection Test to confirm connection to the internet has been made The Connection Test c...

Страница 15: ...n or Mains power On Off switch should be On p 11 To select the two digit channel number e g 39 def wxyz in a short time If one digit channel number quickly changes the channel change To cancel Set to...

Страница 16: ...ge Display information banner Setup Menu Tuning Menu Display Settings VIERA Link Settings Child Lock 1 2 Off Timer Off OSD Language Access You can change language for on screen displays MENU Main Menu...

Страница 17: ...istortion Zoom2 Zoom3 Displays a 16 9 letterbox anamorphic image full screen without distortion Displays a 2 35 1 letterbox anamorphic image full screen without distortion At 16 9 displays the image a...

Страница 18: ...frequently viewed pages p 18 Functions Teletext mode Stop automatic updating If you wish to hold the current page without updating To resume HOLD HOLD INDEX F P Return to the main index page MENU Rev...

Страница 19: ...reen mno Enter the 4 digit number Sub pages The number of sub pages varies depending on the broadcasters It may take some time for searching during which time you can watch TV example P6 The news page...

Страница 20: ...ut using the AV button on the remote control or the side panel of the TV p 11 Press the button repeatedly until the desired input is selected You can label or skip each input mode Input Labels p 42 Sk...

Страница 21: ...below buttons of this TV remote control How to change the code for each equipment Each type of Panasonic equipment has its own remote control code Please change the code for each equipment you want t...

Страница 22: ...t to strike the TV screen or other people unintentionally When using the 3D Eyewear the distance between the user and screen can be misjudged The 3D Eyewear must only be worn when viewing 3D content I...

Страница 23: ...liquid crystal shutters are alternately opened and closed in time with the images on the TV screen to achieve the 3D effect Part names and functions Battery cover When using for the first time remove...

Страница 24: ...tteries as non burnable rubbish or in line with the waste disposal regulations in your local area Loosen the screw and remove the battery cover using the supplied screwdriver Screwdriver supplied Batt...

Страница 25: ...p at the end of the band and fix the twisted part Fix the twisted part Attaching the nose pad Use either nose pad A or B for your preference If you put the 3D Eyewear on vision correction glasses the...

Страница 26: ...this message will be displayed again in the same condition after Mains power On Off switch is next turned On Select No if you do not wish to display this message again To turn the 3D Eyewear off Afte...

Страница 27: ...x 3 2 m Approx 3 2 m 20 20 Approx 3 2 m The range may be shortened depending on the obstacles between the infrared sensors on the TV and the 3D Eyewear the dirt of the infrared sensors or the surround...

Страница 28: ...lect 3D Settings Setup Menu Advance isfccc Display Settings VIERA Link Settings DivX VOD Off Timer Off Off Access 3D Settings Network Setup Child Lock 1 2 OSD Language access select select change acce...

Страница 29: ...type of the input signal Table of images that can be seen for each 3D Picture Format and the input signal format If the picture appears to be abnormal refer to the table below to choose the correct 3...

Страница 30: ...t are connected a selection screen will be displayed Please select the correct description and access Photo Photo mode p 46 When two or more available devices are connected a selection screen will be...

Страница 31: ...settings To reset the picture settings only Reset to Defaults in Picture Menu p 33 To reset the sound settings only Reset to Defaults in Sound Menu p 34 To reset all settings Shipping Condition p 43 i...

Страница 32: ...cess p 34 Auto Tuning Manual Tuning Channel List Edit Access Access Access Tuning Menu Main Menu Picture Sound Setup Picture Sound Setup Intelligent Frame Creation Power Save 16 9 Overscan Off Colour...

Страница 33: ...in Advanced Settings Lock Settings and Copy Adjustment p 39 40 This mode is available only when Advance isfccc in the Setup Menu is set to On Not valid on VIERA CAST If the certified professional dea...

Страница 34: ...the frequency Equalizer below Bass Increases or decreases level to enhance or minimise lower deeper sound output Treble Increases or decreases level to enhance or minimise sharper higher sound output...

Страница 35: ...input or Network service operations PC Setup Input Resolution Switches to a wide view VGA 640 480 pixels WVGA 852 480 pixels XGA 1 024 768 pixels WXGA 1 280 768 pixels 1 366 768 pixels Options change...

Страница 36: ...ation will be displayed for several seconds when this function works Power on Link Sets to use Power on Link functions Off On p 62 Power off Link Sets to use Power off Link functions Off On p 62 Stand...

Страница 37: ...for the 3D compatible 24p source movie Resolution Enhancer Enhances the picture resolution to make the image sharper Off Mid Max You can set this function for each input Not valid on 3D PC VIERA CAST...

Страница 38: ...nu 6 Set see next page access select access select 5 Select a function 2 Display the menu MENU 3 Select Setup Setup Menu Off Timer Off Access Child Lock Tuning Menu Display Settings OSD Language VIERA...

Страница 39: ...i mno tuv pqrs wxyz store search or Channel List Editor To rename the channel name B Edit channel name Name A B C D E F G H I J K L M N U V W X Y Z 0 1 2 3 4 5 6 a b c d e f g h i j k l m n u v w x y...

Страница 40: ...n Viewing Mode in the Picture Menu is set to Professional1 or Professional2 1 Select the input mode to adjust and setup p 19 TV AV Advanced Settings can be locked for each Viewing Mode and input Addit...

Страница 41: ...ea Reset to Defaults Press the OK button to reset to the default White Balance Colour Management R Hue Adjusts the picture hue of red area G Hue Adjusts the picture hue of green area B Hue Adjusts the...

Страница 42: ...s Child Lock Child Lock Control channel audience Performing Shipping Condition p 43 erases the PIN number and all settings Child Lock PIN Entry Please enter new PIN PIN abc def jkl ghi mno tuv pqrs wx...

Страница 43: ...s VIERA Link Settings Off Timer Off Child Lock Access 1 2 The labels you set will be displayed in Input Selection menu p 19 or banner If Skip is selected you cannot select the mode access select selec...

Страница 44: ...e reset channels picture sound settings etc Shipping Condition Reset Settings To return to TV EXIT 3 Select System Menu Setup Menu 2 2 System Menu Other Settings Advance isfccc Access On 1 Display the...

Страница 45: ...Digital format A modified data with a PC may not be displayed correctly DivX p 73 Music Data format MP3 and AAC Copy protected files cannot be played back SD Card format SDXC Card exFAT SDHC Card SD...

Страница 46: ...photos If not press the blue button to activate the Contents Select screen and select the other mode Change the contents p 47 You can change to the other device directly in the same mode if two or mor...

Страница 47: ...elect the sort type Displays the thumbnail grouped by the same month The group of the photos without recorded date is shown as Unknown To display the information of the highlighted group Displays the...

Страница 48: ...r Cinema Transition Effect Selects the transition effect for switching the photo during the slideshow Off Fade Slide Dissolve Motion Random Fade The next photo fades in gradually Slide The next photo...

Страница 49: ...review Video Setup p 49 To display the information of the highlighted title To repeat playback Video Setup p 49 To display the information of the highlighted scene To return to thumbnail RETURN Media...

Страница 50: ...n On Intelligent Frame Creation Off Video Preview On Repeat Off select access select set Menu Item Adjustments Configurations alternatives Video Setup Other Settings Video Preview Sets to start the pr...

Страница 51: ...Setup Select File or Folder and set Set Display the menu My Song_9 My Music_1 My Favourite 00 02 43 00 05 44 1 EXIT RETURN User BGM Folder view Contents Select Play Folder Info EXIT Access RETURN My M...

Страница 52: ...a server and then you can watch them on the TV TwonkyMedia server 5 1 x and Windows 7 are the server software that has been tested for the performance with this TV current as of January 2010 For insta...

Страница 53: ...ork equipment that are authorized by your ISP and telecommunications company You cannot make settings for the network equipment on this TV You may be required to make settings on your computer Dependi...

Страница 54: ...k Setup DivX VOD Off Timer Off Access Child Lock 3D Settings 1 2 Main Menu Picture Sound Setup Accesses the specific web site to update TV s software and search if any software updates are available N...

Страница 55: ...ay Primary DNS or Secondary DNS Move the cursor and enter the number select move abc def jkl ghi mno tuv pqrs wxyz This setting is for the network connection by using the LAN cable Network Setup Netwo...

Страница 56: ...current access point settings press the OK button To change the settings select No on this screen Some access points do not allow access to the internet Perform Connection Test below to check if inter...

Страница 57: ...ation of the highlighted file RECALL or B To return to TV EXIT To return to the previous screen RETURN 2 Select Media Server Input Selection AV1 AV2 AV3 AV4 PC HDMI1 HDMI2 HDMI3 HDMI4 TV Media Server...

Страница 58: ...de the operation guide RECALL To pause return to Single view R Start Slideshow To return to list RETURN To change aspect only for the 4 3 video content ASPECT To the previous scene R To the next scene...

Страница 59: ...is selected at random Interval Selects slideshow interval 5 10 15 30 60 90 120 seconds Repeat Slideshow repeat Off On Main Menu Picture Sound Photo Setup Video Setup Music Setup 3D Settings Photo Set...

Страница 60: ...p 53 VIERA CAST home screen is subject to change without notice The services through VIERA CAST are operated by their respective service providers and service may be discontinued either temporarily or...

Страница 61: ...dels incorporating HDAVI Control and VIERA Link Some functions are not available depending on the equipment s version of HDAVI Control Please confirm the connected equipment s version of HDAVI Control...

Страница 62: ...After connection turn the equipment on and then switch the TV on Set the input mode to HDMI1 HDMI2 HDMI3 or HDMI4 p 19 and make sure that an image is displayed correctly This setup should be done eac...

Страница 63: ...Standby mode of the connected equipment is controlled higher or lower in synchronization with the TV On Off state to reduce the consumption When the TV is set to Standby mode the connected equipment...

Страница 64: ...e TV Yes Stop Pause Live TV No select stop TV Select Yes To operate Pause Live TV To return to Live TV stop playback of Pause Live TV cancel pause Operations may be different depending on the recorder...

Страница 65: ...corder theatre Other means Tuner set top box The menu of the accessed equipment Input mode will be changed automatically Operate the connected equipment 1 Set the remote control code to 73 p 20 2 Foll...

Страница 66: ...rate check the settings and the equipment Summary of features Connection Preparations p 60 61 Display VIERA Link Menu Select Speaker Selection VIERA Link Menu Pause Live TV Start Direct TV Rec VIERA L...

Страница 67: ...system To use Network services VIERA Link Recommended Connection 1 applicable if your amplifier has ARC Audio Return Channel function External Equipment These diagrams show our recommendations for how...

Страница 68: ...in the Sound Menu p 33 M3 stereo mini plug Camcorder Game equipment Fully wired HDMI compliant cable Network Modem LAN cable Rear of the TV Internet S VIDEO 4 pin terminal Chrominance in Chrominance e...

Страница 69: ...62 63 69 6 12 S11 S40 S41 21 24 25 31 21 62 63 69 62 63 69 62 63 62 C13 70 73 74 75 76 77 78 79 S 1 S 2 S 3 S 1 S 1 S 2 S 3 S 1 S 2 S 3 32 41 S 1 S 2 S 3 80 81 89 S1 S2 S10 S1 S2 S10 Z1 Z9 S1 S2 S10...

Страница 70: ...ia etc Type of broadcast Regular broadcast Standard Audio BILINGUAL or DUAL MONO MAIN I SUB II STEREO Mode Indicator No Indicator I II If the stereo signal is poor or the receiving conditions are not...

Страница 71: ...nput in the Sound Menu p 34 If the connected equipment has an aspect adjustment function set the aspect ratio to 16 9 These HDMI connectors are type A These HDMI connectors are compatible with HDCP Hi...

Страница 72: ...5 06 852 480 60 Hz 31 44 59 89 1 024 768 60 Hz 48 36 60 00 1 024 768 70 Hz 56 48 70 07 1 024 768 75 Hz 60 02 75 03 1 024 768 85 Hz 68 68 85 00 1 280 1 024 60 Hz 63 98 60 02 1 280 768 60 Hz 47 70 60 00...

Страница 73: ...data or card Back up the recorded data at regular intervals in case of deteriorated or damaged data or erratic operation of the TV Panasonic is not liable for any deterioration or damage of recorded...

Страница 74: ...f folders the files and folders may not be displayed When there are many files and folders operation may take time to complete or some files may not be displayed or playable ABOUT DIVX VIDEO ON DEMAND...

Страница 75: ...nnections and settings p 52 55 The software update is not completed Network download failed Check the connections and settings p 52 55 USB connection It is recommended to connect the USB Flash Memory...

Страница 76: ...es on the surface Take care not to subject the TV s surfaces to water or detergent A liquid inside the TV could lead to product failure Take care not to subject the surfaces to insect repellent solven...

Страница 77: ...e displayed menu Thumbnail or still picture Problem Actions Screen Chaotic image noisy Change the setting of P NR in the Picture Menu to remove noise p 33 Check nearby electrical products car motorcyc...

Страница 78: ...el of eyesight between the left and right eyes Take the necessary steps wearing glasses etc to correct your eyesight before use 3D Eyewear is turned off automatically Check that there are no obstacles...

Страница 79: ...B N Z 1 12 PAL SECAM D 1 12 NTSC M Japan 2 13 NTSC M USA UHF BAND 21 69 PAL G H I SECAM G K K1 28 69 PAL B AUST 13 57 PAL D K 13 62 NTSC M Japan 14 69 NTSC M USA CATV S1 S20 OSCAR 1 125 USA CATV C13 C...

Страница 80: ...emark of Panasonic Corporation DLNA the DLNA Logo and DLNA CERTIFIED are trademarks service marks or certification marks of the Digital Living Network Alliance Windows is a registered trademark of Mic...

Отзывы: