


18
Advanced
19
Menu
Item
Adjustments / Con
fi
gurations (alternatives)
Picture menu
Menu
Basic picture mode
(Dynamic / Standard / Cinema / Auto)
•
Set for each input signal
Menu
Dynamic
Adjust by each Menu
Contrast,
Brightness, Colour,
Sharpness
Adjusts colour, brightness, etc. for each picture mode to suit your taste
Contrast
Brightness
Colour
Sharpness
NTSC-Tint
Adjusts tint of image
•
For NTSC signal reception only
•
Item will be changed to "Tint" when receiving YUV(60Hz) or HDMI(60Hz) signal
NTSC-Tint
Colour temperature
Chooses the colour balance of the entire image
(Cool / Standard / Warm)
Colour temperature
Standard
Colour management
Automatically adjusts colours to vivid ones
(Off / On)
Colour management
On
D. PNR
Automatically reduces unwanted picture noise
(Off / Strong / Weak / Auto)
•
Set to Off when receiving a strong signal
D. PNR
Auto
MPEG NR
Automatically reduces noise for watching DTV, DVD, VCD and SD Card
(Off / Strong / Mid / Weak)
MPEG NR
Off
Mosquito NR
Automatically reduces
fl
icker noise in the contoured parts of a picture
(Off / Strong / Mid / Weak)
•
Not valid on PC
Mosquito NR
Off
3D-COMB
Automatically makes still pictures and slow pictures look more vivid
(Off / On)
•
For PAL or NTSC signal reception only
•
Not valid on S-Video, components, PC, HDMI and SD Card
3D-COMB
On
Sound menu
Menu
Basic sound mode
(Music / News / Cinema)
•
Set for each input signal
Menu
Music
Bass, Treble
Adjusts the output level of deep bass, high-pitch, shrill sound for each sound mode
Bass
Treble
Balance
Adjusts volume level of right and left speakers
Balance
Headphone volume
Adjusts the volume of the headphones
Headphone volume
SRS TruSurround XT
SRS TruSurround XT® creates a high quality surround sound effect using just two
speakers from the source which can output surround encoded signals
(Off / On)
•
Switching is also possible by SRS button on the remote control
SRS TruSurround XT
Off
HDMI1 / 3 input
Chooses according to the signal when HDMI1 or HDMI3 is connected
(Auto / Digital / Analogue)
(p. 32)
•
HDMI2 terminal is for digital signal only
HDMI1 input
Auto
Setup menu
HDMI setting
Control with HDMI function (p. 26)
HDMI setting
Access
Teletext
Teletext display mode
(TOP / List)
(p. 14)
Teletext
TOP
Off timer
Sets the time the TV automatically turns Off.
(Off / 15 / 30 / 45 / 60 / 75 / 90)
(minutes)
Off timer
Off
Ch colour set
Colour density varying between broadcast channels can be adjusted to three levels for
each reception channel
•
Select the channel you want to adjust and set this function
Ch colour set
Child lock
Child lock can be set for each channel and each AV mode
Image and sound are not available during Child lock On (Black screen will appear)
•
Select the channel or AV mode you want to lock and set this function
Child lock
Off
Side panel
Increases the brightness of the side panel
(Off / Low / Mid / High)
•
The recommended setting is High to prevent panel "after-image"
Side panel
Off
Power save
Reduces brightness of picture to economise on power consumption
(Off / On)
Power save
Off
SD card LED
Lights blue LED while SD Card is inserted
(Off / On)
(p. 25)
SD card LED
On
Tuning menu
Edits or sets channels (p. 20)
Tuning menu
Access
Owner ID
Inputs the owner ID (p. 22)
Owner ID
Access
Colour system
Selects optional colour system based on video signals in AV mode
(Auto / PAL / NTSC 4.43 / NTSC 3.58)
Colour system
Auto
Colour matrix
Displayed during AV mode
Available only with 480p or 576p input signals in a natural colour from digital equipment
connected to AV2 / AV3 Component or HDMI1 / HDMI2 / HDMI3 terminals
Select SD or HD to adjust suitable colour parameters for SD (standard de
fi
nition) or HD
(high de
fi
nition)
•
SD: Input signal is a normal TV system
•
HD: Input signal is a High-De
fi
nition system
Colour matrix
SD
M a i n m e n u
P i c t u r e m e n u
S e t u p m e n u
S o u n d m e n u
Menu
Contrast
Brightness
Colour
Sharpness
NTSC-Tint
Colour temperature
Colour management
Mosquito NR
Standard
On
O
MPEG NR
Off
ff
D. PNR
Auto
Picture menu
Dynamic
3D-COMB
On
MENU
NORMALIZE
EXIT
Menu
Contrast
Brightness
Colour
Sharpness
NTSC-Tint
Colour temperature
Colour management
Mosquito NR
Standard
On
Off
MPEG NR
Off
D. PNR
Auto
3D-COMB
On
Picture menu
Dynamic
Colour temperature
Standard
Sharpness
Access
Tuning menu
MENU
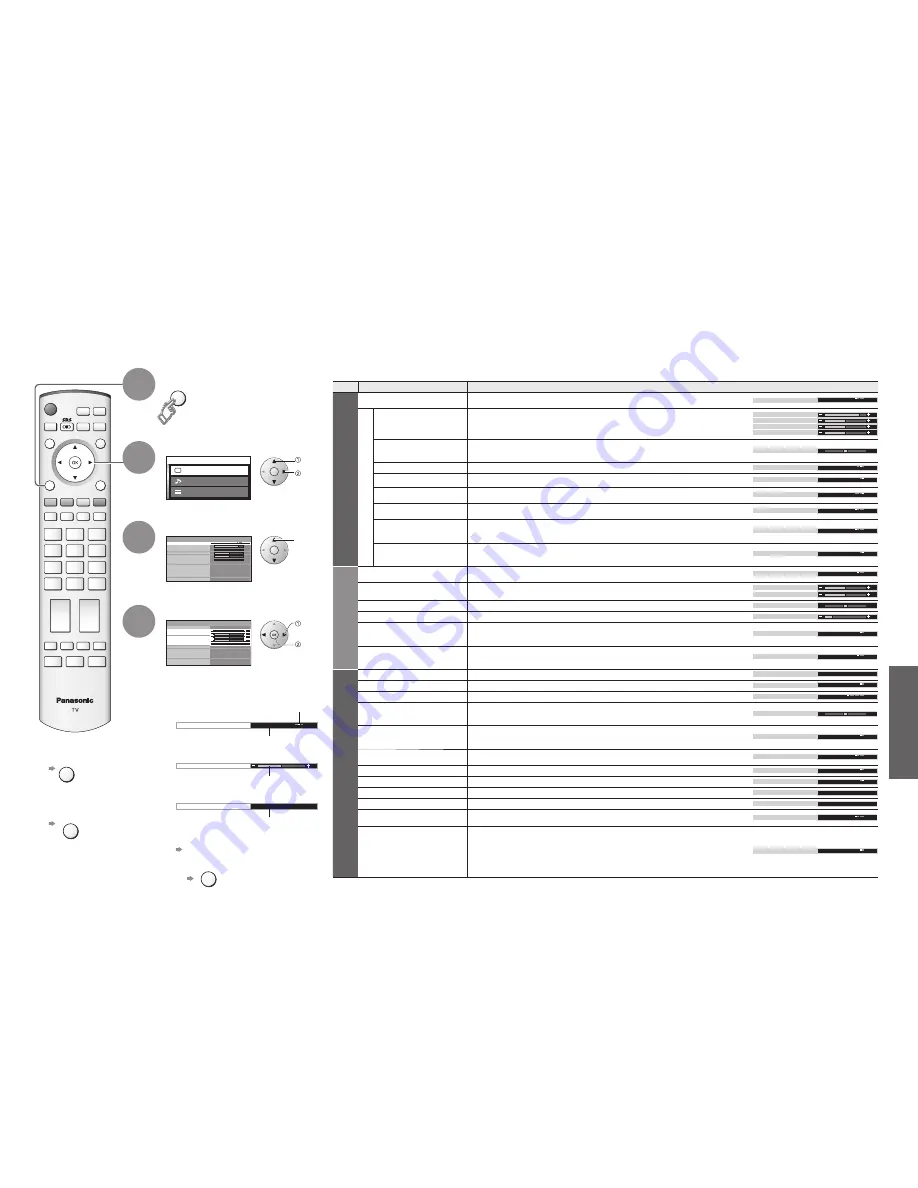
How to Use Menu Functions
Display menu
3
1
2
4
Various menus allow you to make settings for the picture, sound,
and other functions so that you can enjoy watching TV in your own way.
•
Displays the functions that
can be set (varies according
to the input signal)
■
To return to TV
EXIT
■
To return to the
previous screen
MENU
Select the menu
Select the item
(example: Picture menu)
Adjust or select
(example: Picture menu)
(example: Picture menu)
Changed
Number and positions
of alternatives
Moved
Displays the next
screen
■
Choose from among alternatives
■
Adjust using the slide bar
■
Go to the next screen
■
To reset the setting
Display Menu in Picture menu or Sound
menu (Bass, Treble) you want to reset
■
Menu list
•
How to Use Menu Functions
(picture, sound quality
, etc.)
•
A different menu will be displayed while PC or SD Card is used.
(p. 23 and p. 25)
•
In AV mode, the Sound menu and Setup menu change a number of options.
NORMALIZE
select
access
select
change
store
(Required
by some
functions)


