background image

English

22

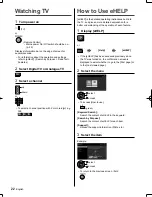
  How to Use eHELP

 [eHELP] is the detailed operating instructions built into 
the TV, and gives a more detailed explanation for a 
better understanding of the operation of each feature.

 1

  Display [eHELP]


 or


 [Help]


 [eHELP]

● 

 If the [eHELP] has been accessed previously since 
the TV was turned on, the confirmation screen is 
displayed to select whether to go to the [First page] or 
to the [Last viewed page].

 2

  Select the menu


   select

   access

● 

 To access [How to use]


 (green)

 [Keyword Search]:

 Search the content of eHELP in the keyword.

 [Search by Purpose]:

 Search the content of eHELP for each item.

 [Support]:

 Access the support information (FAQs, etc.).

 3

  Select the item

 Example:


   select

   access

● 

 To return to the previous screen / field


  Watching TV

 1

  Turn power on


 (TV)

 or


 (Remote Control)


● 

 Mains power On / Off switch should be on. 
(p. 20)

 Displays information bar on the edge of screen for 
several seconds.

● 

 For information about the operation and settings, 
refer to [eHELP]. (Search by Purpose > Read first > 
Features)

 2

  Select Digital TV or Analogue TV


 3

  Select a channel


 up

 down

 or


● 

 To select a channel position with 2 or more-digit, e.g. 
399


Содержание Viera TH-65EZ1000U

Страница 1: ...em for future reference Please carefully read the Safety Precautions of this manual before use The images shown in this manual are for illustrative purposes only For more detailed instructions please refer to eHELP Built in Operating Instructions How to use eHELP p 22 M0417 0 English English Model No TH 65EZ1000U Operating Instructions OLED TV ...

Страница 2: ...first Before use Licence Contents Be Sure to Read Important Notice 3 Safety Precautions 4 Quick Start Guide Accessories 7 Connections 13 Identifying Controls 18 First time Auto Tuning 21 Using your VIERA Watching TV 22 How to Use eHELP 22 Others FAQs 24 Maintenance 25 Specifications 25 ...

Страница 3: ...e area ex channel number channel logo other logos or title image etc Still or moving pictures viewed in 4 3 or 14 9 aspect ratio etc Video games To avoid image retention the screen saver may be activated OLED logo moves or the on screen message may move after a few minutes if no signals are sent or no operations are performed To avoid image retention the screen may become dim when the motionless i...

Страница 4: ...commended by the manufacturer of the TV Only using furniture that can safely support the TV Ensuring the TV is not overhanging the edge of the supporting furniture Not placing the TV on tall furniture for example cupboards or bookcases without anchoring both the furniture and the TV to a suitable support Not standing the TV on cloth or other materials placed between the TV and supporting furniture...

Страница 5: ...uch as newspapers tablecloths and curtains Whether you are using a pedestal or not always ensure the vents at the bottom of the TV are not blocked and there is sufficient space to enable adequate ventilation Do not expose the TV to direct sunlight and other sources of heat To prevent the spread of fire keep candles or other open flames away from this product at all times Suffocation Choking Hazard...

Страница 6: ...l At least two people are required to move the TV Support the TV as shown below to prevent injury that may be caused by the tipping or falling of TV Do not hold the screen part when moving the TV Transport only in upright position Transporting the TV with its display panel facing upwards or downwards may cause damage to the internal circuitry Do not hold the speaker in one hand Do not hold the spe...

Страница 7: ... mm Assembly screw M3 5 mm Base FRONT Bracket L Bracket R Cable cover front Accessories Standard accessories Remote Control p 18 N2QAYB001120 Touch Pad Controller p 19 N2QBYA000019 Pedestal p 7 Speaker p 7 ACCESSORIES FOR SPEAKER WALL HANGING p 27 Cable tie 2 p 16 Batteries R6 2 For Remote Control p 19 R03 2 For Touch Pad Controller p 20 AV2 COMPONENT VIDEO adaptor p 15 Operating Instructions with...

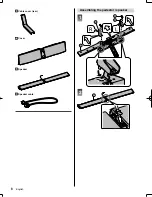
Страница 8: ...English 8 Assembling the pedestal speaker R L A E D F 1 J 2 Cable cover rear Cover Speaker Speaker cable ...

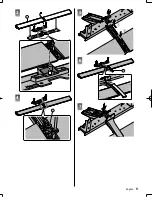
Страница 9: ...English 9 5 G 6 7 J 3 C 4 ...

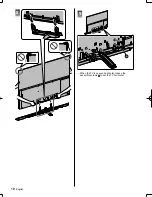
Страница 10: ...English 10 B 9 When the TV is uneven horizontal loosen the assembly screws to set the TV horizontal 8 ...

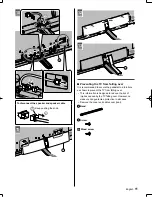
Страница 11: ...n to prevent the TV from falling over This information is designed to reduce the risk of injuries caused by the TV falling over However no measure can guarantee protection in all cases Remove the cover and cable cover rear Band Screw Wood screw K 10 To disconnect the speaker and speaker cable Keep pushing the knob I 11 ...

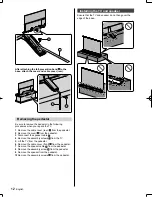
Страница 12: ...n the following procedures when you repack the TV 1 Remove the cable cover rear from the pedestal 2 Remove the cover from the pedestal 3 Disconnect the speaker cable 4 Remove the assembly screws from the TV 5 Lift the TV from the pedestal 6 Remove the cable cover front from the pedestal 7 Remove the speaker cable from the pedestal 8 Remove the assembly screw from the pedestal 9 Remove the speaker ...

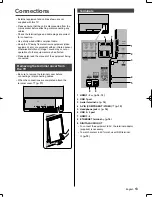
Страница 13: ... the unit is disconnected from the mains socket before attaching or disconnecting any cables Check the terminal type and cable plugs are correct for connection Use a fully wired HDMI compliant cable Keep the TV away from electronic equipment video equipment etc or equipment with an infrared sensor otherwise distortion of image sound may occur or operation of other equipment may be affected Please ...

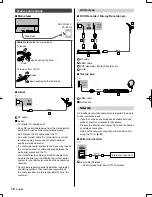
Страница 14: ... mains lead To loosen Knob Keep pushing the knob To remove from the TV Keep pushing both side snaps Snaps Aerial TV RF cable Aerial For Digital TV Analogue TV Keep RF aerial cable away from the mains lead to avoid and minimise mains interference pickup Do not place the RF cable under the TV An aerial correct cable 75 coaxial and correct terminating plug are required to obtain optimum quality pictu...

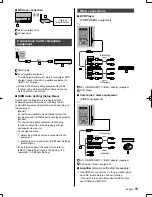
Страница 15: ...nd in HDMI input is not played properly Mode2 For the 4K compatible equipment that has the function to output the image precisely with the expanded colour gamut To change the mode 1 Select the HDMI input mode connected to the equipment 2 Display the menu and select HDMI Auto Setting Setup Menu For information about the valid format refer to eHELP Search by Purpose Watching 4K resolution HDMI Auto ...

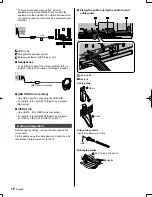
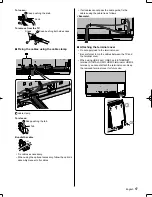
Страница 16: ...D for recording Use USB 1 port for connecting the USB HDD For details refer to eHELP Search by Purpose Recording VIERA Link Use HDMI1 4 for VIERA Link connection For details refer to eHELP Search by Purpose Functions VIERA Link HDAVI Control Cable arrangement Before fixing the cables remove the cover and cable cover rear Fix the cables using the cable clamp and cable tie and then attach the termin...

Страница 17: ...ry follow the option s assembly manual to fix cables If all cables cannot pass the cable guide fix the cables using the cable tie as follows Example Attaching the terminal cover Do not apply load to the terminal cover Be careful not to nip the cables between the TV and the terminal cover When using USB 2 port USB 3 port ETHERNET terminal DIGITAL AUDIO HDMI3 terminal or HDMI4 terminal you cannot at...

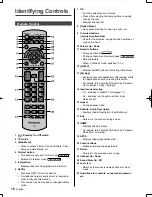
Страница 18: ... Aspect Changes aspect ratio 16 Subtitle Audio Description Displays Audio Description Subtitle Menu 17 Exit Returns to the normal viewing screen 18 HOME Displays Home Screen For details refer to eHELP Search by Purpose Read first Features 19 APPS Displays Apps applications list 20 Cursor buttons Makes selections and adjustments 21 Return Returns to the previous menu page 22 Channel Up Down 23 Soun...

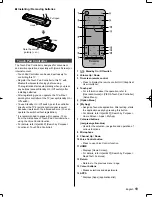
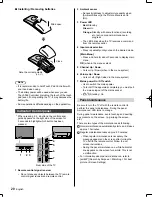
Страница 19: ...Displays Apps applications list Installing Removing batteries Pull open Hook Note the correct polarity or Close Touch Pad Controller The Touch Pad Controller is designed for convenient and intuitive operation especially with Home Screen or internet content Touch Pad Controller can be used exclusively for controlling this TV Register the Touch Pad Controller to this TV with Bluetooth wireless techn...

Страница 20: ...s of the maintenance as following Normal maintenance automatically starts and it takes approx 10 minutes Regular maintenance takes approx 80 minutes When regular maintenance is necessary the message appears on the screen after turning the TV off with the remote control Follow the on screen instructions During the panel maintenance a white horizontal line appears on the screen for a while This is n...

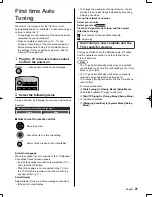
Страница 21: ...tup Menu First time Auto Tuning When the TV is turned on for the first time it will automatically search for available TV channels and give options to set up the TV These steps are not necessary if the setup has been completed by your local dealer Please complete connections p 13 17 and settings if necessary of the connected equipment before starting Auto Tuning For information about the settings ...

Страница 22: ...to use green Keyword Search Search the content of eHELP in the keyword Search by Purpose Search the content of eHELP for each item Support Access the support information FAQs etc 3 Select the item Example select access To return to the previous screen field Watching TV 1 Turn power on TV or Remote Control Mains power On Off switch should be on p 20 Displays information bar on the edge of screen fo...

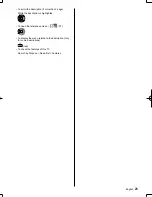
Страница 23: ...n if more than 1 page While the description is highlighted To open the reference screen To display the menu related to the description only for some descriptions red To check the features of this TV Search by Purpose Read first Features ...

Страница 24: ...to power standby function is activated The remote control does not work or is intermittent Are the batteries installed correctly p 19 Has the TV been switched on The batteries may be running low Replace them with new ones Point the remote control directly at the TV s remote control signal receiver within about 7 m and a 30 degree angle of the signal receiver Situate the TV away from sunshine or ot...

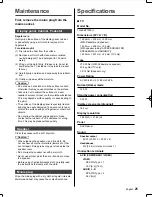
Страница 25: ...lease note do not let liquid enter the TV inside as it may lead to product failure 4 Carefully wipe moisten and wipe away the stubborn dirt 5 Finally wipe away all the moisture Caution Do not use a hard cloth or rub the surface too hard otherwise this may cause scratches on the surface Take care not to subject the surfaces to insect repellent solvent thinner or other volatile substances This may d...

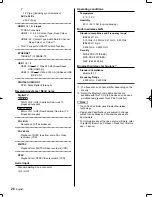
Страница 26: ...or information about the open source software refer to eHELP Search by Purpose Read first Before use Licence Y 1 0 V p p including synchronisation PB CB PR CR 0 35 V p p HDMI 1 2 3 4 input TYPE A Connectors HDMI1 3 4 4K Content Type Deep Colour x v Colour HDMI2 4K Content Type Audio Return Channel Deep Colour x v Colour This TV supports HDAVI Control 5 function ETHERNET 10BASE T 100BASE TX USB 1 2...

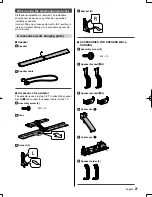
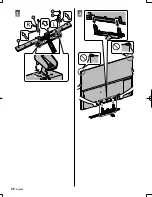
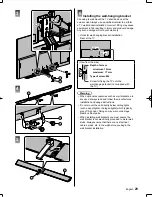
Страница 27: ...lation should never be done by any other than a qualified installation specialist Incorrect fitting may cause equipment to fall resulting in injury and product damage Any such damage will void your warranty Accessories wall hanging parts Speaker Speaker Speaker cable Accessories for pedestal The pedestal is used in step 1 to 7 to attach the speaker bracket and connect the speaker cable into the TV...

Страница 28: ...English 28 C E D F 1 2 ...

Страница 29: ...ximum 17 mm Type of screw M6 Screw for fixing the TV onto the wall hanging bracket not supplied with the TV Warning When optional accessories such as wall brackets etc are used always read and follow the manufactures installation and usage instructions Do not mount the unit directly below ceiling lights such as spotlights or halogen lights which typically give off high heat Doing so may warp or da...

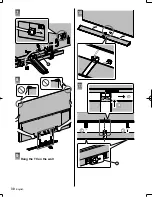
Страница 30: ...English 30 B 7 8 9 Hang the TV on the wall 10 I 11 ...

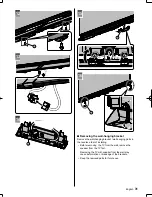
Страница 31: ... wall hanging bracket wall hanging parts in the reverse order of installing Before removing the TV from the wall remove the speaker from the TV first Removing the TV with speaker from the wall may cause deformation or breakage of the brackets Keep the removed parts for future use ...

Страница 32: ......

Страница 33: ......

Страница 34: ......

Страница 35: ... for the name address of the nearest Authorised Service Centre Send or take the product to a Panasonic Authorised Service Centre together with your proof of purchase receipt as a proof of purchase date Please note that freight and insurance to and or from your nearest Authorised Service Centre must be arranged by you Note that home or pick up delivery service is available for the following product...

Страница 36: ... provided below and retain this book plus your purchase receipt as a permanent record of your purchase to aid in identification in the event of theft or loss and for Warranty Service purposes Model Number Serial Number Web Site http www panasonic com Panasonic Corporation 2017 English Printed in Malaysia New Zealand WARRANTY New Zealand only Distributed in New Zealand by Panasonic New Zealand Limi...

Отзывы: