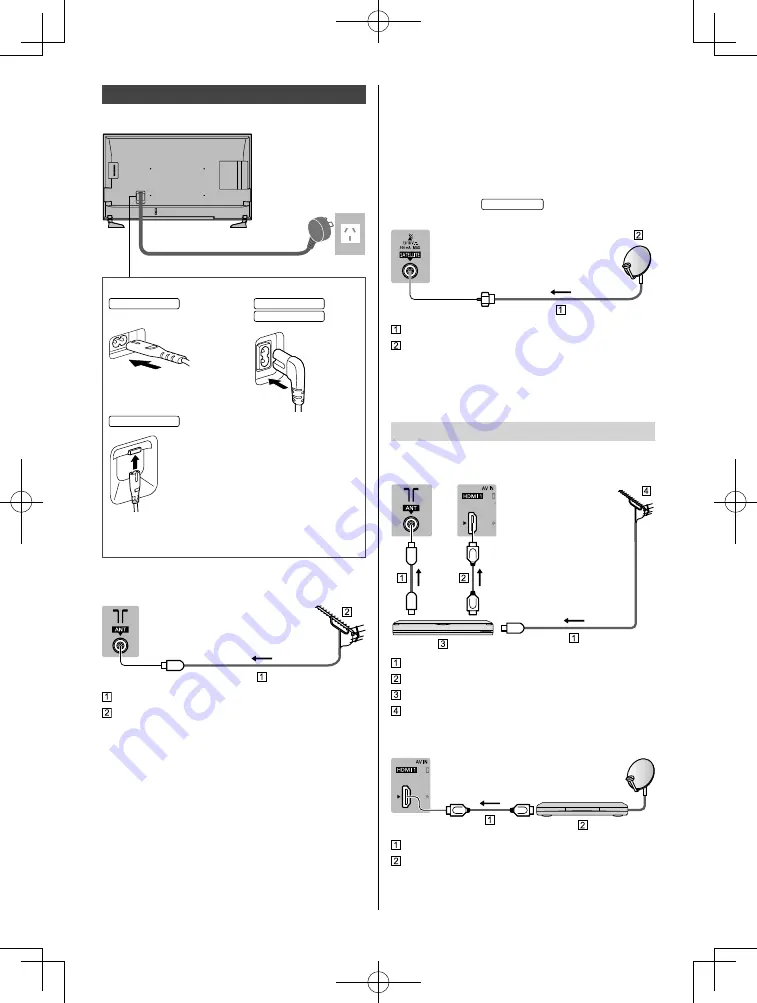
Panasonic VIERA TH-40ES500A Скачать руководство пользователя страница 16

English

16

 Basic connections


  Mains lead


 AC 220-240 V

 50 / 60 Hz

 Mains lead

 Insert the mains plug firmly into place.


32-inch model


40-inch model


55-inch model


49-inch model


● 

 When disconnecting the mains lead, be absolutely 
sure to disconnect the mains plug from the mains 
socket first.


  Aerial

 TV

 
   RF cable
   Aerial

● 

 For Digital TV, Analogue TV

● 

 Keep RF (aerial) cable away from the mains lead to 
avoid and minimise mains interference pickup.

● 

 Do not place the RF cable under the TV.

● 

 An aerial, correct cable (75 

 coaxial) and correct 

terminating plug are required to obtain optimum 
quality picture and sound.

● 

 If a communal aerial system is used, you may require 
the correct connection cable and plug between the 
wall aerial socket and the TV.

● 

 Your local Television Service Centre or dealer may 
be able to assist you in obtaining the correct aerial 
system for your particular area and the accessories 
required.

● 

 Any matters regarding aerial installation, upgrading 
of existing systems or accessories required, and 
the costs incurred, are the responsibility of you, the 
customer.


  Satellite dish 

New Zealand

 TV

 
   Satellite cable
   Satellite dish

● 

 For Satellite TV

● 

 To ensure your satellite dish is correctly installed, 
please consult your local dealer. Also consult the 
received satellite broadcasting companies for details.

 AV devices


  DVD Recorder / Blu-ray Recorder, etc.

 TV

 
   RF cable
   HDMI cable
   DVD Recorder / Blu-ray Recorder, etc.
   Aerial


  Set top box

 TV

 
   HDMI cable
   Set top box

Содержание VIERA TH-40ES500A

Страница 1: ...s manual before use The images shown in this manual are for illustrative purposes only For more detailed instructions please refer to eHELP Built in Operating Instructions How to use eHELP p 23 M0317...

Страница 2: ...anual unless otherwise mentioned Illustrations shown may be different between models and countries Contents Be Sure to Read Important Notice 3 Safety Precautions 4 Quick Start Guide Accessories 6 Conn...

Страница 3: ...he owner of the rights in the content you wish to record or playback This product is licensed under the AVC patent portfolio license for the personal and non commercial use of a consumer to i encode v...

Страница 4: ...the TV Only using furniture that can safely support the TV Ensuring the TV is not overhanging the edge of the supporting furniture Not placing the TV on tall furniture for example cupboards or bookcas...

Страница 5: ...in use for a long time Caution This TV will still consume some power even in the Off mode as long as the mains plug is still connected to a live mains socket Remove the mains plug from the wall socket...

Страница 6: ...orarily stop using the headphones Battery for the Remote Control Caution Incorrect installation may cause battery leakage corrosion and explosion Replace only with the same or equivalent type Do not m...

Страница 7: ...y not be placed all together Take care not to throw them away unintentionally Assembling Removing the pedestal 32 inch model Assembly screw 4 Assembly screw 4 M4 15 mm Bracket Base Preparations Take o...

Страница 8: ...r no measure can guarantee protection in all cases Attaching the fall prevention parts Band Screw Wood screw Base L L Base R R Preparations Take out the pedestal and the TV from the packing case and p...

Страница 9: ...soft cloth blanket etc Use a flat and firm table bigger than the TV Do not hold the screen panel part Make sure not to scratch or break the TV Assembling the pedestal Select a method to assemble the p...

Страница 10: ...English 10 2 3 B 4 G 49 inch model Style1 1 A C A D E F...

Страница 11: ...English 11 2 3 B 4 G 49 inch model Style2 1 A C A D E F...

Страница 12: ...English 12 2 3 B 4 G 55 inch model Style1 1 A C A D E F...

Страница 13: ...English 13 2 3 B 4 G 55 inch model Style2 1 A C A D E F...

Страница 14: ...screws from the TV 4 Pull out the pedestal from the TV 5 Remove the assembly screws from the bracket Preventing the TV from falling over It is recommended to secure the pedestal to a furniture as sho...

Страница 15: ...e Keep the TV away from electronic equipment video equipment etc or equipment with an infrared sensor otherwise distortion of image sound may occur or operation of other equipment may be affected Plea...

Страница 16: ...is used you may require the correct connection cable and plug between the wall aerial socket and the TV Your local Television Service Centre or dealer may be able to assist you in obtaining the correc...

Страница 17: ...r Game equipment VIDEO equipment TV Viewing Listening Camcorder Game equipment Amplifier listening with external speakers Use HDMI2 to connect the TV to an amplifier which has ARC Audio Return Channel...

Страница 18: ...English 18 VIERA Link Use HDMI1 3 for VIERA Link connection For details refer to eHELP Search by Purpose Functions VIERA Link HDAVI Control...

Страница 19: ...o 16 Subtitle Audio Description Displays Audio Description Subtitle Menu 17 Exit Returns to the normal viewing screen 18 HOME Displays Home Screen For details refer to eHELP Search by Purpose Read fir...

Страница 20: ...turn Off the apparatus completely you must pull the mains plug out of the mains socket Standby On Installing Removing batteries Pull open Hook Note the correct polarity or Close Indicator Control pan...

Страница 21: ...V Tuning Menu Setup Menu To add the available TV signal mode later Add TV Signal in Tuning Menu Setup Menu To initialise all settings Shipping Condition in System Menu Setup Menu First time Auto Tunin...

Страница 22: ...ure and the setup of APPS List follow the on screen instructions or refer to eHELP Search by Purpose Home Screen APPS List Operations Turn power on TV or Remote Control Mains power On Off switch shoul...

Страница 23: ...xplanation for a better understanding of the operation of each feature 1 Display eHELP or Help eHELP If the eHELP has been accessed previously since the TV was turned on the confirmation screen is dis...

Страница 24: ...al receiver Situate the TV away from sunshine or other sources of bright light so they do not shine on the TV s remote control signal receiver No image is displayed Check the TV is turned on Check the...

Страница 25: ...cket Display panel Cabinet Pedestal Regular care Gently wipe the surface of the display panel cabinet or pedestal by using a soft cloth to remove dirt or fingerprints For stubborn dirt 1 First clean t...

Страница 26: ...eption New Zealand 8 MHz VHF UHF New Zealand free to air TV broadcast reception PAL B G Reception of Off air broadcast PAL 60 Hz Playback of NTSC tape from some PAL Video recorders VCR M NTSC Playback...

Страница 27: ...lation and usage instructions Do not mount the unit directly below ceiling lights such as spotlights or halogen lights which typically give off high heat Doing so may warp or damage plastic cabinet pa...

Страница 28: ......

Страница 29: ......

Страница 30: ......

Страница 31: ...for the name address of the nearest Authorised Service Centre Send or take the product to a Panasonic Authorised Service Centre together with your proof of purchase receipt as a proof of purchase date...

Страница 32: ...provided below and retain this book plus your purchase receipt as a permanent record of your purchase to aid in identification in the event of theft or loss and for Warranty Service purposes Model Num...

Отзывы: