19
9.2.
Disassembly Procedure for the Unit
9.2.1.
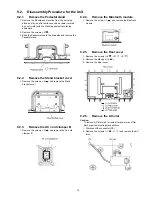
Remove the Pedestal stand
1. Remove the Plasma panel section from the servicing
stand and lay on a flat surface such as a table (covered
by a soft cloth) with the Plasma panel surface facing
downward.
2. Remove the screws (
×
4 ).
3. Slide the Pedestal stand to the downside and remove the
Pedestal stand.
9.2.2.
Remove the Stand bracket cover
1. Remove the screws (
×
4
) and remove the Stand
bracket cover.
9.2.3.
Remove the AC cord clamper B
1. Remove the screws (
×
2
) and remove the AC cord
clamper B.
9.2.4.
Remove the Bluetooth module
1. Remove the screw (
×
1
) and remove the Bluetooth
module.
9.2.5.
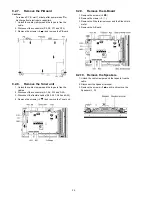
Remove the Rear cover
1. Remove the screws (
×
6 ,
×
21 ,
×
2 ).
2. Remove the M8 caps (
×
4 ).
3. Remove the Rear cover.
9.2.6.
Remove the AC inlet
Caution:
To remove AC inlet wait 1 minute after power was off for
discharge from electrolysis capacitors.
1. Disconnect the connector (P9).
2. Remove the screws (
×
1 ,
×
1
) and remove the AC
inlet.
Содержание Viera TC-P60UT50
Страница 32: ...32 ...
Страница 34: ...34 12 3 Wiring 2 ...
Страница 35: ...35 12 4 Wiring 3 ...
Страница 36: ...36 12 5 Wiring 4 ...
Страница 37: ...37 12 6 Wiring 5 ...
Страница 38: ...Model No TC P60UT50 Schematic Diagram Note S 1 ...
Страница 39: ...Model No TC P60UT50 Replacement Parts List Note S 2 ...
Страница 40: ...Model No TC P60UT50 A Board 1 15 S 3 ...
Страница 41: ...Model No TC P60UT50 A Board 2 15 S 4 ...
Страница 42: ...Model No TC P60UT50 A Board 3 15 S 5 ...
Страница 43: ...Model No TC P60UT50 A Board 4 15 S 6 ...
Страница 44: ...Model No TC P60UT50 A Board 5 15 S 7 ...
Страница 45: ...Model No TC P60UT50 A Board 6 15 S 8 ...
Страница 46: ...Model No TC P60UT50 A Board 7 15 and K Board S 9 ...
Страница 47: ...Model No TC P60UT50 A Board 8 15 S 10 ...
Страница 48: ...Model No TC P60UT50 A Board 9 15 S 11 ...
Страница 49: ...Model No TC P60UT50 A Board 10 15 S 12 ...
Страница 50: ...Model No TC P60UT50 A Board 11 15 S 13 ...
Страница 51: ...Model No TC P60UT50 A Board 12 15 S 14 ...
Страница 52: ...Model No TC P60UT50 A Board 13 15 S 15 ...
Страница 53: ...Model No TC P60UT50 A Board 14 15 S 16 ...
Страница 54: ...Model No TC P60UT50 A Board 15 15 S 17 ...
Страница 55: ...Model No TC P60UT50 C1 Board S 18 ...
Страница 56: ...Model No TC P60UT50 C2 Board 1 2 S 19 ...
Страница 57: ...Model No TC P60UT50 C2 Board 2 2 S 20 ...
Страница 58: ...Model No TC P60UT50 C3 Board 1 2 S 21 ...
Страница 59: ...Model No TC P60UT50 C3 Board 2 2 S 22 ...
Страница 60: ...Model No TC P60UT50 SC Board 1 3 S 23 ...
Страница 61: ...Model No TC P60UT50 SC Board 2 3 S 24 ...
Страница 62: ...Model No TC P60UT50 SC Board 3 3 S 25 ...
Страница 63: ...Model No TC P60UT50 SS Board 1 2 S 26 ...
Страница 64: ...Model No TC P60UT50 SS Board 2 2 and SS2 Board S 27 ...
Страница 65: ...Model No TC P60UT50 A Board Foil side S 28 ...
Страница 66: ...Model No TC P60UT50 A Board Component side S 29 ...
Страница 67: ...Model No TC P60UT50 K Board S 30 ...
Страница 68: ...Model No TC P60UT50 C1 Board S 31 ...
Страница 69: ...Model No TC P60UT50 C2 Board S 32 ...
Страница 70: ...Model No TC P60UT50 C3 Board S 33 ...
Страница 71: ...Model No TC P60UT50 SC Board Foil side S 34 ...
Страница 72: ...Model No TC P60UT50 SC Board Component side S 35 ...
Страница 73: ...Model No TC P60UT50 SS Board Foil side S 36 ...
Страница 74: ...Model No TC P60UT50 SS Board Component side S 37 ...
Страница 75: ...Model No TC P60UT50 SS2 Board S 38 ...
Страница 98: ...Model No TC P60UT50 Exploded View 1 S 61 ...
Страница 99: ...Model No TC P60UT50 Exploded View 2 S 62 ...
Страница 100: ...Model No TC P60UT50 Accessories S 63 ...


