background image

16

17

Quick Start 

Guide

 First 

T

ime 

Setup

 Press to return to 

the previous screen

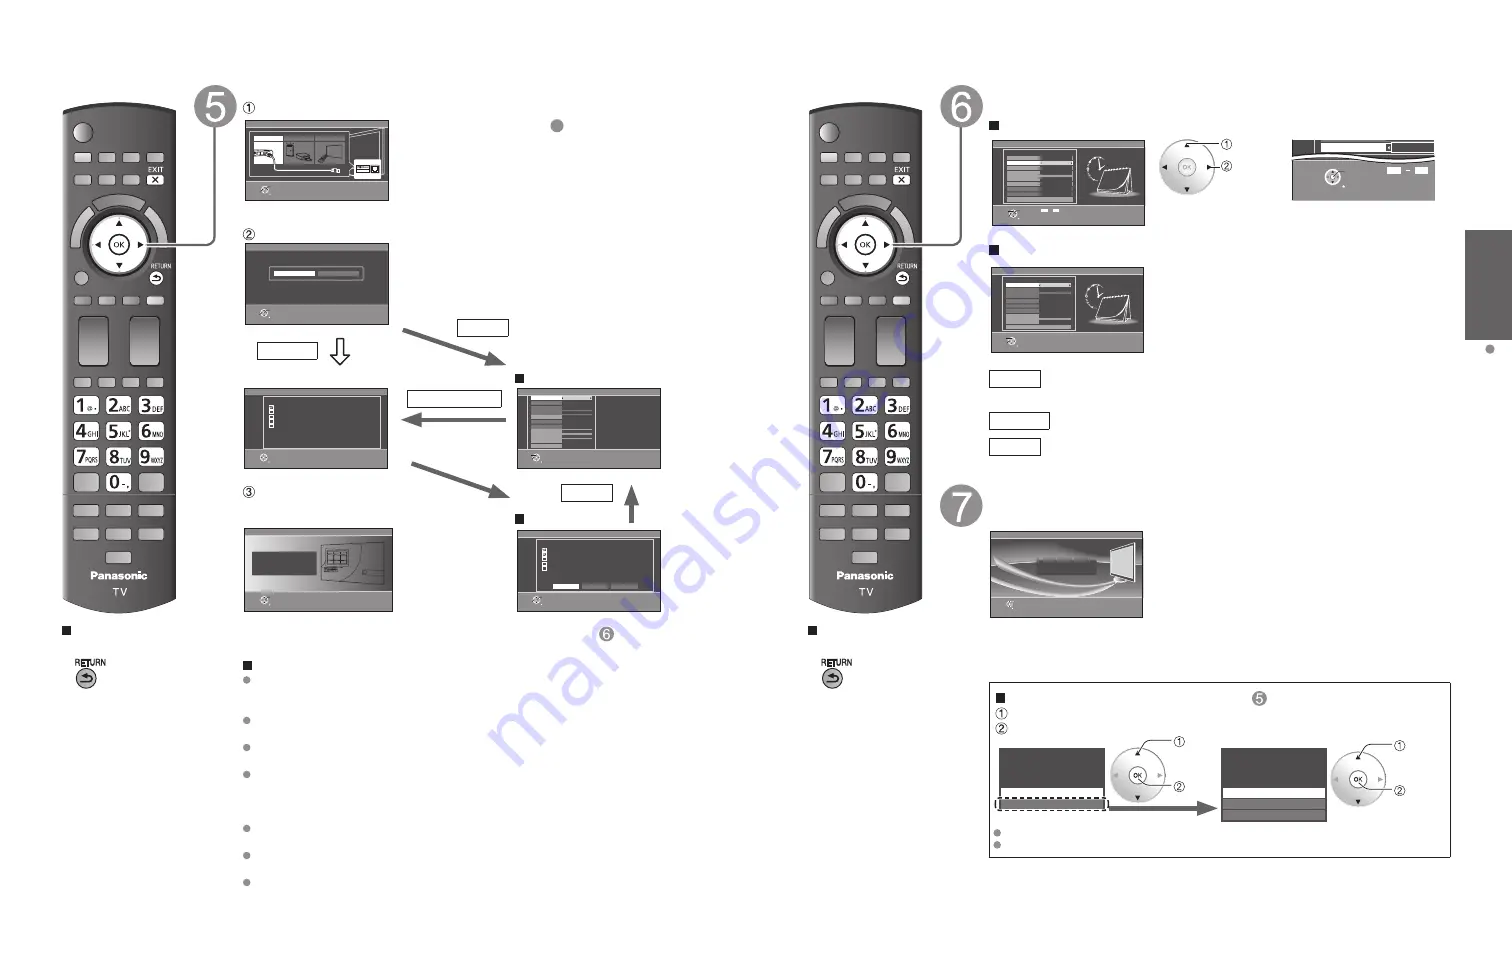
Configure Network settings

 Select the Network type

Network settings

Step 5 of 6

Checks for proper network connection, 

settings and communication to the Internet 

and server automatically.

RETURN

OK

Select

Automatic

Manual

Network settings

Step 5 of 6

Selects Ethernet cable or wireless network. If 
you select  “set later” and want  to repeat the 
Network settings, select  “Network settings” in 
the Setup Menu.

Ethernet cable

Wireless (WiFi)

Set later

RETURN

OK

Select

LAN

 Select the setting mode

Network settings

Connection test

Step 5 of 6

Check Ethernet cable connection
Validate IP address
Check for IP address duplication

Check connection to the Internet
Check communication with VIERA CAST server.

Test in progress...

RETURN

Start connection test

Connection test

Manual

Connection 
error

Network settings

Press OK to continue.

RETURN

OK

Network settings are complete.

You  can use VIERA CAST.

VIERA CAST lets you enjoy Internet 

contents on your VIERA TV.

Set later: 

Go to 

6


 You can set in “Setup” menu later.

Wireless (WiFi):  Start “Wireless network” (p. 17)

Automatic:  Press OK to start setup automatically.


 Error screen is displayed when 

Network connection has failed.

Manual: 

Go to Manual setting.

 Manual setting

 Error screen

 Complete “Network settings”

Helpful information is displayed when you  
successfully complete “Network settings”.

Network settings

Step 5 of 6

IP setting mode

Subnet mask

IP address

Default gateway

Primary DNS

DNS setting mode

Secondary DNS

Connect test

Proxy address
Proxy port

Automatic

255.255.255.0

192.168.0.4

192.168.0.1

192.168.0.1

Automatic

221.184.25.249

00-00-aa-cc-33-ab

RETURN

Change

Select

Mac address

Network settings

Connection test

Step 5 of 6

Try again?

Checks for proper network connection, 

settings and communication to the Internet 

and server.

Check Ethernet cable connection
Validate IP address
Check for IP address duplication

Check connection to the Internet
Check communication with VIERA CAST server.

Connection to local network (router) failed.
Ensure wireless network availability

Retry

Manual

Set later

RETURN

OK

Select

Manual

Automatic

Retry: Go to “Start connection test”
Set later: Go to 

 About wireless LAN

  Wireless LAN adapter and Access point need to be obtained separately.

For the latest information on applicable LAN adapters, check the following website: 
http://panasonic.jp/support/global/cs/tv/

  Check that the Access point supports WPS*. 

(If it does not support WPS, the encryption key of the Access point is required when configuring settings.)

  Follow the instructions on the Access point setup screen and configure the appropriate security settings.

For more details on setting of Access point, please refer to operating manual for the Access point.

  We recommend using 11n (5 GHz) for the wireless system between the wireless 

LAN adapter and Access point.
Communication is also possible with 11a, 11b, and 11g (2.4 GHz), but the 
communication speed may be slower.

  If the wireless system of the Access point is changed, devices that could connect by 

wireless LAN may no longer be able to connect.

  When VIERA CAST or other device is using the network, do not disconnect the 

wireless LAN adapter.

  Keep the TV away from the following devices as much as possible:

Wireless LAN, Microwaves, and other devices that use 2.4 GHz and 5 GHz signals. 
Otherwise, the TV failures such as malfunction may occur due to the radio wave interference.

* WPS: Wi-Fi Protected Setup

First Time Setup 

(Continued)

 Press to return to 

the previous screen

Adjust the Clock (Set clock) 

Select NEXT then press OK to go to the next step.

 Manual setting

Set clock

Step 6 of 6

Current year.

Year

Mode

Hour

Month

Minute

- - -

Manual

- - -

-  -  -

- - -

- - -

DST

Time zone

Next

RETURN

Edit

Select

Change

Day

0

-

9

Follow the instructions on 

screen to complete the 

following operations.

 select

 set

RETURN

OK

0

DST

Minutes

10

or

 Auto setting

Set clock

Step 6 of 6

Year

Mode

Month

Hour

Day

Minute

Auto

DST

Time zone

Next

RETURN

Select

EST

Off

Change

Mode

Manual: Adjust the clock manually (Year/Month/Day/Hour/Minute)

Auto: The clock is adjusted automatically via Internet service. Only 

available when the TV is on a network. -->Set “Network settings” first.

Time zone Select your time zone. (EST/CST/MST/PST/AKST/HST/NST/AST)

DST

Set DST (Daylight Saving Time) setting. (On/Off)

On: Advances the clock one hour from the time it is set according to the time 

zone.

Complete First time setup 

Completion message is displayed when you have successfully completed the 

First time setup.

OK

RETURN

Press OK to exit.

Setup is complete.

Enjoy your Panasonic VIERA TV.

 Wireless network (First time setup) in 

 Display “Wireless network”
 Select the connection method

Wireless network

WPS (Wi-Fi Protected Setup using push button)

Other

Please choose a connection method.

 select

 OK

Wireless network

Search for wireless networks

WPS (Wi-Fi Protected Setup using PIN number)
Manual settings

Please choose a connection method.

 select

 OK

  Follow the directions on screen to complete the setting.

  See page 41 for more information.

Содержание VIERA TC-P50G25X

Страница 1: ...lustrative purposes only Model No TC P50G25X English Customer s Record The model number and serial number of this product can be found on its back cover You should note this serial number in the space provided below and retain this book plus your purchase receipt as a permanent record of your purchase to aid in identification in the event of theft or loss and for Warranty Service purposes Model Nu...

Страница 2: ... obtained from a video provider licensed to provide AVC Video No license is granted or shall be implied for any other use Additional information may be obtained from MPEG LA LLC See http www mpegla com Experience an amazing level of multimedia excitement Enjoy rich multimedia USB device Personal computer Amplifier Home theater system VCR DVD recorder Blu ray Disc recorder Camcorder Set Top Box Wat...

Страница 3: ...d can cause personal injury or even death if not installed correctly To prevent personal injury or death follow these warnings Install the Plasma TV in accordance with the manufacturer s recommended pedestal or stand corresponding hardware and installation instructions This Plasma TV is for use only with the following optional accessories Use with any other type of optional accessories may cause i...

Страница 4: ...nder these conditions might cause a fire or permanent damage to the TV Have the TV evaluated by an Authorized Service Center Servicing of the TV by unauthorized personnel is strongly discouraged due to its high voltage If water or an object gets inside the Plasma TV if the Plasma TV is dropped or if the enclosure becomes damaged unplug the power supply cord immediately A short circuit may occur wh...

Страница 5: ...ere are no electrical cables or pipes in the wall before hanging bracket When using the angled type wall hanging bracket please ensure that there is sufficient space for the connecting cables not to press against the wall when the TV is tilted forward For safety reasons remove units no longer being used from their wall mounted locations How to assemble p 9 Attaching Removing the pedestal Assemblin...

Страница 6: ...been made Back of the TV Cable TV AC 110 127 V 60 Hz VHF UHF Antenna or Accessories Optional Accessory Continued AC cord connection Antenna terminal Pin terminals HDMI terminal green blue red green Firmly tighten by hand Match colors of plugs and terminals Insert firmly Insert firmly Reference of connection Cable You need to subscribe to a cable TV service to enjoy viewing their programming You ca...

Страница 7: ...pment s connections please refer to the operating manuals for the equipment Basic Connection Continued To use HDMI terminals HDMI AV OUT e g Blu ray Disc player AV Equipment Connecting to HDMI terminals will enable you to enjoy high definition digital images and high quality sound The HDMI connection is required for a 1080p signal For VIERA LinkTM connections please refer to p 35 To use COMPONENT ...

Страница 8: ...NT Cable setup Select the connected Antenna in terminal ANT Cable setup Step 3 of 6 Select Not used when viewing TV via Satellite receiver or Cable box Note Select Cable when viewing via Cable DTA Box Antenna Cable In Cable Antenna Not used ANTENNA Cable In RETURN OK Select select OK Not used Go to Label inputs Select Not used when no wire is connected to the Antenna Cable terminal Typical when a ...

Страница 9: ...cs tv Check that the Access point supports WPS If it does not support WPS the encryption key of the Access point is required when configuring settings Follow the instructions on the Access point setup screen and configure the appropriate security settings For more details on setting of Access point please refer to operating manual for the Access point We recommend using 11n 5 GHz for the wireless ...

Страница 10: ...on character keys as remote control keys Key chart Keyboard key Remote key Keyboard key Remote key UP DOWN LEFT RIGHT Cursor key F4 Input Enter OK F5 Channel Down BackSpace Return when you do not input character F6 Channel up 0 9 0 9 F7 Volume Down F1 Menu F8 Volume up F2 VIERA Tools F9 Red F10 Green F11 Blue F12 Yellow Color key Red Blue Yellow Green F3 Submenu For more details on setting and ope...

Страница 11: ...annels 1 3 26 1 1 2 3 4 5 select or 3 Set a Favorite channel Favorite channels 1 3 26 1 1 2 3 4 5 OK To change the page Press repeatedly to change between pages 1 3 2 3 3 3 or exit Changes the page forward backward Using VIERA TOOLS VIERA TOOLS is the easy way to access frequently used menu items They are displayed as shortcut icons on the TV screen Unlike a conventional menu you can enjoy using p...

Страница 12: ... and Size etc Information differs depending on selected data Settings p 25 Photo settings Movie options Music options Mixed media options select OK Press to exit from a menu screen Press to return to the previous screen Insert a Media SD card or USB flash memory This setting will be skipped next time unless you select Set later SD card only Set Image viewer settings Select Play image viewer now Se...

Страница 13: ...Link function Photo settings Picture Audio VIERA Link Slideshow settings SD Card USB select select next select change Recorder TV VIERA Link control Speaker output Record now Stop recording VIERA Link p 38 SD Card USB select SD USB1 USB2 Set select change Return OK Select Connected SD Card example Slideshow settings Fast Off Off Off Sepia Zoom Off Off Slideshow settings Display interval Repeat pla...

Страница 14: ...he TV and you have only one TV set you may choose a wired connection If the Cable DSL modem is far from the TV and or you have more TVs in the house you may want to use a wireless network Connecting to the internet A Basic connection If you are not using the network for connecting anything else but the TV you could just connect the TV directly to the Cable DSL Ethernet connection see schematic bel...

Страница 15: ...9 If there is no input terminal with GAME label you cannot switch the input terminal to any other input terminal than the one currently selected Video 2 GAME HDMI 3 GAME HDMI 1 GAME Operate the connected equipment using the remote control supplied with the equipment Note For details see the manual for the connected equipment If you connect equipment that has the HDAVI Control function to the TV us...

Страница 16: ... of the PC connected to the unit can be displayed on the TV You can also listen to PC sound with the audio cable connected To connect PC p 51 Display the Input select menu Input select TV 1 2 3 4 5 6 7 8 Component 1 Component 2 HDMI 1 HDMI 2 HDMI 3 Video 1 Video 2 9 PC AUX GAME GAME GAME Select PC PC Displays PC screen Corresponding signals p 57 To return to TV PC menu setting change as desired Ma...

Страница 17: ...Menu list Menu Item Adjustments Configurations alternatives Lock Locks the channels and programs p 44 Closed caption Closed caption Displays subtitles Closed caption p 48 Setup Channel surf mode Sets the mode to select the channel with the Channel up down button All Favorite Digital only Analog only Favorite Only channels registered as FAVORITE p 20 Language Selects the screen menu language Clock ...

Страница 18: ...s Follow the connection diagrams below for HDAVI control of a single piece of AV equipment such as a DVD recorder DIGA Home theater system Refer to page 36 39 for Setup Menu settings and additional control information Optional HDMI and or optical cables are not included If connection or setting of equipment compatible with HDAVI control is changed switch the power of this unit Off and On again whi...

Страница 19: ...ble When TV is turned off all connected VIERA Link compatible equipment is moved to ECO Standby mode automatically under above conditions Minimum power consumption of Standby condition for the equipment Unselected device energy save for HDAVI Control 2 or later Condition Unselected device energy save Yes The equipment has HDAVI Control 2 or later for available equipment only connected with an HDMI...

Страница 20: ...1 If there is more than one equipment item a number after the name indicates the number of items e g Recorder 1 Recorder 2 Recorder 3 The number of equipment items that can be connected is three for recorders and a total of three for Home theater Player Camcorder LUMIX Digital camera Note There is a limit to the number of HDMI connectors Recorder TV VIERA Link control Speaker output Record now Sto...

Страница 21: ...ss Wireless network displayed screen only when No adapter or None is displayed Set the following connection Please select the connection with your wireless LAN adapter and Access point Follow the directions on screen to complete the setting Wireless network WPS Wi Fi Protected Setup using push button Please choose a connection method WPS Wi Fi Protected Setup using PIN number Search for wireless n...

Страница 22: ...automatic acquisition in DHCP can be used Menu IP address DNS settings IP setting mode IP setting mode Automatic Manual Default gateway 192 168 0 254 DNS setting mode OK Primary DNS 192 168 0 20 Automatic Secondary DNS 192 168 0 21 The acquired address is displayed select OK Primary DNS 10I 0 0 0 0 select OK or Each IP address is acquired automatically If you are using a broadband router IP automa...

Страница 23: ... E L R Canadian English ratings C F L R Canadian French ratings VIERA CAST lock VIERA CAST lock Locks VIERA CAST Select VIERA CAST in 5 and set to On When you press VIERA CAST the VIERA CAST Lock screen is displayed Type the correct password to enter the Home screen select set On Locks Off Unlocks Change password To change the password In select Change password and press OK Input the new 4 digit p...

Страница 24: ...it Caption Favorite Add next Caption Changes the station identifier Favorite Registers channels to the Favorite List Add Adds or skips channels To cancel the Edit Manual program Edit Cancel Apply Caption Favorite Add 2 Yes 3 Yes 4 Yes 5 Yes Channel select next Changes will be lost Continue Yes No OK returns to ANT Cable setup select Yes Signal meter Check signal strength Check the signal strength ...

Страница 25: ...it from a menu screen Display the menu Select Closed caption Menu Primary CC1 On Closed caption Digital Mode Analog Digital setting Reset to defaults Display broadcast TV s Closed Caption CC text when available next select Closed caption Display Closed caption The television includes a built in decoder that is capable of providing a text display of the audio The program being viewed must be transm...

Страница 26: ...es or as specified 4 18 SUN Day On time Off time 12 0 LAST AM PM Clear 9 OK RETURN Select SUN MON TUE WED THU FRI SAT displays the nearest future date MON FRI SAT SUN DAILY Every SUN Every MON Every TUE Every WED Every THU Every FRI Every SAT Select the channel Channel Select the day Day The time to turn On On time The time to turn Off Off time Select the inputs Inputs Timer setting Off On Timer s...

Страница 27: ...his program may include mild physical or comedic violence or may frighten children under the age of 7 Guidance TV G Viewable Blocked General audience It contains little or no violence no strong language and little or no sexual dialogue or situations TV PG D L S V all selected Any combination of D L S V Parental guidance suggested The program may contain infrequent coarse language limited violence ...

Страница 28: ...nds when playback starts Image or sound may not be available for the first few seconds when input mode is switched Volume function will be displayed when adjusting the volume of the equipment If you connect equipment that has HDAVI Control 2 or later function to the TV with an HDMI cable the sound from the DIGITAL AUDIO OUT terminal can be output as multi channel surround HDAVI Control 5 is the ne...

Страница 29: ...imes the amount of water and then wring the cloth to remove excess liquid Use this cloth to wipe the surface of the display panel then wipe it evenly with a dry cloth of the same type until the surface is dry Do not scratch or hit the surface of the panel with fingernails or other hard objects Furthermore avoid contact with volatile substances such as insect sprays solvents and thinner otherwise t...

Страница 30: ...ound connection has a problem select analog sound connection Problem Actions VIERA logo moves on the screen Screen Some spots remain bright or dark Chaotic image noisy No image is displayed on screen Only spots are displayed instead of images Neither image nor sound is produced The function to prevent Image retention is activated Not a faulty symptom The screen saver is activated if the TV unit is...

Страница 31: ...RCA PIN Type 2 0 5 V rms COMPONENT IN 1 2 Y 1 0 V p p including synchronization PB PR 0 35 V p p AUDIO L R RCA PIN Type 2 0 5 V rms HDMI 1 3 TYPE A Connector 3 This TV supports HDAVI Control 5 function USB 1 2 USB 2 0 Type A connector x 2 DC5V MAX500mA PC D SUB 15PIN R G B 0 7 V p p 75 Ω HD VD 1 0 5 0 V p p high impedance LAN for VIERA CAST IPTV RJ45 10BASE T 100BASE TX Card slot SD CARD slot 1 DI...

Отзывы: