Auto T
uning
12
TV
INFO
RETURN
Y
POWER
jk l
ghi
mno
tuv
pqrs
wxyz
abc
def
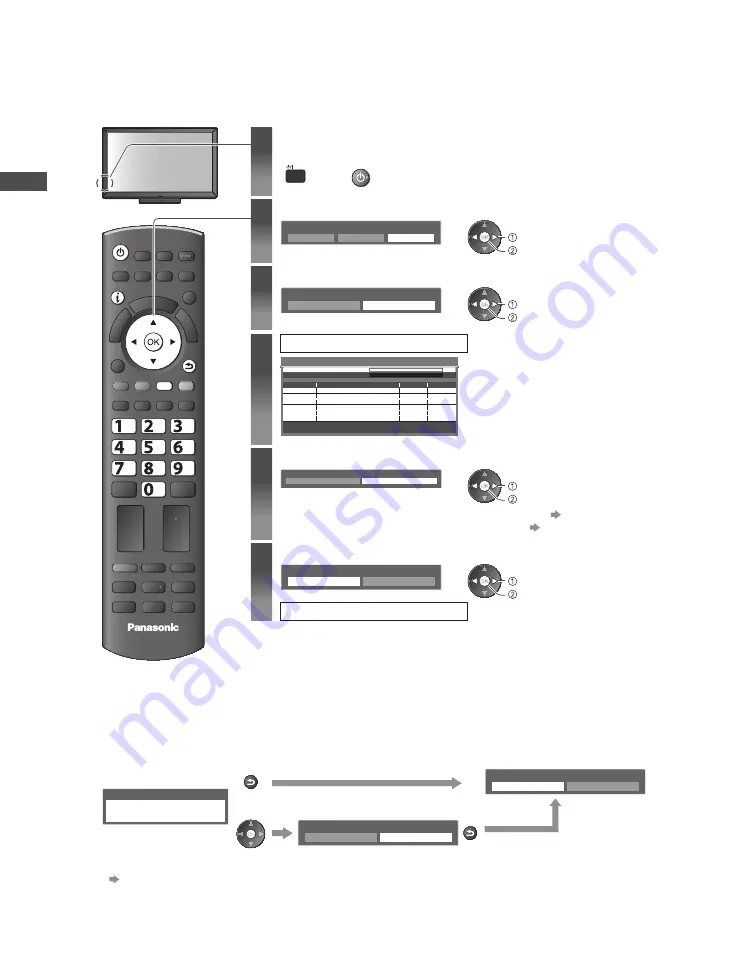
Auto Tuning
Search and store TV channels automatically.
•
These steps are not necessary if the setup has been completed by your local dealer.
1
Turn the TV On with the POWER button
POWER
(TV)
or
(Remote)
2
Select your language
Idioma do menu
English
Português
Español
set
select
3
Select the antenna input type
ANT in
Cable
Antenna
set
select
4
Auto Tuning starts
Analogue Scan
21
68
Analogue Scan
68
Auto Tuning - Digital TV and Analogue
Digital TV Scan
Searching
CH
16
16
16
Channel Name
service 7
service 8
service 5
Type
Digital TV
Digital TV
Digital TV
Quality
10
10
10
This will take about 6 minutes.
Digital TV: 11
Analogue TV: 0
Analogue TV Scan
CH 2
69
CH 7
69
69
69
69
DIGITAL !!07.2
DIGITAL !!07.2
service name max20
Digital TV
Digital TV
Digital TV
10
10
10
•
Auto Tuning will start to search for
TV channels and store them.
The sorted channel order depends
upon the TV signal, the broadcasting
system and reception conditions.
5
Set up the wireless LAN connection
Start wireless LAN connection setup?
Yes
No
confirm
select
•
You can setup the wireless LAN connection later. (p. 50)
•
If you want to select [Yes] in this position. (p. 13)
6
Select [Home]
Please select your viewing environment.
Home
Shop
∗
confirm
select
Auto Tuning is completed
∗
Viewing environment mode
Home : Recommended mode for viewing at home. Select [Home] for optimal picture / power
consumption. [Viewing Mode] is set as [Normal] (p. 23).
Shop : Demonstration mode to explain main features of this TV (for in-store display). [Viewing Mode] is
set as [Dynamic] (p. 23).
To return to viewing environment selection mode if you selected [Shop]
Shop
You have selected shop mode
RETURN
Please select your viewing environment.
Home
Shop
Automatic Demo
Off
On
RETURN
•
To change viewing environment mode later on, reset all settings by accessing Shipping Condition.
[Shipping Condition] (p. 35)


