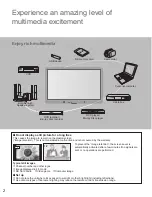
background image

6

CEA CHILD SAFETY NOTICES

WARNING

Flat panel displays are not always supported on the 
proper stands or installed according to the manufacturer’s 
recommendations. Flat panel displays that are inappropriately 
situated on dressers, bookcases, shelves, desks, speakers, 
chests or carts may fall over and may cause personal injury or 
even death. 

The consumer electronics industry (of which Panasonic is 
a member) is committed to making home entertainment 
enjoyable and safe. To prevent personal injury or death, be 
sure to follow the following safety guidelines: 

TUNE INTO SAFETY: 

•  One size does NOT fit all.  Follow the manufacturer’s 

recommendations for the safe installation and use of your 
flat panel display. 

•  Carefully read and understand all enclosed instructions for 

proper use of this product. 

•  Don’t allow children to climb on or play with furniture and 

television sets. 

•  Don’t place flat panel displays on furniture that can easily be 

used as steps, such as a chest of drawers. 

•  Remember that children can become excited while watching 

a program, especially on “larger than life”  flat panel 
displays.  Care should be taken to install the display where it 
cannot be pushed, pulled over, or knocked down. 

•  Care should be taken to route all cords and cables 

connected to the flat panel display so that they cannot be 
pulled or grabbed by curious children. 

WALL MOUNTING:

 IF YOU DECIDE TO WALL MOUNT 

YOUR FLAT PANEL DISPLAY, ALWAYS: 
•  Use a mount that has been recommended by the display 

manufacturer and/or listed by an independent  laboratory 
(such as UL, CSA, ETL). 

•  Follow all instructions supplied by the display and wall 

mount manufacturers. 

•  If you have any doubts about your ability to safely 

install your flat panel display, contact your retailer about 
professional installation. 

•  Make sure the wall where you are mounting the display 

is appropriate.  Some wall mounts are not designed to 
be mounted to walls with steel studs or old cinder block 
construction.  If you are unsure, contact a professional 
installer. 

•  A minimum of two people are required for installation.  Flat 

panel displays can be heavy. 

Panasonic recommends that a qualified installer perform 
the wall-mount installation. See page 4.

The American Academy of Pediatrics discourages 
television viewing for children younger than two years 
of age.

WARNING/CAUTION (3D Eyewear)

WARNING


About Prevention of Accidental Ingestion


Do not store batteries, the band accessory or nose 
pads in places where small children can reach.

  There is a danger small children could swallow such parts 

by mistake.

•  If a child accidentally swallows such parts, seek 

immediate medical attention.


About Prohibition of Disassembly


Do not disassemble or modify the 3D Eyewear.


About lithium battery


Batteries must not be exposed to excessive heat such 
as sunshine, fire or the like.

CAUTION


About 3D Eyewear


 Do not drop, exert pressure on, or step on the 3D 
Eyewear.

  Doing so may damage the glass section, which may result 

in injury.

•  Always store the 3D Eyewear in the case provided when 

not in use.


Be careful of the tips of the frame when putting on the 
3D Eyewear.

  Accidentally inserting the tip of the frame into the eye may 

cause injury.


Be careful not to trap a finger in the hinge section of the 
3D Eyewear.

  Doing so may result in injury.

•  Pay special attention when children are using this product.


About Use of 3D Eyewear


Parents/guardians should monitor children’s viewing 
habits to avoid their prolonged use without rest 
periods.


Use only the 3D Eyewear recommended for this TV.


Only use the 3D Eyewear for the specified purpose.


Do not move around while wearing the 3D Eyewear.

  The surrounding area appears dark, which may result in 

falling or other accidents that may cause injury.


About Viewing of 3D Images


In the event that you experience dizziness, nausea, or 
other discomfort while viewing 3D images, discontinue 
use and rest your eyes.

•  When you set the effect by using “3D adjustment”, take 

into account that the vision of 3D images varies among 
different individuals.


Do not use if the 3D Eyewear is cracked or broken.


About lithium battery


Danger of explosion if battery is incorrectly replaced.
Replace only with the same or equivalent type.

Содержание Viera TC-65PST34

Страница 1: ...Puerto Rico llame al 1 877 95 VIERA 958 4372 www panasonic com help Gracias por su decisión de comprar este producto marca Panasonic Lea estas instrucciones antes de utilizar su televisor y guárdelas para consultarlas en el futuro Las imágenes mostradas en este manual tienen solamente fines ilustrativos Model No Número de modelo TC 65PST34 Español English Thank you for purchasing this Panasonic pr...

Страница 2: ...cal still images Channel number and other logos Image displayed in 4 3 mode SD Card photo Video game Computer image Set up Do not place the unit where it s exposed to sunlight or other bright light including reflections Use of some types of fluorescent lighting may reduce the remote control s transmission range Experience an amazing level of multimedia excitement SD memory card Camcorder Amplifier...

Страница 3: ... consumer engaged in a personal and non commercial activity and or was obtained from a video provider licensed to provide AVC Video No license is granted or shall be implied for any other use Additional information may be obtained from MPEG LA LLC See http www mpegla com See page 62 for more information Watching TV 19 Using VIERA TOOLS 22 Watching content from external devices 23 Viewing 3D images...

Страница 4: ...to qualified service personnel Servicing is required when the apparatus has been damaged in any way such as power supply cord or plug is damaged liquid has been spilled or objects have fallen into the apparatus the apparatus has been exposed to rain or moisture does not operate normally or has been dropped 15 To prevent electric shock ensure the grounding pin on the AC cord power plug is securely ...

Страница 5: ...ed in the socket outlet Do not place a heavy object on the cord or place the cord near a high temperature object Do not twist the cord bend it excessively or stretch it Do not pull on the cord Hold onto the power plug body when disconnecting cord Do not use a damaged power plug or socket outlet If a problem occurs such as no picture or no sound or if smoke or an abnormal odor is detected from the ...

Страница 6: ...nal installer A minimum of two people are required for installation Flat panel displays can be heavy Panasonic recommends that a qualified installer perform the wall mount installation See page 4 The American Academy of Pediatrics discourages television viewing for children younger than two years of age WARNING CAUTION 3D Eyewear WARNING About Prevention of Accidental Ingestion Do not store batter...

Страница 7: ...of North America One Panasonic Way Secaucus NJ 07094 Contact Source Panasonic Consumer Electronics Company 1 877 95 VIERA 958 4372 email consumerproducts panasonic com This device complies with Part 15 of FCC Rules and RSS Gen of IC Rules Operation is subject to the following two conditions 1 This device may not cause harmful interference and 2 this device must accept any interference received inc...

Страница 8: ...ation Screw for fixing the TV onto the wall hanging bracket not supplied with the TV Depth of screw minimum 0 67 17 0 mm maximum 0 87 22 0 mm View from the side a b M8 Warning In order to maintain the TV s performance and safety be absolutely sure to ask your dealer or a licensed contractor to secure the wall hanging brackets Carefully read the instructions accompanying optional accessories and be...

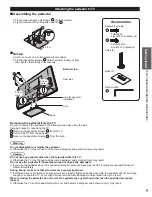
Страница 9: ...he assembly screws A from the pole Warning Do not disassemble or modify the pedestal Otherwise the TV may fall over and become damaged and personal injury may result Caution Do not use any pedestal other than that provided with this TV Otherwise the TV may fall over and become damaged and personal injury may result Do not use the pedestal if it becomes warped or physically damaged If you use the p...

Страница 10: ...g in damage to the remote control Do not mix old and new batteries Do not mix different battery types such as alkaline and manganese batteries Do not use rechargeable Ni Cd batteries Do not burn or break batteries Power cord connection To attach To remove Insert it firmly until the tabs on both sides click into place Keep pushing both sides until they snap and pull ...

Страница 11: ...colors of plugs and terminals Insert firmly Insert firmly Connection references Antenna or Cable connection Cable You need to subscribe to a cable TV service to enjoy viewing their programming You may need to subscribe to a high definition HD cable service to enjoy HD programming The connection for high definition can be done with the use of an HDMI or Component Video cable p 12 Note When using a ...

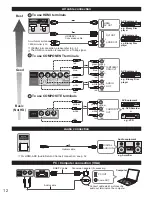
Страница 12: ...inals L R Y PB PR AUDIO OUT COMPONENT VIDEO OUT white red green blue red white red green blue red white red green blue red e g Blu ray Disc player AV Equipment To use COMPOSITE terminals L R COMPOSITE OUT yellow white red yellow white red yellow white red or e g DVD Recorder AV Equipment e g VCR DIGITAL AUDIO IN e g Amplifier Audio equipment For HDMI ARC Audio Return Channel connection see p 32 Op...

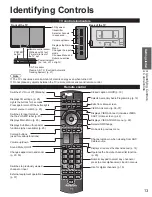
Страница 13: ... input External equipment operations p 37 Closed caption On Off p 19 Selects Secondary Audio Programming p 19 Exits from Menu screen VIERA Link menu p 36 37 Displays VIERA Connect includes VIERA CAST Home screen p 42 Displays VIERA TOOLS menu p 22 Selects OK Change Go back to previous menu Channel up down when viewing from ANT Cable source Displays or removes the channel banner p 19 Operates the F...

Страница 14: ...ect Yes the picture mode will regularly reset to Vivid and a Picture Refresh message will be displayed on the screen Yes select OK Select No and return to previous screen If you select Yes Screen enters the store demonstration mode To display the Set viewing mode screen again as shown above and select Home Use do one of the following Press and hold down the front POWER button for at least five sec...

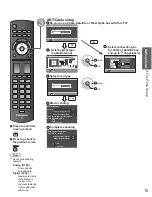
Страница 15: ... a Cable Satellite or Fiber Optic box with this TV No Yes Yes ANT Cable setup Step 4 of 7 Cable service No box Over the Air Antenna How does the TV receive its programming content Antenna Cable In Return OK Select Auto program Step 4 of 7 Return OK Select Yes No Start scanning for available channels in your area ANT Cable setup Step 4 of 7 Antenna Cable in VIDEO IN Antenna Cable In Which wiring me...

Страница 16: ...ck Ethernet cable connection Validate IP address Check for IP address duplication Check connection to the Internet Check communication with VIERA Connect server Test in progress RETURN Start connection test Connection test Manual Connection error Set later Go to You can set in Setup menu later Wireless WiFi Start Wireless network p 18 Automatic Press OK to start setup automatically Error screen is...

Страница 17: ... date and time 2011 4 5 6 00 AM Mode Manual Adjust the clock manually Year Month Day Hour Minute Auto The clock is adjusted automatically via Internet service Only available when the TV is on a network Set Network settings first Time zone Select your time zone EST CST MST PST AKST HST NST AST DST Set DST Daylight Saving Time setting On Off On Advances the clock one hour from the time it is set acc...

Страница 18: ...uctions on the Access point setup screen and configure the appropriate security settings For more details on setting of Access point please refer to operating manual for the Access point We recommend using 11n 5 GHz for the wireless system between the Wireless LAN Adapter and Access point Communication is also possible with 11a 11b and 11g 2 4 GHz but the communication speed may be slower If the w...

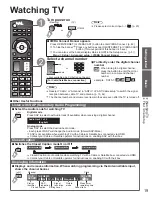
Страница 19: ... turned off Other Useful Functions Listen with SAP Secondary Audio Programming Select the Audio mode for watching TV Digital mode Press SAP to select next Audio track if available when receiving a digital channel Audio track 1 of 2 English Analog mode Press SAP to select the desired Audio mode Each press of SAP will change the Audio mode Stereo SAP Mono SAP is not available when watching TV with a...

Страница 20: ...vorites or type of channels to view when pressing the channel up down button Set favorite channel below Edit the channel identifier p 45 Check the signal strength p 45 All Setup SUB MENU Edit CH caption Signal meter Set favorite Channel surf mode Call up a favorite channel FAVORITE Channel numbers registered in Favorite are displayed on the favorite tune screen Select the desired broadcast station...

Страница 21: ...entering the password enter the password twice in order to register it Make a note of your password Do not forget it If you have forgotten your password consult your local dealer When you select a locked channel a message will be displayed that allows you to view the channel after you input your password Change password p 50 Operate USB keyboard You can operate non character keys as remote control...

Страница 22: ... the view 3D 2D p 25 VIERA Connect Displays VIERA Connect Home Screen for Enjoying Internet Services p 42 Media player Media player p 26 31 Game mode Change to Game mode Picture mode p 47 VIERA Link VIERA Link p 36 37 Eco mode ECO energy saving p 51 VIERA TOOLS is the easy way to access the TV s special features They are displayed as shortcut icons on the TV screen ...

Страница 23: ... no action is taken for several seconds the Input select menu disappears The terminal and label names of the connected equipment are displayed Note The input label will be displayed on the Input select screen if the Input label was customized For side input terminals HDMI 3 GAME Input label is set as default Press Game to switch to the game screen Switches to input terminal that has GAME label Cyc...

Страница 24: ...ommended distance For a 65 inch television 7 10 2 4 m or more Using the 3D Eyewear at a distance closer than the recommended distance may cause eyesight fatigue When the top and bottom area of the screen is blackened such as during some movies view the screen at a distance 3 times further than the height of the actual image That makes the distance closer than above recommended distance Viewing 3D ...

Страница 25: ...pth Medium Diagonal line filter Safety precautions Left Right swap Normal 3D adjustment Off Settings Item Description Auto detect 3D Auto 1 Switches to 3D display when 3D indication is available HDMI 3D AVCHD file etc Auto 2 Same as Auto 1 plus detects 3D signal by identifying similar image in side by side or top and bottom 3D formats Note choose 3D mode manually when auto detection is not availab...

Страница 26: ...ce select Slideshow Media select Info SD memory card OK Select RETURN Sort SUB MENU Photos Videos Music Media Select SD memory card OK RETURN Select Information panel s o t o h p l l A Photos r e y a l p a i d e M Media select Slideshow Drive select Info SD memory card OK Select RETURN Sort SUB MENU 1 70 File name 100 0001 jpg Date 15 04 2011 Size 640x480 Option menu s o t o h p l l A o t o h P r ...

Страница 27: ...ding on data storage conditions Select Title Folder Sort by Date 24 11 2009 01 12 2009 03 12 2009 20 12 2009 22 12 2009 23 10 2009 25 10 2009 01 11 2009 05 11 2009 10 11 2009 22 11 2009 23 11 2009 Media player Photos Media select Slideshow Drive select Info SD memory card OK Select RETURN Sort SUB MENU select OK e g Photos Select file s o t o h p l l A Photos r e y a l p a i d e M Media select Sli...

Страница 28: ...nsition effect shown between photos Off Fade in Wipe Wipe Wipe Wipe Slide in Slide in Slide in Slide in Zoom in Comb Comb Dissolve Checker wipe Motion Random Photo size Removes the black borders that are added according to the size of the photo being displayed Normal Zoom Burst playback Continuously plays photos that were shot On Off Display interval Set Display interval each image is displayed in...

Страница 29: ... or Photos view s o t o h p l l A Photos Multi shot 3D r e y a l p a i d e M Select Info SD memory card OK Select RETURN SUB MENU Select first s o t o h p l l A Photos Multi shot 3D r e y a l p a i d e M Select Info SD memory card OK Select RETURN SUB MENU Select second Select first photo and second photo with OK To select the second image the size and date must be the same as the first image exam...

Страница 30: ...re not supported in MKV file Video options Displayed menu will differ depending on contents Select Video options in Setup SUB MENU next Setup SUB MENU Video options Repeat playback Set play repeat function On Off select On Video options Repeat playback Compatible Data format for Media player SD card USB flash memory Media Compatible format Photo JPEG files DCF and EXIF standards Sub sampling 4 4 4...

Страница 31: ...e Guide and Banner Play Pause Stop Reverse Music options Select Music options in Setup SUB MENU next Setup SUB MENU Music options Repeat playback Set play repeat function Off Repeat Folder One song select On Music options Repeat playback Other settings in Media player Display Menu Select the item select OK Menu Picture Audio 3D settings VIERA Link Set Adjust the Picture Audio and 3D settings selec...

Страница 32: ...Audio Return Channel ARC is a function that enables digital sound signals to be sent via an HDMI cable back from the TV to a connected audio device When adding new equipment reconnecting equipment or changing the setup after the connection turn the equipment on and then switch the TV on Set the input mode to HDMI1 HDMI 2 or HDMI 3 p 23 and make sure that the image is displayed correctly VIERA Link...

Страница 33: ...inal then connect the camcorder to this input After connection confirm the HDAVI control functions p 34 37 HD Camcorder with VIERA Link function HDMI mini HDMI cable LUMIX with VIERA Link function If connection or setting of equipment compatible with HDAVI control is changed switch the power of this unit Off and On again while the power of all equipment is On so that the unit can correctly recogni...

Страница 34: ...ings in Setup Menu Setup 2 2 Advanced setup First time setup About Reset to defaults VIERA Link settings ECO energy saving Keyboard type U S select next Select VIERA Link On No Yes TV Quick start No stay on Menu VIERA Link settings VIERA Link Power on link Power off link Default speakers Energy saving mode Unselected device energy save select Select On default is On change Select and make other se...

Страница 35: ... be turned off automatically when not in use under these conditions The connected equipment has HDAVI Control 2 or later for available equipment only Example of timing for operation When the input is switched from the HDMI Default speakers TV is the default setting To set the Home theater system as Default speakers change the Default speakers setting from TV to Theater Sound will be output from th...

Страница 36: ...next Select the item Recorder TV VIERA Link control Speaker output Back to TV select Items in the VIERA Link menu may be grayed out if no compatible equipment is connected must be HDAVI Control 2 or later or if the equipment has not initiated a connection with the TV In that case switch the equipment s power Off and On while the TV is On For further details see VIERA Link on page 34 Select Home th...

Страница 37: ...g VIERA TOOLS p 22 select change You can select available items only Recorder TV VIERA Link control Speaker output Back to TV If there is more than one equipment item a number after the name indicates the number of items e g Recorder 1 Recorder 2 Recorder 3 The number of equipment items that can be connected is three for recorders and a total of three for Home theater Player Camcorder LUMIX Digita...

Страница 38: ...ired connection Directly connected If you are not using the network for connecting anything else but the TV you could just connect the TV directly to the Cable DSL Ethernet connection Wired connection Using Router If you are using the network for connecting various equipment and want to connect the TV you should use a router to connect the TV to the Internet Wireless connection If you are using th...

Страница 39: ...e Internet Check communication with VIERA Connect server Test in progress Complete Connection test Success Completion screen is displayed Error Follow the directions on screen to complete the setting If you perform the Proxy settings check the Proxy address and the Proxy port number Network connection Select Network type Ethernet cable Wireless WiFi Wireless network Confirm Current settings and st...

Страница 40: ...ss DNS settings IP setting mode IP address 192 168 0 5 Subnet mask 255 255 255 0 Default gateway 192 168 0 254 DNS setting mode Automatic DNS 192 168 0 20 Automatic The acquired address is displayed select OK Each IP address is acquired automatically If you are using a broadband router IP automatic acquisition in DHCP can be used under normal circumstances If you are not sure check with the person...

Страница 41: ...en Set Network camera setting Select RETURN OK Network cameras list Model Status Default Camera name BL C210A Connected Camera 1 Find cameras Delete Disconnect Default camera select For this operation please refer to the operating manual for the Network camera Start camera search Before you start to search for a camera switch the camera to registration mode Search condition also depends on Network...

Страница 42: ...Press to go back to the Home screen Preparations Network connections p 38 Network settings p 39 41 Display the Home screen Select the item and press OK MORE BACK select view Video communication e g Skype requires an exclusive Communication Camera TY CC10W p 8 This screen is an example It varies according to the usage conditions Depending on the usage conditions it may take a while to read all the ...

Страница 43: ... screen 1 9 Preset position Home position 1 9 0 Pan Tilt RETURN Single screen Camera name Camera 1 Model BL C210A Select OK RETURN 4 cam 8 cam Camera name Camera 1 Model BL C210A Multi screen 1 4 9 split screen select OK to Single screen Single screen Preset position Home position 1 9 0 Pan Tilt RETURN Navigation area 4 split screen select OK to Single screen Default camera setting p 41 Note A num...

Страница 44: ...fter the scanning is completed select Apply see p 45 All previously saved channels are erased Press to exit from a menu screen Display the menu Select Setup Menu Setup 1 2 ANT Cable setup Input labels Anti image retention Network settings Channel surf mode Language Clock All 3D settings next select Select ANT Cable setup Menu 3D settings Setup 1 2 ANT Cable setup Input labels Anti image retention ...

Страница 45: ...N D A Select Delete ABC abc or change set Caption Select or edit the station identifier maximum 7 characters available Favorite Set favorite 1 3 26 1 1 2 3 select set Set favorite Select the number Add Press OK to select Yes add or No skip Move the cursor to a channel number Manual program Edit Cancel Apply Caption Favorite Add 2 Yes 3 Yes Channel select press OK to tune to the channel Select Appl...

Страница 46: ...ected to the HDMI 1 terminal Customize label Input labels HDMI 3 Component Video PC HDMI 2 HDMI 1 Change Select Menu structure Menu bar Press OK to move to the Menu items Menu items Press OK to proceed to the next screen if available Help information Operation guide example Input labels Select the menu Menu Picture settings Audio settings Timer Sleep On Off timer Lock Channel Game Program etc Clos...

Страница 47: ...icture mode setting in more detail Reset to defaults Resets all Pro setting adjustments to factory default settings Color space Wide Normal Adjust the color representation in panel color gamut W B high R G B Adjusts the white balance for light red green blue areas W B low R G B Adjusts the white balance for dark red green blue areas Black extension Adjusts the dark shades of the image in gradation...

Страница 48: ...lects between standard RGB range 16 235 bits or non compliance 0 255 bits Auto Switches the RGB range Standard 16 235 Nonstandard depending on the HDMI signal information Contents type HDMI 1 3 Off Auto Photo Graphics Sets content type to each HDMI input Auto Switches content type automatically depending on the HDMI signal information Photo Best setting for JPEG viewing Graphics Best setting for O...

Страница 49: ...onent Video The default setting is Digital for the HDMI connection Digital input signal Select audio input terminal when DVI cable is connected Analog audio input signal Timer settings The TV can automatically turn On Off at the designated date and time If the Timer settings are grayed out first set the clock see p 51 and make sure Auto power on is set to No see p 51 Settings Items Item Descriptio...

Страница 50: ...t password to enter the Home screen Change password Change the password Input the new 4 digit password twice This television is designed to support the Downloadable U S Region Rating System when available Available only in U S A The Off rating is independent of other ratings When placing a lock on a specific age based rating level the Off rating and any other more restrictive ratings will also be ...

Страница 51: ...hen NO SIGNAL and NO OPERATION continue for more than 10 minutes Not in use when Auto power on is set to Yes or On Off Timer is set No signal for 10 minutes was activated will be displayed for about 10 seconds when the TV is turned on for the first time after the power was turned off by No signal for 10 minutes The on screen display will flash 3 2 and 1 to indicate the last three 3 remaining minut...

Страница 52: ...IAN ENGLISH RATINGS C E L R E Exempt Exempt programming includes news sports documentaries and other information programming talk shows music videos and variety programming C Programming intended for children under age 8 No offensive language nudity or sexual content C8 Programming generally considered acceptable for children 8 years and over No profanity nudity or sexual content G General program...

Страница 53: ...f Standard Note that Image retention of the side bar may occur from displaying it for a long time ZOOM ZOOM Note 480i 4 3 480i 16 9 480p 4 3 480p 16 9 FULL JUST 4 3 or ZOOM 1080p 1080i 720p FULL H FILL JUST 4 3 or ZOOM Enlarges the 4 3 image to the entire screen Recommended for Letter Box Zoom adjustments Vertical image position and size can be adjusted in ZOOM Select Zoom adjustments on the Pictu...

Страница 54: ...use the TV to malfunction Do not remove the card while the unit is accessing data this can damage card or unit Do not touch the terminals on the back of the card Do not subject the card to high pressure or impact Insert the card in the correct direction otherwise card or unit may be damaged Electrical interference static electricity or erroneous operation may damage the data or card Back up the re...

Страница 55: ...als are reformatted before being displayed on the screen If the connected device has an aspect adjustment function set the aspect ratio to 16 9 These HDMI connectors are type A These HDMI connectors are compatible with HDCP High Bandwidth Digital Content Protection copyright protection A device having no digital output terminal may be connected to the input terminal of either COMPONENT or VIDEO to...

Страница 56: ...3 75 59 94 1 125 1 080 60p 67 43 59 94 1 125 1 080 60p 67 50 60 00 1 125 1 080 24p 26 97 23 98 1 125 1 080 24p 27 00 24 00 640 400 70 31 47 70 08 640 480 60 31 47 59 94 Macintosh13 640 480 35 00 66 67 640 480 75 37 50 75 00 852 480 60 31 44 59 89 800 600 60 37 88 60 32 800 600 75 46 88 75 00 800 600 85 53 67 85 08 Macintosh16 832 624 49 73 74 55 1 024 768 60 48 36 60 00 1 024 768 70 56 48 70 07 1 ...

Страница 57: ...ar on the top and bottom and or sides of the screen Change the format aspect ratio of the picture by pressing the FORMAT button on the remote control p 20 Check the aspect settings on your external video source such as Cable Satellite box DVD Blu ray Disc player etc Note Some content such as film based movies are available in extra wide format Top and bottom bars are unavoidable Why is the picture...

Страница 58: ...ble or Satellite box to the TV Use an HDMI cable It carries both digital video and audio signal in HD HDMI cable is the only cable needed to connect an HD device to the TV Why does the CC button not display Closed Caption When viewing TV via an HDMI connected device such as a Cable or Satellite box CC must be enabled at the device Closed Caption is available only at supported TV programming Why do...

Страница 59: ... look like 3D 1 Begin playing the 3D video source 2 Ensure that the Panasonic 3D Eyewear glasses are on check the glasses battery 3 Press 3D button directly or press the VIERA TOOLS button on the TV s remote control and select 3D 4 In the 3D format select menu select 3D Notes 1 3D Blu ray discs must be played with a 3D capable Blu ray player 2 Check with your Cable or Satellite provider if their s...

Страница 60: ...sh soap and then wring the cloth dry Use this cloth to wipe the cabinet and then wipe it dry with a dry cloth Do not allow any mild liquid dish soap to come into direct contact with the surface of the Plasma TV If water droplets get inside the unit operating problems may result Avoid contact with volatile substances such as insect sprays solvents and thinner otherwise the quality of the cabinet su...

Страница 61: ... R RCA PIN Type 2 0 5 V rms COMPONENT IN Y 1 0 V p p including synchronization PB PR 0 35 V p p AUDIO L R RCA PIN Type 2 0 5 V rms HDMI 1 3 TYPE A Connector 3 This TV supports HDAVI Control 5 function PC D SUB 15PIN R G B 0 7 V p p 75 Ω HD VD 1 0 5 0 V p p high impedance USB 1 2 USB 2 0 Type A connector x 2 DC5V MAX500mA LAN for VIERA Connect RJ45 10BASE T 100BASE TX Card slot SD CARD slot 1 DIGIT...

Страница 62: ...tware is distributed in the hope that it will be useful but WITHOUT ANY WARRANTY without even the implied warranty of MERCHANTABILITY or FITNESS FOR A PARTICULAR PURPOSE At least three 3 years from delivery of products Panasonic will give to any third party who contact us at the contact information provided below for a charge no more than our cost of physically performing source code distribution ...

Страница 63: ...I Image Viewer Auto 51 Info 19 Input 23 51 L Language 14 51 Last 13 Lock Parental control 50 52 M Media player 22 26 31 Menu 46 Movies Video 30 Music 31 Mute 13 N Network camera 37 39 41 43 Network services 16 38 42 51 P Pedestal 8 10 Photo 28 29 Picture Advanced 48 Picture settings 47 Power 13 R Remote Control 13 Reset 51 S Safety 4 SAP 19 Scan 15 44 SD Card 26 54 Signal Meter 45 Sleep 49 Specifi...

Страница 64: ...anty ONLY COVERS failures due to defects in materials or workmanship and DOES NOT COVER normal wear and tear or cosmetic damage nor does it cover markings or retained images on the glass panel resulting from viewing fixed images including among other things non expanded standard 4 3 pictures on wide screen TV s or onscreen data in a stationary and fixed location The Limited Warranty ALSO DOES NOT ...

Страница 65: ...also contact us directly at 1 877 95 VIERA 958 4372 Monday Friday 9 am 9 pm Saturday Sunday 10 am 7 pm EST For hearing or speech impaired TTY users TTY 1 877 833 8855 Accessory Purchases United States and Puerto Rico Purchase Parts Accessories and Instruction Books on line for all Panasonic Products by visiting our Web Site at http www pstc panasonic com or send your request by E mail to npcparts ...

Страница 66: ...The warranty ALSO DOES NOT COVER damages which occurred in shipment or failures which are caused by products not supplied by Panasonic Canada Inc or failures which result from accidents misuse abuse neglect mishandling misapplication alteration faulty installation set up adjustments misadjustment of consumer controls improper maintenance power line surge lightning damage modification introduction ...

Страница 67: ...67 Support Information Limited Warranty for Canada Note ...

Страница 68: ... servicios que le ofrece la garantía Modelo Número de serie Panasonic Consumer Electronics Company Division of Panasonic Corporation of North America One Panasonic Way Secaucus New Jersey 07094 U S A Panasonic Canada Inc 5770 Ambler Drive Mississauga Ontario L4W 2T3 CANADA 2011 Panasonic Corporation of North America All Rights Reserved Printed in U S A 2011 Panasonic Corporation of North America T...

Отзывы: