


28
29
Advanced
VIERA
Link
TM
“HDA
VI Control
TM
”
Automatic
Input
Switching
When using Blu-ray Disc player, DVD player/recorder or Home theater system, the TV will automatically change to the
appropriate input, when playback begins on one of those devices.
For a Home theater system, the speakers automatically switch to the theater system.
Power on
link
When “Yes” is selected (p. 25), TV is turned on automatically and switches to the appropriate HDMI input whenever a
VIERA Link compatible equipment is initially turned on and the Play mode is selected.
Power off
link
When “Yes” is selected (p. 25) and the TV is turned off, all connected VIERA Link compatible equipment is also
automatically turned off.
A Panasonic DVD Recorder will not turn off if it is still in Rec mode.
Caution:
The TV remains on even if the VIERA Link compatible equipment is turned off.
Energy
saving mode
(for “HDAVI Control
4 or later” (with
Quick Start mode))
Condition
Power off link: Yes; Energy saving mode: Quick Start
The equipment has “HDAVI Control 4 or later (with Quick Start mode)” connected with an HDMI cable.
When TV is turned off, all connected VIERA Link compatible equipment is moved to ECO standby mode* automatically
under above conditions.
* Minimum power consumption of standby condition for the equipment.
Unselected
device
energy save
(for “HDAVI
Control 2 or
later”)
Condition
Unselected device energy save: Yes
The equipment has “HDAVI Control 2 or later” (for available equipment only) connected with an HDMI cable.
[ Examples of timing for operation ]
• When the input is switched from the HDMI.
• When the “Speaker output” is changed from “Home theater” to “TV”.
The connected VIERA Link compatible equipment will be turned off automatically when not in use.
Default
speakers
“TV” is the default setting. To set the Home theater system as Default speakers, change the Default speakers setting
from “TV” to “Theater”. Sound will be output from the Home theater whenever the TV is powered on.
One-touch
theater
playback
If the “ONE TOUCH PLAY” key is pressed on the remote control for a Panasonic Home theater system, the following
sequence of operations is performed automatically:
Home theater power switches On, and playback begins.
TV power switches On, and the playback screen is displayed.
Audio is muted on the TV and switches to the theater system.
Provides
setting
information
(for “HDAVI
Control 3 or
later”)
The following information about the TV settings can be transmitted to each piece of an equipment (Recorder/Home
theater/Player) that has “HDAVI Control 3 or later” function connected to a TV with an HDMI cable.
Transmittable data
Recorder
Home theater
Player
On Screen Display Language setting
(English/Español/Français)
○
○
○
Panel Aspect Ratio
(16:9 fixed)
○
○
○
Closed caption information
(Mode/CC type/Digital setting)
○
---
---
Channel information
(Input signal/Channel list/Caption information)
○
---
---
Note
There is a possibility that all the GUI language information might be set from the equipment that has an HDMI CEC
function connected to the TV with an HDMI cable. Depending on the operating conditions or the specification for
each piece of equipment, the setting may or may not be applied.
For more details on the external equipment’s operation, please refer to the operating manuals for the equipment.
[For Recorder]
You cannot operate other functions while transmitting the TV’s information above except the Power On/Off key operation.
When you turn off this unit, the transmission will be interrupted (only when you are transmitting Channel information).
Automatic lip-
sync function
(for “HDAVI Control
3 or later”)
Minimizes lip-sync delays between the picture and audio when you connect to a Panasonic theater system or
Amplifier.
(Continued)
VIERA Link
TM
“HDAVI Control
TM
”
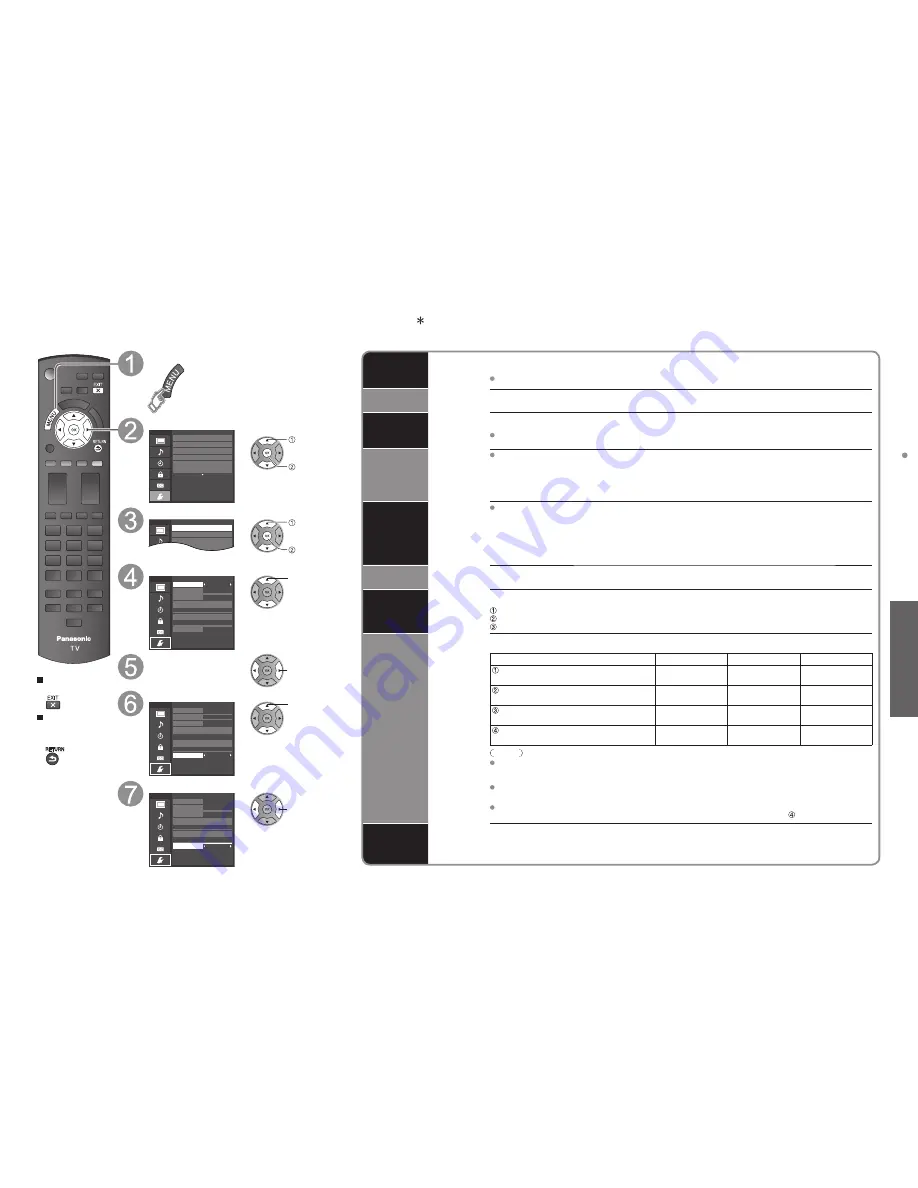
Press to exit from
a menu screen
Press to return
to the previous
screen
Display the menu
Select “Setup”
Menu
Adjusts Surf mode, Language, Clock,
Channels, Inputs, and other settings.
Setup
2/2
Advanced setup
First time setup
About
Reset to defaults
VIERA Link settings
ECO / energy saving
select
next
Select “VIERA Link settings”
Setup
Menu
2/2
Advanced setup
Repeat 1st time setup
VIERA Link settings
ECO / energy saving
select
next
Select “VIERA Link”
On
No
Yes
TV
Quick start
No (stay on)
Menu
Enables or disables interoperability of
“HDAVI Control” compliant HDMI devices.
VIERA Link settings
VIERA Link
Power on link
Power off link
Default speakers
Energy saving mode
Unselected device energy save
select
Select “On”
(default is On)
change
Select settings
On
No
Yes
TV
Quick start
No (stay on)
Menu
Selects either the TV’s speakers or external
home theater as default audio output.
VIERA Link settings
VIERA Link
Power on link
Power off link
Default speakers
Energy saving mode
Unselected device energy save
select
Set
On
No
Yes
Theater
Quick start
No (stay on)
Menu
Selects either the TV’s speakers or external
home theater as default audio output.
VIERA Link settings
VIERA Link
Power on link
Power off link
Default speakers
Energy saving mode
Unselected device energy save
change


