background image

26

VIERA Link

TM

 “HDAVI Control

TM

  Simultaneously control all Panasonic “HDAVI Control” equipped components using one 

button on one remote.

Enjoy additional HDMI Inter-Operability with Panasonic products which have “HDAVI Control” function.

This TV supports “HDAVI Control 3” function.

Connections to the equipment (DVD recorder DIGA, HD Camcorder, Player theatre, RAM theater, 

Amplifier, etc.) with HDMI cables allow you to interface them automatically.

The equipment with “HDAVI Control” function enables the following operations:

 Automatic Input Switching (p. 27)

 Power on link (p. 27)

 Power off link (p. 27)

 Default speakers (p. 27)

 One-touch theater playback (p. 27)

 Speaker control (p. 29)

The equipment with “HDAVI Control 2 “(or more) function enables the following operations.

 VIERA Link control only with the TV’s remote control (for “HDAVI Control 2” or “HDAVI Control 3”) (p. 29)

 Providing the setting information (for “HDAVI Control 3”) (p. 27)

 Automatic lip-sync function (for “HDAVI Control 3”) (p. 27)

 Direct TV Recording (for “HDAVI Control 3”) (p. 29)

VIERA Link “HDAVI Control”, based on the control functions provided by HDMI which is an 

industry standard known as HDMI CEC (Consumer Electronics Control), is a unique function 

that we have developed and added. As such, its operation with other manufacturers’ equipment 

that supports HDMI CEC cannot be guaranteed.

Please refer to the individual manuals for other manufacturers’ equipment supporting the VIERA 

Link function. 


For the first time / When adding new equipment, reconnecting equipment or changing 

the setup after the connection, turn the equipment on and then switch the TV on.

Select the input mode to HDMI1, HDMI2 or HDMI3 (p. 20), and make sure that an image 

is displayed correctly.


HDMI cable

This function needs an HDMI compliant (fully wired) cable. Non-HDMI-compliant cables cannot be utilized.

It is recommended that you use Panasonic’s HDMI cable. Recommended part number:

  RP-CDHG10 (3.3 ft/1.0 m) RP-CDHG15 (4.9 ft/1.5 m), RP-CDHG20 (6.6 ft/2.0 m), 

RP-CDHG30 (9.8 ft/3.0 m), RP-CDHG50 (16.4 ft/5.0 m)

 * For more detail on the external equipment’s connections, please refer to the operating 

manuals for the equipment.


Press to exit from 
a menu screen


Press to return 
to the previous 
screen

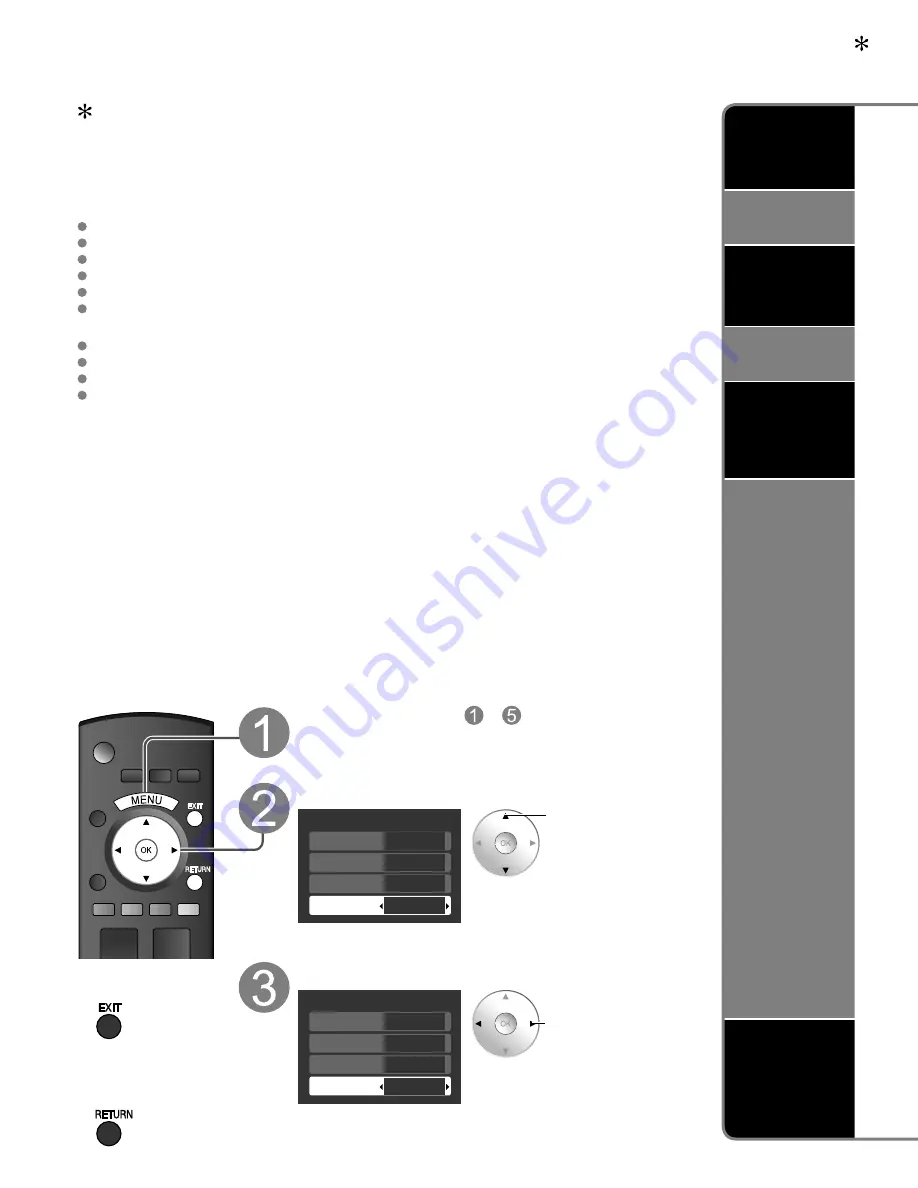
Follow direction   -   in “VIERA Link 

setting” (p. 21)

Select settings

VIERA Link setting

VIERA Link

Power off link
Power on link

Default speakers

On

Set

Set

TV

select

Set

VIERA Link setting

VIERA Link

Power off link
Power on link

Default speakers

On

Set

Set

Theater

change

Automatic

Input

Switching

Power on 

link

Power off 

link

Default

speakers

One-touch

theater

playback

Providing 

the setting 

information

(for “HDAVI 
Control 3”)

Automatic 

lip-sync 

function

(for “HDAVI 
Control 3”)

tc̲37lz85x̲eng̲0794-3.indb   26

tc̲37lz85x̲eng̲0794-3.indb   26

2008/08/25   16:16:46

2008/08/25   16:16:46

Содержание Viera TC-37LZ85X

Страница 1: ...HDTV 37 0 inches measured diagonally Model No TC 37LZ85X English Please read these instructions before operating your set and retain them for future reference The images shown in this manual are for illustrative purposes only Quick Start Guide See page 6 14 ...

Страница 2: ...Corporation HDMI the HDMI logo and High Definition Multimedia Interface are trademarks or registered trademarks of HDMI Licensing LLC VIERA Link is a trademark of Panasonic Corporation Turn your own living room into a movie theater Experience an amazing level of multimedia excitement ...

Страница 3: ...ed Caption 34 Input Labels 35 Using Timer 36 Recommended AV Connections 37 Ratings List for Lock 39 Technical Information 40 Care and Cleaning 43 FAQ 44 Specifications 46 Enjoy your TV Basic Features Advanced Features FAQs etc Safety Precautions 4 Please read before using the unit Accessories Optional Accessory 6 Basic Connection 8 Identifying Controls 12 First Time Setup 13 Quick Start Guide Enjo...

Страница 4: ...wo blades with one wider than the other A grounding type plug has two blades and a third grounding prong The wide blade or the third prong are provided for your safety If the provided plug does not fit into your outlet consult an electrician for replacement of the obsolete outlet 10 Protect the power cord from being walked on or pinched particularly at plugs convenience receptacles and the point w...

Страница 5: ...ISTURE DRIPPING OR SPLASHING DO NOT PLACE LIQUID CONTAINERS FLOWER VASES CUPS COSMETICS ETC ABOVE THE SET INCLUDING ON SHELVES ABOVE ETC 22 WARNING SMALL PARTS CAN PRESENT CHOKING HAZARD IF ACCIDENTALLY SWALLOWED KEEP SMALL PARTS AWAY FROM YOUNG CHILDREN DISCARD UNNEEDED SMALL PARTS AND OTHER OBJECTS INCLUDING PACKAGING MATERIALS AND PLASTIC BAGS SHEETS TO PREVENT THEM FROM BEING PLAYED WITH BY YO...

Страница 6: ...ight light including reflections will fall on the screen Use of some types of fluorescent lighting can reduce remote control transmitter range Adequate ventilation is essential to prevent an internal component failure Keep away from areas of excessive heat or moisture Optional Accessory Wall hanging bracket TY WK32LR2W Please contact your nearest Panasonic dealer to purchase the recommended wall h...

Страница 7: ... a qualified technician to carry out set up Incorrect fitting may cause equipment to fall resulting in injury and product damage Do not mount this LCD Television directly below ceiling lights such as spotlights floodlights or halogen lights which typically give off high heat Doing so may warp or damage plastic cabinet parts A Remove four screws B Pull out the TV Stand Foam mat or thick soft cloth ...

Страница 8: ...ital TV Standards include digital high definition television HDTV standard definition television SDTV data broadcasting multi channel surround sound audio and interactive television If no Cable Box Cable Box Cable You need to subscribe to a cable TV service to enjoy viewing their programming If using a Cable Box set the TV channel to CH3 or CH4 for regular cable You can enjoy high definition progr...

Страница 9: ...DIO OUT P B P R AUDIO AUDIO AUDIO HDMI 1 HDMI 2 AV IN D A B C Example 2 Connecting DVD recorder VCR To record playback DVD Recorder If this source has higher resolution through interlace or progressive signal connection can be done with the use of Component Video or HDMI cable p 11 VCR Connection can be done with the use of an RF cable and Composite Video S Video cable p 11 VHF UHF Antenna TV AV E...

Страница 10: ... 2 AV IN D A B C Basic Connection Continued Example 3 Connecting DVD recorder VCR and satellite receiver DVD Recorder or VCR Satellite Receiver TV VHF UHF Antenna You can enjoy high definition programming by subscribing to high definition satellite service Connection can be done with the use of HDMI or Component Video cable p 11 Note For details of external equipment connections please refer to th...

Страница 11: ...sound For VIERA LinkTM connections please refer to p 38 B To use COMPONENT terminals COMPONENT IN 2 Y R L P B P R AUDIO L R Y PB PR COMPONENT VIDEO OUT AUDIO OUT white red green blue red white red green blue red white red green blue red e g Blu ray Disc player AV Equipment Recorders may also be connected to COMPOSITE or S VIDEO terminals see below C To use S VIDEO terminals R L VIDEO VIDEO IN 1 S ...

Страница 12: ...es TV On or Off Standby Viewing from SD Card p 18 19 Changes the input mode p 20 Displays Sub Menu p 16 24 Colored buttons used for various functions for example p 18 28 Channel up down Changes aspect ratio p 16 Operates the Favorite channel list function p 17 Switches to previously viewed channel or input modes VIERA Link menu p 28 29 Selects Audio Mode for TV viewing p 16 Displays Main Menu p 22...

Страница 13: ...Home Store Please select your viewing environment select ok Please confirm your selection Home before pressing OK button If you select Store by mistake in confirmation screen will be displayed Yes No You are selecting the mode for store demonstration select ok Select No and return to previous screen If you select Yes Screen enters store demonstration mode Displays Please select your viewing enviro...

Страница 14: ...automatically set All channels Scans digital and analog channels Analog only Scans Analog channels only Digital only Scans Digital channels only Confirm registered channels Caption Favorite Add Apply Cancel program Yes Yes Yes select Apply ok If OK is not pressed after selecting Apply the channels will not be saved The channel will be saved when no operation is performed for 60 seconds and the Man...

Страница 15: ...ram channel to switch the signal reception between cable TV and antenna p 14 33 The channel number and volume level remain the same even after the TV is turned off Turn power on TV or Note If the mode is not TV press and select TV p 20 Select a channel number up down or TV To directly input the digital channel number When tuning to a digital channel press the button to enter the minor number in a ...

Страница 16: ... SUB MENU Setup SUB MENU Surf mode Set favorite Off CC Caption select Signal meter All Information Recall Displays or removes the channel banner 15 2 12 30 PM 30 THE NEWS CC SAP TV G 1080i Standard 4 3 ABC HD Channel Station identifier SAP indication Signal resolution Rating Level Picture mode Sleep timer remaining time Aspect ratio Closed caption Clock Change aspect ratio Press FORMAT to cycle th...

Страница 17: ... 1 9 and 0 to select a list number 1 9 and 0 By doing so the displayed channel will be saved on that list number without pressing OK To delete a favorite channel A saved channel can be removed from the list by holding down OK while its position is highlighted Favorite Feature To change the page Pressing changes the page backward Pressing changes the page forward Use Favorite Feature 1 Press FAVORI...

Страница 18: ...k SD card or Select the data to be viewed Note Depending on the JPEG format Information contents may not be displayed correctly Refer to p 41 Data format for SD card browsing for details View Slide show R Y G B Next Rotate Prev RETURN Displays one at a time Navigation area Rotate 90 degrees counter clockwise To next photo Rotate 90 degrees clockwise To previous photo To display hide Navigation are...

Страница 19: ...age sizes the display time will be longer than the number of seconds set To stop in mid cycle Press To adjust picture In or 1 Display Photo menu 2 Select Picture Photo menu Picture Setup slide show select Picture ok 3 Select the item Picture menu p 22 Picture 1 2 Picture mode Picture Reset Vivid 0 Back light 20 select 4 Adjust or select Picture 1 2 Picture mode Picture Reset Vivid 0 Back light 20 ...

Страница 20: ...hoice Select the input of your choice then press OK During the selection if no action is taken for several seconds the Input select menu disappears HDMI 1 GAME Terminal example Label The terminal and label of the connected equipment are displayed To label each of the inputs please refer to p 35 Note The input label will be displayed on Input select screen if Input label is set on p 35 For side inp...

Страница 21: ...tup Menu VIERA Link Lock Setup SD card CC select next Select VIERA Link setting Setup 2 2 VIERA Link setting Advanced Setup About select next Select VIERA Link VIERA Link setting VIERA Link Power off link Power on link Default speakers On Set Set TV select Select On default is On change Now you can set each VIERA Link function according to your preference p 26 27 Note If no HDMI equipment is conne...

Страница 22: ...se Menu Functions Various menus allow you to make settings for the picture sound and other functions so that you can enjoy watching TV best suited for you Press to exit from a menu screen Press to return to the previous screen Display menu Displays the functions that can be set varies depending on the input signal Select the menu Menu Audio Lock Setup SD card CC Timer Picture VIERA Link select nex...

Страница 23: ...C filter On Selects image resolution of component connected devices HD SD SD Standard Definition HD High Definition Only 480p signal accepted regular TV NTSC is not available Color matrix SD Reduces noise of specific digital signals of DVD STB etc On Off MPEG NR Off Selects Dark or Light Valid only for external input signals Dark Light Black level Light Selects between 95 Size 1 or 100 Size 2 for ...

Страница 24: ... menus allow you to make settings for the picture sound and other functions so that you can enjoy watching TV best suited for you Press to exit from a menu screen Press to return to the previous screen Display menu Displays the functions that can be set varies depending on the input signal Select Setup Menu Audio Lock Setup SD card CC Timer Picture VIERA Link next select Select the item Setup 1 2 ...

Страница 25: ...On Off timer and First time setup will not function if Auto power on is set p 36 Auto power on No To conserve energy the TV automatically turns off when NO SIGNAL and NO OPERATION is performed for more than 10 minutes Set No Note Not in use when setting Auto power on On Off Timer Lock or Digital channel No signal shut off was activated will be displayed for about 10 seconds when the TV is turned o...

Страница 26: ...operation with other manufacturers equipment that supports HDMI CEC cannot be guaranteed Please refer to the individual manuals for other manufacturers equipment supporting the VIERA Link function For the first time When adding new equipment reconnecting equipment or changing the setup after the connection turn the equipment on and then switch the TV on Select the input mode to HDMI1 HDMI2 or HDMI...

Страница 27: ...tions is performed automatically Home Theater power switches On and playback begins TV power switches On and the playback screen is displayed Audio is muted on the TV and switches to the theater system The following information about the TV settings can be transmitted to each equipment Recorder Home theater Player that has HDAVI Control 3 function connected to a TV with HDMI cable Transmittable da...

Страница 28: ...to the previous screen Display VIERA Link menu Menu Audio Lock SD card Timer Picture VIERA Link or Select the item Record now Stop recording Speaker output TV VIERA Link control Recorder select set or next Select Record now Stop recording Speaker output TV VIERA Link control Home theater change Set Speaker control VIERA Link Control only with the TV s remote control for HDAVI Control 2 or HDAVI Co...

Страница 29: ...Link Control Select the equipment you want to access Recorder Home theater Player Camcorder Available TV s remote control buttons Move the cursor Select Set Access Return to the previous menu SUB MENU Display the Functions menu on the equipment Available when the purpose of the keys is displayed on screen Record now Stop recording Speaker output TV VIERA Link control Recorder select change You can...

Страница 30: ...ou display the Lock menu Input your 4 digit password A 4 digit code must be entered to view a blocked program or change rating settings Create password Enter password 0 9 If it is your first time entering the password enter the password twice in order to register it Select the Lock mode Lock Mode Channel Game Program Off Off Off Off Change password set select Off Unlocks all the lock settings of C...

Страница 31: ... E L R C F L R Off Off Mode On MPAA next select MPAA U S movie ratings U S TV U S TV program ratings C E L R Canadian English ratings C F L R Canadian French ratings Select the rating to be locked select Example of MPAA U S movie ratings Change password To change the password In select Change password and press OK Input the new 4 digit password twice Lock Mode Channel Game Program Off Off Off Off ...

Страница 32: ...Select Program channel Setup 1 2 All Surf mode Language Clock Program channel External devices Reset next select Select the function Program channel Cable ANT in Auto Manual Signal meter next select Set Auto Set automatically Manual Set manually Signal meter Check signal strength To reset the settings of setup menu Select Reset in Setup menu and press OK Input your 4 digit password with number but...

Страница 33: ...OK to tune to the channel Select Apply Caption Favorite Add Apply Cancel program Yes select Apply ok Select Edit Edit Channel Caption Favorite Add Apply Cancel Manual program 2 Yes 3 Yes 4 Yes 5 Yes select next Select the item to be edited Edit Caption Favorite Add Apply Cancel Manual program 2 Yes Select OK RETURN Prev page R Next page G B Y 3 Yes 4 Yes 5 Yes 6 Yes 7 Yes 8 Yes 9 Yes Channel Capti...

Страница 34: ...ct the setting Primary Second Service 3 Service 4 Service 5 Service 6 The settings in Analog or Digital depend on the broadcaster To make more in depth display settings in digital programs Select Digital setting and press OK Select the item and set Digital setting Size Font Style Foreground Fore opacity Background Automatic Automatic Automatic Automatic Automatic Automatic Back opacity Outline Aut...

Страница 35: ...deo 2 GAME GAME select set Video 1 VCR Label Terminal example Terminals Comp 1 2 HDMI 1 3 Video 1 2 Label SKIP VCR DVD CABLE DBS PVR GAME AUX RECEIVER BLANK If SKIP is selected the TV VIDEO button press will skip its input Each selected labels will be displayed on Input select screen p 20 Press to exit from a menu screen Display menu Select Setup Menu Audio Lock Setup SD card CC Timer Picture VIER...

Страница 36: ...a key is pressed Display menu Select Timer Menu Audio Lock SD card Timer Picture VIERA Link next select Select the timer to set Timer Sleep Timer 1 Timer 2 Timer 3 Timer 4 Timer 5 select next Set the timer To set Sleep Off Timer Set to shut the unit off after a pre selected amount of time Sleep Sleep 60 set 0 30 60 90 minutes To set Timer 1 5 On Off Timer Select the item and set Timer 1 Channel Da...

Страница 37: ...or other connections consult the instructions for each piece of equipment and its specifications Please see p 22 23 for setup when using an external analog audio cable with an HDMI to DVI cable AC 110 127 V 60 Hz AC Cord Connect after all the other connections are complete Back of the TV Cable Box Cable TV or To watch DVDs DVD Player Set Top Box Optical digital audio cable DVD Recorder VCR To list...

Страница 38: ...r Player theater For DVD recorder DIGA Connect with HDMI cable For RAM theater and Player theater Connect with the HDMI and audio cables If audio cable is not connected you cannot listen to the TV program through the theater system Connecting this unit to a DVD recorder DIGA and AV amp When using an VIERA Link audio video amplifier and a compatible DVD recorder DIGA recorder use a daisy chain conn...

Страница 39: ...ogue with sexual content CANADIAN ENGLISH RATINGS C E L R E Exempt Exempt programming includes news sports documentaries and other information programming talk shows music videos and variety programming C Programming intended for children under age 8 No offensive language nudity or sexual content C8 Programming generally considered acceptable for children 8 years and over No profanity nudity or se...

Страница 40: ...on to cycle through the aspect modes This lets you choose the aspect depending on the format of the received signal and your preference p 16 e g in case of 4 3 image FULL JUST FULL JUST Enlarges the 4 3 image horizontally to the screen s side edges Recommended for anamorphic picture Stretches to justify the 4 3 image to the four corners of the screen Recommended for normal TV broadcast H FILL 4 3 ...

Страница 41: ...JPG P1000003 JPG P1000004 JPG 100_PANA Created automatically 3 digit folder number 5 digit arbitrary characters 4 digit arbitrary characters 4 digit file number Usable characters 1 byte a to z A to Z 0 to 9 and _ The folder and file names may be different depending on the digital camera used For the suitable SD Memory Cards please confirm the latest information on the following website http panaso...

Страница 42: ...plicable audio signal sampling frequencies L PCM 48 kHz 44 1 kHz 32 kHz 1 The HDMI logo is displayed on an HDMI compliant device 2 Enquire at your local digital equipment retailer shop Caution Use with a PC is not assumed All signals are reformatted before being displayed on the screen If the connected device has an aspect adjustment function set the aspect ratio to 16 9 These HDMI connectors are ...

Страница 43: ...e substances such as insect sprays solvents and thinner otherwise the quality of the cabinet surface may be adversely affected or the coating may peel off Furthermore do not leave it for long periods in contact with articles made from rubber or PVC Pedestal Cleaning Wipe the surfaces with a soft dry cloth If the unit is particularly dirty clean it using a cloth soaked with water to which a small a...

Страница 44: ...and consult your local dealer The LCD panel moves slightly when it is pushed with a finger A clattered sound might be heard This is not a malfunction There is some looseness around the panel to prevent the damage to the panel The remote control does not work Are the batteries installed correctly p 6 Are the batteries new Pictures from external equipment are distorted when the unit is connected via...

Страница 45: ... plugged into the outlet Is the TV unit turned On Check Picture menu p 22 and volume Check the AV cable connections p 8 11 Check that the correct input has been selected p 20 No sound is produced Are the speakers cables connected correctly Is Sound Mute active p 12 Is the volume set to the minimum Is Speaker output set to Off p 22 Change SAP settings p 16 Check HDMI 1 in HDMI 2 in or HDMI 3 in set...

Страница 46: ...UHF 2 69 CATV 1 135 Operating Conditions Temperature 32 F 95 F 0 C 35 C Humidity 20 80 RH non condensing Connection Terminals VIDEO IN 1 VIDEO RCA PIN Type 1 1 0 V p p 75 Ω S VIDEO Mini DIN 4 pin Y 1 0 V p p 75 Ω C 0 286 V p p 75 Ω AUDIO L R RCA PIN Type 2 0 5 V rms VIDEO IN 2 VIDEO RCA PIN Type 1 1 0 V p p 75 Ω AUDIO L R RCA PIN Type 2 0 5 V rms COMPONENT IN 1 2 Y 1 0 V p p including synchronizat...

Страница 47: ...47 FAQs etc Specifications ...

Страница 48: ...ttp www eiae org Customer s Record The model number and serial number of this product can be found on its back cover You should note this serial number in the space provided below and retain this book plus your purchase receipt as a permanent record of your purchase to aid in identification in the event of theft or loss and for Warranty Service purposes Model Number Serial Number Web Site http pan...

Страница 49: ...e LCD 37 0 pulgadas medidas diagonalmente Número de modelo TC 37LZ85X Lea estas instrucciones antes de utilizar su televisor y guárdelas para consultarlas en el futuro Las imágenes mostradas en este manual tienen solamente fines ilustrativos Guía de inicio rápido vea la página 6 14 Español ...

Страница 50: ...nic Corporation HDMI el símbolo HDMI y la Interface de Multimedios de Alta Definición son marcas comerciales ó marcas registradas de HDMI Licensing LLC VIERA Link es una marca de fábrica de Panasonic Corporation Convierta su propia sala de estar en un cine Sienta un nivel increíble de excitación multimedia ...

Страница 51: ...ón del temporizador 36 Conexiones AV recomendadas 37 Lista de clasificaciones para el bloqueo 39 Información técnica 40 Cuidados y limpieza 43 Preguntas frecuentes 44 Especificaciones 46 Disfrute de su televisor Características básicas Funciones avanzadas Preguntas frecuentes etc Precauciones para su seguridad 4 Asegúrese de leer Accesorios Accesorio opcional 6 Conexión básica 8 Identificación de ...

Страница 52: ...e salen del aparato 11 Usar solo accesorios especificados por el fabricante 12 Usar el aparato solo con el carro plataforma tripié soporte o mesa especificado por el fabricante o vendido con el aparato Cuando un carro sea usado tenga cuidado aI mover dicho carro junto con el aparato para evitar lesiones por volcaduras 13 Desconectar este aparato durante tormentas eléctricas o cuando no vaya a ser ...

Страница 53: ...URA NO COLOCAR ENVASES CON LlQUIDO FLOREROS COPAS COSMÉTICOS ETC SOBRE EL TELEVISOR lNCLUYENDO ANAQUELES COLOCADOS ARRIBA DE ESTE ETC 22 ADVERTENCIA RETIRAR PIEZAS PEQUEÑAS INNECESARIAS Y OTROS OBJETOS FUERA DEL ALCANCE DE LOS NIÑOS PEQUEÑOS ESTOS OBJETOS PUEDEN SER TRAGADOS ACCIDENTALMENTE TAMBIEN TENER CUIDADO AL EMPACAR MATERIALES Y HOJAS DE PLASTICO 23 PRECAUCIÓN PARA EVITAR CHOQUE ELECTRICO N...

Страница 54: ...la de montaje en pared recomendada Para conocer más detalles consulte el manual de instalación de la ménsula de montaje en pared Accesorios Coloque el receptor a una distancia confortable para ver Evite colocarlo donde la luz solar directa u otra luz brillante incluidos reflejos caiga sobre la pantalla La utilización de algún tipo de iluminación fluorescente puede reducir el alcance del transmisor...

Страница 55: ...n instalador profesional quien haya realizado el montaje anulará la garantía de su unidad Asegúrese de pedir siempre a un técnico calificado que lleve a cabo la instalación Una instalación incorrecta podría ser la causa de que el equipo cayera causando lesiones a personas y daños en el producto No monte el televisor LCD directamente debajo de las luces del techo luces direccionales reflectores ó l...

Страница 56: ...misión de datos el audio multicanal de sonido envolvente y la televisión interactiva Si no se utiliza receptor de televisión por cable Receptor de televisión por cable cable Usted necesita suscribirse a un servicio de televisión por cable para poder ver sus programas Si utiliza un receptor de televisión por cable elija el canal de televisión CH3 ó CH4 para ver la televisión por cable normal Podrá ...

Страница 57: ...I 1 HDMI 2 AV IN D A B C Ejemplo 2 Conexión de una grabadora DVD videograbadora Para grabar reproducir Grabadora DVD Si esta fuente tiene una resolución más alta con señales entrelazadas o progresivas la conexión se puede hacer utilizando video componente o HDMI pág 11 Videograbadora La conexión se puede hacer utilizando un cable RF y video compuesto S Vídeo pág 11 Antena de VHF UHF TV Equipo de A...

Страница 58: ... grabadora DVD videograbadora y un receptor de satélite Grabadora DVD ó Videograbadora Receptor de satélite TV Antena de VHF UHF Puede disfrutar de los programas de alta definición suscribiéndose a los servicios de compañías de emisión por satélite de alta definición La conexión se puede hacer utilizando HDMI o video componente pág 11 Nota Para conocer los detalles de las conexiones de los equipos...

Страница 59: ...alta calidad Para las Conexiones VIERA Link consulte la pág 38 B Para utilizar terminales de VIDEO COMPONENTE COMPONENT IN 2 Y R L P B P R AUDIO L R Y PB PR COMPONENT VIDEO OUT AUDIO OUT verde azul rojo blanco rojo verde azul rojo blanco rojo ej Reproductor de Blu ray Disc Equipo de AV verde azul rojo blanco rojo Las grabadoras también se pueden conectar a los terminales de VIDEO COMPUESTO ó S VID...

Страница 60: ...or ó la pone en espera Visión de imágenes de tarjetas SD pág 18 19 Cambia la señal de entrada pág 20 Visualización de submenú pág 16 24 Botones de color utilizados para varias funciones por ejemplo pág 18 y 28 Selecciona canales en orden Cambia la relación de aspecto pág 16 Controla la función de la lista de canales favoritos pág 17 Cambia al canal visto previamente ó modo de entrada Menú VIERA Li...

Страница 61: ...r Hogar Hogar Mostrador Por favor seleccione el ambiente de uso Seleccione Aceptar Confirme su selección Hogar antes de pulsar el botón OK Si selecciona Mostrador por equivocación en se visualizará la pantalla de confirmación Sí No Ha elegido el modo para demostración en tienda Seleccione Aceptar Seleccione No y vuelva a la pantalla anterior Si selecciona Sí la pantalla entra en el modo de demostr...

Страница 62: ...ación de los canales Los canales disponibles analógicos digitales se establecen automáticamente Todos los canales Explora canales digitales y analógicos Sólo analógico Explora canales analógicos solamente Sólo digital Explora canales digitales solamente Confirme los canales registrados Títulos Favoritos Agregar Aceptar Cancelar a manual Sí Sí Sí Seleccione Aceptar Aceptar Si no se pulsa OK después...

Страница 63: ...rada ANT de Programa canal para cambiar la recepción de la señal entre televisión por cable y antena pág 14 33 El número del canal y el nivel del volúmen se fijan incluso después de apagar el televisor Conecte la alimentación TV ó Nota Si el modo no es TV pulse y seleccione TV pág 20 Seleccione un número de canal Arriba Abajo ó TV Para introducir directamente el número de un canal digital Cuando s...

Страница 64: ...iones de uso convenientes SUB MENU Ajuste SUB MENU Modo surf Configurar favorito No CC Seleccionar títulos Medidor de señal Todos Recuperación de información Visualice ó elimine la bandera de canales 15 2 12 30 PM 30 THE NEWS CC SAP TV G 1080i Estándar 4 3 ABC HD Canal Identificador de emisora Indicación SAP Resolución de señales Nivel de clasificación Modo de imagen Tiempo restante del temporizad...

Страница 65: ...eclas numéricas 1 9 y 0 para seleccionar los números de lista grabados 1 9 y 0 Al hacer esto los números se grabarán directamente sin tener que pulsar la tecla OK Para eliminar un canal favorito Un canal memorizado se podrá eliminar de la lista manteniendo pulsado OK mientras su posición está resaltada Función de favoritos Para cambiar la página Pulsando se cambia de página hacia atrás Pulsando se...

Страница 66: ...RA Link Bloqueo Tarjeta SD ó Seleccione los datos que va a ver Diaposi R Y G B Adquiriendo RETURN Selección OK Num Pana0365 Fecha 01 01 2008 Pixel 1600x1200 Total Información 12 Pana0365 Pana0366 Pana0367 Pana0368 Pana0369 Pana0370 Pana0371 Pana0372 Pana0373 Pana0374 Pana0375 Pana0376 Visualizador de fotos Adquiriendo Diaposi R Y G B RETURN Adquiriendo individual R Y G B Pausa Siguíente RETURN Rot...

Страница 67: ...iaporama Seleccione Ajuste de diaporama Aceptar 3 Seleccione el elemento y ajuste Ajuste de diaporama Tiempo desp Repetir 5 Sí Seleccione Ajuste Tiempo desp Puede ajustar los segundos que se va a visualizar cada imagen en el modo de diapositiva 1 10 15 20 30 45 60 120 segundos Repetir Sí ó No la función de repetición de diapositiva Nota Para las imágenes de tamaño grande el tiempo de visualización...

Страница 68: ...ente para seleccionar la entrada de su elección y luego pulse OK Durante la selección el menú Seleccionar entrada desaparece si no se realiza ninguna acción durante varios segundos HDMI 1 JUEGO Etiqueta ejemplo Terminal El terminal y el título del equipo conectado se visualizan Para cambiar la etiqueta de entrada pág 35 Nota Cuando se establezca el título de entrada consulte la pág 35 el título de...

Страница 69: ... Menú VIERA Link Bloqueo Ajuste Tarjeta SD CC Seleccione Siguiente Seleccione Ajuste VIERA Link Ajuste 2 2 Ajuste VIERA Link Ajuste avanzado Acerca de Seleccione Siguiente Seleccione VIERA Link Ajuste VIERA Link VIERA Link Apaga control Prende control Altavoz inicial Sí Fijar Fijar Interno Seleccione Seleccione Sí La opción predeterminada es Sí Cambie Ahora puede establecer cada función VIERA Link...

Страница 70: ...izar las funciones de los menús Varios menús le permiten seleccionar configuraciones para la imagen el sonido y otras funciones para que usted pueda disfrutar viendo la televisión como usted desee Pulse para salir de la pantalla de menú Para volver a la pantalla anterior Visualice el menú Visualiza las funciones que pueden establecerse cambia según la señal de entrada Seleccione el menú Menú Audio...

Страница 71: ...al HD Visión de alta definición Sólo se acepta la señal 480p la televisión convencional NTSC no se está disponible Matriz color SD Reduce el ruido de las señales digitales específicas de DVD STB etc Sí No MPEG NR No Seleccione Obscuro ó Claro Sólo es válido para las señales de entrada externas Obscuro Claro Nivel obscuro Claro Selecciona entre 95 Tamaño 1 o 100 Tamaño 2 para el área de exploración...

Страница 72: ...ajustes para la imagen el sonido y otras funciones para poder disfrutar viendo la TV de la forma que a usted más le convenga Pulse para salir de la pantalla de menú Para volver a la pantalla anterior Visualice el menú Visualiza las funciones que pueden establecerse cambia según la señal de entrada Seleccione Ajuste Menú Audio Bloqueo Ajuste Tarjeta SD CC Cronómetro Imagen VIERA Link Siguiente Sele...

Страница 73: ...da por primera vez después de desconectarse la alimentación mediante Apaga sin señal La visualización en pantalla mostrará parpadeando los números 3 2 y 1 para indicar los últimos tres 3 minutos que quedan hasta que se produzca el apagado Apaga sin señal Sí Para ahorrar energía el televisor se apagará automáticamente cuando no se haga ninguna operación con las teclas del mando a distancia o del pa...

Страница 74: ...agregado Como tal su funcionamiento con equipos de otros fabricantes que soportan HDMI CEC no puede ser garantizado Consulte los manuales individuales de los equipos de otros fabricantes que soportan la función VIERA Link Para la primera vez Cuando se agrega un equipo nuevo se reconecta un equipo o se cambia la instalación después de hacer la conexión encienda el equipo y luego encienda el televis...

Страница 75: ...tes se realiza automáticamente La alimentación del sistema de cine para casa se conecta y empieza la reproducción El televisor se enciende y se muestra la pantalla de reproducción El audio se silencia y el televisor cambia al modo de cine para casa Alguna información de ajuste del televisor se puede transmitir a cada equipo Grabadora Cine para casa Reproductor con la función HDAVI Control 3 conect...

Страница 76: ...nú VIERA Link Menú Audio Bloqueo Tarjeta SD Cronómetro Imagen VIERA Link ó Seleccione el elemento Iniciar grabación Detener grabación Salida altavoz Interno Control VIERA Link Grabador Seleccione Establezca ó Siguiente Seleccione Iniciar grabación Detener grabación Salida altavoz Interno Control VIERA Link Cine para casa Cambie Establezca Control de altavoces Control VIERA Link sólo con el mando a...

Страница 77: ... apuntándolo al televisor Seleccione Control VIERA Link Seleccione el equipo al que quiera acceder Grabador Cine para casa Reproductor Videocámara Control remoto del televisor disponible Mover el cursor Seleccionar Configurar Acceder Volver al menú anterior SUB MENU Visualizar el menú de funciones del equipo Disponible cuando se visualiza la finalidad de las teclas Iniciar grabación Detener grabac...

Страница 78: ...itos Para ver un programa bloqueado ó cambiar los ajustes de calificación deberá introducir un código de 4 dígitos Crear contraseña Ingresar contraseña 0 9 Si es la primera vez que introduce una contraseña introduzca el número dos veces en orden para registrarlo Seleccione el modo de bloqueo Bloqueo Modo Canal Juego Programa No No No No Cambio de contraseña Establezca Seleccione No Desbloquea toda...

Страница 79: ...ciones para películas de los EE UU U S TV Clasificaciones para programas de televisión de los EE UU C E L R Clasificaciones para el inglés de Canadá C F L R Clasificaciones para el francés de Canadá Seleccione la clasificación que va a bloquear Seleccione Ejemplo de MPAA clasificaciones para películas de los EE UU No Sin clasificación G Público en general Todos los públicos PG Se recomienda el aco...

Страница 80: ... Ajuste Tarjeta SD CC Cronómetro Imagen VIERA Link Siguiente Seleccione Seleccione Programa canal Ajuste 1 2 Todos Modo surf Idioma Reloj Programa canal Dispositi externos Restaurar Siguiente Seleccione Seleccione la función Programa canal Cable Entrada ANT Auto Manual Medidor de señal Siguiente Seleccione Establezca Para restablecer los ajustes del menú Ajuste Seleccione Reiniciar en el menú Ajus...

Страница 81: ...ual 2 Sí 3 Sí Seleccione Pulse OK para sintonizar el canal Seleccione Aceptar Títulos Favoritos Agregar Aceptar Cancelar a manual Sí Seleccione Aceptar Aceptar Seleccione Editar Editar Canal Títulos Favoritos Agregar Aceptar Cancelar Programa manual 2 Sí 3 Sí 4 Sí 5 Sí Seleccione Siguiente Seleccione el elemento que quiera editar Editar Canal Títulos Favoritos Agregar Aceptar Cancelar Programa man...

Страница 82: ... 3 Servicio 4 Servicio 5 Servicio 6 La configuración en Análogo ó Digital depende de la emisora Para hacer configuraciones de visualización más a fondo en los programas digitales Seleccione Ajustes digitales y pulse OK Seleccione el elemento y establézcalo Ajustes digitales Tamaño Letra Estilo Frente Opacidad frontal Fondo Automático Automático Automático Automático Automático Automático Fondo obs...

Страница 83: ...GO JUEGO Seleccione Establezca Video 1 VCR Etiqueta Terminal ejemplo Terminales Comp 1 2 HDMI 1 3 Video 1 2 Etiqueta BRINCAR VCR DVD CABLE DBS PVR JUEGO AUX RECEPTOR BLANCO Si se selecciona BRINCAR al pulsar el botón TV VIDEO se omitirá la entrada Cada título seleccionado se visualizará en la pantalla Seleccionar entrada pág 20 Pulse para salir de la pantalla de menú Visualice el menú Seleccione A...

Страница 84: ...ablecer Cronómetro Apagado Cronómetro 1 Cronómetro 2 Cronómetro 3 Cronómetro 4 Cronómetro 5 Seleccione Siguiente Establezca el temporizador Para establecer Apagado Temporizador de apagado Pulse para que la unidad se apague automáticamente después de transcurrir un tiempo preseleccionado Apagado Apagado 60 Establezca 0 30 60 90 minutos Para establecer Cronómetro 1 5 Temporizador de encendido apagad...

Страница 85: ...te las páginas 22 y 23 para hacer la instalación cuando use un cable de audio analógico externo con un cable HDMI a DVI 110 127 V CA 60 Hz Cable de alimentación de CA Conecte después de haber terminado todas las demás conexiones Parte posterior de la unidad Receptor de televisión por cable TV por Cable ó Para ver DVDs Reproductor DVD Receptor digital multimedia Cable óptico digital de audio Grabad...

Страница 86: ...adora DVD DIGA Conecte con cable HDMI Para equipo de cine para casa RAM ó reproductor de cine para casa Conecte con cable HDMI y con cable de audio Si no conecta el cable de audio no puede oír el programa de televisión a través del sistema de cine para casa Conexión de esta unidad a una Grabadora DVD DIGA y amplificador AV Cuando utilice un receptor de audio vídeo VIERA Link y una Grabadora DVD DI...

Страница 87: ...ltos lenguaje profano violencia gráfica y contenido sexual explícito FV FANTASIA CARICATURAS CON VIOLENCIA V VIOLENCIA S SEXO L LENGUAJE OFENSIVO D DIALOGO CON CONTENIDO SEXUAL GRÁFICA DE CLASIFICACIONES PARA INGLÉS DE CANADÁ C E L R E Exenta La programación exenta incluye noticias deportes documentales y otros programas de información entrevistas vídeos musicales y programas de variedades C Progr...

Страница 88: ...os modos de aspecto Esto le permite elegir el aspecto dependiendo del formato de la señal recibida y sus preferencias pág 16 ej en el caso de una imagen 4 3 COMP JUSTO COMP JUSTO Amplía horizontalmente la imagen 4 3 hasta los bordes laterales de la pantalla Recomendada para la imagen anamórfica Alarga para justificar la imagen 4 3 a las cuatro esquinas de la pantalla Recomendada para la emisión de...

Страница 89: ...utomáticamente Número de carpeta de 3 dígitos Caracteres arbitrarios de 5 dígitos Caracteres arbitrarios de 4 dígitos Número de archivo de 4 dígitos Caracteres que se pueden utilizar 1 byte a a z A a Z 0 a 9 y _ Los nombres de carpetas y archivos pueden ser diferentes dependiendo de la cámara digital utilizada Para conocer las tarjetas de memoria SD más apropiadas confirme la información más recie...

Страница 90: ...o aplicable L PCM 48 kHz 44 1 kHz 32 kHz 1 El logotipo HDMI se visualiza en un equipo compatible con HDMI 2 Pregunte en el establecimiento del vendedor de equipos digitales local Precaución No se asume el funcionamiento con un PC Todas las señales se reformatean antes de visualizarse en la pantalla Si el equipo conectado tiene una función de ajuste de relación de aspecto ajuste la relación de aspe...

Страница 91: ...ancias volátiles tales como rociadores de insecticida disolventes y diluyentes de pintura debido a que puede verse afectada la superficie del mueble y puede desprenderse el revestimiento Tampoco deje la superficie por mucho tiempo en contacto con artículos de caucho ó PVC Pedestal Limpieza Limpie las superficies pasando un paño blando y seco Si la unidad está muy sucia límpiela con un paño empapad...

Страница 92: ...y consulte a su concesionario local El panel LCD se mueve un poco cuando se empuja con un dedo y es posible que se oiga un ruido Esto no es un fallo de funcionamiento Para impedir que se dañe el panel al moverlo éste está instalado con un poco de flojedad El mando a distancia no funciona Están instaladas correctamente las pilas pág 6 Son nuevas las pilas La imagen se ve distorsionada cuando el equ...

Страница 93: ...imentación de CA enchufado en la toma de corriente Está encendido el televisor Compruebe el menú Imagen pág 22 y el volúmen Verifique las conexiones de los cables AV pág 8 11 Verifique que se haya seleccionado la entrada correcta pág 20 No se produce sonido Están conectados correctamente los cables de los altavoces Está activo Silenciamiento del sonido pág 12 Está ajustado al mínimo el volúmen Est...

Страница 94: ...0 V p p 75 Ω C 0 286 V p p 75 Ω AUDIO L R Tipo RCA PIN 2 0 5 V rms VIDEO IN 2 VIDEO Tipo RCA PIN 1 1 0 V p p 75 Ω AUDIO L R Tipo RCA PIN 2 0 5 V rms COMPONENT IN 1 2 Y 1 0 V p p incluyendo sincronización PB PR 0 35 V p p AUDIO L R Tipo RCA PIN 2 0 5 V rms HDMI 1 3 Conector tipo A 3 Este televisor soporta la función HDAVI Control 3 Ranura de tarjeta 1 ranura de tarjeta SD TO AUDIO AMP AUDIO L R Tip...

Страница 95: ...47 Preguntas frecuentes etc Especificaciones ...

Страница 96: ... o lo pierda y también para disponer de los servicios que le ofrece la garantía Modelo Número de serie Web Site http panasonic net Panasonic Corporation 2008 Printed in U S A Este producto tiene una lámpara fluorescente que contiene mercurio Debido a consideraciones ambientales puede que deshacerse de este material esté regulado en su comunidad Para obtener información sobre cómo deshacerse o reci...

Отзывы: