


19
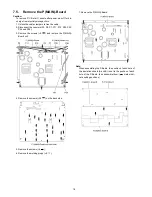
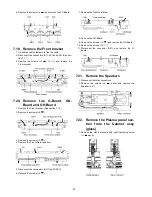
7.6.
Remove the Rear Terminal
cover
1. Remove the screws (
×
4 ,
×
2 ).
2. Remove the Rear Terminal cover.
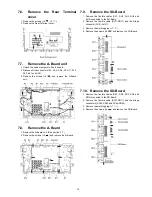
7.7.
Remove the A-Board unit
1. Unlock the cable clampers to free the cable.
2. Disconnect the connectors (A1, A3, A5, A6, A7, A11, A12,
A30, A51 and A52).
3. Remove the screws (
×
4
) and remove the A-Board
unit.
7.8.
Remove the A-Board
1. Remove the A-Board unit. (See section 7.7.)
2. Remove the screws (
×
8
) and remove the A-Board.
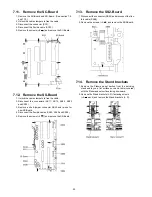
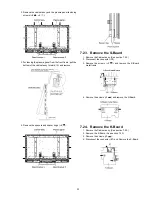
7.9.
Remove the SU-Board
1. Remove the flexible cables (SU1, SU2, SU3, SU4 and
SU5) connected to the SU-Board.
2. Remove the flexible cable (SU11-SD11) and the bridge
connector (SC41-SU41).
3. Remove the molding prop (
×
1 ).
4. Remove the screws (
×
4
) and remove the SU-Board.
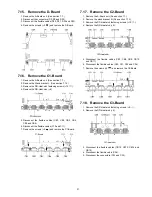
7.10. Remove the SD-Board
1. Remove the flexible cables (SD1, SD2, SD3, SD4 and
SD5) connected to the SD-Board.
2. Remove the flexible cable (SU11-SD11) and the bridge
connectors (SC42-SD42 and SC46-SD46).
3. Remove the molding prop (
×
1 ).
4. Remove the screws (
×
4
) and remove the SD-Board.
Содержание Viera Link TH-50PZ80U
Страница 15: ...15 6 4 No Picture ...
Страница 27: ...27 8 1 4 Adjustment Volume Location 8 1 5 Test Point Location ...
Страница 29: ...29 ...
Страница 30: ...30 ...
Страница 38: ...38 10 3 Wiring 2 ...
Страница 39: ...39 10 4 Wiring 3 ...
Страница 40: ...40 10 5 Wiring 4 ...
Страница 41: ...41 10 6 Wiring 5 ...
Страница 42: ...42 10 7 Wiring 6 ...
Страница 43: ...43 11 Schematic Diagram 11 1 Schematic Diagram Note ...
Страница 106: ...106 13 1 2 Fan part location ...
Страница 107: ...107 13 1 3 Accessories ...
Страница 108: ...108 13 1 4 Mechanical Replacement Parts List ...
Страница 111: ...111 13 2 Electrical Replacement Parts List 13 2 1 Replacement Parts List Notes ...


