background image

7

I

D prohibition : Recognizes the signals from any

touch pens regardless the Pen ID.

ID no. 1 

4 : Recognizes the signals only from the

  touch pens with the same ID.

Touch Pen ID setting and use

Prior to touch pen ID setting

Carefully read the Manual for the touch panel, and
then continue with the following procedure.

1

Turn on the power to the plasma display and
PC, in that order.

2

Switch the plasma display input to PC.

3

After the PC has finished starting up, open
“Touch panel setting program” from the “Task
Bar” on the PC screen, and click on the “Basic
Setting” button.

Touch Pen ID setting

Perform the following operation on the touch panel
within 5 meters. (16.4 feet)

1

Turn the battery cap of the touch pen counter-
clock-wise and remove it. (Be sure that batteries
keep staying in the touch pen.)

2

Hold the touch pen so the pen tip is facing
downwards, press and hold the pen tip, and
perform the following operation.

1

Refit the battery cap and wait for at least 2
seconds.

2

Slowly press the function switch 3 times.

3

Release the pen tip.

4

Slowly press the function switch 3 times.

5

Press the pen tip.
The touch pen will enter the ID setting mode.

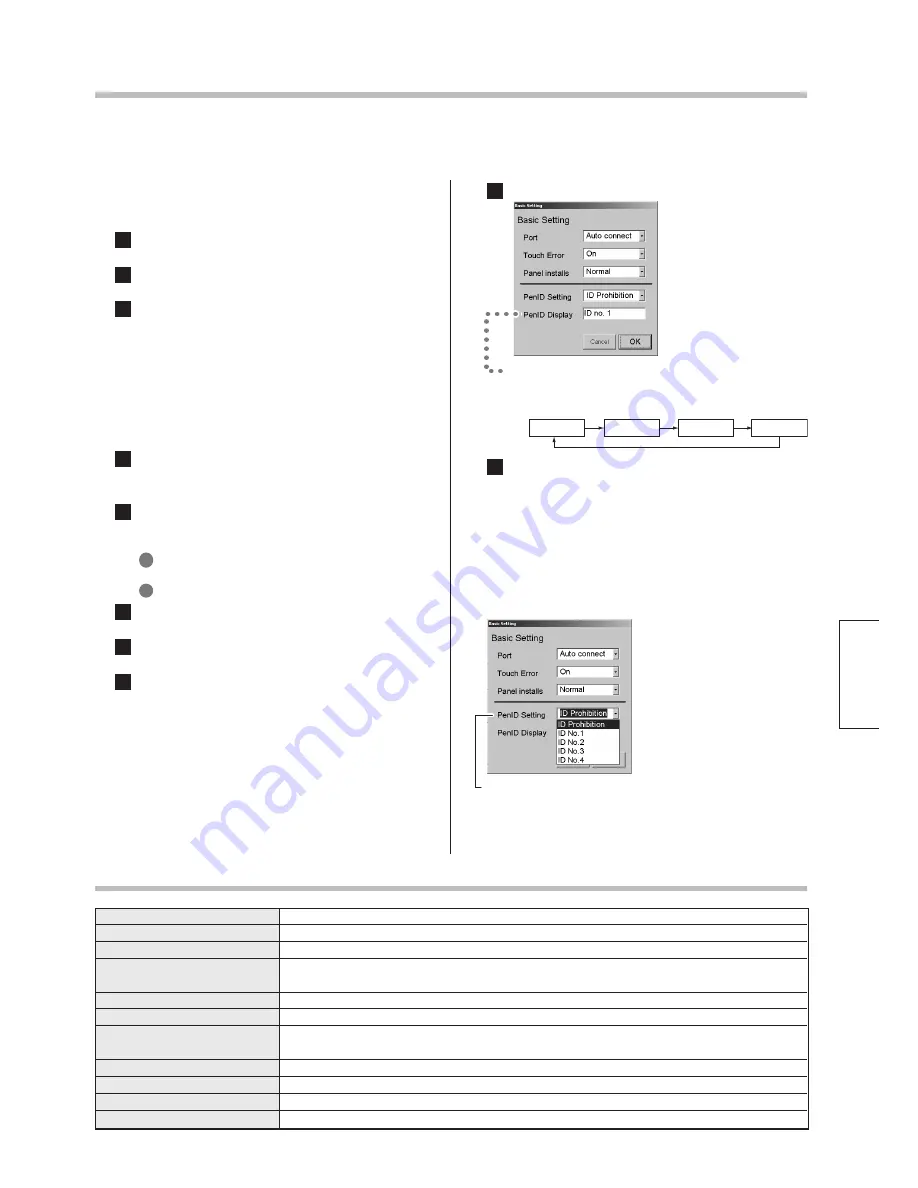
Touch Panel setting for Pen ID

Press “Pen ID Setting”  on the “Basic Setting” screen.

In order to use multiple touch pens and touch panels in close distance, it is necessary to set ID numbers for each
touch pen and touch panel setting, so that all pens can be operated without interfering with each other.

6

Press the function switch, and set the ID number.

By pressing the function switch on the touch

pen, ID number can be changed  with the
following sequence.

7

Press the pen tip. ID number will be set.

Specifications

ID no.1

ID no.2

ID no.3

ID no.4

   Battery
   Battery life
   System
   Transmitted information

   Data transmission time
   IDs (Identification nos.)
   ID setting method

   Infrared wavelength
   Burst frequency
   Number of infrared LEDs
   Transmission distance

LR03, AAA, R03 ... 2 pcs
Approx. 500 hours (With 1 operation per second, using 750 mAh alkaline dry cells)
PIC microcomputer control, Infrared data transmission system

ON/OFF status of pen tip switch
ID (Identification no.)
Approx. 10 ms (1 block of data)
4 nos.

Pen

: Set in ID setting mode

Touch panel : Set with touch panel setting program
940 nm
38 kHz
3
Approx. 5 m

English

Be sure to follow the above procedure when
changing ID numbers.

Содержание TY-TPEN6 - Stylus - Wireless

Страница 1: ...fältig auf Lapicero táctil Manual de instrucciones Antes de conectar utilizar o ajustar este producto lea completamente este manual de instrucciones Guarde este manual para consultarlo en el futuro en caso de ser necesario 日本語 タッチペン 取扱説明書 この取扱説明書をよくお読みのうえ 正しくお使いください 特に 安全上のご注意 2 ページ は ご使用前に必ずお読 みいただき 安全にお使いください お読みになったあとは 保証書と一緒に大切に保管し 必要な時にお読みください 保証書は お買い上げ日 販売店名 などの記入を必ず確かめ 販売店からお受け取りください 製造番号は...

Страница 2: ... 説明しています 下記は絵表示の一例です お使いになる人や他の人への危害 物的損害を未然に防止するため 必ずお守りいただきたいことを 次のように 説明しています 表示内容を無視して誤った使い方をしたときに生じる危害や物的損害の程度を 次の表示で区分し 説明して います 必ずお守りください 新しい電池と古い電池を混ぜたり 指定以外の電池を使用しないでください 間違えますと電池の破裂 液もれにより 火災 けが や周囲を汚損する原因と なることがあります 電池を入れるときには 極性表示 プラス とマイナス の向き に 注意してください 機器の表示通り正しく入 れてください 間違えますと電池の破裂 液もれにより 火災 けが や周囲を汚損する原因に なることがあります 禁止 ...

Страница 3: ...してください テレビやビデオなどのリモコンとタッチぺンを同時に操作すると誤動作する場合がありますので同時 に操作しないでください タッチぺン表面の汚れは柔らかい布で軽くふき取ってください ひどい汚れは 水でうすめた中性洗剤にひたした布を かたく絞ってふき取り 乾いた布で仕上げて ください 水滴が内部に入ると 故障の原因になる場合があります タッチぺンを分解したり改造しないでください 故障の原因になります 長時間使用しないときは 節電のため乾電池をタッチぺン本体から抜いてください 電池の入れかた 電池キャップ 機能スイッチ ペン先 電池キャップを左にまわして外す 電池を 側から先に入れ 電池 キャップを右にまわして取り付ける 1 2 本製品はタッチパネル TY TP42P6 S TY TP50P6 S 専用のペンとして機能します 1 2 2 付属品の確認 ペン先 3 個 単 4 形乾電池 2...

Страница 4: ...チ を ON にする ペン先の交換方法 ペン先 押すとパソコンの マ ウ ス と 同 じ ク リック 左ボタン 操作ができます ペン先を引き抜いて 新しいペン先を差し込む ID no 1 ID no 2 ID no 3 ID no 4 1 2 3 5 6 7 1 2 3 4 ペン先が消耗または破損した場合などは 付属のペン先に交換してください タッチぺン ID 設定 機能スイッチ タッチパネル設定プログラ ム の ユーザー設定 タッチペン機能スイッチ で設定した機能 消しゴム マウス右クリック を使う ときに押しながらペン先を 押します タッチぺンの ID 設定について 複数のタッチペンとタッチパネルを近くで使用する場合 それぞれのタッチペンで個別操作するために タッチペンの ID 番号とタッチパネル側の ID 番号を設定する必要があります 下記の手順で ID 番号 1 4 を設定してくだ...

Страница 5: ... 補修用性能部品の保有期間 当社は このタッチぺンの補修用性能部品 を 製造打ち切り後 8 年保有しています 注 補修用性能部品とは その製品の機能を 維持するために必要な部品です 保証とアフターサービス 松下電器産業株式会社 映像 ディスプレイデバイス事業グループ 567 0026 大阪府茨木市松下町 1 番 1 号 072 622 8181 2003 Matsushita Electric Industrial Co Ltd 松下電器産業株式会社 All Rights Reserved この取扱説明書は再生紙 を使用しています 品番 種類 使用電源 消費電流 電池寿命 方式 伝送情報 データ伝送時間 ID 識別番号 ID 設定方法 赤外線波長 バースト周波数 赤外 LED 数 到達距離 TY TPEN6 タッチぺン DC3 V 単 4 形乾電池 2 個 データ連続送信時 約 36 mA...

Страница 6: ...e is an intense light source or equipment employing infrared rays nearby Keep as far away from such light sources as possible Do not operate the touch pen simultaneously with the remote control for a TV or VCR Incorrect operation may result if operated simultaneously If the touch pen surface becomes soiled gently wipe off the soiling with a soft cloth If the surface becomes extremely soiled soak a...

Страница 7: ...function switch 3 times 5 Press the pen tip The touch pen will enter the ID setting mode Touch Panel setting for Pen ID Press Pen ID Setting on the Basic Setting screen In order to use multiple touch pens and touch panels in close distance it is necessary to set ID numbers for each touch pen and touch panel setting so that all pens can be operated without interfering with each other 6 Press the fu...

Страница 8: ...der Nähe des Stiftes verwendet werden Den Stift nicht zusammen mit einer Fernbedienung für einen Fernseher oder Videorekorder verwenden Bei gleichzeitiger Verwendung können Fehlfunktionen auftreten Wenn die Oberfläche des Stiftes verschmutzt ist sollte sie mit einem weichen Tuch gereinigt werden Wenn der Stift stark verschmutzt ist feuchten Sie ein Tuch mit einem neutralen Reinigungsmittel an wrin...

Страница 9: ... Bildschirms und klicken auf die Schaltfläche mit Basic Setting ID Einstellung für den Touch Pen Den folgenden Vorgang auf dem Touch Panel innerhalb von fünf Metern ausführen 1 Die Kappe des Batteriefachs nach links drehen und entfernen Stellen Sie sicher dass immer Batterien im Touch Pen eingesetzt sind 2 Den Stift so drehen dass die Spitze nach unten zeigt Auf die Stiftspitze drücken und während...

Страница 10: ...de lumière ou un appareil utilisant des infrarouges à proximité Tenez le autant que possible à l écart de telles sources de lumière N utilisez pas le stylet tactile simultanément avec la télécommande d un téléviseur ou un magnétoscope Un mauvais fonctionnement pourrait en résulter Si la surface du stylet tactile devient sale essuyez la avec un chiffon doux Si la surface est très sale trempez un ch...

Страница 11: ...e entre en mode de réglage du numéro d identification Réglage du numéro du panneau tactile pour l identification du stylet Appuyez sur Pen ID setting sur l écran Basic Setting Afin de pouvoir utiliser plusieurs stylets tactiles et panneaux tactiles situés à proximité les uns des autres il est nécessaire de régler un numéro d identification pour chaque stylet et panneau de façon à ce que tous les s...

Страница 12: ... el lápiz táctil y el mando a distancia de un televisor o videograbadora Si los utiliza simultáneamente puede que el funcionamiento no sea correcto Si se ensucia la superficie del lápiz táctil quite suavemente la suciedad pasando un paño blando Si la superficie se ensucia mucho empape un paño en detergente neutro diluido en agua escurra bien el paño limpie la superficie pasando el paño y luego ter...

Страница 13: ... pantalla del PC y haga clic en el botón Basic Setting Puesta de la identificación del lápiz táctil Realice la operación siguiente en el panel táctil estando éste a menos de 5 metros del lápiz táctil 1 Gire la tapa de las pilas del lápiz táctil hacia la izquierda y quítela Asegúrese siempre de que haya pilas introducidas en el lápiz táctil 2 Gire el lápiz táctil de forma que su punta quede hacia a...

Страница 14: ......

Страница 15: ......

Страница 16: ...Matsushita Electric Industrial Co Ltd Web Site http www panasonic co jp global MBS1003S0 Recycled paper Papier recyclé ...

Отзывы: