48
7 25-point calibration
Perform 25-point calibration after adjusting the optical axis
using “LTabMonS”.
7.1.
Prepare setting for adjusting
PC
1. Set the resolution of the PC screen to 1024
×
768.
2. Create a folder directly onto the C Drive for Excel data
processing. C:/25P Adjustment Data Processing
3. There are the files listed below into the "25P Adjustment
Data Processing".
• 25P Adjustment Data Processing.xls
• Grid.exe
• grid.ini
• import.prm
• data (folder)
- Adjustment processing result will be saved in the
data folder automatically ("S/N" xls).
7.2.
Explanation of 25-point Cali-
bration
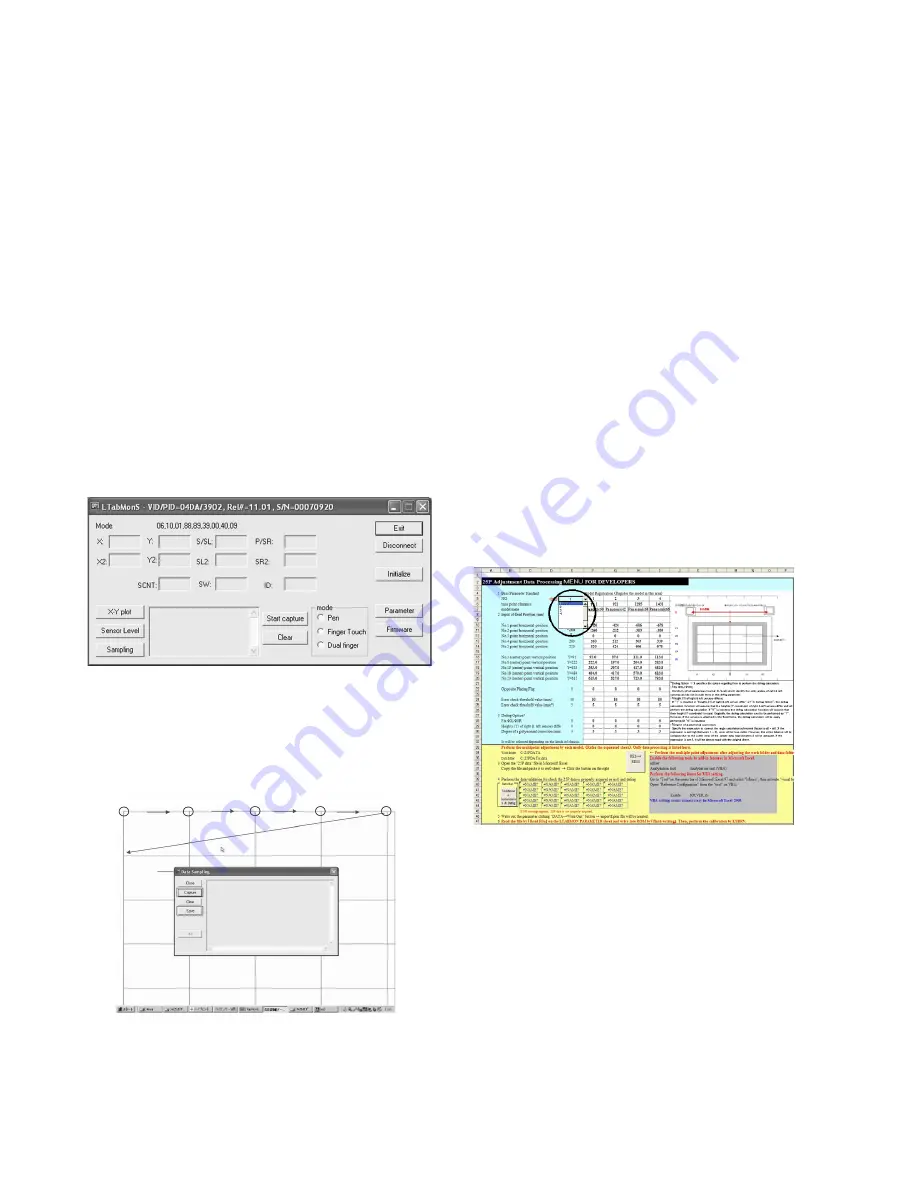
1. To start performing 25-point Calibration
• Start up “LTabMonS”.
a. Press “Sampling”. Detailed sampling data box will
appear.
b. Start up “Grid.exe”.
• About the resolution of the screen.
- The grid has been matched to XGA resolution.
Display it on the screen of XGA (1024
×
768).
• While touching the cross point in the top left corner with
the touch pen, press “Capture (Enter Key)”.
• Move to right one section and press “Capture (Enter
key)”. Repeat the same procedure to get calibration data
from 5 points.
• Move to far left corner in the second row, repeat the
same procedure from left to right to get calibration data.
Collect data from all 25 points.
• When you finish with the last point, press “Save”, and
RES.dat will be saved in "25P Adjustment Data Process-
ing" folder in C drive.
• Right-click to close “Grid”.
• Close “Data Sampling” and “LTabMonS”.
2. Excel data processing (Make sure the setting has been
prepared before hand.)
a. Start up “25P Adjustment Data Procssing.xls”
(Macro).
• Prepare setting of Excel.
- Start up the Visual Basic Editor by selecting "Tools" -
"Macro" -> "Visual Basic Editor".
- Select "Reference Setting" from "Tool".
- Put a check mark on "SOLVER" in available refer-
ences.
- If “SOLVER.xla” doesn’t exist or does not show in ref-
erences, press “reference” to select “SOLVER.xla”.
“SOLVER.xla” should be in C:\Program
Files\Microsoft Office\Library\Solver, or C:\Program
Files\Microsoft Office\OFFICE11\Library\SOLVER.
- Close “Visual Basic Editor”.
- Select “Add-Ins” from “Tools” and put check marks on
“Solver Add-in”, “Analysis ToolPak” and “Analysis
ToolPak-VBA” on “Add-Ins available” list, then click
“OK”.
• Select a number for adjusting model.
Select a number of an adjusting model from the drop-
down menu circled on the figure.
- 1:50 inch TY-TP50P10S
- 2:42 inch TY-TP42P10S
- 3:58 inch TY-TP58P10S
- 4:65 inch TY-TP65P10S
Содержание TY-TP42P10S - Touch-screen - Wired
Страница 6: ...6 4 Operating Instructions ...
Страница 7: ...7 ...
Страница 8: ...8 ...
Страница 9: ...9 ...
Страница 10: ...10 ...
Страница 11: ...11 ...
Страница 12: ...12 ...
Страница 13: ...13 ...
Страница 14: ...14 ...
Страница 15: ...15 ...
Страница 16: ...16 ...
Страница 17: ...17 ...
Страница 18: ...18 ...
Страница 19: ...19 ...
Страница 20: ...20 ...
Страница 21: ...21 ...
Страница 22: ...22 ...
Страница 23: ...23 ...
Страница 24: ...24 ...
Страница 25: ...25 ...
Страница 26: ...26 ...
Страница 27: ...27 ...
Страница 28: ...28 ...
Страница 29: ...29 ...
Страница 30: ...30 ...
Страница 31: ...31 ...
Страница 32: ...32 ...
Страница 33: ...33 ...
Страница 34: ...34 ...
Страница 35: ...35 ...
Страница 36: ...36 ...
Страница 37: ...37 ...
Страница 38: ...38 ...
Страница 39: ...39 ...
Страница 51: ...51 8 Dimensions ...
Страница 55: ...Model No TY TP58P10S Important Safety Notice ...
Страница 56: ...Model No TY TP58P10S Frame Top ...
Страница 57: ...Model No TY TP58P10S Frame Left Right ...
Страница 58: ...Model No TY TP58P10S Frame Bottom ...
Страница 59: ...Model No TY TP58P10S Packing Summary ...


