background image

Using Network Services


(DLNA

 / VIERA

 CAST)

Advanced

71

VIERA CAST™

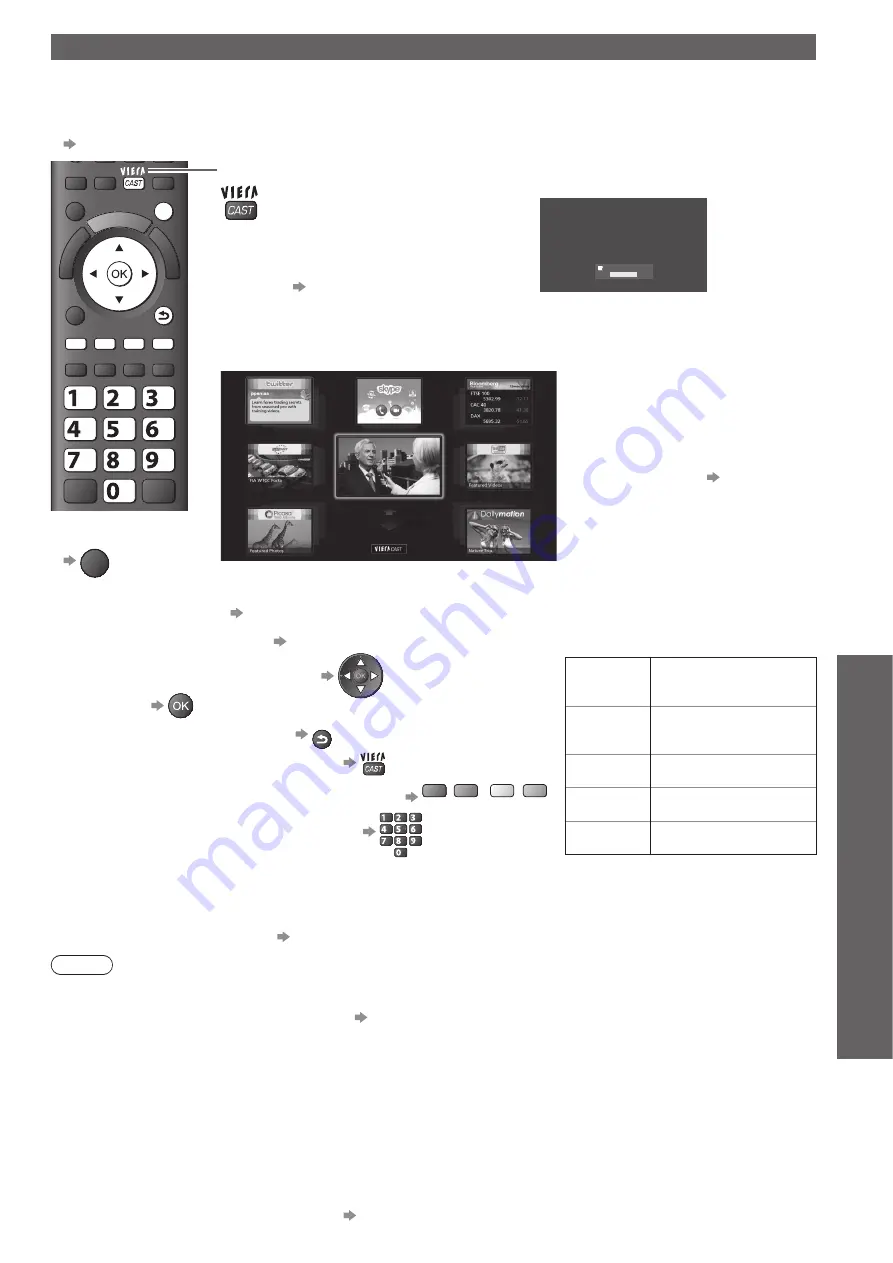
You can access a selection of internet services from VIERA CAST home screen. For example, YouTube, 

Picasa Web Albums (current as of March, 2010).

VIERA CAST requires a broadband internet connection. Dial-up internet connections cannot be used.

Ensure the network connections and network settings are completed.

 “Network connections” (p. 63), “Network Setup” (p. 64 - 67)

EXIT

BACK/

RETURN

abc

def

jkl

ghi

mno

tuv

pqrs

wxyz

To return to TV


EXIT

Access VIERA CAST

Depending on the usage conditions, 

it may take a while to read all the 

data.

You can also access VIERA CAST 

by using VIERA TOOLS 

  “How to Use VIERA TOOLS” 

(p. 26)

Welcome to VIERA CAST™

VIERA CAST™ home screen is subject to change without notice.

The services through VIERA CAST™ are operated by their respective service providers, and service may

be discontinued either temporarily or permanently without notice. Therefore, Panasonic will make no

warranty for the content or the continuity of the services.

All features of websites or content of the service may not be available.

Some content may be inappropriate for some viewers. 

Some content may only be available for specific countries and may be presented in specific languages.

ENTER

Don’t show this message again

Example:

Messages might be displayed before 

VIERA CAST home screen.

Please read these instructions carefully 

and follow the on screen instructions.

MORE

BACK

VIERA CAST home screen

Example:

Video communication 

(ex. Skype™) requires an exclusive 

Communication Camera TY-CC10W 

(optional accessory   p. 6). 

For details, read the manual of the 

Communication Camera.

Note

Be sure to update the software when a software update notice is displayed on the TV screen. If the software is 

not updated, you will not be able to use VIERA CAST.

You can update the software later manually   “Software Update” in the Network Setup Menu (p. 64)

VIERA CAST™ home screen is subject to change without notice.

The services through VIERA CAST™ are operated by their respective service providers, and service may be 

discontinued either temporarily or permanently without notice. Therefore, Panasonic will make no warranty for the 

content or the continuity of the services.

All features of websites or content of the service may not be available.

Some content may be inappropriate for some viewers.

Some content may only be available for specific countries and may be presented in specific languages.

Depending on the connection environment, the internet connection may be slow or may not be successful.

During the operation, audio signal is output from AV1, AV2, AUDIO OUT and DIGITAL AUDIO OUT terminals. 

But no video signals are output. AV1 and AV2 can output audio signal if “AV1 / AV2 out” is set to “Monitor” in the 

Setup Menu (p. 30).

You can set to restrict using VIERA CAST 

 “Child Lock” (p. 42)

Turn the TV off, and then on again when changing or reconnecting the network connection.

How to operate VIERA CAST 

(current as of March, 2010)

To go to the next level 

 Select “MORE”

To back to the previous level 

 Select “BACK”

To move the cursor / select the item 


To access 


To return to the previous screen 


BACK/

RETURN

To return to VIERA CAST home screen 


When the key words are displayed on colour bar 


red


green


yellow


blue

When options with numbers are displayed 


abc

def

jkl

ghi

mno

tuv

pqrs

wxyz

Setup menu

(Items in the “Setup” may change 
without notice.)

Customize 

HomeScreen

Changes the position 

of each services on 

VIERA CAST home screen

My Account

Confirms or removes the 

account information of the TV 

you entered on VIERA CAST

Lock

Sets to restrict access to 

some services

Beep

Sets beep sound On or Off 

when operating VIERA CAST

Notices

Displays the information of 

VIERA CAST

USB Keyboard

You can input characters on VIERA CAST screen by using the USB Keyboard connected to the USB port.

You cannot use two or more keyboards simultaneously.

The USB Keyboard which requires the driver is not supported.

To change the language type

   “USB Keyboard Layout” (p. 33)

Содержание TXPF42G20S

Страница 1: ...tions carefully before operating this product and retain them for future reference The images shown in this manual are for illustrative purposes only Please refer to Pan European Guarantee Card if you need to contact your local Panasonic dealer for assistance Model No TX P42G20E TX P42G20ES TX P46G20E TX P46G20ES TX P50G20E TX P50G20ES ...

Страница 2: ...oes not meet the standards of DVB T or DVB C Not all the features are available depending on the country area broadcaster and service provider Not all CI modules work properly with this TV Consult your service provider about the available CI module This TV may not work correctly with CI module that is not approved by the service provider Additional fees may be charged depending on the service prov...

Страница 3: ...k of content on this or any other device may require permission from the owner of the copyright or other such rights in that content Panasonic has no authority to and does not grant you that permission and explicitly disclaims any right ability or intention to obtain such permission on your behalf It is your responsibility to ensure that your use of this or any other device complies with applicabl...

Страница 4: ...remove the rear cover as live parts are accessible when it is removed There are no user serviceable parts inside High voltage components may cause serious electrical shock Have the TV checked adjusted or repaired at your local Panasonic dealer Do not expose to rain or excessive moisture To prevent damage which might result in electric shock or fire do not expose this TV to rain or excessive moistu...

Страница 5: ...dby mode in the following conditions no signal is received and no operation is performed for 30 minutes in Analogue TV mode Off Timer is active in the Setup Menu p 19 no operation is performed for the period selected in Auto Standby p 33 This function does not affect the recording of Timer Programming Direct TV Recording and One Touch Recording Keep the TV away from these types of equipment Electr...

Страница 6: ... may be on the following web site English only http panasonic jp support global cs tv Communication Camera TY CC10W Caution This camera can be used on VIERA CAST p 71 Please also read the manual of the camera Depending on the area this optional accessory may not be available For details consult your local Panasonic dealer Wall hanging bracket TY WK4P1RW View from the side Rear of the TV Holes for ...

Страница 7: ... installed the TV may fall over and personal injury may result Two or more people are required to install and remove the TV If two or more people are not present the TV may be dropped and personal injury may result Assembly screw 3 silver Assembly screw 4 black Pole TBLA3828 TX P42G20E TX P42G20ES TBLA3834 TX P46G20E TX P46G20ES TX P50G20E TX P50G20ES Base TBLX0149 TX P42G20E TBLX0162 TX P42G20ES ...

Страница 8: ...ections and choices Press after selecting channel positions to quickly change channel Displays the Channel List Volume Up Down Channel Programme Information p 17 Displays channel and programme information Index p 23 Returns to the teletext index page teletext mode Coloured buttons Used for the selection navigation and operation of various functions Exit Returns to the normal viewing screen Numeric...

Страница 9: ...Standby mode by the remote control Increases or decreases the channel position by one When a function is already displayed press to increase or decrease the selected function When in Standby mode switches TV On Press for about 1 second Changes the input mode C A T S Contrast Automatic Tracking System sensor Senses brightness to adjust picture quality when Eco Mode in the Picture Menu is set to On ...

Страница 10: ...V only Mains lead supplied RF cable Terrestrial aerial Rear of the TV AC 220 240 V 50 60 Hz To remove from the TV Push until both side tabs click Press both tabs and pull on mains connector to release tabs Make sure that the mains lead is securely fixed snaps To loosen Keep pushing both side snaps Set the tip in the hooks Insert the clamper in a hole Attach the clamper Clamper Mains Lead Bundle th...

Страница 11: ... V 50 60 Hz AC 220 240 V 50 60 Hz RF cable DVD Recorder or VCR Rear of the TV Set top box RF cable RF cable Fully wired SCART cable Fully wired SCART cable Fully wired HDMI compliant cable Example 2 Connecting DVD Recorder VCR TV DVD Recorder or VCR Example 3 Connecting DVD Recorder VCR and Set top box TV DVD Recorder VCR and Set top box Note Connect to the TV s AV1 AV2 for a DVD Recorder VCR supp...

Страница 12: ...ska čeština Hrvatski Français Norsk Magyar Slovenščina Italiano Suomi Slovenčina Latviešu Español Türkçe Български eesti keel Português Nederlands Еλληνικά Românǎ Lietuvių select set 3 Select your country Country Germany Denmark Poland Austria Sweden Czech France Norway Hungary Italy Finland Slovakia Spain Luxembourg Slovenia Portugal Switzerland Malta Andorra Belgium Estonia Netherlands Lithuania...

Страница 13: ...el 2 BBC Radio Wales 3 E4 Type Quality Free TV 10 Free TV 10 Free TV 10 Channel Name DVB C Auto Setup Searching This will take about 3 minutes Free TV 3 Pay TV 0 Radio 0 DVB T Auto Setup DVB T Auto Setup CH Channel Name Type Quality Searching This will take about 3 minutes Free TV 4 Progress CH 5 69 62 CBBC Channel Free TV 10 62 BBC Radio Wales Free TV 10 62 E4 Free TV 10 62 Cartoon Nwk Free TV 10...

Страница 14: ...connect the Wireless LAN Adaptor and the access point Ensure that your access point supports WPS for this setup WPS Wi Fi Protected Setup Search for access point Access points found automatically are listed Available Access Points Access Point A 11n 2 4GHz 11n 5GHz SSID No Wireless type Encrypt Reception Access Point B Access Point C 11n 5GHz 1 2 3 Select your desired access point select access En...

Страница 15: ...cessing Shipping Condition Shipping Condition p 45 Auto Setup is now complete and your TV is ready for viewing To check channel list at a glance Using TV Guide p 20 To edit or hide skip channels Tuning and Editing Channels p 36 39 If tuning has failed check the connection of the RF cable and then follow the on screen instructions Note If tuning has failed or to retune all channels Auto Setup p 34 ...

Страница 16: ...en instructions 1 Turn power on Press for about 1 second Mains power On Off switch should be On p 9 2 Select the mode TV Selection DVB C DVB T Analogue TV access select The selectable modes vary depending on the stored channels p 12 If TV Selection menu is not displayed press the TV button to switch the mode 1 BBC ONE WALES 20 35 Coronation Street 20 00 20 55 Now For info press Change category All...

Страница 17: ...btitles AD Radio For info press 3 ITV 19 35 itv1 All Analogue Channels CH23 Stereo 45 Example Analogue Channel number Sound mute On Bad signal Poor TV signal quality Encrypted Scrambled programme Dolby D Dolby D Dolby Digital Plus or Dolby Digital audio track Subtitle service available Teletext service available Multiple audio available Multiple video available Multiple audio and video available S...

Страница 18: ...n only ASPECT Press repeatedly until you reach the desired mode Auto The best ratio is chosen and the image expanded to fill the screen For details p 82 16 9 4 3 Full Directly displays the image at 16 9 without distortion anamorphic Displays a 4 3 image enlarged horizontally to fit the screen HD signal only 14 9 Zoom1 Displays the image at the standard 14 9 without distortion Displays a 16 9 lette...

Страница 19: ...ge for teletext if available MPX Analogue mode Selects multiplex sound mode if available Sound Menu p 29 Volume Correction Adjusts volume of individual channel or input mode USB Remove Safely Takes this operation to remove the connected USB device safely from the TV Last view Switch to previously viewed channel or input mode easily LAST VIEW Press again to return to the present view Note Switching...

Страница 20: ...l Info Change display mode Select Advert GUIDE OPTION All Types All Channels Current date and time Programme Landscape Displays by channel TV Guide time Channel position and name Advertisement TV Guide date Example Select programme Select channel RETURN Page up Page down 24 hours Prog Type Category EXIT D 1 BBC ONE D 7 BBC THREE D 14 E4 D 70 BBC FOUR 19 30 20 00 20 00 20 30 20 30 21 00 21 00 22 00...

Страница 21: ... it will appear Select Timer Programming and set Ext Rec or USB HDD Rec to record from the time you finish the timer programming event setting View Das Erste 19 30 20 00 Timer Programming select access Note This function is not available in Analogue mode Timer Programming only works reliably if correct time information is received via the signal from the broadcaster or service provider No other ch...

Страница 22: ...elect among subject blocks blue To select next subject within the subject block After the last subject it moves to the next subject block yellow What is List mode In List mode four differently coloured page numbers are situated at the bottom of the screen Each of these numbers can be altered and stored in the TV s memory Store frequently viewed pages p 23 To change mode Teletext in the Setup Menu ...

Страница 23: ...to change Enter new page number press and hold abc def jkl ghi mno tuv pqrs wxyz View sub page View sub page Only when teletext is more than one page Appears at top of the screen To view specific sub page MENU blue Enter the 4 digit number example P6 mno Sub pages The number of sub pages varies depending on the broadcasters up to 79 pages It may take some time for searching during which time you c...

Страница 24: ... Perform and Check the setup of the equipment 2 Display the Input select menu AV 3 Select the input mode connected to the equipment Input Selection AV1 AV2 S AV3 COMPONENT PC HDMI1 HDMI2 HDMI3 HDMI4 TV Media Server select watch You can also select the input using the AV button on the remote control or the side panel of the TV Press the button repeatedly until the desired input is selected You cann...

Страница 25: ... and hold to search backward Fast forward Skip Search VCR Fast forward view the picture rapidly forward DVD video content Skip to the next track or title not available for the operation of USB HDD Recording Press and hold to search forward Pause Pause Resume DVD Press and hold to play at slow speed PROGRAMME Channel Up Down Select channel REC Record Start recording How to change the code for the t...

Страница 26: ... two or more available devices are connected a selection screen will be displayed Please select the correct description and access Video Video mode p 58 When two or more available devices are connected a selection screen will be displayed Please select the correct description and access Music Music mode p 61 When two or more available devices are connected a selection screen will be displayed Plea...

Страница 27: ...0 0 60 Off Eco Mode example Picture Menu change store or access Required by some functions To return to TV at any time EXIT To return to the previous screen BACK RETURN To change menu pages up down Choose from among alternatives To reset the settings To reset the picture settings only Reset to Defaults in the Picture Menu p 28 To reset the sound settings only Reset to Defaults in the Sound Menu p ...

Страница 28: ...Not valid on VIERA CAST If the certified professional dealer sets these modes Professional1 and Professional2 may be displayed as isf Day and isf Night Contrast Brightness Colour Sharpness Increases or decreases the levels of these options according to your personal preference Tint With an NTSC signal source connected to the TV the picture hue can be adjusted to suit your taste For NTSC signal rec...

Страница 29: ...on Balance Adjusts volume level of right and left speakers Headphone Volume Adjusts the volume of the headphones Surround Surround sound settings Off V Audio V Audio Surround V Audio Provides a dynamic enhancer of width to simulate improved spatial effects V Audio Surround Provides a dynamic enhancer of width and depth to simulate improved spatial effects Volume Correction Adjusts the volume of in...

Страница 30: ...settings for the recording p 50 Link Settings VIERA Link Sets to use VIERA Link functions Off On p 75 HDMI Content Type Adjusts the picture settings according to the content type signal from the connected equipment via HDMI cable Off Auto This function is available if the connected equipment supports HDMI Content Type The content type information will be displayed for several seconds when this fun...

Страница 31: ...nnels p 37 Auto Setup Automatically sets the DVB T channels received in the area p 35 Manual Tuning Sets the DVB T channels manually p 37 Update Channel List Updates DVB T Channel List while keeping your settings p 36 Favourite Network Selects your favourite network for each broadcasters only available in some countries New Channel Message Selects whether to give a notification message when a new ...

Страница 32: ...button is pressed TV Guide Channel List TV Guide Electronic Programme Guide EPG is available To use EPG p 20 Channel List EPG is not available and the channel list will appear instead of it Input Labels Labels or skips each input terminal p 43 Banner Display Timeout Sets how long the Information banner p 17 stays on screen 0 No display 1 2 3 4 5 6 7 8 9 10 seconds Playing Time Display Set to On to...

Страница 33: ...ces the picture resolution to make the image sharper Off Mid Max This function is available for SD Standard definition signal As for HD High definition signal this function is available when aspect mode is set to 16 9 16 9 Overscan is set to On 4 3 Full or Zoom Not valid on PC VIERA CAST and Media Player Auto Standby Sets the time the TV automatically goes to Standby mode when no operation is perf...

Страница 34: ...ol Rate Quick Auto Network ID 41001 362 MHz Normally set Symbol Rate Auto Search mode Scan mode Frequency Network ID Store set select select enter abc def jkl ghi mno tuv pqrs wxyz Full scans the whole frequency range Quick scans the suitable frequency in your country Enter the Home Frequency and Network ID specified by your cable provider Depending on the country you select Auto is displayed and ...

Страница 35: ...up Manual Tuning Access 6 Start Auto Setup All DVB T tuning data will be erased DVB T Auto Setup DVB T DVB T Auto Setup CH Channel Name Type Quality Searching This will take about 3 minutes Free TV 4 Progress CH 5 69 62 CBBC Channel Free TV 10 62 BBC Radio Wales Free TV 10 62 E4 Free TV 10 62 Cartoon Nwk Free TV 10 Pay TV 0 Radio 0 All analogue tuning data will be erased Analogue Auto Setup Analog...

Страница 36: ...new channels delete removed channels update channel name and position automatically to Channel List DVB T Update Channel List CH Channel Name Type Quality Searching This will take about 3 minutes Free TV 0 Progress CH 5 69 Pay TV 0 Radio 0 Channel List is updated while keeping your settings in Favourites Edit Channel List Child Lock etc Display a notification message New Channel Message Selects wh...

Страница 37: ...els Edit DVB Channels Channel List You can hide unwanted DVB channels The hidden channels cannot be displayed except in this function Use this function to skip unwanted channels Select a channel and reveal hide All DVB C Channels Sorting 123 70 72 105 719 720 1 7 CBBC Channel Cartoon Nwk BBCi BBC Radio Wales BBC Radio Cymru BBC ONE Wales BBC THREE reveal hide select reveal hide skip To reveal all ...

Страница 38: ...ogue Tuning Menu Language Display Settings Common Interface USB HDD Setup Timer Programming access select 5 Select one of the following functions Analogue Tuning Menu Channel List Access Auto Setup Access Manual Tuning Access Auto Setup Retuning from Setup Menu p 35 access select The function items vary depending on the country you select p 12 6 Set You can retune channels or skip unwanted channel...

Страница 39: ...e Edit channel name Name A B C D E F G H I J K L M N U V W X Y Z 0 1 2 3 4 5 6 a b c d e f g h i j k l m n u v w x y z _ O P Q R S T 7 8 9 o p q r s t maximum five characters set select BACK RETURN You can set characters by using numeric buttons Characters table for numeric buttons p 84 Note If a VCR is connected only with the RF cable edit VCR Set Analogue channel manually Manual Tuning Fine Tuni...

Страница 40: ...onnected to the TV If a compatible recorder with Q Link VIERA Link or similar technologies is connected to the TV p 74 and p 75 and the Link Settings p 30 are completed no setting of the recorder is required Also read the manual of the recorder If the recorder is not compatible with Q Link VIERA Link or similar technologies set Q Link in the Setup Menu p 30 to the connected terminal AV1 or AV2 and...

Страница 41: ...sage appears if you are watching TV Reminder to remind watching the programme When you are watching TV a reminder message appears 2 mins before the start time Press the OK button to switch to the programmed channel Set the channel date and time repeat the operations as below Set items in the order of to select the item set and can also be entered with numeric buttons abc def jkl ghi mno tuv pqrs w...

Страница 42: ...to be locked To cancel Select the locked channel input To jump to the top of the next input red To lock all green To cancel all locks yellow To sort channel names in alphabetical order blue Child Lock List TV and AV Name Input Lock Type BBC 1 Wales DVB C FreeTV BBC THREE DVB T Lock FreeTV E4 DVB T Lock FreeTV VCR Analogue Lock Analogue BBC1 Analogue Lock Analogue Analogue Lock Analogue AV1 Externa...

Страница 43: ...ENT HDMI1 HDMI2 HDMI3 AV2 S AV3 COMPONENT HDMI1 HDMI2 HDMI3 HDMI4 HDMI4 1 2 PC PC set select Input Labels 2 2 Analogue Analogue DVB C DVB C DVB T DVB T The labels you set will be displayed in Input Selection menu p 24 TV Selection menu p 16 or banner If Skip is selected you cannot select the mode For easier identification and selection of the input mode you can label each input mode or skip termin...

Страница 44: ...es or regions Although CI module may enable you to view some services this TV does not guarantee all services e g pay TV Please use only the approved CI module by the broadcaster Consult your local Panasonic dealer or broadcasters for more information and conditions of the services Caution Turn Off Mains power On Off switch whenever inserting or removing the CI module If a view card and a card rea...

Страница 45: ...esets the TV to its original condition i e no channels tuned in All settings other than USB HDD registration are reset channels picture sound settings etc To return to TV EXIT Restore Settings Shipping Condition Check the message and initialise EXIT RETURN Confirm All tuning data will be erased Are you sure Are you sure Shipping Condition confirm confirm start Shipping Condition Follow the on scre...

Страница 46: ... in Standby Off System Update Search Now set select Every time you set the TV automatically performs a search in standby and downloads an update if any software updates are available The automatic updating is performed under the following conditions Standby TV turned Off with the remote control Recording of Timer Programming Direct TV Recording or One Touch Recording is not in progress If System U...

Страница 47: ...usts the white balance of dark red area G Cutoff Adjusts the white balance of dark green area B Cutoff Adjusts the white balance of dark blue area Gamma Switches the gamma curve S Curve 1 8 2 0 2 2 2 4 2 6 Reset to Defaults Press the OK button to reset to the default Advanced Settings Setup PC Setup Input Resolution Switches to a wide view VGA 640 480 pixels WVGA 852 480 pixels XGA 1 024 768 pixel...

Страница 48: ...ed picture settings for each input and Viewing Mode To use this function completely set Advance isfccc to On in the Setup Menu p 32 For PC input mode some functions are available without setting Advance isfccc To return to TV EXIT Lock the picture setting Lock Settings Advanced Settings can be locked for each Viewing Mode and input Additionally Contrast Brightness Colour Sharpness Tint and Reset t...

Страница 49: ...ts Reset 2 2 Gamma Menu Item Adjustments Configurations alternatives Picture Advanced Settings White Balance R Gain Adjusts the white balance of bright red area G Gain Adjusts the white balance of bright green area B Gain Adjusts the white balance of bright blue area R Cutoff Adjusts the white balance of dark red area G Cutoff Adjusts the white balance of dark green area B Cutoff Adjusts the white...

Страница 50: ...annot playback its contents with another TV including the TV of the same model number or any PCs If your TV is repaired due to a malfunction the registered USB HDD may not be available with your repaired TV Register this USB HDD again to use it with your repaired TV All data in it will be erased USB HDD connection Connect the USB HDD to the USB 1 or 2 port USB cable USB HDD socket outlet Be sure t...

Страница 51: ... the name select Yes Set characters one by one Store USB HDD Name USB HDD 1 A B C D E F G H I J K L M N U V W X Y Z 0 1 2 3 4 5 6 a b c d e f g h i j k l m n u v w x y z _ O P Q R S T 7 8 9 o p q r s t set select BACK RETURN You can set characters by using numeric buttons USB HDD Registration Yes No Name USB HDD 1 Edit name select set Confirmation to enable USB HDD for recording If the registered ...

Страница 52: ... p 50 and p 51 Ensure not to connect or disconnect any USB devices during USB HDD recording Otherwise the recording may not work properly 1 Display the menu MENU 2 Select Setup Main Menu Picture Sound Setup access select 3 Select USB HDD Setup Setup Menu 1 2 Child Lock DVB C Tuning Menu Language Display Settings Common Interface Access Off USB HDD Setup Link Settings Off Timer Timer Programming ac...

Страница 53: ...ne Touch Recording REW LIVE TV On 180 minutes select When you select On the recording will start automatically To operate the REW LIVE TV Set the position to TV DVD VCR TV To pause To search backward press and hold After pausing or searching backward the following buttons are available to operate search backward pause search forward playback stop stops the current operation and goes back to live T...

Страница 54: ...ard exFAT SDHC Card SD Card FAT16 or FAT32 Compliant card type maximum capacity SDXC Card 64 GB SDHC Card 32 GB SD Card 2 GB miniSD Card 2 GB requiring miniSD adapter If miniSD Card is used insert remove it together with the adapter Check the latest information on the card type at the following website English only http panasonic jp support global cs tv USB Flash Memory format FAT16 FAT32 or exFAT...

Страница 55: ...ect access USB Remove Safely Name Product USB Flash Disk select set Starting Media Player To return to TV EXIT or SD CARD To return to the previous screen BACK RETURN 1 Insert the SD Card or USB Flash Memory For registered USB HDD ensure the connection status is Yes p 51 2 Switch to Media Player SD CARD When SD Card is inserted switching will be done automatically 3 Start Media Player Media Player...

Страница 56: ... the photos without recorded date is shown as Unknown Display the view selection Select the sort type Select one of the sorted group to display the thumbnail of the selected group green Folder view Sort by Date Sort by Month select access Sort by Date Slideshow Contents Select Info EXIT Access Select RETURN View Select 24 11 2009 01 12 2009 03 12 2009 20 12 2009 22 12 2009 23 10 2009 25 10 2009 01...

Страница 57: ... colour effect of photos on Single view and Slideshow Off Sepia Gray scale This function is not available when Frame is set to Drift Gallery or Cinema Transition Effect Selects the transition effect for switching the photo during the slideshow Off Fade Slide Dissolve Motion Random Fade The next photo fades in gradually Slide The next photo slides and appears from the left side Dissolve The photo i...

Страница 58: ... display DivX files and then select one of the file to be played back Playback from the selected scene in the title AVCHD or MPEG2 Playback will start from the selected scene to the end of the title Select the title Select the scene to start playback access select Title view Trip1 Contents Select Info EXIT Play RETURN Trip1_8 Trip1_1 Trip1_2 Trip1_3 Trip1_4 Trip1_5 Trip1_6 Trip1_7 Media Player Vid...

Страница 59: ...8 10 2009 12 00 Duration 00 20 Playback the content from the list Select the content Start playback select Delete the selected content Select the content Delete the content Confirm select red Delete DVB T BBC 1 Das Erste Wed 28 10 2009 12 00 00 20 How to operate in the playback Playback Title Date Time Das Erste 28 10 2009 12 00 00 02 05 00 15 39 EXIT RETURN Operation guide Information banner To d...

Страница 60: ...ing for digital audio output signal from DIGITAL AUDIO OUT terminal Auto PCM Auto Dolby Digital is output as Dolby Digital Bitstream MPEG is output as PCM PCM Digital output signal is fixed to PCM Video Setup Setup the settings for Video mode These settings are not available for the registered USB HDD Display the menu MENU Select Video Setup Select Other Settings Select the items and set Sound Mai...

Страница 61: ... music folders in the SD Card or USB Flash Memory will be displayed You can also access Music mode directly by using VIERA TOOLS How to use VIERA TOOLS p 26 To display the information of the highlighted title 1 3 Folder name My Music_1 Number of files 11 My Music_1 folder number total folder number Playback from Folder view Playback all the files in the selected folder will start Select the folder...

Страница 62: ...e TV TwonkyMedia server 5 1 x and Windows 7 are the server software that has been tested for the performance with this TV current as of January 2010 For installing read the manual of the server software The DLNA control function of Windows 7 is not supported with this TV When a server software for the media server is installed on the PC the data may be at risk of being accessed by other people Ple...

Страница 63: ...your modem has broadband router functions but there are no vacant ports use a hub Ensure that the Broadband routers and hubs are compatible with 10BASE T 100BASE TX If you use the equipment compatible only with 100BASE TX category 5 LAN cables are required Example 2 You can connect the TV and the equipment directly to use DLNA features LAN cable DLNA Certified media server for example PC DIGA Reco...

Страница 64: ...re Update MAC Address ab cd ef gh ij kl access select Set characters one by one BACK RETURN VIERA Name Name VIERA A B C D E F G H I J K L M N U V W X Y Z 0 1 2 3 4 5 6 a b c d e f g h i j k l m n u v w x y z _ O P Q R S T 7 8 9 o p q r s t select set You can set characters by using numeric buttons Characters table for numeric buttons p 84 Update TV s software Accesses the specific web site to upda...

Страница 65: ...ly Select Proxy Settings and set the items Network Setup Network Type Wired IP DNS Settings Proxy Settings Connection Test VIERA Name VIERA Access Software Update MAC Address ab cd ef gh ij kl Access Point Settings access select After settings return to Network Setup screen BACK RETURN Proxy Sets Proxy address This is the address of the relay server that is connected to the target server instead o...

Страница 66: ...ess ab cd ef gh ij kl Wired is selected in Network Type No adaptor Wireless LAN Adaptor is not connected No settings Setting for connecting to the access point has not been set Connecting Connecting to the access point in progress Connected Wireless LAN connection to the access point succeeded To display the current access point settings press the OK button To change the settings select No on this...

Страница 67: ... 6 a b c d e f g h i j k l m n u v w x y z _ O P Q R S T 7 8 9 o p q r s t Enter the encryption key of the access point Set characters one by one Store select set BACK RETURN You can set characters by using numeric buttons Access Point Settings Encryption key is set to XXXXXXXX Select Yes to confirm Select No to change Yes No Select Yes select confirm To re enter the encryption key select No WPS P...

Страница 68: ...hoto or video to be viewed Pixel Format 3648x2736 JPEG Media Server SERVER1 Slideshow Info Select EXIT RETURN View P000102 2008 10 05 09 54 P000135 2008 11 20 13 18 P000180 2008 12 07 11 31 P000214 2008 12 10 15 20 P000251 2008 12 19 12 39 P000276 2008 12 25 14 06 P000293 2009 01 06 13 52 M10025 2009 01 12 15 56 M10042 2009 01 20 10 08 M10054 2009 01 28 14 48 M10078 2009 02 09 19 58 28 File list a...

Страница 69: ...ayback Playback Fast forward Stop To the previous scene red To the next scene green To change aspect only for the 4 3 video content ASPECT To return to list BACK RETURN For DIGA Recorder Control the DIGA Recorder The screen of the DIGA Recorder will be displayed You can control the functions of the DIGA Recorder with this TV remote control according to the operation guide Before operating register...

Страница 70: ...ged reduced moved up or moved down Random Each transition is selected at random Interval Selects slideshow interval 5 10 15 30 60 90 120 seconds This function is not available when Transition Effect is set to Motion Repeat Slideshow repeat Off On Video Setup Other Settings Video Preview Sets to start the preview of the title or scene in the thumbnail screen Off On Image may not be displayed for an...

Страница 71: ...RA CAST home screen is subject to change without notice The services through VIERA CAST are operated by their respective service providers and service may be discontinued either temporarily or permanently without notice Therefore Panasonic will make no warranty for the content or the continuity of the services All features of websites or content of the service may not be available Some content may...

Страница 72: ...ideo Camera LUMIX Camera with VIERA Link function Preset download 2 Easy playback Power on link Power off link Reduce unnecessary power consumption in standby 3 3 Auto standby for unnecessary equipment 3 3 Pause Live TV programme 2 4 Direct TV Recording 2 Control the menu of the connected equipment by VIERA remote control 1 1 1 Speaker control Connection HDMI cable DIGA Recorder DVD Player Blu ray...

Страница 73: ...t connect the equipment supporting VIERA Link to the TV s AV1 or AV2 terminal and set AV1 AV2 out to Monitor in the Setup Menu p 28 Use any one of the optical digital audio cable RCA cable and SCART cable for audio output from the TV 1 Available with the equipment which has HDAVI Control 2 or later function 2 Available with the equipment which has HDAVI Control 3 or later function 3 Available with...

Страница 74: ...ing is performed the recorder is automatically turned on if it is in Standby mode Changing channel or turning off the TV is available while the recorder is recording from its own tuner Changing channel is not available while the recorder is recording from the TV tuner To stop recording Unlock the tuner G U I D E Unlock Continue Tuner Locked Press EXIT to unlock and stop recording EXIT Power on lin...

Страница 75: ...ad the manual of the equipment For optimal recording the settings of the recorder may need to be changed For details read the manual of the recorder Download preset channel language country region settings Preset download see below Set VIERA Link On in the Setup Menu VIERA Link p 30 Set up the TV After connection turn the equipment on and then switch the TV on Select the input mode to HDMI1 HDMI2 ...

Страница 76: ...tly Unlock the tuner G U I D E Unlock Continue Tuner Locked Press EXIT to unlock and stop recording EXIT Features available Using VIERA Link Menu Features available Reduce unnecessary power consumption in standby Standby Power Save Set Standby Power Save On in the Setup Menu to use this function Standby Power Save p 30 The power consumption in Standby mode of the connected equipment is controlled ...

Страница 77: ...ay VIERA Link Menu 2 Select Pause Live TV and pause VIERA Link Menu Pause Live TV Start Direct TV Rec VIERA Link Control Speaker Selection Start Recorder Home Cinema select pause The TV picture will be paused Live TV programme is recorded on HDD from where it was paused If the paused TV picture disappears after a few minutes OPTION the paused picture will be restored Follow the operation guide to ...

Страница 78: ...ate it Use its own remote control to operate the equipment 1 Display VIERA Link Menu 2 Select VIERA Link Control VIERA Link Menu Pause Live TV Start Direct TV Rec VIERA Link Control Speaker Selection Start Recorder Home Cinema select 3 Select the equipment you want to access The type of the connected equipment is displayed Select the type of the equipment and access VIERA Link Menu Pause Live TV S...

Страница 79: ...RA Link features p 72 and p 73 Preparations p 75 Access and control the speaker volume TV 1 Display VIERA Link Menu 2 Select Speaker Selection VIERA Link Menu Pause Live TV Start Direct TV Rec VIERA Link Control Speaker Selection Start Recorder Home Cinema select 3 Set to Home Cinema or TV set Home Cinema Player theatre Blu ray Disc theatre or Amplifier will be automatically turned on if it is in ...

Страница 80: ...m To enjoy the sound from the external equipment in multi channel sound e g Dolby Digital 5 1ch connect the equipment to the amplifier For the connections read the manuals of the equipment and amplifier Types of connectable equipment to each terminal Terminal Recording Playback equipment AV1 AV2 AV3 Side panel of the TV V L R To record playback videocassettes DVDs VCR DVD Recorder To watch DVDs DV...

Страница 81: ...IO OUT R L DIGITAL AUDIO OUT ETHERNET USB 2 1 1 2 3 4 1 2 1 Headphones Camcorder Game equipment To adjust volume Headphone Volume in the Sound Menu p 29 Camcorder HDMI equipment USB devices M3 stereo mini plug Viewing Listening Internet Network Hub or Router Installing the Ferrite core Pull back the tabs in two places Wind the cable twice Open Press the cable through and close LAN cable Ferrite co...

Страница 82: ...ontrol signal through SCART HDMI terminal Letterbox detection or Justify to fill the screen to determine This process may take several minutes depending on the darkness of the image Letterbox detection If black bands at the top and bottom of the screen are detected Auto mode chooses the best ratio and expands the image to fill the screen If no aspect signals are detected Auto mode enhances the ima...

Страница 83: ...s and folders may not be displayed When there are many files and folders operation may take time to complete or some files may not be displayed or playable ABOUT DIVX VIDEO ON DEMAND This DivX Certified device must be registered in order to play DivX Video on Demand VOD content To generate the registration code locate the DivX VOD section in the Setup Menu Go to vod divx com with this code to comp...

Страница 84: ...l RGB VIDEO Q Link Suitable inputs for AV1 include RGB Red Green Blue AV2 SCART terminal RGB VIDEO S VIDEO Q Link AV2 Pins 15 and 20 are dependent on AV2 S VHS VIDEO switching Socket Earth 21 CVBS out video 19 CVBS earth 17 Red in 15 Red earth 13 Green in 11 Green earth 9 Blue in 7 Blue earth 5 Audio out L 3 Audio out R 1 20 CVBS in video 18 RGB status earth 16 Status RGB 14 Earth 12 10 Q Link dat...

Страница 85: ...in the Sound Menu p 30 If the connected equipment has an aspect adjustment function set the aspect ratio to 16 9 These HDMI connectors are type A These HDMI connectors are compatible with HDCP High Bandwidth Digital Content Protection copyright protection An equipment having no digital output terminal may be connected to the input terminal of either COMPONENT S VIDEO or VIDEO to receive analogue s...

Страница 86: ... 080 24p PC from D sub 15P Applicable input signal for PC is basically compatible to VESA standard timing Signal name Horizontal frequency kHz Vertical frequency Hz 640 400 70 Hz 31 47 70 07 640 480 60 Hz 31 47 59 94 640 480 75 Hz 37 50 75 00 800 600 60 Hz 37 88 60 32 800 600 75 Hz 46 88 75 00 800 600 85 Hz 53 67 85 06 852 480 60 Hz 31 44 59 89 1 024 768 60 Hz 48 36 60 00 1 024 768 70 Hz 56 48 70 ...

Страница 87: ...button if you would like to change the aspect ratio manually p 18 S Video black and white picture Check that the output of the external equipment matches the input of the TV If the output of the external equipment is set to S Video the TV must also be set to S Video p 24 No programmes shown on TV Guide Check the digital transmitter Adjust the direction of the aerial to another transmitter installe...

Страница 88: ...minimum Sound level is low or sound is distorted Sound signal reception may be deteriorated Set MPX p 29 in the Sound Menu to Mono Analogue only Unusual sound from the TV When power is on drive noise may be heard from inside the TV not a sign of faulty operation HDMI Sound is unusual Set the sound setting of the connected equipment to 2ch L PCM Check the HDMI1 2 3 4 Input setting in the Sound Menu...

Страница 89: ... is activated The TV enters Standby mode about 30 mins after analogue broadcasting ends The remote control does not work or is intermittent Are the batteries installed correctly p 8 Has the TV been switched On The batteries may be running low Replace them Point the remote control directly at the front of the TV within about 7 m and a 30 degree angle of the front of the TV Situate the TV away from ...

Страница 90: ...and the double D symbol are trademarks of Dolby Laboratories Manufactured under license under U S Patent 5 451 942 other U S and worldwide patents issued pending DTS and the Symbol are registered trademarks and DTS Digital Out and the DTS logos are trademarks of DTS Inc Product includes software DTS Inc All Rights Reserved Manufactured under license from Real Sound Lab SIA CONEQ is a trademark of ...

Страница 91: ...nasonic jp support global cs tv Aerial input VHF UHF Operating Conditions Temperature 0 C 35 C Humidity 20 80 RH non condensing Connection Terminals AV1 SCART terminal 21 Pin terminal Audio Video in Audio Video out RGB in Q Link AV2 SCART terminal 21 Pin terminal Audio Video in Audio Video out RGB in S Video in Q Link AV3 VIDEO RCA PIN Type 1 1 0 V p p 75 Ω AUDIO L R RCA PIN Type 2 0 5 V rms COMPO...

Страница 92: ...ease contact your local authorities or dealer and ask for the correct method of disposal Note for the battery symbol bottom two symbol examples This symbol might be used in combination with a chemical symbol In this case it complies with the requirement set by the Directive for the chemical involved Customer s Record The model number and serial number of this product may be found on its rear panel...

Отзывы: