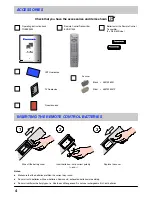
Panasonic TX14BTB Скачать руководство пользователя страница 7

7

QUICK START GUIDE

2

Programmes will appear immediately if your dealer has

programmed the TV for you.

If the TV has not been programmed for you then

Auto

setup

will begin. TV stations will be located, sorted into

order and stored ready for use.

*2

1

Ensure that the

VCR is in Standby mode

.

Switch ON your Satellite Receiver; to ensure reliable

tuning select either SKY ONE or SKY NEWS (for

analogue satellite receiver). Select any channel for

digital satellite receiver.

*1

Plug the TV into mains socket and switch ON.

3

Owner ID

As an added feature, this TV has the option of

adding a security code (Owner ID) and personal

details into its memory, so that in the unfortunate

event of theft it will help the Police to trace the

owner.

Enter required 4 digit Owner ID

PIN NUMBER

.

(using 0 to 9 on the remote control).

4

Enter

NAME,

HOUSE

NUMBER

and

POSTCODE.

If a 4 digit

PIN NUMBER

was

entered above, you will be taken automatically

to the

NAME

line.

If not, move to the

NAME

line.

Change character.

Select character position.

Repeat above until

NAME, HOUSE NUMBER

and

POSTCODE

are entered.

Press

“TV/AV”

to store the details.

Press

“TV/AV”

again, when you are asked

“Are you sure ?”

For further information on Owner ID, see page 15.

A space is provided on page 15 to write down the

PIN

NUMBER

for future reference

.

Mains

Socket

*1.

If, after Auto Setup is complete, the programme position of the digital satellite receiver is not to your preference, you can re---arrange

the programme position with the Swap feature. (See page 16 for details.)

*2.

The sorting order depends upon the TV signal, the broadcasting system, and reception conditions. If either BBC1, BBC2 or ITV are

not located, then their respective pre---allocated programme positions (1 to 3) will remain unused.

Programme

Position

All stations

available

No Channel 5

No Channel 5 /

S4C

No Channel 4 /

Channel 5

No S4C

No Channel 4 /

S4C

No Channel 4 / S4C /

Channel 5

1

BBC1

BBC1

BBC1

BBC1

BBC1

BBC1

BBC1

2

BBC2

BBC2

BBC2

BBC2

BBC2

BBC2

BBC2

3

ITV

ITV

ITV

ITV

ITV

ITV

ITV

4

Channel 4

Channel 4

Channel 4

S4C

Channel 4

Channel 5

Satellite

5

S4C

S4C

Satellite

Satellite

Channel 5

Satellite

~

6

Channel 5

Satellite

~

~

Satellite

~

~

7

Satellite

~

~

~

~

~

~

Note :

The next available channel will appear, if no other stations are available then the Programme position will remain unused.

Содержание TX14BTB

Страница 1: ...asonic Panaso nic Panasonic Panasonic Panasonic Panasonic Panasoni c Panasonic Panasonic Panasonic Panasonic Panasonic Panasonic Panasonic Panasonic Panasonic Panasonic Pa nasonic Panasonic Panasonic Panasonic Panasonic Pana sonic Panasonic Panasonic Panasonic Panasonic Panaso nic Panasonic Panasonic Panasonic Panasonic Panasoni c Panasonic Panasonic Panasonic Panasonic Panasonic Panasonic Panason...

Страница 2: ...arnings and Precautions 3 D Accessories 4 D Inserting the Remote Control Batteries 4 D Basic Controls 5 D Quick Start Guide 6 D Main Menu Flow Chart 8 D On Screen Displays 8 D Main menu 9 D Setup menu 10 D Tuning menu 11 D Tuning Auto Setup 12 D Tuning Manual Tuning 13 D Tuning Shipping Condition 14 D Tuning Owner ID 15 D Swap Programme swapping 16 D Other Features D AV selection AV mode 16 D VCR ...

Страница 3: ... refitted when the fuse is replaced If you lose the fuse cover the plug must not be used until a replacement cover is obtained Replacement fuse covers can be purchased through your local Panasonic dealer The plug fitted to this appliance incorporates a mains filter circuit If this is removed or replaced with a non filtered plug this television will no longer meet the European standards for Electro...

Страница 4: ...538301 n TX 14B4T TX 14B4T B Silver 4857538301Z Av cover INSERTING THE REMOTE CONTROL BATTERIES Replace the cover 1 2 3 Slide off the battery cover Insert batteries note correct polarity and Notes D Make sure that the batteries are fitted the correct way round D Do not mix old batteries with new batteries Remove old exhausted batteries immediately D Do not mix different battery types i e Alkaline ...

Страница 5: ...ion has been selected adjusts the volume Function select Press to select On Screen Menus see page 8 Recalls the settings stored with the STR button on the TV front panel Numeric keys to change programmes directly select channels teletext page Direct channel access press then select the channel on the numeric buttons If you want to select a channel on HYPERBAND cable TV press the direct channel acc...

Страница 6: ... of TV to VCR and Satellite receiver using Scart and RF cables SATELLITE RECEIVER VCR Scart socket TV Scart socket Aerial Input socket Aerial Output socket AV Scart socket VCR Mains Socket Mains Socket Aerial Input socket Aerial Output socket Aerial Input socket AV Scart socket TV Mains Socket RF Connections Connect an RF cable to the Aerial In socket of the Satellite Receiver Connect an RF cable ...

Страница 7: ... HOUSE NUMBER and POSTCODE are entered Press TV AV to store the details Press TV AV again when you are asked Are you sure For further information on Owner ID see page 15 A space is provided on page 15 to write down the PIN NUMBER for future reference Mains Socket 1 If after AutoSetup is complete the programme position of the digital satellite receiver is not toyour preference you can re arrange th...

Страница 8: ...evels Contrast Brightness Colour Sharpness Tint NTSC only Setup menu Main Menu Menu title Sub menu Selection bar Instructions Level indicator Press the F button to enter the menu Press the N button to exit the menu The cursor buttons are used to navigate the menu system and to select levels Select Adjust Exit Some selections such as Contrast Brightness Colour and Sharpness will allow you to increa...

Страница 9: ...ease levels set option or access further menus Press the N button to exit the menu Contrast The Contrast Brightness Colour and Sharpness levels can be adjusted to suit your own preferences You can revert to the factory set levels at any time by pressing the N button The Tint adjustment will only appear as a menu item if you have an NTSC signal source connected to the TV and will allow adjustment o...

Отзывы: