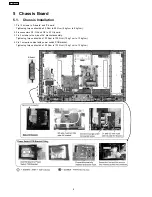


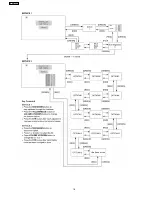


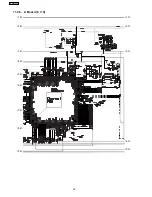

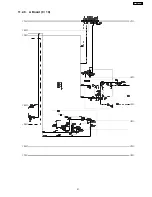
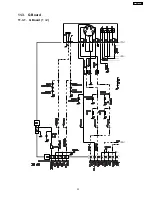
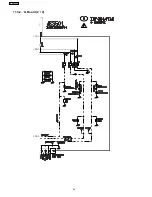
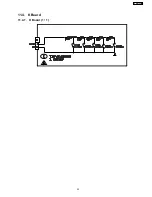
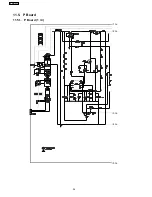
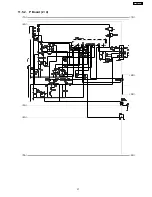

11 Schematic Diagram
11.1. Schematic Diagram Notes
Notes :
1.
Resistor
Unit of resistance is OHM [
Ω
] (K = 1 000, M = 1 000 000).
2.
Capacitor
Unit of capacitance is µF unless otherwise noted.
3.
Coil
Unit of inductance is µF unless otherwise noted.
4.
Test Point
: Test Point position
5.
Earth Symbol
: Chassis Earth (Cold)
: Line Earth (Hot)
6.
Voltage Measurement
Voltage is measured using DC voltmeter.
Conditions of the measurement are the following :
Power Source....................AC AUTO 110-240 V, 50/60 Hz
Receiving Signal................Colour Bar signal (RF)
All customer’s controls.......Maximum positions
7. Number in red circle indicates waveform number.
(See waveform pattern table)
8. When an arrow mark (
) is found, connection is easily found from the direction of the arrow.
9. Indicates the major signal flow: Video
Audio
10. This schematic diagram is the latest at the time of printing and subject to change without notice.
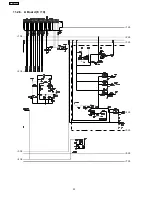
Remarks :
1. The Power Circuit contains a circuit area which uses a separate power supply to isolate the earth connection.
The circuit is defined by HOT and COLD indications in the schematic diagram. Take the following precautions:
All circuits, except the Power Circuit are cold.
Precautions:
a. Do not touch the hot part or the hot and cold parts at the same time or you may be shocked.
b. Do not short-circuit the hot and cold circuits or a fuse may blow and parts may break.
c.
Do not connect an instrument such as an oscilloscope to the hot and cold circuits simultaneously or a fuse may blow.
Connect the earth of instruments to the earth connection of the circuit being measured.
d. Make sure to disconnect the power plug before removing the chassis.
22
TX-R32LX80K
Содержание TX-R32LE8
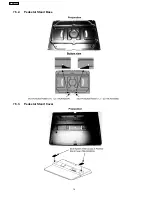
Страница 10: ...7 Disassembly for Service 7 1 AC Code dressing for 2 Pin 7 2 AC Code dressing for 3 Pin 10 TX R32LX80K ...
Страница 13: ...7 5 Pedestal Assembly Preparation 7 5 1 Pedestal Rotation Base 13 TX R32LX80K ...
Страница 14: ...7 5 2 Pedestal Stand Base 7 5 3 Pedestal Stand Cover 14 TX R32LX80K ...
Страница 18: ...18 TX R32LX80K ...
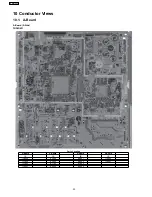
Страница 21: ...10 2 A Board A Board B Side TNP4G431 Parts Location A Board IC IC5002 IC5001 IC4003 21 TX R32LX80K ...
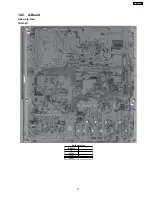
Страница 23: ...11 2 A Board 11 2 1 A Board 1 10 1A 2A 3A 4A 5A 6A 7A 8A 9A 23 TX R32LX80K ...
Страница 24: ...11 2 2 A Board 2 10 1B 2B 3B 4B 1A 2A 3A 4A 5A 6A 7A 8A 9A 24 TX R32LX80K ...
Страница 25: ...11 2 3 A Board 3 10 1C 2C 3C 4C 5C 6C 7C 1B 2B 3B 4B 25 TX R32LX80K ...
Страница 26: ...11 2 4 A Board 4 10 1D 2D 3D 4D 5D 6D 7D 1C 2C 3C 4C 5C 6C 7C 26 TX R32LX80K ...
Страница 27: ...11 2 5 A Board 5 10 1E 2E 3E 4E 5E 6E 7E 8E 9E 1D 2D 3D 4D 5D 6D 7D 27 TX R32LX80K ...
Страница 28: ...11 2 6 A Board 6 10 1F 2F 3F 4F 5F 1E 2E 3E 4E 5E 6E 7E 8E 9E 28 TX R32LX80K ...
Страница 29: ...11 2 7 A Board 7 10 1G 2G 3G 4G 1F 2F 3F 4F 5F 29 TX R32LX80K ...
Страница 30: ...11 2 8 A Board 8 10 1H 2H 3H 4H 5H 6H 7H 1G 2G 3G 4G 30 TX R32LX80K ...
Страница 31: ...11 2 9 A Board 9 10 1I 2I 3I 4I 6I 5I 1H 2H 3H 4H 5H 6H 7H 31 TX R32LX80K ...
Страница 32: ...11 2 10 A Board 10 10 1I 2I 3I 4I 6I 5I 32 TX R32LX80K ...
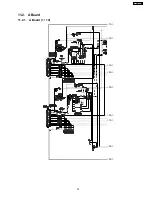
Страница 33: ...11 3 G Board 11 3 1 G Board 1 2 1A 2A 3A 33 TX R32LX80K ...
Страница 34: ...11 3 2 G Board 2 2 1A 2A 3A 34 TX R32LX80K ...
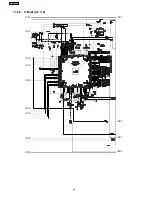
Страница 35: ...11 4 K Board 11 4 1 K Board 1 1 35 TX R32LX80K ...
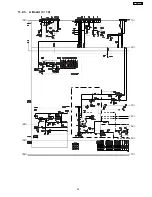
Страница 36: ...11 5 P Board 11 5 1 P Board 1 4 1A 2A 3A 4A 5A 36 TX R32LX80K ...
Страница 37: ...11 5 2 P Board 2 4 1B 2B 3B 4B 1A 2A 3A 4A 5A 37 TX R32LX80K ...
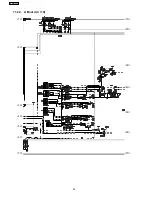
Страница 38: ...11 5 3 P Board 3 4 1C 2C 3C 4C 5C 6C 7C 8C 9C 1B 2B 3B 4B 38 TX R32LX80K ...
Страница 39: ...11 5 4 P Board 4 4 1C 2C 3C 4C 5C 6C 7C 8C 9C 39 TX R32LX80K ...
Страница 40: ...11 6 SW Board 11 6 1 SW Board 1 1 40 TX R32LX80K ...
Страница 41: ...11 7 V Board 11 7 1 V Board 1 4 1A 2A 3A 41 TX R32LX80K ...
Страница 42: ...11 7 2 V Board 2 4 1B 2B 3B 4B 1A 2A 3A 42 TX R32LX80K ...
Страница 43: ...11 7 3 V Board 3 4 1C 2C 3C 4C 5C 1B 2B 3B 4B 43 TX R32LX80K ...
Страница 44: ...11 7 4 V Board 4 4 1C 2C 3C 4C 5C 44 TX R32LX80K ...
Страница 45: ...11 8 Z Board 11 8 1 Z Board 1 4 1A 2A 3A 4A 5A 6A 45 TX R32LX80K ...
Страница 46: ...11 8 2 Z Board 2 4 1B 2B 3B 4B 5B 6B 7B 9B 8B 1A 2A 3A 4A 5A 6A 46 TX R32LX80K ...
Страница 47: ...11 8 3 Z Board 3 4 1C 2C 3C 4C 5C 6C 7C 8C 1B 2B 3B 4B 5B 6B 7B 9B 8B 47 TX R32LX80K ...
Страница 48: ...11 8 4 Z Board 4 4 1C 2C 3C 4C 5C 6C 7C 8C 48 TX R32LX80K ...
Страница 49: ...12 Parts Location Mechanical Replacement Parts List 12 1 Parts Location 49 TX R32LX80K ...
Страница 50: ...13 Packing Exploded View TX R32LX80K 50 ...
Страница 51: ...14 Replacement Parts List 51 TX R32LX80K ...


