background image


*!%%%%%

`   Z ›$‚ž‘"'

` #”

–š
 

££

‚&_
‰‚&^

~‚ƒ‹

€££

@

ª=#”
= ”œš#”

23

;!%

~~*#

 `”Z ` !šš #” › ›
 ”šƒ#Š!<¡

ƒš› š›››| #”Z#š|š š#”›
š|š?

””?
` " |!
` X|<–%
{ ||ŠZŠŠ%|Z–

‚ #” ”œš›š?
‚Z‚Z‚ Z|Z|Z!Z!šZƒZ< Z\Z\›Z–Z
–Z‘|Z~Z~ Z_Z_ Z_Z_=|ZZZZ—#|Z
`Z`|Z¢Z&#Z&#Z&Z&Z<#›Z"

\›_‚—   #” š šœš

Содержание TX-P42GT60E

Страница 1: ... Card if you need to contact your local Panasonic dealer for assistance English Nederlands For more detailed instructions refer to eHELP Built in Operating Instructions How to use eHELP p 17 Contents Be Sure to Read Important Notice 2 Safety Precautions 3 Quick Start Guide Accessories 6 Connections 8 Identifying Controls 13 First time Auto Setup 15 Using your VIERA Operations 16 How to Use eHELP 1...

Страница 2: ...y of DVB T or DVB S services in your area Consult your cable service provider for availability of DVB C services with this TV This TV may not work correctly with the signal which does not meet the standards of DVB T DVB C or DVB S Not all the features are available depending on the country area broadcaster service provider satellite and network environment Not all CI modules work properly with thi...

Страница 3: ...rform the setup or installation of approved wall hanging brackets The recording and playback of content on this or any other device may require permission from the owner of the copyright or other such rights in that content Panasonic has no authority to and does not grant you that permission and explicitly disclaims any right ability or intention to obtain such permission on your behalf It is your...

Страница 4: ...may interfere with the automatic control equipment and cause accidents due to the malfunction Keep the distance at least 22 cm from the TV and 3D Eyewear when you have a cardiac pacemaker Radio waves may interfere with the operation of the pacemaker Do not disassemble or alter the TV and 3D Eyewear in any way Built in wireless LAN Caution Do not use the built in wireless LAN to connect to any wire...

Страница 5: ...ips of the frame when putting on the 3D Eyewear Be careful not to trap your fingers in the hinge section of the 3D Eyewear Do not use the 3D Eyewear if it is physically damaged If you suffer from any eyesight problems short far sighted astigmatism eyesight differences in left and right ensure that you correct your vision before using the 3D Eyewear The supplied 3D Eyewear can be worn over vision c...

Страница 6: ...re for headphones Small size p 11 Operating Instructions Pan European Guarantee Card Use the Ferrite cores to comply with the EMC standard Accessories may not be placed all together Take care not to throw them away unintentionally For the information of optional accessories refer to eHELP Support Optional accessories Assembling Removing the pedestal Assembly screw 7 M5 16 Bracket Base Assembly scr...

Страница 7: ...ick enough and made of hard material Commercially available screw not supplied Diameter 3 mm Length 25 30 mm Removing the pedestal from the TV Be sure to remove the pedestal in the following way when using the wall hanging bracket or repacking the TV 1 Remove the assembly screws from the TV 2 Pull out the pedestal from the TV 3 Remove the assembly screw from the cover 4 Pull out the cover 5 Remove...

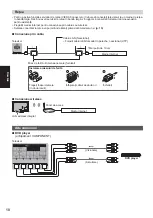
Страница 8: ... 4 6 5 2 1 3 8 7 1 CI slot p 11 2 SD Card slot 3 Headphone jack p 11 4 USB 1 3 port 5 HDMI1 3 p 9 11 6 DIGITAL AUDIO 7 AV2 COMPONENT VIDEO p 10 11 8 AV1 SCART p 9 9 Terrestrial cable terminal see below 10 Satellite terminal see below 11 ETHERNET p 10 Basic connections Mains lead satellite dish and aerial To ensure your satellite dish or aerial is correctly installed please consult your local deale...

Страница 9: ...VCR RF cable SCART cable RF cable Terrestrial aerial Cable AV1 SCART adaptor supplied DVD Recorder VCR and Set top box TV Set top box HDMI cable SCART cable SCART cable DVD Recorder VCR Terrestrial aerial RF cable RF Cable AV1 SCART adaptor supplied Cable ...

Страница 10: ...wireless connection Setup of the network connection will start when first using the TV p 15 Wired connection TV Internet environment Less than 10 cm LAN cable Unshielded Use the Unshielded Twist Pair UTP LAN cable Ferrite core Large size supplied Installing the Ferrite core Pull back the tabs in two places Wind the cable twice Close Wireless connection Internet environment Access point Built in wi...

Страница 11: ...y the sound from the external equipment in multi channel sound e g Dolby Digital 5 1ch connect the equipment to the amplifier For the connections read the manuals of the equipment and amplifier Headphones TV M3 stereo mini plug To adjust volume Headphone Volume in the Sound Menu Less than 10 cm Ferrite core Small size supplied Installing the Ferrite core Pull back the tabs in two places Wind the c...

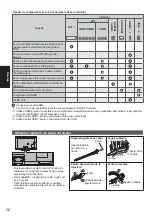
Страница 12: ...SCART adaptor supplied is necessary 2 Use HDMI2 for connecting an amplifier This connection is applicable when using an amplifier that has ARC Audio Return Channel function 3 Use USB 1 port for connecting the Communication Camera 4 Use USB 3 port for connecting the USB HDD Using the cable tie supplied Attach the cable tie Bundle the cables hole Insert the cable tie in a hole hooks Set the tip in t...

Страница 13: ...ff 10 Teletext button 11 Volume Up Down 12 Numeric buttons Changes channel and teletext pages Sets characters When in Standby mode switches TV on 13 eHELP Displays eHELP Built in Operating Instructions 14 Light Lights the buttons for about 5 seconds except the buttons 25 15 Input mode selection TV switches to DVB S DVB C DVB T Analogue mode AV switches to AV input mode from Input Selection list 16...

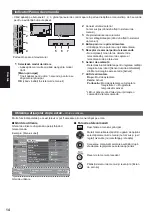
Страница 14: ...n menu Move the cursor select from a range of options select the menu item up and down only adjust levels left and right only Access the menu store settings after adjustments have been made or options have been set Return to the previous menu Exit the menu system and return to Home Screen 1 Input mode selection Press repeatedly until you reach the desired mode Main Menu Press and hold for about 3 ...

Страница 15: ...nd the signal mode you select DVB C Network Settings Normally set Frequency and Network ID to Auto If Auto is not displayed or if necessary enter Frequency and Network ID specified by your cable provider with numeric buttons Confirm the Electronic Touch Pen optional accessory introduction screen 3 Select the type of Home Screen The demonstration to explain how to use my Home Screen is displayed Co...

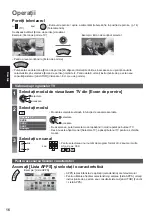
Страница 16: ...r on TV or J X Z Z Z Z _ Watching TV 1 Select the TV viewer from Home Screen 2 Select the mode TV Selection DVB S DVB C DVB T Analogue J Z 3 Select a channel or Z To access each feature Access APPS List and select a feature _ _ Z _ _ ...

Страница 17: ...English 17 How to Use eHELP _ Z 1 Display eHELP or Help eHELP _ _ Z _ 2 Select the category and item ...

Страница 18: ...wear with this TV 1 Turn the TV on 2 Press Power button for about 1 second to turn the 3D Eyewear on The lamp lights for about 2 seconds and then flashes The 3D Eyewear will be turned on and start registration Place the 3D Eyewear within 50 cm from the TV while registration in progress 3 After the registration is successfully completed the 3D Eyewear will reconnect with TV automatically when the 3...

Страница 19: ...rt FAQs The TV does not switch on Check the mains lead is plugged into the TV and the socket outlet The TV goes into Standby mode Auto power standby function is activated The remote control does not work or is intermittent Are the batteries installed correctly p 13 Has the TV been switched on The batteries may be running low Replace them with new ones Point the remote control directly at the TV s ...

Страница 20: ...s may cause scratches on the surface Take care not to subject the TV s surfaces to water or detergent Liquid inside the TV could lead to product failure Take care not to subject the surfaces to insect repellent solvent thinner or other volatile substances This may degrade surface quality or cause peeling of the paint The surface of the display panel is specially treated and may be easily damaged T...

Страница 21: ...SD Card slot 1 Common Interface slot complies with CI Plus 1 ETHERNET RJ45 IEEE802 3 10BASE T 100BASE TX USB 1 2 3 USB1 2 USB2 0 DC 5 V Max 500 mA USB3 USB3 0 DC 5 V Max 900 mA DIGITAL AUDIO output PCM Dolby Digital DTS Fibre optic Receiving systems Band name Check the latest information on the available services at the following website English only http panasonic net viera support DVB S S2 Digit...

Страница 22: ...e devices are available with this TV Up to 5 devices can be used simultaneously except the 3D Eyewear 3D Eyewear Dimensions W H D 164 7 mm 41 0 mm 170 7 mm Mass Approx 34 g Lens type Liquid Crystal Shutter Usage temperature range 0 C 40 C Battery Coin shaped lithium battery CR2025 Operation time Approx 75 hours in continuous use of the battery made by Panasonic Materials Main body Resin Lens secti...

Страница 23: ...following countries Albania Andorra Austria Belgium Bulgaria Cyprus Czech Republic Denmark Estonia Finland France Germany Greece Hungary Italy Iceland Latvia Liechtenstein Lithuania Luxembourg Malta Monaco Netherlands Norway Poland Portugal Romania Slovakia Slovenia Spain Sweden Switzerland Turkey The wireless LAN feature of this TV shall exclusively be used inside buildings When using the wall ha...

Страница 24: ...disposal service or the point of sale where you purchased the items Penalties may be applicable for incorrect disposal of this waste in accordance with national legislation For business users in the European Union If you wish to discard electrical and electronic equipment please contact your dealer or supplier for further information Information on Disposal in other Countries outside the European ...

Страница 25: ... Panasonic dealer voor assistentie Nederlands Raadpleeg de eHELP ingebouwde bedieningsinstructies voor gedetailleerde instructies Gebruik van de eHELP p 17 Inhoudsopgave Belangrijke informatie Belangrijke kennisgeving 2 Veiligheidsmaatregelen 3 Quick Start handleiding Accessoires 6 Verbindingen 8 Bedieningsonderdelen 13 Automatisch instellen bij het eerste gebruik 15 Uw VIERA tv gebruiken Bedienin...

Страница 26: ...le dealer voor de beschikbaarheid van DVB T of DVB S services in uw gebied Raadpleeg uw kabelprovider voor de beschikbaarheid van DVB C services met deze tv Deze tv werkt mogelijk niet correct met een signaal dat niet voldoet aan de normen voor DVB T DVB C of DVB S Afhankelijk van het land het gebied de zender de serviceprovider de satelliet en de netwerkomgeving zijn mogelijk niet alle functies b...

Страница 27: ...nic dealer om de instellingen of installatie uit te voeren van een goedgekeurde muurbevestigingssteun Het opnemen en afspelen van inhoud op dit of elk ander apparaat kan de toestemming vereisen van de eigenaar van de auteursrechten of andere soortgelijke rechten in die inhoud Panasonic heeft geen bevoegdheid om u deze toestemming te geven en verleent u deze ook niet en wijst uitdrukkelijk alle rec...

Страница 28: ...atische regelapparatuur zoals automatische deuren of brandalarmen De radiogolven kunnen interfereren met de automatische controleapparatuur en storing en ongevallen veroorzaken Hou tenminste 22 cm afstand van de TV en 3D bril wanneer u een pacemaker hebt De radiogolven kunnen de werking van de pacemaker verstoren Demonteer of wijzig de TV en 3D bril op geen enkele manier Ingebouwd draadloos LAN Le...

Страница 29: ... druk er niet op en trap er niet op Let op de hoeken van de montuur wanneer u de 3D bril opzet Zorg dat u uw vingers niet knelt in het scharniergedeelte van de 3D bril Gebruik de 3D bril niet als deze beschadigd is Als u gezichtsproblemen hebt bijziend verziend astigmatisme verschil in het gezichtsvermogen links en rechts moet u uw gezichtsvermogen corrigeren voordat u de 3D bril gebruikt De meege...

Страница 30: ...oofdtelefoon Klein p 11 Gebruiksaanwijzing Instructions Europese Garantie Gebruik de ferrietkernen om te voldoen aan de EMC norm De accessoires mogen niet allemaal samen worden geplaatst Zorg dat u ze niet per ongeluk weggooit Raadpleeg de eHELP voor informatie over optionele accessoires Ondersteuning Optionele accessoires De standaard monteren verwijderen Montageschroef 7 M5 16 Steun Steunplaat M...

Страница 31: ...en van een hard materiaal gemaakt zijn In de handel verkrijgbare schroef niet meegeleverd Diameter 3 mm Lengte 25 30 mm De standaard van de tv verwijderen Verwijder de standaard op de volgende manier wanneer u de muurbevestigingssteun gebruikt of de tv opnieuw inpakt 1 Verwijder de montageschroeven uit de tv 2 Trek de standaard van de tv 3 Verwijder de montageschroef van het deksel 4 Verwijder het...

Страница 32: ... Aansluitingen 10 11 9 4 6 5 2 1 3 8 7 1 CI sleuf p 11 2 SD kaartsleuf 3 Ingang koptelefoon p 11 4 USB poort 1 3 5 HDMI1 3 p 9 11 6 DIGITAL AUDIO 7 AV2 COMPONENT VIDEO p 10 11 8 AV1 SCART p 9 9 Aansluiting aardse ingang kabel zie hieronder 10 Satellietaansluiting zie hieronder 11 ETHERNET p 10 Basisaansluitingen Netsnoer satellietschotel en antenne Neem contact op met uw lokale leverancier om te c...

Страница 33: ...ecorder RF kabel SCART kabel RF kabel Aardse antenne Kabel AV1 SCART adapter meegeleverd DVD videorecorder en set top box TV Set top box HDMI kabel SCART kabel SCART kabel DVD videorecorder Aardse antenne RF kabel RF kabel AV1 SCART adapter meegeleverd Kabel ...

Страница 34: ...n van de netwerkverbinding start bij het eerste gebruik van de tv p 15 Bekabelde verbinding TV Internetomgeving Minder dan 10 cm LAN kabel niet afgeschermd Gebruik een niet afgeschermde dubbeldraadse getwist paar LAN kabel UTP Ferrietkern groot formaat meegeleverd De ferrietkern installeren Trek de lipjes achteruit op twee plaatsen Wind de kabel twee keer op Sluiten Draadloze verbinding Internetom...

Страница 35: ...eld Dolby Digital 5 1 kanaals via het externe apparaat sluit u het apparaat aan op de versterker Raadpleeg de handleiding van het apparaat en de versterker voor informatie over de aansluiting Hoofdtelefoon M3 stereoministekker Het volume aanpassen Hoofdtel Volume in het menu Geluid Kleiner dan 10 cm TV Ferrietkern klein formaat meegeleverd De ferrietkern installeren Trek de lipjes achteruit op twe...

Страница 36: ... versterker aan te sluiten Deze aansluiting is van toepassing bij het gebruik van een versterker met ARC Audio Return Channel 3 Gebruik de USB 1 poort voor verbinding met de communicatiecamera 4 Gebruik de USB 3 poort voor verbinding met de USB HDD De kabelbinder meegeleverd gebruiken Bevestig de kabelbinder Bundel de kabels opening Steek de kabelbinder in een opening geleiders Schuif de punt onde...

Страница 37: ...De tv aanzetten vanuit stand by 13 eHELP De eHELP weergeven ingebouwde bedieningsinstructies 14 LIGHT Verlicht de toetsen ongeveer 5 seconden behalve de toetsen 25 15 Selecteert de ingangsmodus TV Overschakelen tussen DVB S DVB C DVB T analoog AV Overschakelen naar een AV ingangsmodus in de lijst met ingangssignalen 16 Verlaten Terugkeren naar Beginscherm 17 HOME Opent Beginscherm 18 Tv programmag...

Страница 38: ...s opslaan Terugkeren naar het vorige menu Het menusysteem afsluiten en terugkeren naar Beginscherm Indicator Bedieningspaneel Als u op een van de toetsen 1 2 of 3 drukt wordt gedurende 3 seconden rechts op het scherm een hulpaanduiding weergegeven voor de ingedrukte toets Achterzijde van de tv 3 1 4 2 5 6 7 1 Selecteert de ingangsmodus Druk zo vaak als nodig om de gewenste stand te selecteren Hoof...

Страница 39: ...erkinstellingen Gewoonlijk stelt u Frequentie en Netwerk ID in op Auto Als Auto niet wordt weergegeven of indien nodig stelt u Frequentie en Netwerk ID met de cijfertoetsen in met de gegevens van uw kabelmaatschappij Bevestig het introductiescherm van de elektronische aanraakpen optioneel toebehoren 3 Selecteer het type Beginscherm Er wordt uitleg weergegeven hoe u Mijn Beginscherm kunt gebruiken ...

Страница 40: ... X Z XX X Z X Z _ X Tv kijken 1 Selecteer de tv weergave in Beginscherm 2 Selecteer de stand X X Z X X TV keuze DVB S DVB C DVB T Analoog X X X XX X Z 3 Selecteer een kanaal of X Z 399 Toegang tot de functies Open APPS lijst en selecteer de gewenste functie _ ...

Страница 41: ...Nederlands 17 Gebruik eHELP _ Z X _ 1 Weergave eHELP of Help eHELP _ _ X _ X _ Z 2 Selecteer de categorie en het onderdeel X ...

Страница 42: ... 2 Houd de aan uit knop ongeveer 1 seconde ingedrukt om de 3D bril in te schakelen Het lampje brandt 2 seconden en begint daarna te knipperen De 3D bril wordt ingeschakeld en de registratie start Houd de 3D bril tijdens de registratie binnen een afstand van 50 cm van de tv 3 Na de succesvolle registratie wordt altijd automatisch verbinding gemaakt tussen de tv en de 3D bril als deze in de 3D stand...

Страница 43: ...eelgestelde vragen De tv gaat niet aan Controleer of de stekker van het netsnoer in de tv en in het stopcontact zit De tv schakelt over naar de stand bystand De automatische stand byfunctie is geactiveerd De afstandsbediening werkt niet of slechts af en toe Zijn de batterijen op de juiste manier in de afstandsbediening geplaatst p 13 Is de tv ingeschakeld De batterijen zijn wellicht leeg Vervang d...

Страница 44: ...het oppervlak omdat u daardoor krassen kunt maken Gebruik geen water of schoonmaakproducten op de tv Wanneer een vloeistof in de tv terechtkomt kan dit defecten veroorzaken Zorg dat er geen insecticiden oplosmiddelen verdunners of andere vluchtige stoffen met de tv in aanraking komen Hierdoor kan de kwaliteit van het oppervlak afnemen of kan de verf afbladderen Het scherm is behandeld en voorzien ...

Страница 45: ...Kaartsleuf SD kaartsleuf 1 CI sleuf conform CI Plus 1 ETHERNET RJ45 IEEE802 3 10BASE T 100BASE TX USB 1 2 3 USB1 2 USB 2 0 DC 5 V Max 500 mA USB3 USB 3 0 DC 5 V Max 900 mA DIGITAL AUDIO uitgang PCM Dolby Digital DTS optische vezel Ontvangstsystemen Bandnaam U kunt de meest recente informatie over de beschikbare diensten op de volgende website bekijken alleen Engels http panasonic net viera support...

Страница 46: ...ooth compatibele apparaten kunnen met deze tv gebruikt worden Maximaal 5 apparaten kunnen tegelijk gebruikt worden de 3D bril niet inbegrepen 3D bril Afmetingen B H D 164 7 mm 41 0 mm 170 7 mm Gewicht Ca 34 g Type lens LCD sluiter Gebruikstemperatuurbereik 0 C 40 C Batterij Lithium knoopcelbatterij CR2025 Autonomie Ca 75 uur bij continu gebruik en een Panasonic batterij Materialen Hoofdeenheid har...

Страница 47: ...elgië Bulgarije Cyprus Denemarken Estland Finland Frankrijk Duitsland Griekenland Hongarije Italië IJsland Letland Liechtenstein Litouwen Luxemburg Malta Monaco Nederland Noorwegen Oostenrijk Polen Portugal Roemenië Slovenië Slowakije Spanje Tsjechische Republiek Turkije Zweden Zwitserland De draadloze LAN functie van deze tv mag uitsluitend in gebouwen gebruikt worden Nederlands Bij gebruik van d...

Страница 48: ...erwijderingsdiensten of de winkel waar u de goederen gekocht hebt Voor een niet correcte verwijdering van dit afval kunnen boetes opgelegd worden in overeenstemming met de nationale wetgeving Voor zakengebruikers in de Europese Unie Indien u elektrische en elektronische uitrusting wilt vewijderen neem dan contact op met uw dealer voor meer informatie Informatie over de verwijdering in andere lande...

Страница 49: ...Manual de utilizare 2 3 6 8 13 15 16 17 18 Altele 19 20 21 J _ _ _ ...

Страница 50: ... 2 Z Z Z Z Z Z Z Z Z Z Z Z Z Z _ ...

Страница 51: ... 3 Z Z Z Z Z Z Z Z Z _ Z Z Z Z Z Z _ Z __ ...

Страница 52: ... 4 Pentru a preveni Z Z Z Z Z Z _ Z _ Z _ Z Z _ Z Z Z Z _ Z Z Z _ Z Z _ Z Z Z Z _ Z 10 10 10 7 ...

Страница 53: ... 5 Z Z Mutarea televizorului Z Z Z Z Z Z Z Z Z Z Z Z Z Z Z Z Z Z Z Z Z Z Z _ Z Z Z Z Z Model de 42 inci Z Model de 50 inci Z Z Z Z ...

Страница 54: ... 6 J J J J J _ Manual de utilizare Z M5 16 Gât ...

Страница 55: ... 5 A A B F 1 2 3 4 6 B C D E 15 15 Model de 42 inci Z _ ª _ 2 3 4 5 6 ...

Страница 56: ... _ Z Z Z Z Terminale _ 4 6 5 2 3 2 3 4 5 6 J _ _ _ Z Z Z cleme ...

Страница 57: ... Televizor Televizor ...

Страница 58: ... _ Z Televizor _ _ Z _ Televizor ...

Страница 59: ... Televizor Televizor Z _ Z Z Televizor Televizor Modul IO Z ...

Страница 60: ... J Terminal 1 J 2 3 _ X televizor Z Z Z ...

Страница 61: ... 2 3 Z Z Z Z 4 5 _ 6 OK Z _ Z Z _ J Z eAJUTOR Lumina _ 20 J 22 23 24 Ultima vizualizare 25 20 J 22 23 24 25 2 4 5 _ 3 6 J ...

Страница 62: ... Z Z Z Ghid de utilizare 1 2 0 0 0 11 0 Z OK 2 3 4 5 6 _ 3 4 2 5 6 ...

Страница 63: ... Z 2 Z Z Z Z Z 3 Z Z Z Z ...

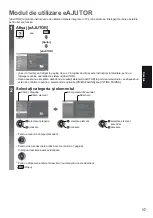
Страница 64: ... 16 TV sau Z Z Z 1 2 DVB S DVB C Z Z 3 sus jos sau Z _ _ Z _ ...

Страница 65: ... 17 1 sau Z Z _ 2 ...

Страница 66: ... 18 Vizionarea imaginilor 3D Z 3D Accesorii p 6 Z Z redate alternativ Ochelari 3D Z Z 3D Prima înregistrare 1 2 A _ Z 3 Z 1 2 _ Z Z 3 Z Z Z Z Imagini 2D convertite în 3D ...

Страница 67: ... 19 1 2 _ Z Z Z Z Z Z Z p 13 Z Z _ Z Z Z Z ...

Страница 68: ... 20 ª Z Z _ Z Z _ Z Z ª ...

Страница 69: ... 21 Date tehnice Televizor Model de 42 inci Model de 50 inci J _ _ _ Z X Z X Z X Z X Z Conectori Z Z Intrare AV2 VIDEO VIDEO Z Z Y Z P R Z J Z Z Z Z Z Z Z ETHERNET Z J Z Z AUDIO Z J _ _ J _ _ ...

Страница 70: ... 22 Z Z µ µ LAN wireless integrat Z Z Z Z Z Z Z Z Z Z Z Z Ochelari 3D Z Z Z µ µ Z Z Z Z Z _ Z Z Z Z Z ...

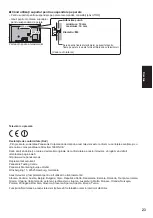
Страница 71: ... Z _ ª 23 Z Z X Z Z Z Z Z Z Z Z Z Z Z Z Z Z Z Z Z Z _ Z _ Z _ Z _ Z Z Z Z Z Z Z Z Z Z Z Z Z _ ...

Страница 72: ... Web Site http panasonic net Panasonic Corporation 2013 Z Z Z Z Z Z Z Z Z Z Z Z Z Z Z Z Z ...

Отзывы: