background image

TELETEXT Operation 


33 

Teletext is only available on certain broadcast channels. The time taken to display the pages and sub-
pages is set by the teletext transmitter and not by the television. 
Teletext is also used for Closed Captioning of television programmes for the hearing impaired. Closed 
captions can be found on Teletext Page 801.  
Not all broadcast stations transmit closed captions in the same way. Some, but not all, of the methods are 
listed below:  
1. 

A teletext screen appears and the closed captions are accessed like any other teletext page. 

2. 

The picture remains on the screen while you type in 801. 

3. 

The picture disappears while you type in 801. The picture stays black until the page is reached. 

4. 

The picture disappears while you type in 801. The picture stays black until a programme containing 
closed captions is broadcast. 

 
Some broadcast stations will have a message on the screen to tell you that closed captions are not 
available for this programme. Some broadcast stations give you no indication at all. 

 
TOP (Table Of Pages) MODE 
In TOPTEXT mode, the red button moves to the previous page number and the green button moves to 
the next page number. The yellow and blue buttons correspond to different subjects. Pushing the 
coloured button can access these subjects. This is the current preferred method of operation in Australia. 
 
LIST MODE 
In LIST mode, four different coloured page numbers are shown at the bottom of the screen. Each of these 
numbers can be altered and stored in the TV’s memory. These coloured page numbers correspond to the 
colour coded buttons on the remote control. 


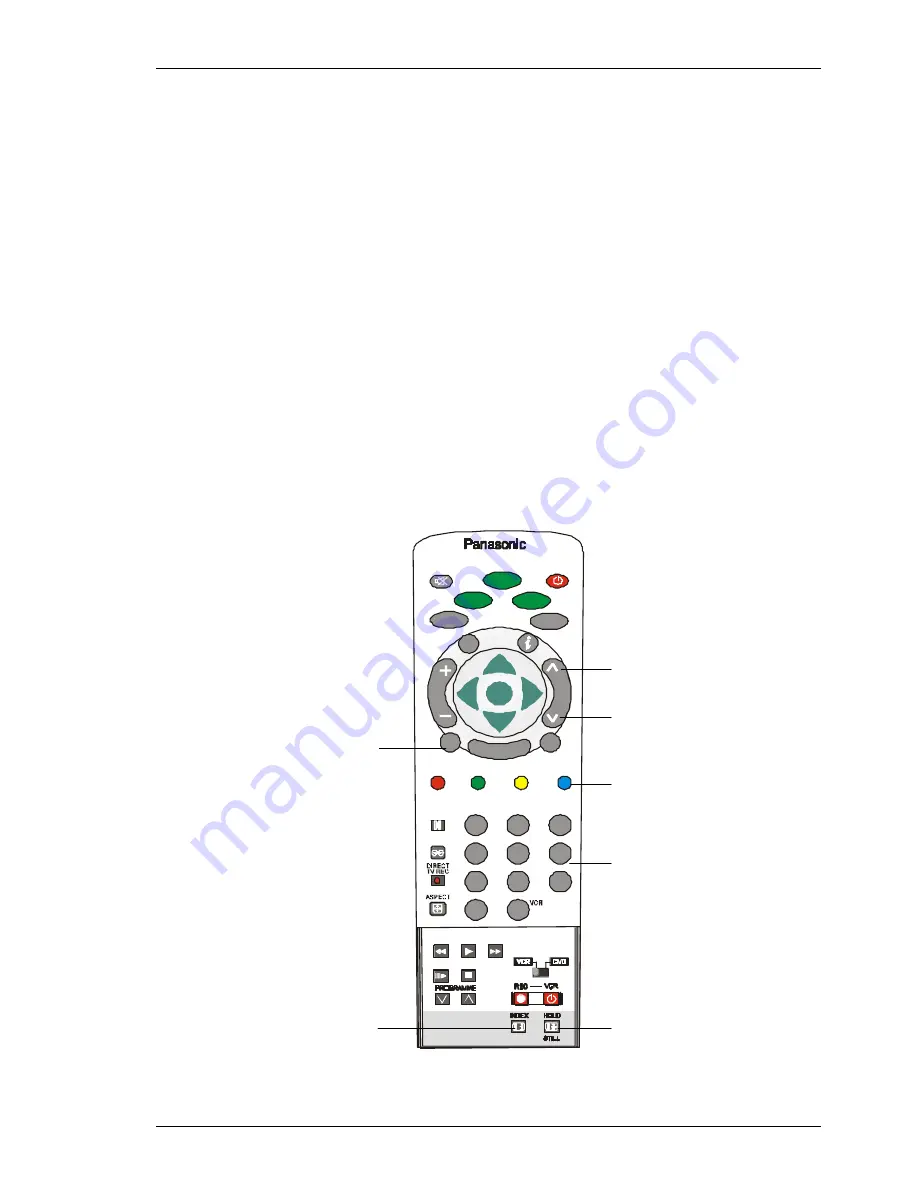
PAGE UP 


PAGE DOWN 


TEXT 


COLOURED BUTTONS 


PAGE NUMBERS 


INDEX   

HOLD 


SET UP

PICTURE

GUIDE

1

4

7

C

2

5

8

0

3

6

9

TV/AV

SOUND

HELP

TEXT

STTL

OK

EXIT

Содержание TX-76DT30A

Страница 1: ...der tau FLA DIGI AL Operating Instructions Please read these operating instructions completely before operating this set and retain the booklet for future reference TQB4A0158P Trade Mark of the DVB Digital Video Broadcasting Project 1991 to 1996 Registration number 2716 ...

Страница 2: ...ecycling If you or someone else has no further use for the carton it can be flattened or cut up and placed into the recycle bin or service provided by your local council applicable for most parts of Australia By recycling the cardboard you are benefiting the environment by reducing waste to landfill and reducing the dependence on virgin forest timbers for paper fibre Plastics Panasonic is reducing...

Страница 3: ...o be left unattended for extended periods several days or more turn the power off to the unit DO NOT leave in Standby mode This will ensure that you enjoy the picture clarity as it was meant to be Refer to page 31 for operating instructions for the GEOMAGNETIC feature Analogue and Digital television what are they Analogue transmission is the system that has been used for many years for broadcastin...

Страница 4: ...e Menu 14 Sound Menu 15 Aspect Control 16 Setup Menu 17 Guide 18 DVB Timer Programming 19 DVB Setup Menu 21 Favourites Setup 22 System Update 23 Tuning Menu 24 Auto setup 25 Analogue manual tuning 26 Q Link Download 28 Shipping condition 30 Owner ID 31 Geomagnetic Correction 32 Teletext Operation 33 35 Connecting Equipment to the TV 36 43 VCR Installation 36 Remote Control VCR DVD Operation 37 Fro...

Страница 5: ...erial as per step 1 If you are connecting VCR then connect the aerial as shown in step 2 If your VCR is Q Link compatible then go to step 3 Step 1 Using the television on its own RF IN Terminal 75 Co Axial Cable Step 2 Using the television with a Standard VCR Step 3 Using the television with a Q Link compatible VCR Refer to pages 38 to 41 for S VHS VCR DVD and other Audio Video connections SERIA L...

Страница 6: ...d performance may cause incorrect operation Do Not mix battery types Alkaline with zinc carbon etc Do Not mix old and new batteries Replace both batteries at the same time Do Not attempt to recharge batteries Do Not short circuit batteries Do Not disassemble batteries Do Not heat or burn batteries Connect the Power Plug This television is designed for the Australian Standard Mains Voltage of 240V ...

Страница 7: ... the correct order Not all VCRs support this download of programme information some may require to be started manually Refer to your VCR operating instruction book If a VCR other than those described above has been connected then there will be no download operation The TV is now ready for use Notes If the VCR has not accepted download data from the TV you may need to select the Download option fro...

Страница 8: ...enus and also to return to the previous menu The up and down cursor buttons are used to move the cursor up and down the menus The left and right cursor buttons are used to access menus adjust levels or to select from a range of options The OK button is used to store settings after adjustments have been made or options have been set for example Picture and Sound settings The EXIT button is used to ...

Страница 9: ... through the programme list If you have set favourite channels and want to scroll through only those channels press the Blue button To step through your favourite channels press the Blue button repeatedly Further information on the individual programmes shown can be displayed by pressing the Information button To return to the normal Information banner view press the Information button once more F...

Страница 10: ...ce Tuning and Geomagnetic Correction Notes Tint Only displayed when receiving NTSC signals Tuning Not displayed when the TV is showing a DVB station or when in AV mode For manual tuning of analogue stations please refer to page 26 or 27 For Geomagnetic Correction instructions please refer to page 32 This button is used to select the next lower programme number It is also used with the F button to ...

Страница 11: ...D BUTTONS N AMBIENCE PROGRAMME NUMBERS DIRECT TV RECORD ASPECT DIRECT CHANNEL NUMBER PLAY REWIND REVIEW FAST FORWARD CUE STOP STILL ADVANCE VCR DVD SWITCH RECORD PROGRAMME DOWN STANDBY PROGRAMME UP STILL For details of Teletext remote control operation please refer to page 33 For details of VCR remote control operation please refer to page 37 SET UP PICTURE GUIDE 1 4 7 C 2 5 8 0 3 6 9 TV AV SOUND ...

Страница 12: ...ease refer to page 14 GUIDE The GUIDE Button displays the current television guide for all digital channels available in your area Please refer to page 18 HELP Provides a demonstration of On Screen Display menus VOLUME UP Used to increase the volume level OK The OK Button is used to confirm selections and choices VOLUME DOWN Used to decrease the volume level TEXT This button is used to switch betw...

Страница 13: ...AV input individually to compensate for different output levels from the audio sources Please refer to page 17 for Volume correction adjustment INFORMATION This button is used to show the status information for the current Programme position PROGRAMME NUMBER UP Pressing this button selects the next higher Programme Number in sequence POSITION CURSOR BUTTONS These buttons are used with the Menu but...

Страница 14: ...ve an NTSC signal source connected to the TV You will be able to adjust the picture hue The Colour balance setting allows you to set the overall colour tone of the picture You can switch between Cool Normal and Warm P NR will automatically reduce unwanted picture noise Al automatically analyses the incoming picture and processes it to give improved contrast and optimum depth of field P NR Off AI O...

Страница 15: ...hone volume can be adjusted independently of the TV speakers so that everyone can enjoy listening at their own comfort level Not available with DVB programmes Switch between Stereo and Mono If reception deteriorates it is advisable to switch to Mono Multi audio which will only appear when a DVB programme is selected allows you to select an alternative sound track The number of options available de...

Страница 16: ...he screen This process can take several minutes depending on the darkness of the picture You may prefer to manually select one of the other aspect options available to view the picture Notes If in Panasonic Auto mode you experience problems with the screen display size when playing back widescreen format recordings from your VCR then it is possible that the tracking control of your VCR requires ad...

Страница 17: ...specialised DVB options See page 21 The Teletext option allows you to choose between FASTEXT or LIST mode See page 33 Lets you control any picture movement Set to ON to correct minor picture movement Set to OFF to have no flicker reduction at all If you notice a slight tilt to the picture or if there are coloured patches at the corners of the screen this feature might help to eliminate them See pa...

Страница 18: ...s The types displayed will change depending on which of the guides you have selected Note Some types may not be available Information You can view further information about the selected programme Select a programme position Press the Yellow multi function button to display the information Press the Yellow button again to return to the list Next The TV Guide displays the current programmes being tr...

Страница 19: ...on which recording Is to take place The current Date and Time are shown at the top of the menu Move to the Start time field Set the Start time Move to the End time field Set the End time The duration of the recording is shown in the Min column Move to the Subtitles field If you wish to record subtitles If available select Auto Press the OK button to store Notes To delete a timer programme select t...

Страница 20: ...elect various options to determine how often a recording should be made Press the down cursor button repeatedly to access the following options daily SU SA The VCR will record at the same time every day daily MO SA The VCR will record at the same time each day from Monday to Saturday daily MO FR The VCR will record at the same time each day from Monday to Friday weekly SA FR TH WE TU MO or SU The ...

Страница 21: ...tter signal The Common Interface Module menu provides access to functions contained on a Common Interface Module inserted into one of the Cl slots These are located at the rear of the TV See page 42 Allows you to select your favourite programme positions and display them as a list in the TV Guide See page 22 This menu allows you to download new software to the television See page 23 This option al...

Страница 22: ...Access Favourites Setup menu Move to the programme position that you wish to set as a favourite Press the OK button to set your favourite A tick appears next to the selected program position You may move to and select as many programme positions as you wish To clear a previously selected favourite select it with the cursor bar and press the OK button Press the Setup button to return to the DVB Set...

Страница 23: ... begin to search for new software this will take a few seconds If a newer version is available Important Note You must not switch off the TV while downloading is in progress as errors could occur Downloading will take between five and thirty minutes to complete so check first that there are no imminent programmes that you wish to watch Press the OK button to Initiate download If a newer version is...

Страница 24: ...ith a Q Link compatible VCR Allows you to clear all tuning information and reset all control levels back to factory settings See page 30 You may wish to lock a programme channel to prevent access to it Set to ON to lock the current programme position Set to OFF to unlock Note When a programme position is locked Direct Channel Access using the C and numeric keys on the remote control is not availab...

Страница 25: ...ompatible VCR Is connected via the AV2 socket programme data will be sent to the VCR via Q Link see page 28 Once this operation is completed the TV will display programme position 1 Select Access Exit Analogue manual tuning New services message Off Tuning menu Auto setup Access Shipping condition Child lock Off Owner ID Q Link Download TV VCR WARNING All current tuning data will be erased OK Start...

Страница 26: ...ou have finished with the Tuning menu press the EXIT button to exit Note It is possible to tune manually tune analogue stations using the front panel controls Please refer to page 27 EXIT Manual tuning 00 75 02 44 Programme down up Search Exit down up SETUP Return Select Access Exit Flicker reduction On Geomagnetic AV2 out Analogue Off timer Off DVB timer lock Off DVB setup Teletext Top Setup menu...

Страница 27: ...s found the search will pause If it is not the correct station you can press the or buttons to continue searching When the desired station is found press the TV AV button to move to the programme position indicator Press or to select the programme position in which the station Is to be stored Press STR to store the programme position The programme position and channel number indicators will flash ...

Страница 28: ... Link a trademark of Philips Corporation Megalogic a trademark of Grundig Corporation SMARTLINK a trademark of Sony Corporation These VCR s may support some or all of the above functions Refer to your VCR operating instruction book Preset Download This allows the programme order from the TV to be downloaded to the VCR helping to ensure that correct recordings are made there are several ways to per...

Страница 29: ...ations If you press the DIRECT TV REC button while watching a DVB station the VCR will automatically switch to its AV input to record the DVB signal from the TV via the SCART cable and the DVB programme position will be locked If you attempt to select another DVB programme position while recording you will see the message This programme is locked Press the OK button to clear the message or the EXI...

Страница 30: ...move to a different area when you will probably want the TV to tune itself to your new local stations This can be done either through the Shipping condition menu or through the Auto setup menu The Shipping condition menu will reset all data clearing all tuning information and resetting all control levels back to factory settings You may need to adjust your VCR or programme position 0 VCR after ope...

Страница 31: ...ollowed by OK to proceed If a 4 digit PIN NUMBER was entered above you will be taken automatically to the NAME line If not move to the NAME line Enter your name Use the left and right buttons to change characters Move to HOUSE NO Enter your House Number or other identification Use the left and right buttons to change characters Move to POSTCODE Enter your Postcode Use the left and right buttons to...

Страница 32: ...n the front of the TV Press the F button repeatedly until the Geomagnetic Correction feature is displayed Press the or buttons repeatedly until the picture appears to be level Press the F button again to return to normal viewing Close the flap to prevent damage F F GEOMAGNETIC CORRECTION ADJUST TILT F TO EXIT STR F TV AV 000 000 SETUP Return Adjust tilt Exit GEOMAGNETIC CORRECTION Select Access Ex...

Страница 33: ...ays black until a programme containing closed captions is broadcast Some broadcast stations will have a message on the screen to tell you that closed captions are not available for this programme Some broadcast stations give you no indication at all TOP Table Of Pages MODE In TOPTEXT mode the red button moves to the previous page number and the green button moves to the next page number The yellow...

Страница 34: ...e Red Green Yellow Blue buttons In TOP TEXT mode these correspond to the differently coloured subjects In LIST mode they correspond to the differently coloured page numbers List Store In LIST mode the four page numbers can be altered only for analogue stations stored in programme positions 1 25 To do this press one of the four coloured buttons and enter the new page number Press and hold OK the pa...

Страница 35: ...es so that you are always offered the most recently transmitted selection of sub pages In Teletext operation use the following procedure to access sub pages If the sub page you want to look at is not yet available press the SETUP button to display special functions followed by the Yellow button to view the TV picture whilst waiting for more sub pages to be found The sub pages found will be display...

Страница 36: ...r additional equipment Use the AV2 Scart terminal for a standard VCR or an S Video VCR or a Q Link or compatible VCR To tune your TV to the VCR Switch on the VCR Insert and play a pre recorded tape with known content On the TV select programme position 0 Open the Front panel flap Press the F button repeatedly until Tuning mode is reached Press the or button to access Tuning mode Press or to begin ...

Страница 37: ...e VCR Fast Forward Cue Press to fast forward the tape Press during playback to watch the picture at fast speed VCR Selects VCR Control Record Used to start the VCR recording Standby Used to switch the VCR ON or OFF Standby Play Starts the DVD playing Skip Back Press once to skip to the previous track Press and hold to watch the picture in reverse at high speed Stop Used to stop the DVD Pause Still...

Страница 38: ...b other people in the house When using the headphones for this purpose you must remember to turn the television volume down Please refer to page 15 for headphone volume adjustment The normal television sound controls volume bass treble balance sound mode and ambience have no effect on the headphone sound Front AV Inputs VCRs cameras games and other video sources can be connected to the television ...

Страница 39: ...ction book for details Warning Progressive input from a DVD player or Set Top Box etc will cause strange pictures Switch to interlace Socket earth 21 CVBS out video 19 CVBS earth 17 P In 15 Earth 13 Y In 11 Earth 9 R P In 7 Earth 5 Audio out L 3 Audio out R 1 R 20 CVBS in video 18 16 14 Earth 12 10 8 Status CVBS 6 Audio in L 4 Audio earth 2 Audio in R Socket earth 21 CVBS out video 19 CVBS earth 1...

Страница 40: ... Make sure that the Scart adaptor is switched to IN Connecting an S Video VCR to the Television S Video equipment uses a 4Pin Mini Din Male plug for the video and RCA plugs for the audio When an S Video cable is connected to an S Video input terminal the RCA video terminal for that AV position will be disconnected Use the supplied Scart adaptor RCA cables not supplied and the S Video cable not sup...

Страница 41: ...s the television becomes a visual display for tape editing or copying NOTES Make sure that the Scart adaptor is switched to OUT Never connect the same video recorder or other device to both the VIDEO IN and MONITOR OUT terminals of this television as this could cause incorrect operation Audio Out The Audio Out terminals allow you to connect the television to an amplifier of audiocassette recorder ...

Страница 42: ...splayed If you have inserted a module check that it is fully inserted The features that now appear on screen are dependent on the contents of the selected Common Interface Module Refer to the instructions supplied with the card or contact the vendor In all cases it is possible to navigate the pages using buttons on the remote control but because the commands available must apply to all manufacture...

Страница 43: ...from None Hardware or Software Determines whether parity checking should be used Select from None Odd or Even Modem only Select either DTMF Tone dialing or Pulse dialing Many internal telephone networks require you to dial a single digit before dialing an outside line If the Modem is connected to such a system use the Prefix function to enter the initial dig it for example 0 The Redial attempts fu...

Страница 44: ...o let you know that you are in Text mode See page 33 Question I turned my television to Standby with the remote control and then I turned it off with the power switch I turned the TV back on with the power switch but it s still in Standby and I can t find my remote control How can I turn the TV back on Answer Press the front panel Up or Down button See page 10 DVB Questions Question Why are there ...

Страница 45: ...ion is essential Allow a gap of at least 10cm around the TV even in a cabinet or between shelves Remove the Power Plug from the wall socket when the Television is not going to be used for an extended period of time Cabinet and Picture Tube Care The cabinet and picture tube can be kept in good condition by wiping with a clean lint free cloth moistened with mild detergent and water For safety remove...

Страница 46: ...lume brightness and contrast levels An HD signal may be selected Push the i button to check the function of the TV Colour Control If the picture is from a tape playback try adjusting the tracking Retune the Television Refer to page 26 27 Magnetic Interference from unshielded equipment or the television may have been moved while it was switched ON Switch the television OFF with the main power switc...

Страница 47: ...n Scart Socket Audio Video In Out Y PB PR AV2 Rear 21pin Scart Socket Audio Video In Out S Video Q Link AV3 Front S Video In RCA AV In AV4 Rear 21pin Scart Socket Audio Video In Out Y PB PR Monitor Out RCA Video Audio S Video Y 1 0Vp p 75 C 0 3Vp p 75 Video in 1 0Vp p 75 Audio in Approx 400mV 47k Monitor Out Video Out 1 0Vp p 75 Audio Out Approx 400mV Data connections MODEM 9 pin male D Type conne...

Страница 48: ...orks Australia Pty Ltd P O Box 326 Penrith NSW 2751 ABN 25 000 611 389 Certified to International Quality Standard AS NZS ISO9001 Certified to International Environmental Standard ISO14001 Printed in Australia TQB4A0158P ...

Отзывы: