background image

English

   - 7 -

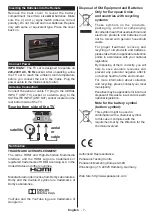
Inserting the Batteries into the Remote

Remove the back cover to reveal the battery 

compartment. Insert two size 

AAA

 batteries. Make 

sure the (+) and (-) signs match (observe correct 

polarity). Do not mix old and new batteries. Replace 

only with same or equivalent type. Place the cover 

back on.

Connect Power 

IMPORTANT

: The TV set is designed to operate on 

220-240V AC, 50 Hz

 socket. After unpacking, allow 

the TV set to reach the ambient room temperature 

before you connect the set to the mains. Plug the 

power cable to the mains socket outlet.

Antenna Connection

Connect the aerial or cable TV plug to the AERIAL 

INPUT (ANT-TV) socket or satellite plug to the 

SATELLITE INPUT (ANT SAT) socket located on the 

rear bottom side of the TV.

Rear bottom side of the TV

satellite

aerial 

or

cable

Notification

TRADEMARK ACKNOWLEDGMENT

The terms HDMI and High-Definition Multimedia 

Interface, and the HDMI Logo are trademarks or 

registered trademarks of HDMI Licensing LLC in the 

United States and other countries.

Manufactured under license from Dolby Laboratories. 

Dolby and the double-D symbol are trademarks of 

Dolby Laboratories.

YouTube and the YouTube logo are trademarks of 

Google Inc.

Disposal of Old Equipment and Batteries

Only for European Union 

and countries with recycling 

systems

These symbols on the products, 

packaging, and/or accompanying 

documents mean that used electrical and 

electronic products and batteries must 

not be mixed with general household 

waste.
For proper treatment, recovery and 

recycling of old products and batteries, 

please take them to applicable collection 

points in accordance with your national 

legislation.
By disposing of them correctly, you will 

help to save valuable resouces and 

prevent any potential negative effects 

on human health and the environment.
For more information about collection 

and recycling, please contact your local 

municipality.
Penalties may be applicable for incorrect 

disposal of this waste, in accordance with 

national legislation.

Note for the battery symbol 

(bottom symbol):

This symbol might be used in 

combination with a chemical symbol. 

In this case it complies with the 

requirement set by the Directive for the 

chemical involved.

Authorized Representative: 
Panasonic Testing Centre
Panasonic Marketing Europe GmbH
Winsbergring 15, 22525 Hamburg, Germany

Web Site: http://www.panasonic.com

Содержание TX-65CW324

Страница 1: ...OPERATING INSTRUCTIONS MODE D EMPLOI BEDIENUNGSANLEITUNG TX 65CW324 COLOUR TELEVISION WITH REMOTE CONTROL TÉLÉVISEUR COULEUR AVEC TÉLÉCOMMANDE FARB TV GERÄT MIT FERNBEDIENUNG ...

Страница 2: ...irst Time Installation 11 Media Playback via USB Input 12 Media Browser Menu 12 CEC and CEC RC Passthrough 13 TV Menu Contents 14 General TV Operation 18 Using the Channel List 18 Configuring Parental Settings 18 Electronic Programme Guide EPG 18 Teletext Services 19 Software Upgrade 19 Troubleshooting Tips 19 PC Input Typical Display Modes 20 AV and HDMI Signal Compatibility 20 Supported Video Fi...

Страница 3: ...by qualified personnel before operating it any further Do not expose the TV to direct sunlight open flames or place it near intense heat sources such as electric heaters Listening in excessive volumes from earphones and headphones may cause hearing loss Ensure that no open flame sources such as lit candles are placed on top of the TV To prevent injuries this TV must be securely attached to a wall ...

Страница 4: ...evision set or its controls If your existing television set is being retained and relocated the same considerations as above should be applied Maintenance First remove the mains plug from the mains socket Display panel Cabinet Pedestal Regular care Gently wipe the surface of the display panel cabinet or pedestal by using a soft cloth to remove dirt or fingerprints For stubborn dirt 1 First clean t...

Страница 5: ...tand s When using the wall hanging bracket Please contact your local Panasonic dealer to purchase the recommended wall hanging bracket Holes for wall hanging bracket installation Rear of the TV a b a mm 400 b mm 400 View from the side a Depth of screw a min mm 4 max mm 8 Diameter M6 Note The screws for fixing the TV onto the wall hanging bracket are not supplied with the TV Environmental Informati...

Страница 6: ...2 x AAA Instruction Book Detachable stand Stand mounting screws M4 x 12 Standby Notifications If the TV does not receive any input signal e g from an aerial or HDMI source for 5 minutes it will go into standby When you next switch on the following message will be displayed TV switched to stand by mode automatically because there was no signal for a long time Press OK to continue If the TV is on an...

Страница 7: ...ouble D symbol are trademarks of Dolby Laboratories YouTube and the YouTube logo are trademarks of Google Inc Disposal of Old Equipment and Batteries Only for European Union and countries with recycling systems These symbols on the products packaging and or accompanying documents mean that used electrical and electronic products and batteries must not be mixed with general household waste For prop...

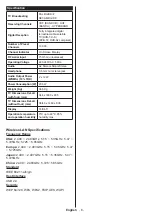
Страница 8: ...ereo jack Audio Output Power WRMS 10 THD 2 x 12 W Power Consumption W 200 W Weight Kg 36 5 Kg TV Dimensions DxLxH with foot mm 344 x 1460 x 905 TV Dimensions DxLxH without foot mm 38 48 x 1460 x 838 Display 16 9 65 Operation temperature and operation humidity 0ºC up to 40ºC 85 humidity max Wireless LAN Specifications Frequency Range USA 2 400 2 483GHz 5 15 5 35GHz 5 47 5 725GHz 5 725 5 85GHz Europ...

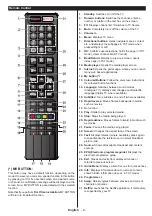
Страница 9: ...each many web based applications 12 My button 13 Coloured Buttons Follow the on screen instructions for coloured button functions 14 Language Switches between sound modes analogue TV displays and changes audio subtitle language digital TV where available 15 Subtitles Turns subtitles on and off where available 16 Rapid reverse Moves frames backwards in media such as movies 17 No function 18 Play St...

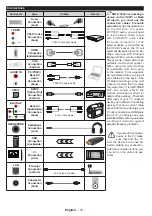
Страница 10: ...ernal device is connected via the SCART socket the TV will automatically switch to AV mode When receiving DTV channels Mpeg4 H 264 or while in Media Player mode output will not be available via the scart socket When using the wall mounting kit available from third party in the market if not supplied we recommend that you plug all your cables into the back of the TV before mounting on the wall Inse...

Страница 11: ...mpleted Cable If Cable broadcast search option is turned on the TV will search for digital cable broadcasts after other initial settings are completed According to your other preferences a confirmation message may be displayed before starting to search Select YES and press OK to proceed To cancel operation select NO and press OK You can select Network or set values such as Frequency Network ID and...

Страница 12: ...oragedevices before connecting them to the TV Manufacturer will not be responsible for any file damage or data loss Certain types of USB devices e g MP3 Players or USB hard disk drives memory sticks may not be compatible with this TV The TV supports FAT32 and NTFS disk formatting While formatting USB hard drives which have more than 1TB Tera Byte storage space you may experience some problems in t...

Страница 13: ...e TV supports also ARC Audio Return Channel feature This feature is an audio link meant to replace other cables between the TV and the audio system A V receiver or speaker system WhenARC is active TV does not mute its other audio outputs automatically So you need to decrease TV volume to zero manually if you want to hear audio from connected audio device only same as other optical or co axial digi...

Страница 14: ...er quality and readability When Movie Sense option is set to Low Medium or High Movie Sense demo option will be available If one of these options is selected and if you press OK button then the demo mode starts While demo mode is active the screen will be divided into two sections one displaying the movie sense activity the other displaying the normal settings for TV screen Film Mode Films are rec...

Страница 15: ...e If the viewed channel supports AVL Automatic Volume Limiting Sets the sound to obtain fixed output level between programmes Headphone Lineout When you connect an external amplifier to your TV using the headphone jack you can select this option as Lineout If you have connected headphones to the TV set this option as Headphone Please ensure before using headphones that this menu item is set to Hea...

Страница 16: ...N number and deactivate Netflix ESN number is an unique ID number for Netflix created especially to identify your TV More Displays other setting options of the TV Menu Timeout Changes timeout duration for menu screens Blue Background Activates or deactivates the blue background system when the signal is weak or absent Software Upgrade Ensures that your TV has the latest firmware Press OK to see th...

Страница 17: ... for direct broadcast entry Network channel scan Searches for the linked channels in the broadcast system Digital Aerial Searches for aerial network channels Digital Cable Searches for cable network channels Analogue fine tune You can use this setting for fine tuning analogue channels This feature is not available if no analogue channels are stored Satellite Settings Displays satellite settings Sa...

Страница 18: ...te If the country option in the First Time Installation is set as France Italy or Austria Maturity Lock s value will be set to 18 as default Child Lock If this option is set to ON the TV can only be controlled by the remote control In this case the control buttons on the TV will not work Internet Lock If this option is set to OFF the open browser application in the portal will be disabled Set to O...

Страница 19: ...OK button Setup Menu will be displayed Then select More and press the OK button Navigate to Software upgrade and press the OK button In Upgrade options menu select Scan for upgrade and press OK button to check for a new software upgrade If a new upgrade is found it starts to download the upgrade After the download is completed confirm the question asking about rebooting the TV by pressing the OK t...

Страница 20: ...60 85Hz 33 1280x1024 60Hz 34 1280x1024 75Hz 35 1280x1024 85Hz 36 1400x1050 60Hz 37 1400x1050 75Hz 38 1400x1050 85Hz 39 1440x900 60Hz 40 1440x900 75Hz 41 1600x1200 60Hz 42 1680x1050 60Hz 43 1920x1080 60Hz 44 1920x1200 60Hz AV and HDMI Signal Compatibility Source Supported Signals Available EXT SCART PAL O SECAM O NTSC4 43 O NTSC3 58 O RGB 50 60 Side AV PAL O SECAM O NTSC4 43 O NTSC3 58 S VIDEO 50Hz...

Страница 21: ...0fps 62 5 Mbps 1080P 60fps 62 5 Mbps Motion JPEG 640x480 30fps 10 Mbps Other 1080P 30fps 40 Mbps avi MPEG1 2 MPEG4 Sorenson H 263 H 263 H 264 WMV3 Motion JPEG mkv MPEG1 2 MPEG4 H 263 H 264 WMV3 Motion JPEG asf Sorenson H 263 H 264 WMV3 Motion JPEG flv WMV3 1080P 30fps 40 Mbps swf RV30 RV40 1080P 30fps 40 Mbps wmv Supported Picture File Formats for USB Mode Image Photo Resolution width x height Rem...

Страница 22: ...2 8Kbps 384Kbps MPEG1 2 Layer3 8Kbps 320Kbps WMA 128bps 320Kbps 8KHz 48KHz WMA 10 Pro M0 192kbps 48KHz WMA 10 Pro M1 384kbps 48KHz WMA 10 Pro M2 768kbps 96KHz mkv mka MPEG1 2 Layer1 32Kbps 448Kbps 16KHz 48KHz MPEG1 2 Layer2 8Kbps 384Kbps MPEG1 2 Layer3 8Kbps 320Kbps AC3 32Kbps 640Kbps 32KHz 44 1KHz 48KHz AAC HEAAC 8KHz 48KHz WMA 128bps 320Kbps 8KHz 48KHz WMA 10 Pro M0 192kbps 48KHz WMA 10 Pro M1 3...

Страница 23: ...32Kbps 640Kbps 32KHz 44 1KHz 48KHz AAC HEAAC 8KHz 48KHz swf MPEG1 2 Layer3 8Kbps 320Kbps 16KHz 48KHz ec3 EAC3 32Kbps 6Mbps 32KHz 44 1KHz 48KHz rm rmvb ra AAC HEAAC 8KHz 48KHz LBR cook 6Kbps 128Kbps 8KHz 11 025KHz 22 05KHz 44 1KHz wma wmv WMA 128bps 320Kbps 8KHz 48KHz WMA 10 Pro M0 192kbps 48KHz WMA 10 Pro M1 384kbps 48KHz WMA 10 Pro M2 768kbps 96KHz webm VORBIS Up to 48KHz Supported Subtitle File ...

Страница 24: ...cable not supplied you can refer to the following resolution information 56Hz 60Hz 66Hz 70Hz 72Hz 75Hz 640x400 þ 640x480 þ þ þ þ 800x600 þ þ þ þ þ 832x624 þ 1024x768 þ þ þ þ þ 1152x864 þ þ þ 1152x870 þ 1280x768 þ þ 1360x768 þ 1280x960 þ þ 1280x1024 þ þ 1400x1050 þ þ 1440x900 þ þ 1600x1200 þ 1680x1050 þ 1920x1080 þ 1920x1200 þ ...

Страница 25: ...etwork Type can be selected as Wired Device Wireless Device or Disabled in accordance with the active connection to the TV set Select this as Wired Device if you are connecting via an ethernet Internet Speed Test Highlight Internet Speed Test and press the OK but ton TV will check the internet connection bandwidth and display the result when complete Advanced Settings Highlight Advanced Settings a...

Страница 26: ...tons to set Press the OK button to save settings when complete Other Information The status of the connection will be displayed as Connected or Not Connected and the current IP address if a connection is established Connecting to your mobile device via WiFi IfyourmobiledevicehasWiFifeature youcanconnect it to your TV via a router in order to access the content in your device For this your mobile d...

Страница 27: ...ired or Wireless Network See the Wired Wireless Connectivity chapters for detailed configuration information 3 Play Shared Files via Media Player Select Media Player by using the Left or Right buttons from the main menu and press OK The media browser will then be displayed Audio Video Sharing Audio Video Sharing support is only available in the Media Player Folder mode To enable folder mode go to ...

Страница 28: ...ected to the web site of the nero software 10 A shortcut is now placed on your desktop Congratulations You successfully installed Nero MediaHome on your PC Run Nero MediaHome by double clicking on the shortcut icon Internet Portal Portal feature adds your TV a feature that allows you to connect a server on the Internet and view the content provided by this server over your Internet connection Port...

Страница 29: ...r visit websites using the web browser Enter the address of a website URL into the address bar and click on the button to visit Enter keyword s into the address bar and click on the button to search for the related websites Click on the links to visit the related websites When you hover the cursor down to the middle of the screen the shortcuts assigned to the coloured buttons of the remote control...

Страница 30: ...e USB 41 Menu Navigateur Média 42 Serveurs Intermédiaires CEC et CEC RC 42 Contenu du menu Téléviseur 43 Fonctionnement Général de la TV 47 Utilisation de la Liste de Chaînes 47 Configuration des Paramètres Parentaux 47 Guide des Programmes Électroniques EPG 47 Services Télétexte 48 Mise à Jour du Logiciel 48 Résolution des Problèmes et Astuces 48 Modes d affichage Typiques d une Entrée de PC 49 C...

Страница 31: ...imentation or le laisser s entrelacer avec d autres câbles Lorsqu il est endommagé faites le remplacer par un personnel qualifié N utilisez pas cet appareil dans les zones humides ou moites N exposez pas le téléviseur aux liquides Si un liquide se verse sur la TV débranchez la immédiatement et faites la inspecter par un technicien qualifié avant de l utiliser à nouveau N exposez pas la télé aux ra...

Страница 32: ...ssi le décès Gardez les nouvelles et anciennes piles hors de portée des enfants Si le compartiment à piles ne se ferme pas correctement arrêtez d utiliser le produit et tenez le hors de la portée des enfants Si à votre avis la batterie aurait été avalée ou logée à l intérieur du corps consultez de toute urgence un médecin i CLASS 1 LASER PRODUCT AVERTISSEMENT Ne posez jamais le téléviseur sur un s...

Страница 33: ...pourrait altérer le fini de la surface Prise d alimentation Essuyez régulièrement la fiche du cordon d alimentation avec un chiffon sec L humidité et la poussière peuvent causer un incendie ou une électrocution Fixation Retrait du Piédestal Préparations Retirez le s piédestal aux et le téléviseur de la caisse d emballage et mettez le téléviseur sur une table de travail avec le panneau de l écran s...

Страница 34: ...res Personnels est sélection née le message L écran s éteindra dans 15 se condes s affiche à l écran Sélectionnez Continuer et appuyez sur OK pour éteindre immédiatement l écran Si vous n appuyez sur aucun bouton l écran va s éteindre après 15 secondes Appuyez sur n im porte quelle touche de la télécommande ou sur le téléviseur pour allumer l écran à nouveau Remarque L option D extinction D écran ...

Страница 35: ... un onglet de menu et appuyez sur OK pour entrer Utilisez à nouveau ces boutons de directions pour sélectionner ou définir un élément Appuyez sur le bouton Return Back ou Menu pour sortir du menu Sélection D entrée Une fois les équipements externes connectés à votre téléviseur vous pouvez commuter entre différentes sources d entrée Appuyez sur le bouton Source de la télécommande successivement pou...

Страница 36: ... ménagères Pour le traitement la récupération et le recyclage des piles et des appareils usagés veuillez les déposer dans les points de collecte prévus conformément à la législation nationale En mettant au rebut ces produits convenablement vous contribuez à la préservation de précieuses ressources et à la réduction de leur éventuel impact sur la santé et l environnement Pour plus de détails sur la...

Страница 37: ...Puissance de Sortie Audio WRMS 10 THD 2 x 12 W Consommation Électrique W 200 W Poids Kg 36 5 Kg Dimensions TV DxLxH avec pied mm 344 x 1460 x 905 Dimensions TV DxLxH sans pied mm 38 48 x 1460 x 838 Affichage 16 9 65 Température de fonctionnement et humidité 0 ºC à 40 ºC soit 85 d humidité maximale Spécifications du LAN sans fil Gamme de fréquence États Unis 2 400 2 483 GHz 5 15 5 35 GHz 5 47 5 725...

Страница 38: ...ueil où vous pourrez accéder aux nombreuses applications Web 12 Mon Bouton 13 Boutons de couleur Suivez les instructions qui s affichent à l écran pour les fonctions de boutons de couleur 14 Langue Bascule entre les modes sonores TV analogique affiche et change la langue audio des sous titres le cas échéant en TV numérique 15 Sous titres Active et désactive les sous titres si disponibles 16 Retour...

Страница 39: ...anché à l aide des prises PÉRITEL le téléviseur passe automatiquement en mode AV Pendant la réception des chaînes DTV Mpeg4 H 264 ou en mode Lecteur Multimédia la sortie ne sera pas disponible à travers la prise péritel Lorsque vous utilisez le kit de montage au mur fourni par un tiers du contrat si non fourni nous vous recommandons de connecter tous vos câbles à l arrière du téléviseur avant l in...

Страница 40: ...tenne est activée le téléviseur procède à la recherche d émissions hertziennes une fois les autres réglages initiaux terminés Câble Si l option de recherche des émissions par câble est activée le téléviseur procède à la recherche d émissions numériques par câble une fois les autres réglages initiaux terminés Selon vos préférences un message peut s afficher avant le lancement de la recherche Sélect...

Страница 41: ...appuyez sur OK pour confirmer LCN est le système du numéro de chaîne logique qui sélectionne des émissions disponibles conformément à une séquence de chaînes reconnaissables si disponible Remarque Évitez d éteindre le téléviseur lors de l initialisation de la première installation Veuillez noter que certaines options ne seront pas disponibles selon le choix du pays Lecture de Média via Entrée USB ...

Страница 42: ...MI connecté lecteur DVD enregistreur 1 etc La télécommande de la télé peut automatiquement fonctionner après avoir sélectionné la source HDMI connectée Pour terminer cette opération et à nouveau commander la TV à distance appuyez sur le bouton Menu Rapide de la télécommande sélectionnez l option CEC RC Passthrough puis régler sur Off à l aide des boutons de gauche ou droite Cette fonction peut éga...

Страница 43: ... de meilleures qualités et lisibilité Lorsque l option Effet Film est définie sur Faible Moyen ou Élevé la version démo de cette option est disponible Si l une de ces options est sélectionnée et si vous appuyez sur le bouton OK le mode démo s affiche Lorsque le mode démo est actif l écran se divise en deux sections l une affichant l activité du mode Movie sense l autre affichant les paramètres nor...

Страница 44: ...AVL Limitation Automatique du Volume Cette fonction règle le son pour obtenir le niveau de sortie prévu entre les programmes Casque Sortie de Ligne Si vous voulez connecter un amplificateur externe à votre télé à l aide d une fiche pour casque audio sélectionnez l option Sortie de Ligne Si vous avez branché des casques à votre téléviseur définissez cette option en tant que Casque Veuillez vous ass...

Страница 45: ...ication unique pour Netflix créé spécialement pour identifier votre téléviseur Plus Affiche les autres options de réglage du téléviseur Temporisation du Menu Change la durée de temporisation des écrans du menu Fond Bleu Active ou désactive le système du fond bleu quand le signal est faible ou absent Mise À Jour Du Logiciel S assure que votre TV est doté du tout dernier microprogramme Appuyez sur O...

Страница 46: ...iffusion directe Recherche des Chaînes Réseau Recherche les chaînes liées dans le système de diffusion Antenne Numérique Recherche les chaînes d antenne réseau Câble Numérique Recherche les chaînes de câble réseau Recherche Fine Analogique Vous pouvez utiliser ce réglage pour la recherche fine de chaînes analogiques Cette option est disponible uniquement si des chaînes analogiques sont mémorisées ...

Страница 47: ...roprié le menu Paramètres du Contrôle Parental s affiche Verrouillage Menu Cette option permet d autoriser ou de verrouiller l accès à tous les menus ou menus d installation du téléviseur Verrouillage Maturité Une fois définie cette option recherche l information relative aux émissions parentales et si ce niveau parental est inactivé l accès à la diffusion n est pas activé Remarque Si l option Pay...

Страница 48: ...es Télétexte Appuyez sur le bouton Text pour entrer Appuyez à nouveau sur ce bouton pour activer le mode de mélange ce qui vous permet de voir la page télétexte et la diffusion télévisée simultanément Appuyez de nouveau sur ce bouton pour quitter Si disponible des sections contenues dans une page de télétexte présenteront un code coloré et peuvent être sélectionnées en appuyant sur les touches col...

Страница 49: ...ez les piles Les sources d entrée ne peuvent pas être sélectionnées Si vous ne pouvez pas sélectionner une source d entrée il est possible que votre périphérique ne soit pas connecté Le cas échéant Vérifiez les câbles AV et les branchements si vous essayez de basculer à la source d entrée dédiée à l appareil connecté Modes d affichage Typiques d une Entrée de PC Le tableau ci dessous est une illus...

Страница 50: ... 50 Hz 60 Hz O 1080i 50 Hz 60 Hz O HDMI 480i 480p 60Hz O 576i 576p 50Hz O 720p 50 Hz 60 Hz O 1080i 50 Hz 60 Hz O 1080p 24Hz 25Hz 30Hz 50Hz 60Hz O X Non Disponible O Disponible Dans certains cas un signal du téléviseur peut ne pas s afficher correctement Le problème peut être celui d une inconsistance au niveau des normes de l équipement source DVD décodeur etc Si vous rencontrez ce type de problèm...

Страница 51: ... 5 Mbps 1 080 P 60 fps 62 5 Mbps Motion JPEG 640 x 480 30 fps 10 Mbps Autre 1 080 P 30 fps 40 Mbps avi MPEG1 2 MPEG4 Sorenson H 263 H 263 H 264 WMV3 Motion JPEG mkv MPEG1 2 MPEG4 H 263 H 264 WMV3 Motion JPEG asf Sorenson H 263 H 264 WMV3 Motion JPEG flv WMV3 1 080 P 30 fps 40 Mbps swf RV30 RV40 1 080 P 30 fps 40 Mbps wmv Formats de Fichiers Image Pris en Charge Pour le Mode USB Image Photo Résolut...

Страница 52: ...ouche2 8 Kbps 384 Kbps MPEG1 2 Couche3 8 Kbps 320 Kbps WMA 128 bps 320 Kbps 8KHz 48KHz WMA 10 Pro M0 192 kbps 48KHz WMA 10 Pro M1 384 kbps 48KHz WMA 10 Pro M2 768 kbps 96KHz mkv mka MPEG1 2 Couche1 32 Kbps 448 Kbps 16KHz 48KHz MPEG1 2 Couche2 8 Kbps 384 Kbps MPEG1 2 Couche3 8 Kbps 320 Kbps AC3 32 Kbps 640 Kbps 32KHz 44 1KHz 48KHz AAC HEAAC 8KHz 48KHz WMA 128 bps 320 Kbps 8KHz 48KHz WMA 10 Pro M0 1...

Страница 53: ...8KHz AAC HEAAC 8KHz 48KHz swf MPEG1 2 Couche3 8 Kbps 320 Kbps 16KHz 48KHz ec3 EAC3 32 Kbps 6 Mbps 32KHz 44 1KHz 48KHz rm rmvb ra AAC HEAAC 8KHz 48KHz LBR cook 6 Kbps 128 Kbps 8KHz 11 025KHz 22 05KHz 44 1KHz wma wmv WMA 128 bps 320 Kbps 8KHz 48KHz WMA 10 Pro M0 192 kbps 48KHz WMA 10 Pro M1 384 kbps 48KHz WMA 10 Pro M2 768 kbps 96KHz webm VORBIS Jusqu à 48 KHz Formats de Fichiers de Sous Titrage Pri...

Страница 54: ...l aide des câbles convertisseurs DVI DVI à HDMI non fournis 56Hz 60Hz 66Hz 70Hz 72Hz 75Hz 640 x 400 þ 640 x 480 þ þ þ þ 800 x 600 þ þ þ þ þ 832 x 624 þ 1024 x 768 þ þ þ þ þ 1152 x 864 þ þ þ 1152 x 870 þ 1280 x 768 þ þ 1360 x 768 þ 1280 x 960 þ þ 1280 x 1024 þ þ 1400 x 1050 þ þ 1440 x 900 þ þ 1600 x 1200 þ 1680 x 1050 þ 1920 x 1080 þ 1920 x 1200 þ ...

Страница 55: ...se murale du réseau Entrée LAN à l arrière du téléviseur réseau prise murale Configuration des paramètres des périphériques câblés Type de Réseau Le Type de Réseau peut être sélectionné comme Dispositif Câblé ou Dispositif sans Fil en fonction de la connexion active du téléviseur Sélectionnez l option Dispositif câblé si vous vous connectez via un réseau Ethernet Test de débit Internet Sélectionne...

Страница 56: ...N vous devez définir les paramètres de ce mode Si le réseau sélectionné est protégé par un mot de passe entrez la clé en utilisant le clavier virtuel Vous pouvez utiliser ce clavier grâce aux boutons de direction ainsi que le bouton OK sur la télécommande Attendez que l adresse IP s affiche sur l écran Cela montre que la connexion est établie Pour vous déconnecter d un réseau sans fil sélectionnez...

Страница 57: ... en mode Partage audio vidéo ou pendant la navigation via la fonction Partage audio vidéo Domaine non Valide Assurez vous de vous être déjà connecté à votre PC avec un nom d utilisateur mot de passe autorisé et veillez également à ce que votre domaine soit actif avant de partager quelque fichier que ce soit dans le programme du serveur de média de votre ordinateur Si le domaine n est pas valide vo...

Страница 58: ...de votre navigateur http www nero com mediahome tv 2 Cliquez sur la touche Télécharger de la page d ouverture Le fichier d installation va être téléchargée sur le PC 3 Une fois le téléchargement fini cliquez deux fois sur le fichier d installation pour lancer l installation L assistant d installation vous guide tout au long de l installation 4 Les premières fenêtres s affichent en premier L assist...

Страница 59: ...e votre choix en appuyant sur OK après votre choix Appuyez sur le bouton Return Back pour revenir à l écran précédent En outre vous pouvez accéder à certaines fonctions en utilisant la fonction de raccourci définie pour les boutons numériques et de couleur sur la télécommande Appuyez sur la touche Quitter pour sortir du mode Portail Internet Fenêtre PIP Le contenu source en cours s affichera sur l...

Страница 60: ...du site web URL dans la barre d adresse puis cliquez sur bouton pour le parcourir Saisissez les mots de passe dans la barre d adresse et cliquez sur le bouton pour rechercher les sites web concernés Cliquez sur les liens pour parcourir les sites web concernés Lorsque vous déplacez le curseur vers le milieu de l écran les raccourcis assignés aux boutons de couleur de la télécommande apparaissent Vo...

Страница 61: ...71 Erstinstallation 71 Medien Abspielen über USB Eingang 72 Menü Medienbrowser 72 CEC und CEC RC Passthrough 73 TV Menuinhalte 74 Allgemeine Bedienung 78 Verwendung der Senderliste 78 Einstellung der Kindersicherungseinstellungen 78 EPG Elektronischer Programmführer 78 Teletext Dienste 79 Softwareaktualisierung 79 Fehlerbehebung Tipps 79 Typische Anzeigemodi PC Eingang 80 AV und HDMI Signalkompati...

Страница 62: ...önnen zu Bränden oder Stromschlägen führen Handhaben Sie das Netzkabel immer am Stecker trennen Sie das TV Gerät nicht durch Ziehen des Netzkabels vom Netz Berühren Sie niemals das Netzkabel den Stecker mit nassen Händen da dies einen Kurzschluss oder elektrischen Schlag verursachen kann Machen Sie niemals Knoten in das Netzkabel und binden Sie es nie mit anderen Kabeln zusammen Wenn es beschädigt...

Страница 63: ... enthaltendes Zubehör bzw Dieses Gerät verfügt möglicherwe ise über eine Knopfzellbatterie Wenn die Knopfzellenbatterie verschluckt wird führt dies innerhalb 2 Stunden zu schweren inter nen Verätzungen mit möglicher Todesfolge Halten Sie gebrauchte und neue Batterien von Kindern fern Wenn das Batteriefach nicht sicher gesch lossen stoppen Sie die Verwendung des Geräts und halten Sie Kinder fern Fa...

Страница 64: ...r anderen harten Gegenständen zu zerkratzen Sorgen Sie dafür dass das Gehäuse und der Ständer nicht über eine längere Zeit hinweg mit Gummi oder PVC haltigen Substanzen in Berührung kommen Diese könnten die Oberfläche angreifen Netzstecker Wischen Sie den Netzstecker regelmäßig mit einem trockenen Tuch ab Feuchtigkeit oder Staub können Brände oder einen Stromschlag verursachen Montage Abbau des St...

Страница 65: ... Rechte Taste bei gewählter Auto Option bzw die Linke Taste bei gewählter Benutzerdefiniert Option gedrückt wird wird die Meldung Der Bildschirm schaltet sich in 15 Sekunden aus auf dem Bildschirm angezeigt Wählen Sie Fortfahren und drücken Sie OK um den Bildschirm umgehend auszuschalten Wenn Sie keine Taste drücken wird der Bildschirm nach 15 Sekunden ausgeschaltet Drücken Sie eine beliebige Tast...

Страница 66: ... Menüpunkt zu auswählen oder einzustellen Drücken Sie die Return Back Taste bzw die Menu Taste um einen Menü Bildschirm zu verlassen Eingangsauswahl Sobald Sie ein externes System an Ihr Gerät angeschlossen haben können Sie zwischen den verschiedenen Eingangsquellen schalten Drücken Sie auf Ihrer Fernbedienung hintereinander die Quellen Taste um die verschiedenen Signalquellen auszuwählen Kanäle w...

Страница 67: ... und Batterien bringen Sie diese zu den in den zutreffenden gesetzlichen Regelungen vorgesehenen Sammelstellen Durch die vorschriftsmäßige Entsorgung tragen Sie zum sparsamen Verbrauch wertvoller Rohstoffe bei und verhindern potenziell schädliche Folgen für die menschliche Gesundheit und die Umwelt Für weitere Informationen zur Sammlung und dem Recycling von Wertstoffen wenden Sie sich bitte an di...

Страница 68: ... Audio Output Power WRMS 10 THD 2 x 12 W Leistungsaufnahme W 200 W Gewicht Kg 36 5 Kg TV Abmessungen TxBxH Mit Ständer mm 344 x 1460 x 905 TV Abmessungen TxBxH ohne Ständer mm 38 48 x 1460 x 838 Bildschirm 16 9 65 Betriebstemperaturen und Betriebsfeuchtigkeit 0ºC bis 40ºC max 85 Feuchtigkeit Technische Daten für das WLAN Frequenzreichweite USA 2 400 2 483GHz 5 15 5 35GHz 5 47 5 725GHz 5 725 5 85GH...

Страница 69: ...aplayer Bildschirm 11 Internet Öffnet die Portalseite wo Sie auf viele Web basierte Anwendungen zugreifen können 12 Meine Taste 13 Farbtasten Folgen Sie der Anleitung zu den Farbtasten auf dem Bildschirm 14 Sprache Wechselt die Ton Modi analoges TV zeigt und ändert Ton und die Untertitel Sprache digitales TV sofern vorhanden 15 Untertitel Schaltet Untertitel ein und aus sofern verfügbar 16 Schnell...

Страница 70: ...Gerät automatisch in den AV Modus Wenn Sie gerade DTV Kanäle Mpeg4 H 264 empfangen oder im Medienbrowsermodus sind ist die Ausgabe über die Scart Buchse nicht verfügbar Bei Verwendung des Wandmontage Kits erhältlich bei verschiedenen Drittanbietern falls nicht mitgeliefert empfehlen wir Ihnen bevor Sie das TV Gerät an die Wand montieren alle Kabel an die Rückseite des TV Gerätes anzuschließen Sie ...

Страница 71: ...cht das TV Gerät nach digitalen terrestrischen Sendern sobald die Ersteinstellungen vorgenommen worden sind Kabel Wenn die Suchoption Kabel eingestellt wurde sucht das TV Gerät nach digitalen Kabelsendern sobald die Ersteinstellungen vorgenommen worden sind Abhängig von Ihren Einstellungen wird möglicherweise eine Bestätigungsaufforderung angezeigt bevor die Suche startet Wählen Sie JA und drücken...

Страница 72: ...V Gerät anschließen WICHTIG Sichern Sie die Dateien Ihres Speich ergerätes bevor Sie es mit dem Gerät verbinden Der Hersteller übernimmt keinerlei Haftung für beschädigte Dateien oder Datenverluste Unter Um ständen sind bestimmteArten von USB Geräten z B MP3 Player oder USB Festplattenlaufwerke Speich ersticks mit diesem TV Gerät nicht kompatibel Das TV Gerät unterstützt mit FAT32 oder NTFS format...

Страница 73: ...Return Channel Diese Funktion ist einAudio Link um andere Kabel zwischen dem Fernseher und der Audioanlage A V Receiver oder Lautsprecher System zu ersetzen Bei aktivierten ARC schaltet das TV Gerät seine anderen Audio Ausgänge nicht automatisch stumm Das heißt dass Sie die TV Lautstärke manuell auf Null reduzieren müssen wenn Sie den Ton des angeschlossenen Audiogeräts bzw andere optische oder ko...

Страница 74: ...be in Hinblick auf Qualität und Auslesbarkeit optimiert Wenn die Movie Sense Option auf Niedrig Mittel oder Hoch gesetzt ist ist die Filmerkennnung Demo Option verfügbar Ist eine dieser Optionen gewählt beginnt der Demo Modus wenn Sie die OK Taste drücken Bei aktivierten Demomodus wird der Bildschirm in zwei Hälften geteilt In der einen Hälfte erfolgt die Wiedergabe mit der Movie Sense Funktion in...

Страница 75: ...ische Lautstärkebegrenzung Diese Funktion stellt den Ton so ein dass zwischen den Programmen ein konstanter Ausgangspegel erhalten bleibt Kopfhörer Lineout Wenn Sie einen externen Verstärker an Ihren Fernseher anschließen durch Benutzen des Kopfhöreranschlusses können Sie diese Option als Lineout festlegen Wenn Sie einen Kopfhörer an den Fernseher angeschlossen haben legen Sie diese Option als Kop...

Страница 76: ...ist eine eindeutige Identifikationsnummer die speziell zur Identifizierung Ihres Fernsehgeräts generiert wurde Mehr Zeigt weitere Einstellungsoptionen für das TV Gerät an Menu Timeout Verändert die Timeout Zeit zwischen den Menübildschirmen Blauer Hintergrund Aktiviert oder deaktiviert den blauen Hintergrund bei schwachem oder fehlendem Signal Softwareaktualisierung Stellt sicher dass die Firmware...

Страница 77: ...erdaten verwendet werden Netzwerk Sendersuchlauf Sucht nach den verknüpften Kanälen des Sendenetzwerks Digitalantenne Sucht nach Sendern des Antennennetzwerks Digitalkabel Sucht nach Sendern des Kabelnetzwerks Analoge Feinabstimmung Sie können diese Funktion zur Feinabstimmung von analogen Kanälen verwenden Diese Funktion steht nicht zur Verfügung wenn keine digitalen Kanäle abgespeichert sind Sat...

Страница 78: ...e PIN eingegeben werden Nach der Eingabe der richtigen PIN werden die Einstellungen Kindersicherung angezeigt Menüsperre Diese Einstellung aktiviert bzw deaktiviert den Zugang zu allen Menüs bzw Installationsmenüs des TV Geräts Altersfreigabe Ist diese Option eingestellt bezieht das Fernsehgerät vom Sender Altersinformationen Ist die entsprechendeAltersstufe im Gerät deaktiviert wird der Zugriff a...

Страница 79: ...etext Seite und die Fernsehsendung gleichzeitig zu sehen Drücken Sie nochmals diese Taste um den Modus wieder zu verlassen Sofern vorhanden werden die Abschnitte einer Teletextseite farbcodiert und können dann durch Drücken der entsprechenden Farbtaste ausgewählt werden Folgen Sie den auf dem Bildschirm angezeigten Anweisungen Digitaler Teletext Drücken Sie die Text Taste um die digitalen Teletext...

Страница 80: ...tterien leer Ersetzen Sie diese Eingangsquellen können nicht ausgewählt werden Wenn Sie keine Eingabequelle wählen können haben Sie wahrscheinlich kein Gerät angeschlossen Wenn nicht Prüfen Sie die AV Kabel und deren Anschlüsse wenn Sie versuchen die dem angeschlossenen Gerät zugewiesene Eingangsquelle einzuschalten Typische Anzeigemodi PC Eingang In der folgenden Tabelle werden einige der übliche...

Страница 81: ...0Hz O HDMI 480i 480p 60Hz O 576i 576p 50Hz O 720p 50Hz 60Hz O 1080i 50Hz 60Hz O 1080p 24Hz 25Hz 30Hz 50Hz 60Hz O X Nicht verfügbar O Verfügbar In einigen Fällen kann unter Umständen ein Signal nicht richtig auf dem LCD Schirm angezeigt werden Das Problem kann durch eine Inkompatibilität in den Standards des Quellgeräts verursacht werden DVD Settop Box etc Wenn so etwas bei Ihnen auftritt sollten S...

Страница 82: ... 5 Mbps 1080P 60fps 62 5 Mbps Motion JPEG 640x480 30fps 10 Mbps Andere 1080P 30fps 40 Mbps avi MPEG1 2 MPEG4 Sorenson H 263 H 263 H 264 WMV3 Motion JPEG mkv MPEG1 2 MPEG4 H 263 H 264 WMV3 Motion JPEG asf Sorenson H 263 H 264 WMV3 Motion JPEG flv WMV3 1080P 30fps 40 Mbps swf RV30 RV40 1080P 30fps 40 Mbps wmv Im USB Modus Unterstützte Bilddateiformate Bild Foto Auflösung Breite x Höhe Hinweis JPEG B...

Страница 83: ...r2 8Kbps 384Kbps MPEG1 2 Layer3 8Kbps 320Kbps WMA 128bps 320Kbps 8KHz 48KHz WMA 10 Pro M0 192kbps 48KHz WMA 10 Pro M1 384kbps 48KHz WMA 10 Pro M2 768kbps 96KHz mkv mka MPEG1 2 Layer1 32Kbps 448Kbps 16KHz 48KHz MPEG1 2 Layer2 8Kbps 384Kbps MPEG1 2 Layer3 8Kbps 320Kbps AC3 32Kbps 640Kbps 32KHz 44 1KHz 48KHz AAC HEAAC 8KHz 48KHz WMA 128bps 320Kbps 8KHz 48KHz WMA 10 Pro M0 192kbps 48KHz WMA 10 Pro M1 ...

Страница 84: ...2Kbps 640Kbps 32KHz 44 1KHz 48KHz AAC HEAAC 8KHz 48KHz swf MPEG1 2 Layer3 8Kbps 320Kbps 16KHz 48KHz ec3 EAC3 32Kbps 6Mbps 32KHz 44 1KHz 48KHz rm rmvb ra AAC HEAAC 8KHz 48KHz LBR cook 6Kbps 128Kbps 8KHz 11 025KHz 22 05KHz 44 1KHz wma wmv WMA 128bps 320Kbps 8KHz 48KHz WMA 10 Pro M0 192kbps 48KHz WMA 10 Pro M1 384kbps 48KHz WMA 10 Pro M2 768kbps 96KHz webm VORBIS Bis zu 48KHz Im USB Modus Unterstützt...

Страница 85: ...lüsse Ihres TV Gerätes anschließen können Sie die folgenden Auflösungsrichtwerte verwenden 56Hz 60Hz 66Hz 70Hz 72Hz 75Hz 640x400 þ 640x480 þ þ þ þ 800x600 þ þ þ þ þ 832x624 þ 1024x768 þ þ þ þ þ 1152x864 þ þ þ 1152x870 þ 1280x768 þ þ 1360x768 þ 1280x960 þ þ 1280x1024 þ þ 1400x1050 þ þ 1440x900 þ þ 1600x1200 þ 1680x1050 þ 1920x1080 þ 1920x1200 þ ...

Страница 86: ...en Fernseher direkt mit der Netzwerk Steckdose zu verbinden LAN Eingang an der Rückseite des TV Geräts Netzwerk Wandsteckdose Konfiguration der Einstellungen für drahtgebundene Geräte Netzwerktyp Als Netzwerktyp können Sie Drahtgebundenes Gerät oder Drahtloses Gerät oder aber Deaktiviert auswählen entsprechend der aktiven Verbindung zum TV Gerät Wählen Sie die Option Drahtgebundenes Gerät wenn Sie...

Страница 87: ...n Das TV Gerät sucht nun automatisch nach Drahtlosnetzwerken Eine Liste der verfügbaren Netzwerke wird angezeigt Bitte wählen Sie aus der Liste das gewünschtes Netzwerk Hinweis Wenn das Modem den N Modus unterstützt sollten Sie die N Modus Einstellungen bevorzugen Falls das gewählte Netzwerk passwortgeschützt geben Sie dieses bitte über die virtuelle Tastatur ein Sie können diese Tastatur über die...

Страница 88: ...über eine eigene MAC Adresse verfügt kann Ihr Internetdienstanbieter die MAC Adresse Ihres Fernsehers nicht validieren Aus diesem Grund kann Ihr Fernseher nicht mit dem Internet Verbindung aufnehmen Kontaktieren Sie Ihren Internetdienstanbieter und lassen Sie sich erklären wie Sie ein anderes Gerät wie zum Beispiel Ihr TV Gerät mit dem Internet verbinden können Es ist auch möglich dass die Verbind...

Страница 89: ...stmögliche Streamingqualitiät auf dieses TV Gerät zu erzielen muss die Nero Software installiert werden Nero MediaHome Installation Um Nero MediaHome zu installieren gehen Sie bitte wie folgt vor Hinweis Sie müssen diese Software auf Ihrem PC installieren um die Audio Video Sharing Funktion zu verwenden 1 Geben Sie den unten aufgeführten Link vollständig in die Adressleiste Ihres Webbrowsers ein h...

Страница 90: ...Gewünschte aus Sie können den gewünschten Inhalt anzeigen indem Sie nach der Auswahl OK drücken Drücken Sie die Back Return Taste um auf die vorherige Ansicht zurückzukehren Darüber hinaus können Sie auf verschiedene Funktionen mit Hilfe der für die Farb oder Zifferntasten der Fernbedienung festgelegten Shortcuts zugreifen Um den Internet Portal zu verlassen drücken Sie die Exit Taste Bild in Bild...

Страница 91: ...te zu suchen oder diese zu öffnen Geben Sie die Adresse URL der Website in die Adressleiste ein und klicken Sie auf die Schaltfläche um diese aufzurufen Geben Sie die einen oder mehrere Suchbegriffe in die Adressleiste ein und klicken Sie auf die Schaltfläche um nach passenden Websites zu suchen Klicken Sie auf einen Link um die jeweilige Website aufzurufen Wenn Sie mit dem Cursor auf die Bildschi...

Страница 92: ......

Отзывы:

Похожие инструкции для TX-65CW324