

17
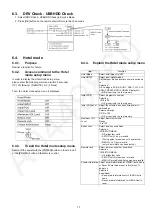
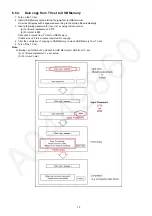
6.3.
DRV Check - USBHDD Check
1. Select [DRV Check - USBHDD Check] in Service Mode.
2. Press [OK] button on the remote control for more than 3 seconds.
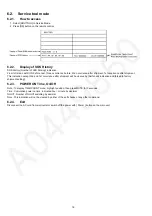
6.4.
Hotel mode
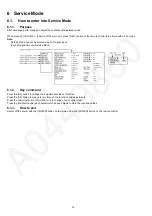
6.4.1.
Purpose
Restrict a function for hotels.
6.4.2.
Access command to the Hotel
mode setup menu
In order to display the Hotel mode setup menu,
please enter the following command (within 2 seconds).
[TV]: Vol.[Down] + [REMOTE] : AV (3 times)
Then, the Hotel mode setup menu is displayed.
6.4.3.
To exit the Hotel mode setup menu
Switch off the power with the [POWER] button on the main unit
or the [POWER] button on the remote control.
6.4.4.
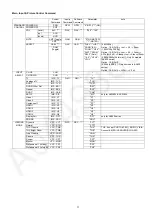
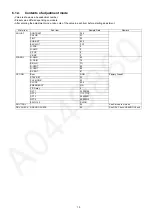
Explain the Hotel mode setup menu
Item
Function
Hotel Mode
Select hotel mode On/Off
Initial INPUT
Select input signal modes.
Set the input, when each time power is switched
on.
Selection :
Off, Analogue, DVB-S, DVB-C, DVB-T, AV1, AV2,
HDMI1, HDMI2, HDMI3, HDMI4, DisplayPort
• Off: give priority to a last memory.
Initial POS
Select programme number.
Selection :
Off/0 to 99
• Off: give priority to a last memory
Initial VOL Level
Adjust the volume when each time power is
switched on.
Selection/Range :
Off/0 to 100
• Off: give priority to a last memory
Maximum VOL
Level
Adjust maximum volume.
Range :
0 to 100
Button Lock
Select local key conditions.
Selection :
Off/SETUP/MENU
• Off: altogether valid
• SETUP: only F-key is invalid
(Tuning guide (menu) can not be selected.)
• MENU: only F-key is invalid
(only Volume/Mute can be selected.)
Remote Lock
Select remote control key conditions.
Selection :
Off/SETUP/MENU
• Off: altogether valid
• SETUP: only Setup menu is invalid
• MENU: Picture/Sound/Setup menu are invalid
Private Information Select private information for VIERA Cast is Keep
or Reset if Hotel mode is set to [On] when TV
power on.
Selection :
Keep/Reset
• Keep: private information for VIERA Cast is
keep
• Reset: private information for VIERA Cast is
reset
Содержание TX-58AXR800
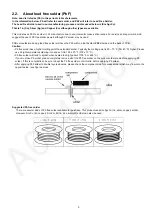
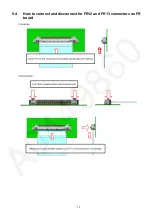
Страница 13: ...13 5 4 How to connect and disconnect for FR12 and FR13 connectors on FR board ...
Страница 36: ...36 8 3 5 Specification of sticking the sponge 8 3 6 Specification of sticking the AL tape CI SLOT ...
Страница 37: ...37 8 3 7 Specification of sticking the AL tape CI SLOT 8 3 8 Specification of sticking the AL tape CI SLOT ...
Страница 39: ...39 8 3 11 Specification of sticking the AL tape Gasket CI SLOT ...
Страница 40: ...40 8 3 12 Specification of sticking Gasket CI SLOT Back cover side ...
Страница 43: ...43 8 3 17 Specification of sticking the gasket and the tape 8 3 18 Specification of sticking the gasket ...
Страница 44: ...44 8 3 19 Specification of fixing the shield case 8 3 20 Specification of sticking the gasket near Bluetooth ...
Страница 45: ...45 8 3 21 Specification of sticking the gasket 8 3 22 Specification of sticking the FELT Source PCB TOP Cover ...
Страница 47: ...47 8 3 25 Specification of fixing the shield case 8 3 26 Specification of sticking the rubber and gasket ...
Страница 48: ...48 8 3 27 Specification of sticking the rubber and gasket 8 3 28 Specification of sticking the rubber ...
Страница 49: ...49 8 3 29 Specification of sticking the gasket 8 3 30 Specification of sticking the gasket ...
Страница 50: ...50 8 3 31 Specification of sticking the gasket 8 3 32 Specification of sticking the gasket ...
Страница 51: ...51 8 3 33 Specification of sticking the gasket 8 3 34 Specification of sticking the gasket ...
Страница 52: ...52 8 3 35 Specification of sticking the gasket 8 3 36 Specification of sticking the rubber and gasket ...
Страница 53: ...53 8 3 37 Specification of sticking the gasket ...
Страница 59: ...59 11 Wiring Connection Diagram 11 1 Wiring Diagram ...
Страница 61: ...61 ...
Страница 62: ...62 ...
Страница 63: ...63 ...


