background image

9

English

to output the high frame rate image.
(This mode is valid in HDMI 1 and 2)

To change the mode
1. Select the HDMI input mode connected to the 

equipment.

2. Display the menu bar and select [Main Menu], and 

then select [Setup].

3. Change the mode in [HDMI Auto Setting].

For information about the valid format, refer to 
[eHELP] (Search by Purpose > Watching > 4K 
resolution > HDMI Auto Setting).

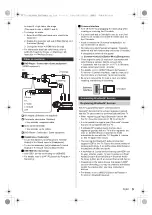
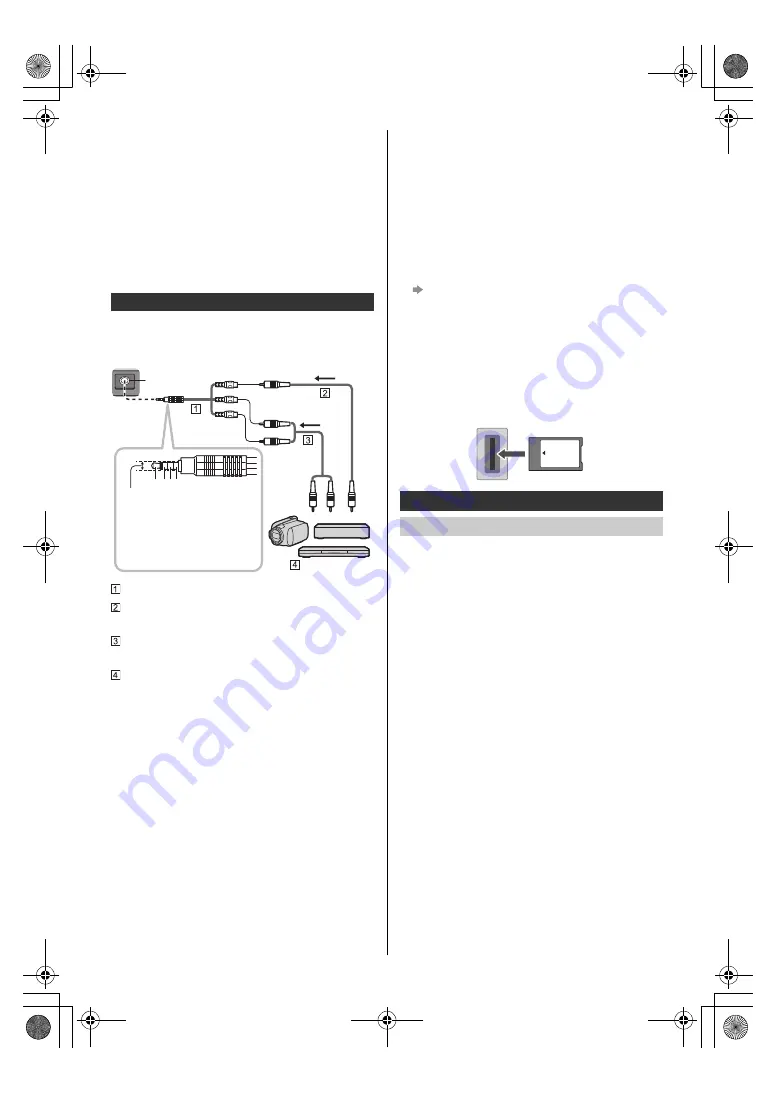
DVD Player / Camcorder / Game equipment

(VIDEO equipment)

AV adaptor (Shielded / not supplied)

Composite video cable (Shielded)

Use shielded composite cable.

Audio cable (Shielded)

Use shielded audio cables.

DVD Player / Camcorder / Game equipment

Headphones / Subwoofer

To use headphones, set [Headphone Terminal 
Output] in the Sound menu to [Headphone].

To use the subwoofer, set [Headphone Terminal 
Output] in the Sound menu to [Sub Woofer].

USB HDD (for recording)

Use USB 1 port for connecting the USB HDD.

For details, refer to [eHELP] (Search by Purpose > 
Recording).

Common Interface

Turn off the TV by unplugging the mains plug when 
inserting or removing the CI module.

If a smart card and a CI module come as a set, first 
insert the CI module, then insert the smart card into 
the CI module.

Insert or remove the CI module completely in the 
correct direction as shown.

Normally encrypted channels will appear. (Viewable 
channels and their features depend on the CI module.)
If encrypted channels do not appear

[Common Interface] in [System Menu] ([Setup] menu)

There might be some CI modules in the market with 
older firmware versions that do not work fully 
interoperable with this new CI+ v1.4 TV. In this case, 
please contact your content provider.

For details, refer to [eHELP] (Search by Purpose > 
Functions > Common Interface), read the manual of 
the CI module, or check with the content provider.

Be sure to remove the CI module card, etc. before 
repairing, transferring or discarding.

This TV supports Bluetooth

®

 communications.

Bluetooth

®

 devices that have been registered (paired) 

with this TV can connect to (communicate with) this TV.

When registering (pairing) a Bluetooth

®

 device with 

this TV, move the device within 50 cm of the TV.

It is not possible to register (pair) Bluetooth

®

 devices 

that are not compatible with this TV.

If a Bluetooth

®

 enabled device that you have 

registered (paired) with this TV is then registered and 
used on another device, it may then be made 
unavailable for use with this TV. Register the device 
on this TV again if this occurs.

You can register Bluetooth

®

 audio devices that 

support A2DP on this TV. Due to the characteristics of 
wireless technology, there will be some delay between 
the playback of video and audio.

A maximum of 2 audio devices that support A2DP can 
be used simultaneously. To use 2 devices, set [Dual 
Audio] (Setup > Bluetooth Setup > Bluetooth Audio 
Settings) to [On], and then connect the second device.

Depending on the audio devices that support A2DP 
you are connecting, you may be unable to individually 
control the volume when you have connected 2 
devices.

For details, refer to [eHELP] (Search by Purpose > 
Functions > Bluetooth devices).

Other connections

a b c d

AV IN

(Viewing)

(Listening)

a: L
b: Video
c: Ground
d: R

3.5 mm

TV

Connecting Bluetooth

®

 devices

Registering Bluetooth

®

 devices

CI module

Common

Interface

TX-55_65MZ2000B_TQB5ZA0024_eng.book  9 ページ  2023年3月3日 金曜日 午後3時34分

Содержание TX-55MZ2000B

Страница 1: ...P Thank you for purchasing this Panasonic product Please read these instructions carefully before operating this product and retain them for future reference Please carefully read the Safety Precautio...

Страница 2: ...different depending on the model 2022 Advanced Micro Devices Inc All rights reserved AMD the AMD Arrow logo FreeSync and combinations thereof are trademarks of Advanced Micro Devices Inc 2022 NVIDIA C...

Страница 3: ...red by the warranty Care for the data stored in such devices is the responsibility of the customer Panasonic accepts no responsibility for abuse of this data Handling of customer information Certain c...

Страница 4: ...anything unusual immediately switch off the mains supply switch and remove the mains plug Mains plug type may vary depending on the country Do not touch the mains plug with wet hands Do not place a he...

Страница 5: ...going to be retained and relocated the same considerations as above should be applied This TV is designed for table top use Suffocation Choking Hazard Warning The packaging of this product may cause s...

Страница 6: ...re moving the TV disconnect all cables At least two people are required to move the TV to prevent injury that may be caused by the tipping or falling of TV Do not hold the screen part as shown below w...

Страница 7: ...Europe GmbH Panasonic Testing Centre Winsbergring 15 22525 Hamburg Germany Manufacturer Panasonic Entertainment Communication Co Ltd 1 10 12 Yagumo higashi machi Moriguchi City Osaka 570 0021 Japan Ma...

Страница 8: ...g cable digital analogue broadcasts For details refer to eHELP Search by Purpose Watching Basic Basic connection Satellite connection To ensure your satellite dish is correctly installed please consul...

Страница 9: ...operable with this new CI v1 4 TV In this case please contact your content provider For details refer to eHELP Search by Purpose Functions Common Interface read the manual of the CI module or check wi...

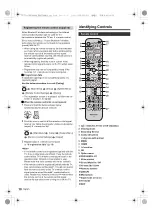
Страница 10: ...he remote control signal receiver and follow the procedure below to deregister unpair the remote control Main Menu Setup System Menu Remote Control Settings Unpair 3 Register pair the remote control a...

Страница 11: ...about 15 seconds 3 When a screen asking you to confirm the forced reset of the remote control mode is displayed press the MUTE button again for about 3 seconds The TV recognizes speech when you talk i...

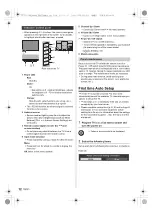
Страница 12: ...ndby To turn Off the apparatus completely you must pull the mains plug out of the mains socket Standby On 8 Model name plate Be sure to turn the TV off with the remote control or Power On Off switch t...

Страница 13: ...l seconds to display the image after turning the TV on When turning the TV on the panel adjustment is performed It is not a malfunction The TV does not switch on Check the mains lead is plugged into t...

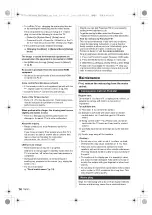
Страница 14: ...he surface of the display panel cabinet or pedestal by using a soft cloth to remove dirt or fingerprints For stubborn dirt 1 First clean the dust from the surface 2 Dampen a soft cloth with clean wate...

Страница 15: ...VHF Cable PAL 525 60 VCR DVD player and recorder M NTSC VCR NTSC AV input only Satellite dish input Female F type 75 2 Aerial input UHF VHF UHF Operating conditions Temperature 0 C 35 C Humidity 20 80...

Страница 16: ...e Monday Friday 9 00am 5 00pm Excluding public holidays Or go on line through our Internet Accessory ordering application at www pas europe com Most major credit and debit cards accepted All enquiries...

Отзывы: