background image

English

   - 6 -

Ultra HD (UHD)

TV supports Ultra HD (Ultra High Definition - also 

known as 4K) which provides resolution of 3840 x 

2160 (4K:2K). It equals 4 times the resolution of Full 

HD TV by doubling the pixel count of the Full HD TV 

both horizontally and vertically. Ultra HD contents are 

supported from HDMI, USB inputs and over DVB-T2 

and DVB-S2 broadcasts. 

High Dynamic Range (HDR) / Hybrid Log-Gamma 

(HLG)

Using this feature the TV can reproduce greater 

dynamic range of luminosity by capturing and then 

combining several different exposures. HDR/HLG 

promises better picture quality thanks to brighter, more 

realistic highlights, more realistic colour and other 

improvements. It delivers the look that filmmakers 

intended to achieve, showing the hidden areas of 

dark shadows and sunlight with full clarity, colour and 

detail. HDR/HLG contents are supported via native 

and market applications, HDMI, USB inputs and over 

DVB-S broadcasts. Set the related HDMI source 

input as 

Enhanced 

from the 

Sources

 option in the 

Settings>System 

menu in order to watch HDR/HLG 

content, if the HDR/HLG content is received through 

an HDMI input. The source device should also be at 

least HDMI 2.0a compatible in this case.

Accessories Included

•  Remote Control
•  Batteries: 2 x AA
•  Instruction Book
•  Detachable stand
•  Stand mounting screws 

(M4 x 12)

Standby Notifications

If the TV does not receive any input signal (e.g. from 

an 

aerial or HDMI source) f

or 3 mi

nutes, it will go 

into standby. When you next switch-on, the following 

message will be displayed: 

TV switched to stand-by 

mode automatically because there was no signal 

for a long time.

The 

Auto TV OFF

 option(in the 

Settings

>

System 

>

More 

menu) could have been set to a value between 

1 and 8 hours by default. If this setting is not set as 

Off


and the TV has been left on and not been operated 

during the set time, it will switch into standby mode 

after the set time has expired. Wh

en you next switch-on 

the TV

, the following message will be displayed. 

TV 

switched to stand-by mode automatically because 

no operation was made for a long time.

” 

Before the 

TV switches into standby mode a dialogue window will 

be displayed. If you do not press any button the TV 

will switch into the standby mode after a waiting period 

of about 5 minutes. You can highlight 

Yes

 and press 

OK

 to switch the TV into standby mode immediately. 

If you highlight 

No 

and press 

OK

, the TV will remain 

on. You can also choose to cancel the 

Auto TV OFF


function from this dialogue. Highlight 

Disable

 and 

press 

OK

, the TV will remain on and the function will 

be cancelled. You can enable this function again by 

changing the setting of the 

Auto TV OFF

 option from 

the 

Settings>System>More

 menu. 

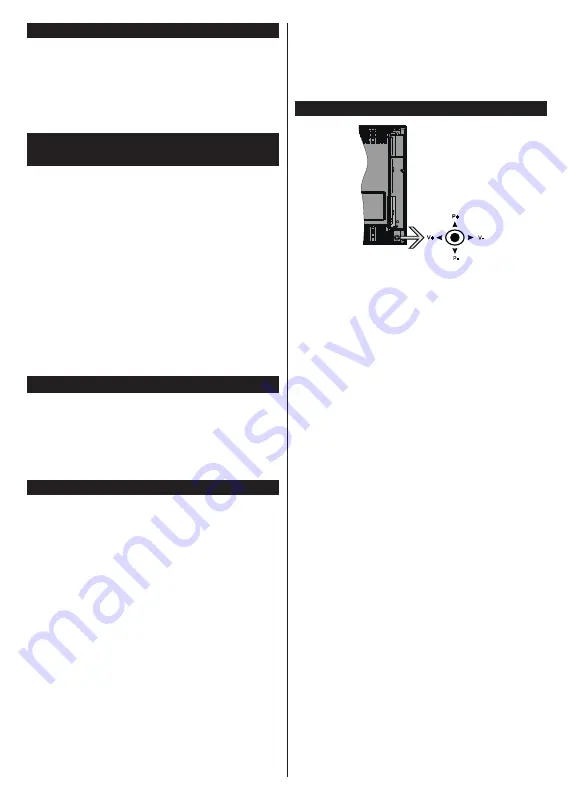
TV Control & Operation

P+

V+

V-

P-

The joystick allows you to control the Volume / 

Programme / Source and Standby-On functions of 

the TV.

Note:

 The position of the joystick may differ depending on 

the model.

To change volume:

 Increase the volume by pushing 

the joystick right. Decrease the volume by pushing 

the joystick left.

To change channel:

 Scroll through the stored 

channels by pushing the joystick up or down.

To change source:

 Press the centre of the joystick 

in, the sources list will appear on the screen. Scroll 

through the available sources by pushing the joystick 

up or down.

To turn the TV off:

 Press the centre of the joystick in 

and hold it down for a few seconds, the TV will turn 

into standby mode.

To turn on the TV:

 Press the centre of the joystick in, 

the TV will turn on.

Note: 

Main menu OSD cannot be displayed via joystick.

Operation with the Remote Control

Press  the 

Home

 button on your remote control to 

display main menu. Use the directional buttons and 

OK

 button to navigate and set. Press 

Return/Back 

or 

Home

 button to quit a menu screen.

Input Selection

Once you have connected external systems to your 

TV, you can switch to different input sources. Press the 

Source

 button on your remote control consecutively 

to select the different sources.

Changing Channels and Volume

You can change the channel and adjust the volume 

by using the 

Programme


+/- 

and 

/-

 buttons 

on the remote. 

Содержание TX-50GX550B

Страница 1: ...TX 50GX551B TX 50GX555B LED TV You can find instructions for your TV s features in the E Manual To access the E Manual enter Settings menu select Manuals and press OK For quick access press Home Menu button and then Info button e MANUAL ...

Страница 2: ...ime Installation 14 Media Playback via USB Input 15 Media Browser 15 CEC 16 Settings Menu Contents 17 General TV Operation 22 Using the Channel List 22 Configuring Parental Settings 22 Electronic Programme Guide 22 Teletext Services where available 23 MHEG Teletext 23 BBC Red Button RB 23 Software Upgrade 23 Troubleshooting Tips 24 PC Input Typical Display Modes 24 AV and HDMI Signal Compatibility...

Страница 3: ...illed with liquids such as vases cups etc on or over the TV e g on shelves above the unit Do not expose the TV to direct sunlight or do not place open flames such as lit candles on the top of or near the TV Do not place any heat sources such as electric heaters radiators etc near the TV set Do not place the TV on the floor and inclined surfaces To avoid danger of suffocation keep plastic bags out ...

Страница 4: ...onnected to the protective earthing of the building installation through the MAINS connection or through other apparatus with a connection to protective earthing and to a television distribution system using coaxial cable may in some circumstances create a fire hazard Connection to a television distribution system has therefore to be provided through a device providing electrical isolation below a...

Страница 5: ...ct failure 4 Carefully wipe moisten and wipe away the stubborn dirt 5 Finally wipe away all the moisture Caution Do not use a hard cloth or rub the surface too hard otherwise this may cause scratches on the surface Take care not to subject the surfaces to insect repellent solvent thinner or other volatile substances This may degrade surface quality or cause peeling of the paint The surface of the ...

Страница 6: ...off function Ethernet LAN for Internet connectivity and service 802 11 a b g n built in WLAN Support Audio Video Sharing HbbTV When using the wall hanging bracket Please contact your local Panasonic dealer to purchase the recommended wall hanging bracket Holes for wall hanging bracket installation Rear of the TV a b a mm 200 b mm 200 View from the side a Depth of screw a min mm 10 max mm 13 Diamet...

Страница 7: ... following message will be displayed TV switched to stand by mode automatically because no operation was made for a long time Before the TV switches into standby mode a dialogue window will be displayed If you do not press any button the TV will switch into the standby mode after a waiting period of about 5 minutes You can highlight Yes and press OK to switch the TV into standby mode immediately I...

Страница 8: ...o edit a previously created timer highlight that timer select the Edit Selected Timer tab and press OK Change the sub menu options as desired and press OK to save your settings To cancel an already set timer highlight that timer select Delete Selected Timer tab and press OK A confirmation message will be displayed Highlight Yes and press OK to proceed The timer will be cancelled It is not possible...

Страница 9: ...r Inc in the United States and other countries Manufactured under license from Dolby Laboratories Dolby Dolby Audio and the double D symbol are trademarks of Dolby Laboratories Confidential unpublished works Copyright 1992 2019 Dolby Laboratories All rights reserved YouTube and the YouTube logo are trademarks of Google Inc This product contains technology subject to certain intellectual property r...

Страница 10: ...H declares that this TV is in compliance with the essential require ments and other relevant provisions of the Directive 2014 53 EU If you want to get a copy of the original DoC of this TV please visit the following website http www ptc panasonic eu doc Authorized Representative Panasonic Testing Centre Panasonic Marketing Europe GmbH Winsbergring 15 22525 Hamburg Germany Web Site http www panason...

Страница 11: ...ator On Screen Display RF Aerial Input 75 Ohm unbalanced Operating Voltage 220 240V AC 50Hz Audio A2 Stereo Nicam Stereo Headphone 3 5 mm mini stereo jack Audio Output Power WRMS 10 THD 2 x 10 W Networked Standby W 2 Power Consumption W 135 W Weight kg 13 5 Kg TV Dimensions DxLxH with stand mm 235 x 1127 x 702 TV Dimensions DxLxH without stand mm 74 x 1127 x 656 Display 16 9 50 Operation temperatu...

Страница 12: ...s recommended that user checks with local authorities for the current status of their national reg ulations for both 2 4 GHz and 5 GHz wireless LAN s Standard IEEE 802 11 a b g n Host Interface USB 2 0 Security WEP 64 128 WPA WPA2 TKIP AES WAPI Notice DVB Data broadcasting IPTV functions This TV is designed to meet the standards as of August 2017 of DVB T T2 MPEG2 MPEG4 AVC H 264 and HEVC H 265 di...

Страница 13: ... off digital TV where available 13 Rewind Moves frames backwards in media such as movies 14 Stop Stops the media being played 15 Play Starts to play selected media 16 Pause Pauses the media being played 17 No function 18 Fast Forward Moves frames forward in media such as movies 19 Text Displays teletext where available press again to superimpose the teletext over a normal broadcast picture mix 20 ...

Страница 14: ...en using the wall mounting kit available from a third party in the market if not supplied we recommend that you plug all your cables into the back of the TV before mounting on the wall Insert or remove the CI module only when the TV is SWITCHED OFF You should refer to the module instruction manual for details of the settings The Each USB input of your TV supports devices up to 500mA Connecting dev...

Страница 15: ... you have any questions complaints or comments regarding this privacy policy or its enforcement please contact by email at smarttvsecurity vosshub com Highlight Next and press OK button on the remote control to continue and the Network Internet Settings menu will be displayed Please refer to Connectivity section to configure a wired or a wireless connection If you want your TV to consume less powe...

Страница 16: ...of the TV IMPORTANT Back up the files on your storage devices before connecting them to the TV Manufacturer will not be responsible for any file damage or data loss Certain types of USB devices e g MP3 Players or USB hard disk drives memory sticks may not be compatible with this TV The TV supports FAT32 and NTFS disk formatting Wait a little while before each plugging and unplugging as the player ...

Страница 17: ...y by setting the related option under the Settings System More menu accordingly The TV supports ARC Audio Return Channel This feature is an audio link meant to replace other cables between the TV and an audio system A V receiver or speaker system When ARC is active the TV does not mute its other audio outputs automatically You will need to decrease TV volume to zero manually if you wish to hear th...

Страница 18: ...tion may be available depending on the Picture Zoom setting Highlight and press OK then use directional buttons to shift the picture upwards or downwards Film Mode Filmsarerecordedatadifferentnumberofframespersecondtonormaltelevisionprogrammes Turn this feature on when you are watching films to see the fast motion scenes clearly Skin Tone Skin tone can be changed between 5 and 5 Colour Shift Adjus...

Страница 19: ...will always function as Normal When the TV switches to Night mode for the first time after setting this option as Auto an information bar will pop up on the screen Please note that compared to Normal mode Night mode provides more aggressive dynamic compression control which is suitable for silent environments Headphone Lineout When you connect an external amplifier to your TV using the headphone j...

Страница 20: ...ct broadcast entry Network channel scan Searches for the linked channels in the broadcast system D Aerial Searches for aerial network channels D Cable Searches for cable network channels Analogue fine tune You can use this setting for fine tuning analogue channels This feature is not available if no analogue channels are stored and if currently watched channel is not an analogue channel Installati...

Страница 21: ...is feature is supported by your TV you can view your ESN number and deactivate Netflix ESN number is an unique ID number for Netflix created especially to identify your TV Note For 4K video streaming a minimum 25Mb s internet connection speed is required For an example of the requirements for streaming 4K content you may find more information on the Netflix website https help netflix com en node 1...

Страница 22: ... compatible device to turn on the TV and switch to its input source automatically Press Left or Right button to enable or disable the feature Speakers To hear the TV audio from the connected compatible audio device set as Amplifier You can use the remote control of the TV to control the volume of the audio device Show All Cookies Displays all saved cookies Delete All Coo kies Deletes all saved coo...

Страница 23: ...ture may not be available depending on the model of your TV and the selected country in the First Time Installation Set PIN Defines a new PIN number Default CICAM PIN This option will appear as greyed out if no CI module is inserted into the CI slot of the TV You can change the default PIN of the CI CAM using this option Note Default PIN could have been set to 0000 or 1234 If you have defined the ...

Страница 24: ...text information Operate it with the coloured buttons cursor buttons and the OK button The operation method may differ depending on the contents of the digital teletext Follow the instructions displayed on the digital teletext screen When the Text button is pressed again the TV returns to television broadcast MHEG Teletext With digital terrestrial broadcasting DVB T in addition to pictures and sou...

Страница 25: ...put source It is possible that no device is connected Check the AV cables and connections from your device Check the device is switched on The Image is not centered in VGA source To have your TV automatically center the image enter the PC Position menu in Picture menu highlight Autoposition and press OK Wait for it to finish In order to set the position of the image manually you can use H Position...

Страница 26: ... 720p 50Hz 60Hz O 1080i 50Hz 60Hz O 1080p 24Hz 25Hz 30Hz 50Hz 60Hz O 3840x2160p 24Hz 25Hz 30Hz 50Hz 60Hz O 4096x2160p 24Hz 25Hz 30Hz 50Hz 60Hz O X Not Available O Available In some cases a signal on the TV may not be displayed properly The problem may be an inconsistency with standards from the source equipment DVD Set top box etc If you do experience such a problem please contact your dealer and ...

Страница 27: ...V mkv WebM webm Picture File Formats Image Photo Resolution width x height JPEG Base line 15360x8640 Progressive 1024x768 PNG non interlace 9600x6400 interlace 1200x800 BMP 9600x6400 Audio File Formats Audio Codec Sample rate Bit Rate Container MPEG1 2 Layer1 16KHz 48KHz 32Kbps 448Kbps MP3 mp3 AVI avi ASF asf Matroska mkv mka MPEG transport stream ts trp tp MPEG program stream DAT VOB MPG MPEG WAV...

Страница 28: ...v AVI avi Matroska mkv mka 3GPP 3gpp 3gp MP4 mp4 mov m4a LBR cook 8KHz 11 025KHz 22 05KHz 44 1KHz 6Kbps 128Kbps RM ra FLAC 8KHz 96KHz 1 6Mbps Matroska mkv mka Subtitle File Formats Internal Subtitles Extension Container Subtitle Code dat mpg mpeg vob MPG MPEG DVD Subtitle ts trp tp TS DVB Subtitle mp4 MP4 DVD Subtitle UTF 8 Plain Text mkv MKV ASS SSA UTF 8 Plain Text VobSub DVD Subtitle avi AVI 1 ...

Страница 29: ...rs by using DVI converter cable DVI to HDMI cable not supplied you can refer to the following resolution information 56Hz 60Hz 66Hz 70Hz 72Hz 75Hz 640x480 x x 800x600 x x x 1024x768 x x x 1280x768 x x 1280x960 x 1360x768 x 1366x768 x 1280x1024 x x x 1400x1050 x 1600x900 x 1920x1080 x ...

Страница 30: ... DNS settings of the TV Highlight the desired one and press Left or Right button to change the setting from Automatic to Manual Now you can enter the Manual IP and or Manual DNS values Select the related item in the drop down menu and enter the new values using the numeric buttons of the remote Highlight Save and press the OK button to save settings when complete Wireless Connectivity To Connect t...

Страница 31: ...you can connect it to your TV via a router in order to access the content in your device For this your mobile device must have an appropriate sharing software Connect your TV to your router following the steps mentioned in the sections above Afterwards connect your mobile device to the router and then activate the sharing software on your mobile device Then select files that you want to share with...

Страница 32: ... address a unique identifier number of your PC or modem has been permanently registered it is possible that your TV might not connect to the internet In such a case the MAC address is authenticated each time when you connect to the internet This is a precaution against unauthorized access Since your TV has its own MAC address your internet service provider cannot validate the MAC address of your T...

Страница 33: ...sed and played back directly from the TV Guide Refer to the section Electronic Programme Guide for more information Requirements The Freeview Play services may only be used if the following requirements are fulfilled Connecting the TV to the internet Aminimum broad band speed of 2Mbps is required for proper operation of catch up and on demand services Agreeing to the terms and conditions of Freevi...

Страница 34: ... red button icon mode or full UI mode the following scenarios can occur The application can continue running The application can be terminated The application can be terminated and another autostart red button application can be launched HbbTV allows the applications to be retrieved both from broadband or broadcast The broadcaster may enable both ways or one of them If the platform does not have a...

Страница 35: ...e terminal which is marked with the letter E or by the earth symbol or coloured green or green and yellow The wire which is coloured blue or black must be connected to the terminal which is marked with the letter N or coloured Black The wire which is coloured brown or red must be connected to the terminal which is marked with the letter L or coloured Red For continued protection against risk of fi...

Отзывы: