Panasonic TX-48AS640B Скачать руководство пользователя страница 17

17

English

  How to Use eHELP

 [eHELP] is the detailed operating instructions built into 
the TV, and helps you to get more understanding of the 
operations for each feature.
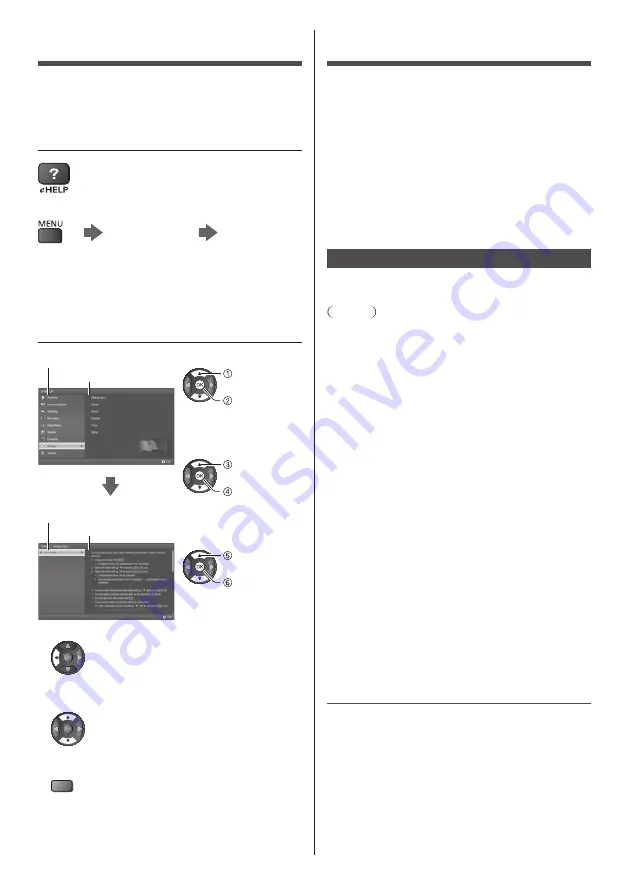
 1

 Display [eHELP]


 or


 [Help]


 [eHELP]


 If this is not the first time to view [eHELP] from 
when the TV is turned on, the confirmation screen 
is displayed to select whether [First Page] or [Last 
Page].

 2

  Select the category and item


 Category field

 Item field


    select 

category

    access


    select item

   access


    select sub 

item

   access


 Sub item field

 Description


 To return to the previous field


 To scroll the description (if more than 1 page)
 While the description is highlighted


 To display the menu related to the description (only 
for some descriptions)
 

 (red)

  Viewing 3D images

 You can enjoy viewing 3D images with contents or 
programmes corresponding to the 3D effect by wearing 
the 3D Eyewear (supplied).


 The 3D Eyewear must be worn to view 3D images.


 This TV supports [Frame Sequential]

*

, [Side by Side] 

and [Top and Bottom] 3D formats.


 For more information, refer to [eHELP] (Watching > 
3D).

 *

:  The 3D format that the images for the left and right 

eyes are recorded with the high definition quality and 
alternately played back.

 3D Eyewear

 Use the supplied 3D Eyewear or Panasonic 3D Eyewear 
that supports Bluetooth wireless technology.

 Note


 Do not exert pressure on or scratch the lens of the 3D 
Eyewear.


 Do not use devices such as mobile phones 
or personal transceivers that emit strong 
electromagnetic waves near the 3D Eyewear as this 
may cause the 3D Eyewear to malfunction.


 Do not wear the 3D Eyewear when watching anything 
other than 3D images. Liquid crystal displays (such as 
computer screens, digital clocks or calculators, etc.) 
may be difficult to see while wearing the 3D Eyewear.

 First registration

 Perform the first registration when first using the 3D 
Eyewear with this TV.

 1


Turn the TV on

 2


Press Power button for about 1 second to turn the 
3D Eyewear on


 The lamp lights for about 2 seconds and then 
flashes.


 The 3D Eyewear will be turned on and start 
registration.


 Place the 3D Eyewear within 50 cm from the TV 
while registration in progress.

 3


After the registration is successfully completed, 
the 3D Eyewear will reconnect with TV 
automatically when the 3D Eyewear is turned on 
near the TV in 3D mode


 Registration again

 When connection with the registered TV fails, or when 
using with another TV, re-register the 3D Eyewear.

 1

  Turn the TV on

 2

  Within 50 cm from the TV, press Power button until 

lamp lights, then release it to start registration

 3

  After the registration is successfully completed, the 3D 

Eyewear will reconnect with TV automatically when the 
3D Eyewear is turned on near the TV in 3D mode

Содержание TX-48AS640B

Страница 1: ...ructions carefully before operating this product and retain them for future reference The images shown in this manual are for illustrative purposes only English Model No TX 40AS640B TX 48AS640B TX 55AS640B For more detailed instructions refer to eHELP Built in Operating Instructions How to use eHELP p 17 M0314 0 English ...

Страница 2: ... Contents Be Sure to Read Important Notice 3 Safety Precautions 3 Quick Start Guide Accessories 7 Connections 8 Identifying Controls 12 First time Auto Setup 15 Using your VIERA Operations 16 How to Use eHELP 17 Viewing 3D images 17 Others FAQs 19 Maintenance 20 Specifications 20 ...

Страница 3: ...ift open the fuse cover in the mains plug with a screwdriver and replace the fuse then press the fuse cover down securely Important Notice Notice for DVB Data broadcasting IPTV functions This TV is designed to meet the standards as of August 2013 of digital services Not all the features are available depending on the country area broadcaster service provider and network environment The compatibili...

Страница 4: ... 50 60 Hz Insert the mains plug fully into the socket outlet Ensure that the mains plug is easily accessible Disconnect the mains plug when cleaning the TV Do not touch the mains plug with wet hands Do not damage the mains lead Do not place a heavy object on the lead Do not place the lead near a high temperature object Do not pull on the lead Hold onto the mains plug body when disconnecting the pl...

Страница 5: ...t use the TV 3D Eyewear and Touch Pad Controller near any automatic control equipment such as automatic doors or fire alarms Radio waves may interfere with the automatic control equipment and cause accidents due to the malfunction Keep the distance at least 22 cm from the TV 3D Eyewear and Touch Pad Controller when you have a cardiac pacemaker Radio waves may interfere with the operation of the pa...

Страница 6: ...t to trap your fingers in the hinge section of the 3D Eyewear Do not use the 3D Eyewear if it is physically damaged If you suffer from any eyesight problems short far sighted astigmatism eyesight differences in left and right ensure that you correct your vision before using the 3D Eyewear The supplied 3D Eyewear can be worn over vision correction glasses Stop using the 3D Eyewear immediately if yo...

Страница 7: ...uch Pad Controller p 13 N2QBYA000004 Pedestal p 7 Mains lead p 9 Batteries R6 2 For Remote Control p 12 R03 2 For Touch Pad Controller p 14 3D Eyewear 2 p 17 Operating Instructions Production Registration Leaflet Accessories may not be placed all together Take care not to throw them away unintentionally For the information of optional accessories refer to eHELP Support Optional accessories ...

Страница 8: ...ment with an infrared sensor otherwise distortion of image sound may occur or operation of other equipment may be affected Please also read the manual of the equipment being connected Terminals 2 3 4 7 5 6 9 10 8 1 1 CI slot p 11 2 Headphone jack p 11 3 USB 1 2 port 4 HDMI3 5 AV1 SCART p 9 6 AV2 COMPONENT VIDEO p 10 7 ETHERNET p 10 2 3 B Removing the pedestal from the TV Be sure to remove the pede...

Страница 9: ...al Satellite dish DVD Recorder VCR Cable TV box 8 Terrestrial terminal p 9 9 DIGITAL AUDIO 10 HDMI1 2 p 9 10 11 Basic connections Mains lead AC 220 240 V 50 60 Hz Mains lead supplied Insert the mains plug firmly into place When disconnecting the mains lead be absolutely sure to disconnect the mains plug at the socket outlet first Aerial TV RF cable Terrestrial aerial For DVB Analogue ...

Страница 10: ...rnet service you need a broadband network environment If you do not have any broadband network services please consult your retailer for assistance Prepare the internet environment for wired connection or wireless connection Setup of the network connection will start when first using the TV p 15 Wired connection TV Internet environment LAN cable Shielded Use the Shielded Twist Pair STP LAN cable W...

Страница 11: ...r For the connections read the manuals of the equipment and amplifier TV HDMI cable Amplifier with speaker system External equipment DVD Player etc Headphones To adjust volume Headphone Volume in the Sound Menu To select the sound output to adjust volume Speaker Setting in the Sound Menu TV M3 stereo mini plug Common Interface Turn the TV off with Mains Power On Off switch whenever inserting or re...

Страница 12: ...en 18 TV Guide Displays Electronic Programme Guide 19 Cursor buttons Makes selections and adjustments 20 Return Returns to the previous menu page 21 Channel Up Down 22 Sound Mute On Off 23 Last view Switches to previously viewed channel or input mode 24 Operations for contents connected equipment etc Installing Removing batteries Pull open Hook Note the correct polarity or Close Identifying Contro...

Страница 13: ...registration starts automatically when you press any buttons except Standby On Off switch after installing batteries After registering you can operate the TV without pointing this controller at the TV except Standby On Off switch To use Standby On Off switch point the controller directly at the TV s remote control signal receiver because it works with the infrared You can operate the switch withou...

Страница 14: ...e remote control 4 Input mode selection Press repeatedly until you reach the desired mode Main Menu Press and hold for about 3 seconds to display main menu OK when in the menu system 5 Channel Up Down Cursor Up Down when in the menu system 6 Volume Up Down Cursor Left Right when in the menu system 7 Mains power On Off switch Use to switch the mains power Installing Removing batteries Slide open No...

Страница 15: ...to Setup Automatically sets up the TV and searches for available TV channels when the TV is turned on for the first time These steps are not necessary if the setup has been completed by your local dealer Please complete connections p 8 11 and settings if necessary of the connected equipment before starting Auto Setup For details of settings for the connected equipment read the manual of the equipm...

Страница 16: ...ctions or refer to eHELP my Home Screen APPS List Operations Turn power on TV or Remote Control Mains power On Off switch should be on p 14 The last viewed Home Screen is displayed Example TV Home Screen Example Selected content screen To return to Home Screen at any time You can set up or make Home Screen to display desired information to access specific features easily to select the default Home...

Страница 17: ...supports Bluetooth wireless technology Note Do not exert pressure on or scratch the lens of the 3D Eyewear Do not use devices such as mobile phones or personal transceivers that emit strong electromagnetic waves near the 3D Eyewear as this may cause the 3D Eyewear to malfunction Do not wear the 3D Eyewear when watching anything other than 3D images Liquid crystal displays such as computer screens ...

Страница 18: ...om right of the screen 2 View the 3D images Safety precautions will be displayed when you first watch the 3D image Select Yes or No to continue to view 3D images Note Turn off the 3D Eyewear after using it Use the 3D Eyewear within approximately 3 2 m from the TV You cannot view the 3D images with the 3D Eyewear too far from the TV because of the difficulty of receiving radio waves from the TV The...

Страница 19: ...d to reset any future recordings FAQs Before requesting service or assistance please follow these simple guides to solve the problem For more information refer to eHELP Support FAQs The TV does not switch on Check the mains lead is plugged into the TV and the socket outlet The fuse in the mains plug may have blown Replace it with one of an identical rating p 3 The TV goes into Standby mode Auto po...

Страница 20: ...re Gently wipe the surface of the display panel cabinet or pedestal by using a soft cloth to clean the dirt or fingerprints For stubborn dirt 1 First clean the dust on the surface 2 Dampen a soft cloth with clean water or diluted neutral detergent 1 part detergent to 100 parts water 3 Wring the cloth firmly Please note liquids do not enter the TV inside May lead to product failure 4 Finally wipe a...

Страница 21: ... and Touch Pad Controller 3D Eyewear Dimensions W H D 164 7 mm 41 0 mm 170 7 mm Mass Approx 34 Usage temperature range 0 C 40 C AUDIO L R RCA PIN Type 2 0 5 V rms Y 1 0 V p p including synchronisation PB CB PR CR 0 35 V p p HDMI 1 2 3 input TYPE A Connectors HDMI1 3 3D Content Type HDMI2 3D Content Type Audio Return Channel This TV supports HDAVI Control 5 function Card slot Common Interface slot ...

Страница 22: ... information of the open source software refer to eHELP Support Licence This equipment complies with the EMC standards listed below EN55013 EN61000 3 2 EN61000 3 3 EN55020 EN55022 EN55024 When using the wall hanging bracket Please contact your local Panasonic dealer to purchase the recommended wall hanging bracket Holes for wall hanging bracket installation Rear of the TV a b 40 inch model a 200 m...

Страница 23: ......

Страница 24: ...rrect method of disposal Note for the battery symbol bottom two symbol examples This symbol might be used in combination with a chemical symbol In this case it complies with the requirement set by the Directive for the chemical involved Sales and Support Information Customer Communications Centre For customers within the UK 0844 844 3899 For customers within Ireland 01289 8333 Monday Friday 9 00am...

Отзывы: