background image

English

11

6

B

7

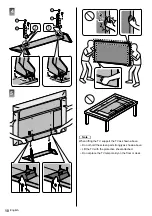
Note


Remove the protective sheet and the protective film 
after installing the pedestal.

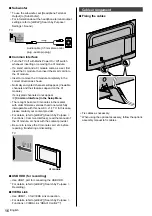
 Removing the pedestal

Be sure to remove the pedestal in the following 
procedures when you use the wall-hanging bracket or 
repack the TV.

1

Remove the assembly screws   from the TV.

2

Pull out the pedestal from the TV.

3

Remove the assembly screws   from the bracket.

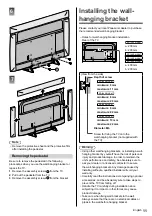
 Installing the wall-
hanging bracket

Please contact your local Panasonic dealer to purchase 
the recommended wall-hanging bracket.


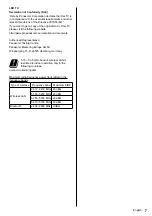
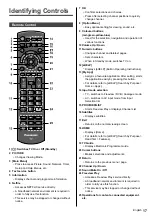
Holes for wall-hanging bracket installation
Rear of the TV

a

b

40-inch model

a: 200 mm

b: 200 mm

50-inch model

58-inch model

65-inch model

a: 400 mm

b: 200 mm

(View from the side)

Depth of screw

40-inch model

minimum: 9 mm

maximum: 11 mm

50-inch model

minimum: 8 mm

maximum: 20 mm

58-inch model

minimum: 9 mm

maximum: 22 mm

65-inch model

minimum: 10 mm

maximum: 22 mm

Diameter: M6

Screw for fixing the TV onto the 
wall-hanging bracket (not supplied with 
the TV)

Warning


Using other wall-hanging brackets, or installing a wall-
hanging bracket by yourself have the risk of personal 
injury and product damage. In order to maintain the 
unit’s performance and safety, be absolutely sure to 
ask your dealer or a licensed contractor to secure 
the wall-hanging brackets. Any damage caused by 
installing without a qualified installer will void your 
warranty.


Carefully read the instructions accompanying optional 
accessories, and be absolutely sure to take steps to 
prevent the TV from falling off.


Handle the TV carefully during installation since 
subjecting it to impact or other forces may cause 
product damage.


Take care when fixing wall brackets to the wall. 
Always ensure that there are no electrical cables or 
pipes in the wall before hanging bracket.

TQB0E2929U.indd   11

03/02/2020   3:26:44 PM

Содержание TX-40HX800B

Страница 1: ...manual before use The images shown in this manual are for illustrative purposes only F0320 0 English Model No TX 40HX800B TX 40HX820B TX 50HX800B TX 50HX820B TX 58HX800B TX 58HX820B TX 65HX800B TX 65H...

Страница 2: ...olby Atmos Dolby Audio and the double D symbol are trademarks of Dolby Laboratories Manufactured under license from Dolby Laboratories Confidential unpublished works Copyright 2012 2019 Dolby Laborato...

Страница 3: ...application provider Before repairing transferring or discarding this TV erase all the information recorded on this TV according to the following procedure eHELP Search by Purpose Functions Shipping...

Страница 4: ...t it securely into the mains plug For plug type shown in example 2 Lift open the fuse cover in the mains plug with a screwdriver and replace the fuse then press the fuse cover down securely This TV is...

Страница 5: ...dren to climb such as toys and remote controls on the top of the TV or furniture on which the TV is placed If the existing TV is going to be retained and relocated the same considerations as above sho...

Страница 6: ...ts cm 10 10 10 10 Ventilation should not be impeded by covering the ventilation openings with items such as newspapers tablecloths and curtains Whether you are using a pedestal or not always ensure th...

Страница 7: ...eu compliance documents Authorized Representative Panasonic Testing Centre Panasonic Marketing Europe GmbH Winsbergring 15 D 22525 Hamburg Germany 5 15 5 35 GHz band of wireless LAN is restricted to...

Страница 8: ...Production Registration Leaflet Accessories may not be placed all together Take care not to throw them away unintentionally Note Illustrations shown above may be different between models and countries...

Страница 9: ...l before taking out the TV from the carton Do not hold the screen panel part Make sure not to scratch or break the TV Assembling the pedestal Do not assemble the pedestal by any method other than thos...

Страница 10: ...D A C 5 Note When lifting the TV support the TV as shown above Do not hold the screen part strongly as shown above Lift the TV with the protective sheet attached Do not place the TV temporarily on the...

Страница 11: ...0 mm 58 inch model minimum 9 mm maximum 22 mm 65 inch model minimum 10 mm maximum 22 mm Diameter M6 Screw for fixing the TV onto the wall hanging bracket not supplied with the TV Warning Using other w...

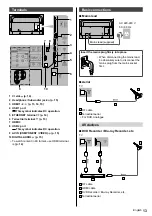
Страница 12: ...or disconnecting any cables Check the terminal type and cable plugs are correct for connection Use a fully wired HDMI compliant cable Please use a High Speed HDMI cable when connecting for high resol...

Страница 13: ...VIDEO p 15 10 DIGITAL AUDIO p 15 To watch content in 4K format use HDMI terminal p 14 Basic connections Mains lead AC 220 240 V 50 60 Hz Mains lead supplied Insert the mains plug firmly into place Wh...

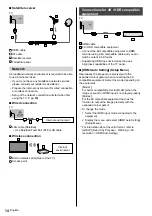
Страница 14: ...ompatible equipment Connect the 4K compatible equipment to HDMI terminal using a 4K compatible cable and you can watch content in 4K format Supporting HDR does not increase the peak brightness capabil...

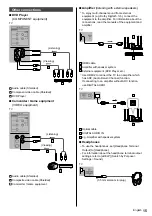
Страница 15: ...ent to the amplifier For information about the connections read the manuals of the equipment and amplifier TV HDMI cable Amplifier with speaker system External equipment DVD Player etc Use HDMI2 to co...

Страница 16: ...nnels do not appear Common Interface in the Setup Menu There might be some CI modules in the market with older firmware versions that do not work fully interoperable with this new CI v1 4 TV In this c...

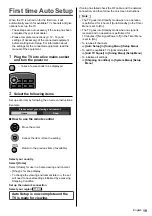
Страница 17: ...ndby mode switches TV on 12 eHELP Displays eHELP Built in Operating Instructions 13 My App Assigns a favourite application After setting starts the application easily by pressing this button For detai...

Страница 18: ...ient Sensor in the Picture Menu is set to On 2 Power LED Red Standby Green On Depending on the ambient brightness adjusts the brightness of LED to easy to view levels automatically Orange Standby with...

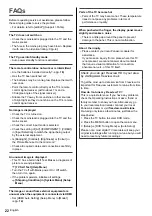
Страница 19: ...urn to the previous item if available Select your country Select Home Select Home for use in a home viewing environment Shop is for shop display To change the viewing environment later on the set will...

Страница 20: ...es a more detailed explanation for a better understanding of the operation of each feature 1 Display eHELP or Help eHELP If the eHELP has been accessed previously since the TV was turned on the confir...

Страница 21: ...if more than 1 page While the description is highlighted To open the reference screen To display the menu related to the description only for some descriptions red To check the features of this TV Se...

Страница 22: ...ff switch then turn it on again If the problem persists initialise all settings Shipping Condition in System Menu Setup Menu The image or sound from external equipment are unusual when the equipment i...

Страница 23: ...e stubborn dirt 5 Finally wipe away all the moisture Caution Do not use a hard cloth or rub the surface too hard otherwise this may cause scratches on the surface Take care not to subject the surfaces...

Страница 24: ...al 14 0 Net TV only 58 inch model 23 0 Net With Pedestal 20 5 Net TV only 65 inch model 28 5 Net With Pedestal 26 0 Net TV only Power source AC 220 240 V 50 60 Hz Panel LED LCD panel Sound Speaker out...

Страница 25: ...02 11a n ac 5 180 GHz 5 320 GHz 5 500 GHz 5 700 GHz IEEE802 11b g n 2 412 GHz 2 472 GHz Security WPA2 PSK TKIP AES WPA PSK TKIP AES WEP 64 bit 128 bit Bluetooth wireless technology 2 Standard Complian...

Страница 26: ......

Страница 27: ......

Страница 28: ...4 3899 For customers within Ireland 01289 8333 Monday Friday 9 00am 5 00pm Excluding public holidays For further support on your product please visit our website www panasonic co uk Direct Sales at Pa...

Отзывы: