background image

5

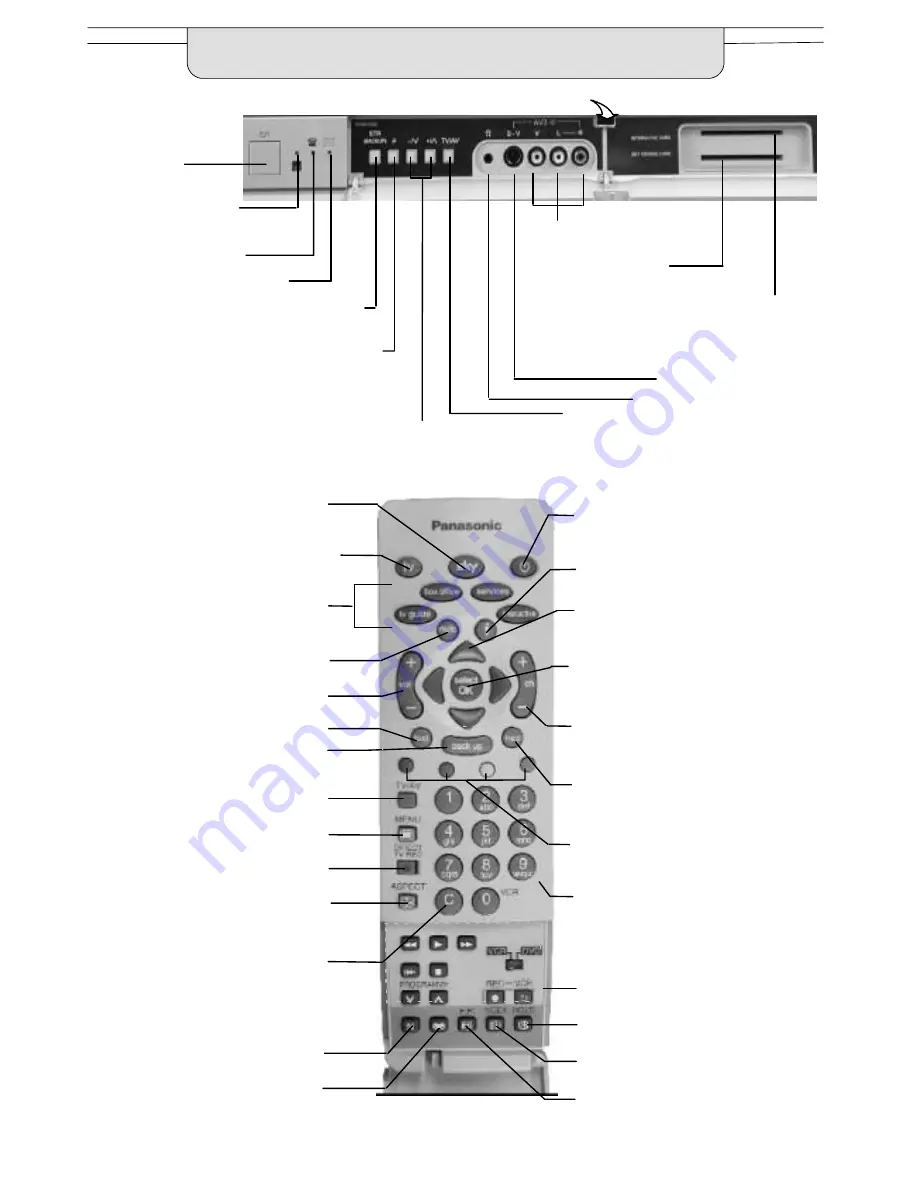
Aspect control button

(see page 13)

Switch between viewing TV or AV input,

(see page 35), select DTT or Analogue

television (see page 10) or access the DTT

guide

(see page 33)

Standby On/Off switch

Switches TV On or Off standby

Switches DTT system on or off

standby if tuner lock is not set

Programme / channel change buttons ---

press the OK button after selecting

programme positions 1---19 to avoid delay;

Teletext page buttons (see page 40); when

in Standby mode, switches TV on

Sound mute On/Off

Direct channel access

During normal TV viewing or when in the

Tuning menu, press and then enter

channel number using the numeric

buttons

Teletext button (see page 40)

Multi function buttons used for

Teletext functions (see page 40)

AV selection (see page 35)

The N button will recall settings

stored with OK

Cursor buttons to make selections and

adjustments. Scroll through status

information for each available digital

channel.

The Help button provides advice on using

the Sky Guide system

Ambience on/off

Direct TV Record button

(see page 37)

VCR / DVD buttons

(see page 39)

Press here and open flap to expose TV controls, front AV3 and headphone terminals

MAINS Power

On/Off switch

STR (BACKUP) (Normalisation store)

Used to store tuning and other function settings.

Also Exits or navigates the menu system

F (Function select)

Displays the On Screen Display functions, use

repeatedly to select from the available functions

--- Volume, Contrast, Brightness, Colour,

Sharpness, Tint (in NTSC mode), Bass, Treble,

Balance, Tuning mode

(only when viewing analogue transmissions)

and Geomagnetic Correction

Increases or decreases the programme position by one. When a function is

already displayed, press to increase or decrease the selected function

TV/AV switch (see page 35)

Headphone socket (see page 43)

RCA Audio/Video

sockets (page 43)

Indicator LED’s:

Red indicates

Standby mode; flashes red

when receiving a command

from the remote control

S---VHS socket (see page 43)

Exits or navigates the menu system

OK button to confirm selections and

choices.

Press after selecting programme positions

1---19 to avoid delay

Displays Favourite page (see page 41)

Displays DTT subtitles (if available)

Shows status information for the current

Programme position

Freezes the current teletext page

(see page 40)
Selects the nearest teletext index page

(see page 41)

Volume increase / decrease (see page 11)

Channel number up and down, Teletext

page selection (see page 11)

The SKY button provides access the

Digital satellite system

The Sky Guide buttons. When in Digital

satellite mode, press to access the Sky

Guide system

When in Sky mode,

press the TV button

immediately before the text button to

access analogue text where available.

Can also be used to exit digital text

Access the Main menu

(see page 12)

Green when on---line (using

the telephone line)

Yellow when message is waiting (full

operation subject to Sky services

Insert your Sky

viewing card here

Insert your Interactive card here

when using interactive services,

and only when an instruction to

do so appears on screen

BASIC CONTROLS :
FRONT PANEL AND REMOTE CONTROL

All manuals and user guides at all-guides.com

Содержание TX-32DTDS3

Страница 1: ...tructions Colour Television with Integrated Digital Terrestrial Decoder and Integrated Digital Satellite Decoder TX 32DTS3 U K Standard TX 28DTS3 ALL MODES All manuals and user guides at all guides co...

Страница 2: ...ect Control 13 Main Menu 15 Sound Menu 16 Setup Menu 17 Tuning Menu overview 18 Tuning Menu Auto setup 19 Tuning Menu Analogue Manual Tuning 20 Tuning Menu Install satellite 21 Tuning Menu Shipping co...

Страница 3: ...d should be approved by ASTA or BSI to BS1362 Check for the ASTA mark ASA or the BSI mark on the body of the fuse If the fitted plug has a removable fuse cover you must ensure that it is refitted when...

Страница 4: ...cable PAN 001 02 Use only this cable Replace the cover 1 2 3 Slide off the battery cover Insert batteries note correct polarity and Notes D Make sure that the batteries are fitted the correct way roun...

Страница 5: ...NTSC mode Bass Treble Balance Tuning mode only when viewing analogue transmissions and Geomagnetic Correction Increases or decreases the programme position by one When a function is already displayed...

Страница 6: ...AV2 Scart of the TV must be connected to the AV1 socket of the VCR If your VCR is not a Q Link VCR please consult your VCR operating instruction book RF Connection D Connect the RF cable to the Aerial...

Страница 7: ...be found on page 36 In order for Q Link to function correctly the Scart cables must be connected correctly Please see page 6 option 2 It is advised that if you wish to use your VCR in a recording cap...

Страница 8: ...mins If both connections are available you may select Aerial and Dish See If you have not connected your dish select Aerial only A dish may be installed at a later date See Aerial and Dish The TV set...

Страница 9: ...s not accepted download data from the TV you may need to select the Download option from the VCR s menu system Refer to the VCR operating instruction book If Q Link is not operating correctly check th...

Страница 10: ...ions that have been found press the TV AV button followed by the Yellow multi function button on the remote control see page 33 DTT stations are shown with a n in the DTT column Use the cursor buttons...

Страница 11: ...eomagnetic Correction feature is displayed Press the or buttons repeatedly until the picture appears to be level 002 STR F v TV AV Geomagnetic Correction Adjust tilt F To exit Press the F button again...

Страница 12: ...MENU button is used to open the main menu and also to return to the previous menu The up and down cursor buttons are used to move the cursor up and down the menus The left and right cursor buttons are...

Страница 13: ...the picture are detected PanasonicAutochooses the best ratio and expands the picture to fill the screen This process can take several minutes depending on the darkness of the picture You may prefer t...

Страница 14: ...display a 4 3 picture at its standard 4 3 size with no aspect distortions Zoom1 Zoom1 will display 16 9 letterbox or 4 3 pictures with no aspect distortions Zoom2 Zoom2willdisplay16 9anamorphic letter...

Страница 15: ...ment of the hue The Colour balance setting allows you to set the overall colour tone of the picture P NR will automatically reduce unwanted picture noise AI automatically analyses the incoming picture...

Страница 16: ...DTT programmes Select On to provide stereo sound reproduction Select Off for FM Mono sound output If Nicam Mono is being transmitted select either FM Mono Off Nicam Mono I M1 or Nicam Mono II M2 The o...

Страница 17: ...etextoptionallowsyoutochoose between FASTEXT or LIST mode See page 40 If you notice a slight tilt to the picture or if there are coloured patches at the corners of the screen use this feature to elimi...

Страница 18: ...e satellite system if you have not already done so See page 21 Allowsyouto clearall tuninginformation and reset all control levels back to factory settings See page 22 You may wish to lock a programme...

Страница 19: ...setup Press OK to start Auto setup The TV will search for locate and sort into order your local stations If a compatible VCR is connected via the AV2 socket programme data will be sent to the VCR via...

Страница 20: ...nu Move to Analogue manual tuning Access Analogue manual tuning Press repeatedly until the required station is found Press OK to store the programme position Press MENU to return to the Tuning menu If...

Страница 21: ...up menu Move to Tuning menu Access Tuning menu Move to Install satellite Access Install satellite Press OK to Install the satellite system Press MENU to return to the Tuning menu If you have finished...

Страница 22: ...in the Setup menu You may need to adjust your VCR or programme position 0 VCR after operating the Shipping condition menu refer to page 38 From the Main menu access the Setup menu Digital satellite DT...

Страница 23: ...to Tuning menu Access Tuning menu Move to Owner I D THEN Access Owner I D If the Owner I D has previously been set enter the PIN NUMBER using 0 to 9 on the remote control followed by OK to proceed th...

Страница 24: ...is found the search will pause if it is not the correct station you can press the or buttons to continue searching When the desired station is found press the TV AV button to move to the programme pos...

Страница 25: ...flow of data causing the picture to appear to be made up of large blocks or to freeze intermittently If the picture disappears completely this could mean that signal quality is very poor If this happe...

Страница 26: ...menus Press the back up button to exit This option allows you to set how long the information banner stays on screen Select from 0 no display to 10 seconds in 1 second increments The PC Connection me...

Страница 27: ...From the Main menu access the Setup menu Move to DTT setup Access DTT setup menu Move to Common Interface Module Access Common Interface Module COMMON INTERFACE MODULE MENU Card reader Viewing card T...

Страница 28: ...g buttons on the remote control but because the commands available must apply to all manufacturers of DTT equipment some on screen commands may not correspond exactly to the remote control buttons For...

Страница 29: ...favourite Press the OK button to set your favourite A tick appears next to the selected program position You may move to and select as many programme positions as you wish To clear a previously selec...

Страница 30: ...page 26 Use the cursor up and down buttons to scroll through the programme list If you have set favourite channels and want to scroll through only those channels press the Blue button To step through...

Страница 31: ...re this will take a few seconds If a newer version is available Important Note You must not switch off the TV while downloading is in progress as errors could occur Downloading will take a few minutes...

Страница 32: ...e data bits to be sent Select from either 7 or 8 Determines the number of stop bits to be used Select from 1 or 2 Determines whether a protocol should beused Selectfrom None Hardwareor Software Determ...

Страница 33: ...ayed If you wish to view one of the listed programmes select it with the up down cursor keys and press the OK button From the Category and Type guides you can also view a list of programmes by categor...

Страница 34: ...t programmes When you are viewing the list of next programmes you have the option to set a reminder Set Reminder allows you to mark a programme that you do not want to miss When the programme is about...

Страница 35: ...tions remain on screen The options will disappear You may wish to make adjustments in the Sound or Setup menus From the Main menu access the Sound menu Move to your choice Access adjustments or option...

Страница 36: ...d Downloading of tuning information from the TV to the VCR D Direct TV Record For immediate recording of the current program What You See Is What You Record This TV will also communicate with other VC...

Страница 37: ...V input to record the DTT signal from the TV via the SCART cable and the DTT programme position will be locked If you attempt to select another DTT programme position whilst recording you will see the...

Страница 38: ...he instruction books for your additional equipment Use the AV2 Scart terminal for any VCR To tune your TV to the VCR Switch on the VCR insert and play a pre recorded tape with known content On the TV...

Страница 39: ...icture rapidly forward Cue DVD Press once to skip to the next track In play mode press and hold to view the picture rapidly forward Skip Fast Forward Cue VCR Press to rewind the tape In Play mode pres...

Страница 40: ...ation that is not transmitting teletext press the back up button to return to normal viewing TV Teletext mode Pages can be selected in two ways a Press the Up Down buttons to increase or decrease the...

Страница 41: ...ages found will be displayed across the top of the screen When the sub page you are waiting for is available press the Yellow button to return to viewing the Teletext pages then use the left and right...

Страница 42: ...button should allow you to exit the teletext system Alternatively press the CHANNEL UP DOWN buttons to select another channel DTT Teletext services Arrow keys Up Down Left Right Select Go OK Coloured...

Страница 43: ...Earth Earth Earth Audio out L Audio out R CVBS in video Q Link data Status CVBS Audio in L Audio earth Audio in R 21 19 17 15 13 11 9 7 5 3 1 20 18 16 14 12 10 8 6 4 2 S C In AV2 Scart socket S Video...

Страница 44: ...YER The SERIAL port is provided for future applications Telephone cable PAN 001 02 Use only the lead supplied to connect to an appropriate telephone socket GAMES CONSOLE COMPUTER RGB Notes D Additiona...

Страница 45: ...ot switched on Picture Sound controls set at minimum levels Check if in standby mode No Colour Normal Sound Colour controls set at minimum levels Poor or Distorted Picture Weak or No Sound Retune Chan...

Страница 46: ...To check the quality of your signal use the Signal Quality feature see page 25 Good quality signal indication is green Poor quality signal indication is red Symptom Checks Blocky interference Picture...

Страница 47: ...service please contact your local Panasonic dealer quoting the model number and serial number both are located at the rear of the TV TX 32DTS3 TX 28DTS3 Power Source 220 240V 50Hz A C Power Consumptio...

Страница 48: ...tly by Panasonic UK Ltd S It couldn t be simpler www panasonic co uk for UK customers only MADE FROM 100 RECYCLED PAPER 244 039 Printing paper Low emissions during production In the unlikely event tha...

Отзывы: