background image

21

MULTI WINDOW

1

2

3

4

5

6

7

8

9

C

0

N

Swap

Source

2

AV1

sub

window

main

window

A
B

Swap

Source

Swap

Source

2

2

AV1

AV1

Swap

Source

2

AV1

Multi window

Press the 

MULTI WINDOW

 button. Whilst the on screen selector keys are displayed,

use the 

Red

 or 

Green

 buttons to move between the 

picture in picture

 feature,

picture out of picture

 and 

picture and picture

 feature.

The on screen selector keys that appear for the features clear after a few seconds.
If you want to select an operation when the keys are not shown, press the 

MULTI

WINDOW

 button again and the keys will reappear.

Press the 

MULTI WINDOW

 button (whilst the selector keys are displayed) to return

to normal viewing.

Note:

This TV has one tuner. When the main and sub windows are both TV mode, these
are the same TV channel.

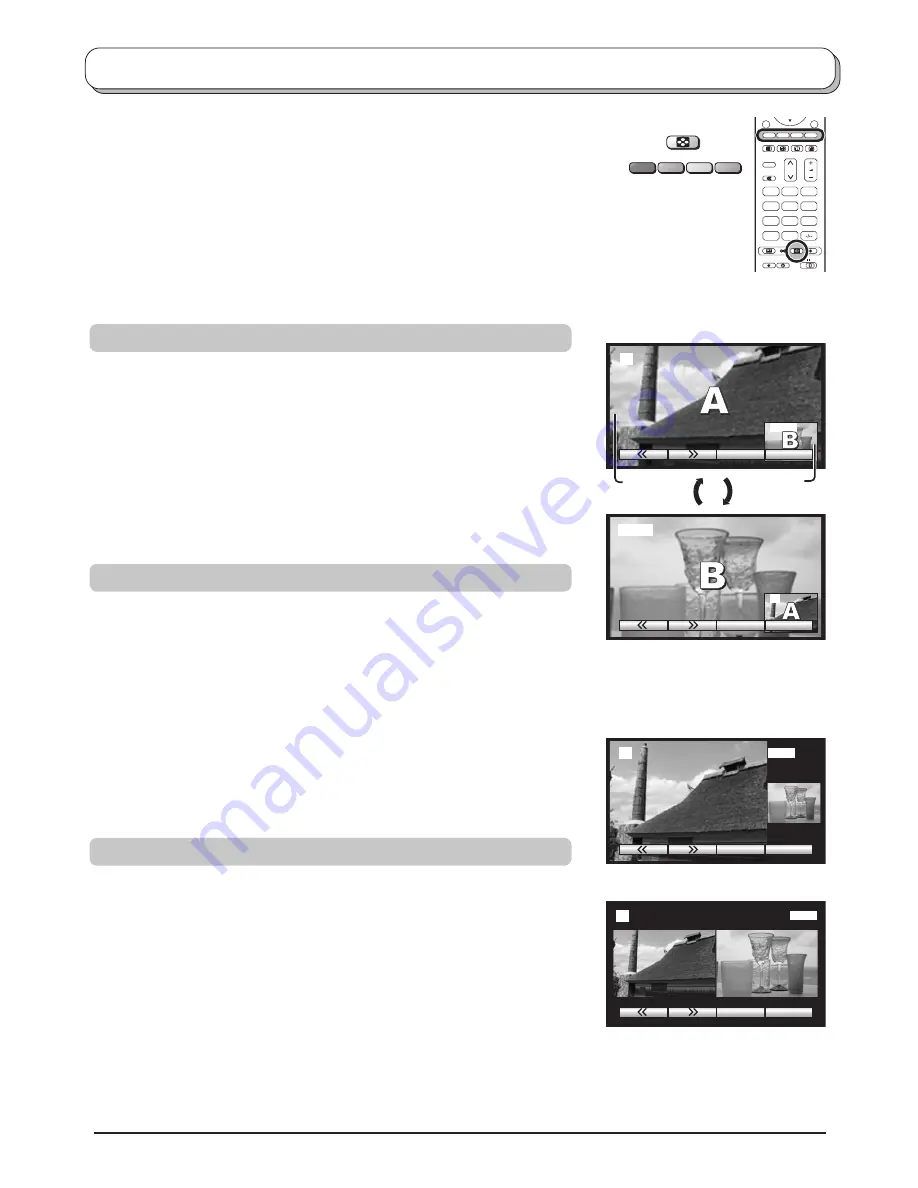
Picture and picture

Picture in picture

Allows two pictures to be viewed at the same time.
Press the 

Yellow

 button to select the contents of the smaller window,

switching between displaying a TV channel and all AV sources in turn.
To change the TV channel: press the 

Yellow

 button until the currently

selected TV channel is shown, then use the remote control to change
channel (whilst the on screen selector keys are still displayed).
Press the 

Blue

 button to swap the contents of the two windows.

Use the remote control to select a TV channel or an AV source to appear
in the main window.

Picture out of picture

Allows two pictures to be viewed at the same time, as picture in picture
does. The difference is how the two pictures are displayed: in picture in
picture the smaller window appears within the main picture; in picture out
of picture the smaller window appears to the right of the main picture.
Press the 

Yellow

 button to select the contents of the smaller window,

switching between displaying a TV channel and all AV sources in turn.
To change the TV channel: press the 

Yellow

 button until the currently

selected TV channel is shown, then use the remote control to change
channel (whilst the on screen selector keys are still displayed).
Press the 

Blue

 button to swap the contents of the two windows.

Use the remote control to select a TV channel or an AV source to appear
in the main window.

Picture out of picture

 mode

Allows two pictures to be viewed at the same time.
Press the 

Yellow

 button to select the contents of the right window,

switching between displaying a TV channel and all AV sources in turn.
To change the TV channel: press the 

Yellow

 button until the currently

selected TV channel is shown, then use the remote control to change
channel (whilst the on screen selector keys are still displayed).
Press the 

Blue

 button to swap the contents of the two windows.

Use the remote control to select a TV channel or an AV source to appear
in the left window.

Note:

When the main window is 50 Hz input signal picture (e.g., PAL, SECAM)
and the sub window is 60 Hz input signal picture (e.g., PAL 60, NTSC),
the sub window cannot be displayed.

The two pictures have been
swapped, the picture in the smaller
window has become the main
window picture.

Picture in picture

 mode

Picture and picture

 mode

Содержание TX-26LX1F

Страница 1: ...1F TX 32LX1F TX 26LX1P TX 32LX1P Operating Instructions LCD TV Model No Please read these instructions before operating your set and retain them for future reference English TQBC0697 1 1 N 2 3 4 5 6 7 8 9 C 0 ...

Страница 2: ...amme edit 13 Adding deleting a programme channel 13 Moving a programme channel 13 Tuning a programme channel 13 Renaming a programme channel 14 Locking a programme channel 14 Changing the sound system for a channel 14 Copying programme information to a recording device 14 Tuning menu Auto setup 15 Tuning menu Manual tuning 16 Manual tuning via front panel 16 Q Link 17 Aspect Controls 18 Multi wind...

Страница 3: ...e a permanent after image to remain on the LCD TV screen Examples of still pictures include logos video games computer images teletext and images displayed in 4 3 mode This type of LCD panel damage is not an operating defect and as such is not covered by the Panasonic warranty The On Off switch on this model does not fully disconnect the TV from the mains supply Remove the mains plug from the wall...

Страница 4: ... be adjusted between 40 right and left direction How to use the LCD stand Note To avoid interference appearing on the screen do not bundle the RF cable and mains lead together 1 Push down hooks and pull the cover slightly towards yourself to disengage the claws at 4 points 2 Slowly pull out in the downward direction Note The stand angle cannot be adjusted forward and backward Rise the lower part o...

Страница 5: ...witch on the TV set to turn the set on To switch the TV set to Standby mode press the button on the remote control The TV set can be switched on by pressing the button again if it was switched to Standby mode Note This TV will still consume some power as long as the mains plug is still inserted into the wall socket Power Indicator Remote control signal sensor LED Indicator Standby Red On No Light ...

Страница 6: ...k compatible recording device you can now switch it On Downloaded tuning data will match the television s Not all devices support this download of programme information some may require to be started manually See the device s instruction book for details If the recording device has not accepted download data from the TV you may need to select the download option from the device s menu If Q Link is...

Страница 7: ...ct channel access During normal TV viewing or when in the Tuning Programme edit or Manual tuning menus press and then enter channel number using the numeric buttons N Normalize button Resets all settings to their default levels Standby On Off button Switches TV On or Off Standby mode Menu button Press to access the Picture Sound and Setup menus see page 8 11 Status button Press to display programm...

Страница 8: ...cursor and select menus The left and right cursor buttons are used to access menus adjust levels or to select from a range of options The OK button is used with a number of features to store settings after adjustments have been made or options have been set The EXIT button is used to exit the menu system and return to the normal viewing screen An On Screen Help box is displayed whenever a menu is ...

Страница 9: ...nd stored to suit your particular viewing requirement e g you may require different settings for viewing sports films news etc Viewing mode offers you up to a maximum of three separate settings for each signal source RF AV1 AV2 AV3 and AV4 Changes will be stored automatically By analysing and processing the incoming picture all three modes feature automatic enhancement Increase or decrease the lev...

Страница 10: ...o enhance or minimise lower deeper sound output Increase or decrease level to enhance or minimise sharper higher sound output The levels of sound between the left and right speakers can be adjusted to suit your listening position Can be adjusted independently of the TV speakers so that everyone can enjoy listening at a level comfortable for them Usually set to Stereo to provide the best reproducti...

Страница 11: ...n the Q Link option You can choose from the current TV programme position the signal entering AV1 AV2 AV3 AV4 or Monitor the picture displayed on screen Allows you to choose between TOP or List mode See page 28 30 Switches the TV off within a preset time which you can choose from between 0 to 90 minutes in 15 minute intervals Occasionally whilst viewing still or slow moving pictures colour pattern...

Страница 12: ...the volume level varies significantly between stations Adjusting one station s volume to bring it into line with the other stations means you can avoid having to adjust the volume each time you change channels This option is used when a decoder is connected via AV2 AV4 Store the setting as On so that every time this programme position is selected the TV software is set to handle the decoded inform...

Страница 13: ...nnel Tuning a programme channel Make sure the cursor is in the Prog column Press the Yellow button Choose the new position for the programme channel Press the Yellow button again to confirm your decision Move to the Chan column Increase or decrease the programme channel number you will see the TV retune to the new number as you change it or use the C button for Direct Channel Access See page 7 Pre...

Страница 14: ...me information to a recording device You can copy programme information to a compatible recording device connected to AV2 AV4 See page 32 for connection information Press the Blue button Programme data will now be sent to the recording device s This might take a few seconds depending on the number of stations stored If the message Feature not available appears on the screen the television is unabl...

Страница 15: ...art and complete the Auto setup procedure so that the TV is retuned Press to start Auto setup The TV will search for locate store and then sort into order your local stations If compatible recording device is connected via the AV2 AV4 terminal programme data will be sent to the device via Q Link See page 17 Once this operation is completed the TV will display the programme now stored on programme ...

Страница 16: ...earch and Change TV system Press the or button to change programme position or start search When the desired station is found press the STR button to store The programme position will flash Repeat above procedure to tune additional programme positions Press the F button at any time to go back to watching TV Note When using a VCR without video and audio input output terminals it is convenient to co...

Страница 17: ...Standby mode the TV will automatically switch on and select the correct AV input so that you can view the content Recording device Auto Power Standby When the TV is switched into Standby mode the recording device will also switch into Standby mode if there is no media inserted or if there is media inserted and the device is in Rewind or Stop mode If a VCR is rewinding a tape it will not switch int...

Страница 18: ...tions available to view the picture Notes If in Panasonic Auto mode you experience problems with the screen display size when playing back widescreen format recordings from your VCR then it is possible that the tracking control of your VCR requires adjustment your VCR instruction book will contain adjustment details The widescreen aspect ratios of different films and programmes can vary If these a...

Страница 19: ...sh to expand a 4 3 picture to fill the whole screen rather than watching a programme with black stripes down the left and right sides of the picture The 4 3 picture will be stretched horizontally so that the image fills the screen this is done in such a way that the stretching is only obvious at the left and right edges of the screen 4 3 will display a 4 3 picture at its standard 4 3 size with no ...

Страница 20: ...ns Zoom2 will display 16 9 anamorphic letterbox pictures as a full screen display with no aspect distortions Zoom3 will display 21 9 letterbox pictures as a full screen display with no aspect distortions 16 9 will display the picture at its maximum size but with sligth stretching Aspect Controls Zoom1 Zoom2 Zoom3 ...

Страница 21: ...ime as picture in picture does The difference is how the two pictures are displayed in picture in picture the smaller window appears within the main picture in picture out of picture the smaller window appears to the right of the main picture Press the Yellow button to select the contents of the smaller window switching between displaying a TV channel and all AV sources in turn To change the TV ch...

Страница 22: ...e exiting the feature Picture and text Press the TV TEXT button followed by the MULTI WINDOW button to move between viewing teletext and the picture and text feature Picture and text lets you see the current programme and a page of teletext side by side Whilst using this feature the remote control affects the teletext page if you wish to make changes to the programme viewed press the TV TEXT butto...

Страница 23: ...Do not insert anything other than the PC Card Cautions Always insert card in the correct direction Failure to do so may result in damage to the card and this set The SD Card and PC Card are precision devices Do not subject them to excessive pressure or strong impacts Warning As with any small object SD Cards can be swallowed by young children Do not allow children to handle the SD Card Please remo...

Страница 24: ... confirm that a card is correctly inserted Press the SD button again to exit Photo View mode Compatible Card miniSD Card requires miniSDTM adapter The media listed in the right column above can be read via the PC Card in the PC Card adapter Hard disk PC Cards and other recorded media cannot be used Place the selected media onto the PC Card and then insert into the PC Card Slot When both SD Card an...

Страница 25: ...View mode Press the MENU button Move to choose Picture menu Access Picture menu Move to choose menu option Adjust chosen option or access chosen menu Press the EXIT button at any time to exit Picture menu Backlight Contrast Brightness Colour Sharpness Increase or decrease the levels of these options according to your personal preference The picture hue can be adjusted to suit your taste Allows you...

Страница 26: ...n the following three modes 12 images are displayed Press to select desired image Press the OK button to display Single mode Single mode A single image selected from the index area fills the screen You can also rotate or magnify the image Press to select the next or previous image Press the OK button to display Multi mode Press the Red or Green button to rotate the image Each press rotates images ...

Страница 27: ...by mode Press again to switch back on VCR DVD switch Use this switch to select whether controls operate the DVD equipment or VCR Play Press to playback the tape or DVD Stop Press to stop the tape or DVD Skip Fast Forward Cue VCR Press to fast forward the tape In Play mode press to view the picture rapidly forward Cue DVD Press once to skip to the next track Skip Rewind Review VCR Press to rewind t...

Страница 28: ... is in use the aspect ratio is set to 16 9 TV Teletext mode Press the TV TEXT button to switch between the current programme Page Selection Pages can be selected in two ways a Press the Up Down buttons to increase or decrease the page number by one b By entering the page number using 0 9 on the remote control Full Top Bottom Press the MENU button to display special functions followed by the Green ...

Страница 29: ...e some time for the automatic changing of the sub pages to reach the sub page you require As each sub page is found its number is displayed at the top of the page so that you may select it as more sub pages are picked up the display at the top of the page changes so that you are always offered the most recently transmitted selection of sub pages In Teletext operation use the following procedure to...

Страница 30: ...t page 6 enter 0 0 0 and 6 Press the Yellow button to view the TV picture whilst waiting for more sub pages to be found The sub pages found will be displayed across the top of the screen When the page is available press the Yellow button to view the page Regardless of how many pages are found pressing the Yellow button will take you to the sub page which you requested Press the TV TEXT button to r...

Страница 31: ...input when the keys are not shown press the TV AV button again and the keys will reappear Notes The volume level of the headphones can be adjusted by selecting Headphone volume from the Sound menu Additional equipment and cables shown are not supplied with this TV set Notes You can also select an AV source using the TV AV button on the front panel of the TV Press the TV AV button repeatedly until ...

Страница 32: ...en a Monaural VCR is used connect the Monaural Audio cable to the Audio L Left terminal Amplifier to Speaker System AV1 VCR SET TOP BOX DVD PLAYER DVD RECORDER CAMCORDER GAME CONSOLE COMPUTER RGB AV2 VCR S VIDEO VCR Q Link COMPATIBLE VCR DVD PLAYER S VIDEO CAMCORDER DVD PLAYER How to connect the Audio Output terminals How to connect the AV1 2 4 Scart terminals How to connect the Component Input te...

Страница 33: ...Not plugged into AC outlet Not switched on Picture Sound controls set at minimum levels Check if in Standby mode Colour controls set at minimum levels Retune Channel s Sound reception may have deteriorated Switch MPX setting Sound menu to Off until reception improves This is a characteristic of liquid crystal panels and is not a problem The liquid crystal panel is built with very high precision te...

Страница 34: ...o CVBS earth Audio out L Audio out R CVBS in video Earth Status RGB Earth Q Link data Status CVBS Audio in L Audio earth Audio in R AV4 Scart terminal RGB VIDEO S VIDEO Q Link AV4 Pins 15 and 20 are dependent on AV4 S VHS VIDEO switching Red in Red earth Green in Green earth Blue in Blue earth Maintenance To clean this set wipe with a soft dry cloth If the surfaces are extremely dirty use a soft c...

Страница 35: ... VHF E2 E12 VHF H1 H2 ITALY VHF A H ITALY UHF E21 E69 CATV S01 S05 CATV S1 S10 M1 M10 CATV S11 S20 U1 U10 CATV S21 S41 Hyperband PAL D K SECAM D K VHF R1 R2 VHF R3 R5 VHF R6 R12 UHF E21 E69 PAL 525 60 Playback of NTSC tape from some PAL Video recorders VCR M NTSC Playback from M NTSC Videorecorders VCR NTSC AV input only Playback from NTSC Videorecorders VCR UHF VHF Temperature 5 C 35 C Humidity 5...

Страница 36: ...tain this book plus your purchase receipt as a permanent record of your purchase to aid in identification in the event of theft or loss and for Warranty Service purposes Model Number Serial Number Printed in Japan MBS0104S1024 Matsushita Electric Industrial Co Ltd Web Site http www panasonic co jp global 2004 Matsushita Electric Industrial Co Ltd All Rights Reserved ...

Отзывы: