background image

Printed in Poland 

Matsushita Electric Industrial Co., Ltd.

Web Site : http://www.panasonic.co.jp/global/

©


2006 Matsushita Electric Industrial Co., Ltd. All Rights Reserved.

Customer’s Record

The model number and serial number of this product can be found on its rear panel. You should note this serial 
number in the space provided below and retain this book, plus your purchase receipt, as a permanent record 
of your purchase to aid in identification in the event of theft or loss, and for Warranty Service purposes.

Model Number 

TX-20LB5F/G 

Serial Number

Information on Disposal for Users of Waste Electrical & Electronic Equipment
(private households)

This symbol on the products and/or accompanying documents means that used electrical
and electronic products should not be mixed with general household waste.
For proper treatment, recovery and recycling, please take these products to designated
collection points, where they will be accepted on a free of charge basis. Alternatively, in
some countries you may be able to return your products to your local retailer upon the
purchase of an equivalent new product.
Disposing of this product correctly will help to save valuable resources and prevent any
potential negative effects on human health and the environment which could otherwise arise

from inappropriate waste handling. Please contact your local authority for further details of your nearest
designated collection point.
Penalties may be applicable for incorrect disposal of this waste, in accordance with national legislation.

For business users in the European Union

If you wish to discard electrical and electronic equipment, please contact your dealer or supplier for further
information.

Information on Disposal in other Countries outside the European Union

This symbol is only valid in the European Union.
If you wish to discard this product, please contact your local authorities or dealer and ask for the correct
method of disposal.

Содержание TX-20LB5FG

Страница 1: ... instructions before operating your set and retain them for future reference TQB0E0287U 1 N 2 3 4 5 6 7 8 9 C 0 English TX 20LB5F G Model No Operating Instructions LCD TV The image shown is for illustration purpose only ...

Страница 2: ...trol 6 Using the On Screen Displays 7 Picture menu 8 Sound menu 9 Setup menu 10 Tuning menu overview 11 Tuning menu Programme edit 12 Adding deleting a programme channel 12 Moving a programme channel 12 Tuning a programme channel 12 Renaming a programme channel 13 Locking a programme channel 13 Changing the sound system for a channel 13 Programme Guide 14 Tuning menu Auto setup 15 Tuning menu Manu...

Страница 3: ... video games computer images teletext and images displayed in 4 3 mode This type of LCD panel damage is not an operating defect and as such is not covered by the Panasonic warranty The On Off switch on this model disconnect the TV from the mains supply However remove the mains plug from the wall socket if the TV set is not used for a prolonged period of time Sleep feature If the set is not switche...

Страница 4: ...he batteries are fitted the correct way round Do not mix old batteries with new batteries Remove old exhausted batteries immediately Do not mix different battery types i e Alkaline and Manganese or use rechargeable Ni Cd Ni MH batteries View from the side 3 2 1 Pull and hold the hook then open the battery cover Insert batteries note correct polarity and R6 UM3 size Replace the cover 15 ...

Страница 5: ...er Indicator Standby Red On No Light CH12 02 78 01 41 3 Select your language and country Select your language and press the OK button Select your country and press the button to start Auto Setup For Belgium and Switzerland select the desired language Auto setup will begin your stations will be located and stored Scart cables Not supplied Country Deutschland Österreich France Italia España Portugal...

Страница 6: ...ogramme table Press again to remove the information Cursor buttons to make selections and adjustments Menu button Press to access the Picture Sound and Setup menus see page 7 10 Teletext button see page 18 20 Text F P button see page 19 N Normalize button Resets all settings to their default levels Channel up down button Sound mute On Off Direct channel access During normal TV viewing or when in t...

Страница 7: ...e OK button is used with a number of features to store settings after adjustments have been made or options have been set The EXIT button is used to exit the menu system and return to the normal viewing screen An On Screen Help box is displayed whenever a menu is displayed on the TV This Help box indicates which buttons on the remote control are used to navigate the menu shown see above for descri...

Страница 8: ... incoming picture all three modes feature automatic enhancement Contrast Brightness Colour Sharpness Increase or decrease the levels of these options according to your personal preference Tint With an NTSC signal source connected to the TV the picture hue can be adjusted to suit your taste Colour balance Allows you to set the overall colour tone of the picture Choose from Cool Normal and Warm P NR...

Страница 9: ...njoy listening at a level comfortable for them MPX Usually set to Stereo to provide the best reproduction but if reception deteriorates or if the service is not available then switch to Mono Mono M1 and M2 can also be selected if a mono signal is being transmitted Mode Sound quality can be improved when watching music scene or drama by selecting the appropriate Music or Speech mode Ambience Ambien...

Страница 10: ...function lets you change the language used for On Screen Displays Colour system During AV mode Colour system is displayed See page 11 Volume correction During AV mode Volume correction is displayed You can adjust volume level of AV mode Volume level is memorised TV OK 1 2 3 4 5 6 7 8 9 C 0 N Setup menu Press the MENU button Move to choose Setup menu Access Setup menu Move to choose menu option Adj...

Страница 11: ...n signal being received Volume correction Lets you adjust the volume level of individual stations Use this feature if the volume level varies significantly between stations Adjusting one station s volume to bring it into line with the other stations means you can avoid having to adjust the volume each time you change channels OK Main Menu Picture Menu Sound Menu Setup Menu Setup Menu Teletext FLOF ...

Страница 12: ...ramme channel Move the cursor to the programme to be moved Press the Yellow button Choose the new position for the programme channel Press the Yellow button again to confirm your decision Moving a programme channel Move to the Chan column Increase or decrease the programme channel number you will see the TV retune to the new number as you change it or use the C button for Direct Channel Access See ...

Страница 13: ...ve to the Lock column Choose between Lock On or Lock Off Press the OK button to store the new setting You can change the sound system used for a programme channel Move to the Sys column Choose the required sound system SC1 PAL B G H SECAM B G SC2 PAL I SC3 PAL D K SECAM D K F SECAM L L Press the OK button to store the new setting Programme edit Prog Chan Name Lock Sys 1 CH21 ABC Off SC1 2 CH51 XYZ...

Страница 14: ...on In this guide use the cursor buttons to move the cursor bar around the list Use the RED and GREEN button to step through the guide page by page Press the BLUE button to view the selected programme The Guide can be cleared from the screen using the EXIT STATUS or N button N EXIT Red Green Yellow Blue 1 CH44 SC1 VCR 24 25 49 50 74 75 99 Page Page OK Prog Name Chan Prog Name Chan VCR CH21 13 01 BB...

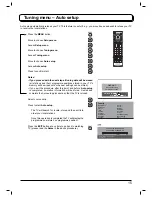
Страница 15: ...k to watching TV please read the Notes in the above procedure Notes If you proceed with the next step all tuning data will be erased all stations and their programme positions stored in your TV s memory will be wiped out so the new settings can be stored If you exit the procedure after this point and before Auto setup is completed no station information will be stored Restart and complete the Auto...

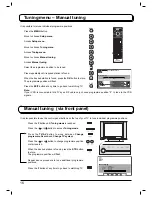
Страница 16: ...ccess Tuning mode Press the TV AV button to move between Change programme Search and Change TV system Press the or button to change programme position or start search When the desired station is found press the STR button to store The programme position will flash Repeat above procedure to tune additional programme positions Press the F button at any time to go back to watching TV Note If your VCR ...

Страница 17: ...ncluding widescreen cinema format pictures Press the ASPECT button repeatedly to move through the two aspect options 4 3 16 9 OR Press the ASPECT button Whilst the on screen selector keys are displayed use the Red or Green buttons to move in either direction through the two aspect options Auto only AV1 16 9 will display a 16 9 picture 16 9 4 3 will display a 4 3 picture at its standard 4 3 size wi...

Страница 18: ...D VCR DVD switch Use this switch to select whether controls operate the DVD equipment or VCR Play Press to playback the tape or DVD Stop Press to stop the tape or DVD Skip Fast Forward Cue VCR Press to fast forward the tape In Play mode press to view the picture rapidly forward Cue DVD Press once to skip to the next track or title Skip Rewind Review VCR Press to rewind the tape In Play mode press ...

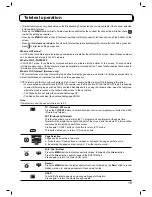
Страница 19: ...lay the contrast function with a white bar press to alter the setting as required Pressing the MENU button whilst in Teletext operation will display special function options at the bottom of the screen Pressing the Volume up down button whilst in Teletext operation will display the volume function with a green bar press to alter the setting as required What is LIST mode In LIST mode four different...

Страница 20: ...6 7 8 9 0 F P It is not possible to change the programme position when in News flash Update or Sub Coded Page Access operation Teletext operation VCR 1 2 3 4 5 6 7 8 9 0 MENU Accessing sub pages When Teletext information exceeds one page it may take some time for the automatic changing of the sub pages to reach the sub page you require As each sub page is found its number is displayed at the top of...

Страница 21: ...ture whilst waiting for more sub pages to be found The sub pages found will be displayed across the top of the screen When the page is available press the Yellow button to view the page Regardless of how many pages are found pressing the Yellow button will take you to the sub page which you requested Press the TV TEXT button to return to normal TV operation INDEX INDEX Press the INDEX button to re...

Страница 22: ...ear after a few seconds If you want to select an input when the keys are not shown press the TV AV button again and the keys will reappear Notes The volume level of the headphones can be adjusted by selecting Headphone volume from the Sound menu Additional equipment and cables shown are not supplied with this TV set Notes You can also select an AV source using the TV AV button on the top panel of ...

Страница 23: ...with TTL output 5V to this set How to connect the AV2 Input terminals How to connect the AV1 Scart terminal VCR SET TOP BOX DVD PLAYER CAMCORDER GAME CONSOLE COMPUTER RGB VCR S VIDEO VCR DVD PLAYER CAMCORDER S VIDEO CAMCORDER AV1 V L R S V Audio OUT Video OUT S Video OUT L R S VIDEO AUDIO VIDEO Connect the S VIDEO or VIDEO terminal ...

Страница 24: ...Sound mute switched on No Picture No Sound TV set to AV mode Not plugged into AC outlet Not switched on Picture Sound controls set at minimum levels Check if in Standby mode No Colour Normal Sound Colour controls set at minimum levels Poor or Distorted Picture Weak or No Sound Retune Channel s Normal Picture Weak or Distorted Sound Sound reception may have deteriorated Switch MPX setting Sound men...

Страница 25: ...l wrung soft cloth dipped in neutral cleanser diluted with water CAUTION If water or similar substances get inside the monitor via the liquid crystal panel surface a malfunction may result Maintenance Neutral detergent Scart and S video terminal information 21 19 17 15 13 11 9 7 5 3 1 20 18 16 14 12 10 8 6 4 2 Socket Earth CVBS out video CVBS earth Red in Red earth Green in Green earth Blue in Blu...

Страница 26: ...ER BAND SI S3 S1 S20 BAND IV V CH21 CH68 PAL B G D K SECAM L L NTSC AV input only Aerial Rear UHF VHF Operating Conditions Temperature 10 C 40 C Humidity 0 90 RH non condensing Connection Terminals AV1 Scart connecter 21 Pin terminal Audio Video in Audio Video out RGB in AV2 VIDEO RCA PIN Type x 1 S VIDEO Mini DIN 4 pin AUDIO L R RCA PIN Type x 2 Dimensions W H D Including TV Stand 608 mm W X 215 ...

Страница 27: ......

Страница 28: ...cts to designated collection points where they will be accepted on a free of charge basis Alternatively in some countries you may be able to return your products to your local retailer upon the purchase of an equivalent new product Disposing of this product correctly will help to save valuable resources and prevent any potential negative effects on human health and the environment which could othe...

Отзывы: