background image

6

7

Quick Start Guide

TV

VOL

CH

OPTION

ASPECT

POWER

SD CARD

EXIT

GUIDE

RETURN

INPUT

SURROUND

MULTI PIP

REC

POWER

INFO

MUTE

CH

VOL

STTL

G

R

Y

B

S VIDEO

AV4 IN

VIDEO

L/MONO-R

AV IN

AUDIO

PULL

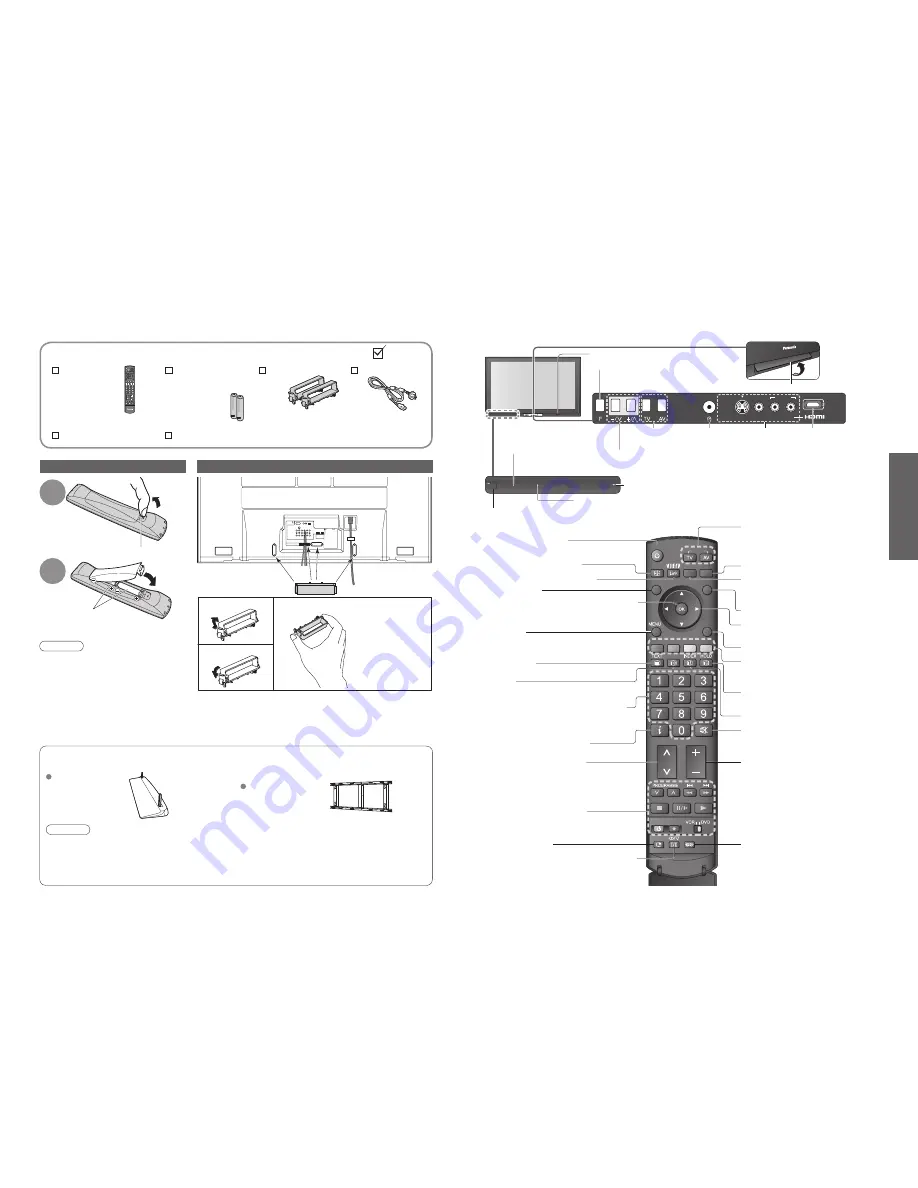
Identifying Controls

Accessories / Options

• 

Identifying Controls

• 

Accessories / Options


Remote 

Control 

Transmitter

• 

N2QAYB000122

Standard accessories

Check that you have the accessories and items shown

Cursor buttons to make selections and 

adjustments

Standby On / Off switch

(Switches TV On or Off standby)

Sound mute On / Off

Changes aspect ratio

 (p. 11)

Selects services in sequence

Teletext 

(p. 16)

OK button to con

fi

 rm selections and choices

Press after selecting programme positions to 

quickly change programme.

VCR / DVD operations 

(p. 15)

Volume

Programme Information 

(p. 11)

Teletext Index 

(p. 17)

Coloured buttons used for the 

selection, navigation and operation of 

various functions

EXIT 

(Returns to TV screen)

Surround

 (p. 20)

Programme / service change buttons (0-9) 

and Teletext page buttons. 

(p. 10 and p. 16)

When in Standby mode, switches TV On.

Access VIERA Link Menu

 (p. 33)

TV Guide

 (p. 12)

Option menu

Sets the preferred settings of the 

current programme easily 

(p. 10)

Main Menu

Press to access VIERA Link, Picture, 

Sound and Setup menus 

(p. 18)

Subtitles

Showing subtitles 

(p. 10)

Multi window

 (p. 11)

Viewing SD Card

 (p. 30)

Returns to the previous menu

Still picture

 (p. 10)

Teletext Hold

 (p. 17)

Changes the sound track, if programme has 

multiple audio tracks 

(DVB)

Stereo / Bilingual Sound Selection 

(p. 37) 

(Analogue)


Batteries for the 

Remote Control 

Transmitter 

(2)

• 

R6 (AA)


Operating Instructions


Clamper 

(2)


Mains Lead


Guarantee

Installing remote’s batteries

1

Pull 

open

Hook

2

Note the correct

polarity (+ or -)

Close

Caution

• 

Incorrect installation may cause battery 

leakage and corrosion, resulting in 

damage to the remote control.

Do not mix old and new batteries.

Do not mix different battery types (such 

as alkaline and manganese batteries).

Do not use rechargeable (Ni-Cd) 

batteries.

• 

Do not burn or breakup batteries.

Using the clamper

Caution

• 

In order to maintain the unit’s performance and safety, be absolutely sure to ask your dealer or a licenced 

contractor to secure the wall-hanging brackets.

• 

Carefully read the instructions accompanying the plasma TV stand or pedestal, and be absolutely sure to take 

steps to prevent the TV from tipping over.

• 

Handle the TV carefully during installation since subjecting it to impact or other forces may cause product damage.

• 

Do not bundle the RF cable and mains lead together (could cause 

distorted image).

• 

Fix cables with clampers as necessary.

• 

When using the optional accessory, follow the option’s assembly 

manual to 

fi

 x cables.

Changes the input mode

TV -  switches DVB (digital broadcasting) 

/ Analogue mode

 (p. 10)

AV -  changes AV input mode

 (p. 14)

Snap open

Snap shut

Remove from the TV

Push both side 

hooks and pull 

out

Rear of the TV

Pedestal

TY-ST65R2-WG

Wall-hanging bracket

(vertical)

TY-WK65PV7

Optional accessories

Remote control signal receiver

Power LED

 Standby: red

On: green

Lift door to open

Mains power 

On / Off switch

Increases or decreases the programme position by one. When a function is already displayed, 

press to increase or decrease the selected function. When in Standby mode, switches TV On.

Changes the 

input mode

Function select

 Volume / Contrast / Brightness / Colour / 

Sharpness / Tint (NTSC mode) / Bass / 

Treble / Balance / Auto Tuning (p. 24)

Headphones jack 

(p. 34)

AV4 terminals 

(p. 34)

SD CARD slot (p. 31)

C.A.T.S. (Contrast Automatic Tracking System) sensor

( senses brightness to adjust picture quality in “Auto” Mode in Picture Menu) (p. 20)

HDMI3 terminal 

(p. 34)

Содержание TQBC2206

Страница 1: ...ervice is required you should Telephone Panasonic s Customer Care Centre on 132600 or visit our website and use the Service Centre Locator for the name address of the nearest Authorised Service Centre Send or bring the product to a Panasonic Authorised Service Centre together with your proof of purchase receipt as a proof of purchase date Please note that freight and insurance to and or from your ...

Страница 2: ...iewing from SD Card Photos and Movies 30 VIERA Link HDAVI ControlTM 32 External Equipment 34 Basic Features Watching TV 10 Using TV Guide 12 Watching Videos and DVDs 14 Viewing Teletext 16 Enjoy your TV Technical Information 36 FAQs 40 Licence 42 Specifications 43 WARRANTY 44 FAQs etc Accessories Options 6 Identifying Controls 7 Basic Connection 8 Auto Tuning 9 Quick Start Guide Full HD Plasma Pan...

Страница 3: ...fire or electrical shock may result Do not expose to direct sunlight and other sources of heat Avoid exposing the TV to direct sunlight and other sources of heat To prevent fire never place any type of candle or naked flame on top or near the TV Do not allow children to handle SD card As with a small object SD card can be swallowed by young children Please remove SD card immediately after use Do n...

Страница 4: ...tion Incorrect installation may cause battery leakage and corrosion resulting in damage to the remote control Do not mix old and new batteries Do not mix different battery types such as alkaline and manganese batteries Do not use rechargeable Ni Cd batteries Do not burn or breakup batteries Using the clamper Caution In order to maintain the unit s performance and safety be absolutely sure to ask y...

Страница 5: ...y be able to assist you in obtaining the correct Aerial system for your particular area and the accessories required Any matters regarding Aerial installation upgrading of existing systems or accessories required and the costs incurred are the responsibility of you the Customer Example 1 Connecting aerial Example 2 Connecting DVD Recorder VCR TV only Plug the TV into mains socket and switch On Tak...

Страница 6: ...is function is active Display hide subtitles if available Display subtitles Watch TV DVD etc in multi window DVD Exit PandP Swap AV1 AV1 Exit PandP Swap DVD AV1 DVD Exit PinP Swap MULTIPIP B Y View in multi window p 38 Main screen Colour bar Sub screen To exit multi window return to the single screen view with main screen MULTIPIP To change the layout images first show the colour bar INFO To chang...

Страница 7: ...cted favourites list B To view a programme list of the selected type DVB mode Y Using TV Guide select favourite list TV Guide Electronic Programme Guide EPG provides an on screen listing of programmes currently broadcast and future broadcasts over the next seven days depending on the broadcaster Analogue broadcasts will be listed after DVB broadcasts D means DVB channel and A means Analogue channe...

Страница 8: ... mode Turn on Play Playback videocassette DVD Stop Stop the operations Rewind Skip Search VCR Rewind view the picture rapidly in reverse DVD Skip to the previous track or title Press and hold to search backward Fast forward Skip Search VCR Fast forward view the picture rapidly forward DVD Skip to the next track or title Press and hold to search forward Pause Pause Restart DVD Press and hold to pla...

Страница 9: ...ore frequently viewed pages Store frequently viewed pages in the colour bar List mode only press and hold As page is displayed The number changes to white Corresponding colour button To change stored pages press and hold Enter new page number Colour button you want to change View sub page Sub pages The number of sub pages varies depending on the broadcasters up to 79 pages It may take some time fo...

Страница 10: ...o change menu pages up down Overview VIERA Link Control Speaker Selection VIERA Link Menu Home Cinema Recorder p 33 Main Menu VIERA Link Picture Sound Setup The menu of the accessed equipment 1 2 Viewing Mode Auto Contrast Brightness Colour Sharpness Tint Colour Balance Warm Colour Management Off P NR Off Picture Menu 2 2 3D COMB Off Reset Picture Defaults Set MPEG NR Off Picture Menu p 20 1 2 Tun...

Страница 11: ...io level of MPEG as the initial setting 0dB to 12dB in 2dB reductions DVB mode only HDMI1 3 Input Select to fit the input signal Auto Digital Analogue p 29 Auto Automatic detection of digital or analogue sound source Digital HDMI cable connection Analogue HDMI DVI adapter cable connection HDMI input mode only HDMI2 terminal is for digital signal only No setting for HDMI2 available Reset Sound Defa...

Страница 12: ...ces DVB Favourites Edit G To add all services to the list Y Create your favourite service List from various broadcasters up to 4 Fav List1 Fav List2 Fav List3 Fav List4 The list is displayed in information banner p 11 TV Guide p 12 and then easily accessed select To display another List B A service is added Select a service and add it to the list To edit List Select the field of List to edit and T...

Страница 13: ...is will take about 3 mins Analogue Tuning 0 75 Digital DVB Tuning 6 69 2 RF Ch Service Name Type Quality ABC TV Sydney DVB 10 3 SBS DIGITAL 1 DVB 10 4 FTV guide DVB 10 7 7 Digital DVB 10 9 NINE DIGITAL DVB 10 CH 29 Analogue CH 33 Analogue EXIT RETURN Start Auto Tuning Analogue DVB tuning data will be erased Auto Tuning Access Auto Tuning Settings are made automatically Automatically set the DVB an...

Страница 14: ...estore Settings Resets the TV to its original condition i e no channels tuned in All settings channels picture sound quality etc are reset 1 EXIT RETURN Confirm Analogue DVB tuning data will be erased Are you sure Are you sure Shipping Condition set Input Labels Restore Settings Input Labels 2 3 4 Select Setup Select Input Labels Display the menu Select a input terminal and set To return to TV EXI...

Страница 15: ...ayed on HDMI compliant equipment 2 Enquire at your local digital equipment retailer shop HDMI high definition multimedia interface allows you to enjoy high definition digital images and high quality sound by connecting the TV and the equipment HDMI compatible equipment 1 with an HDMI or DVI output terminal such as a set top box or a DVD player can be connected to the HDMI terminal using an HDMI co...

Страница 16: ... 1 17 23 10 2006 1600 x 1200 100 0004 100 0003 100 0001 100 0008 100 0007 100 0006 100 0005 100 0012 100 0011 100 0010 100 0009 Photo View Mode Select View EXIT Select RETURN Reading Slide show Thumbnail screen Error display images that could not be loaded etc Selected photo Selected photo information is displayed view select Rewind Pause Playback Playback Fast forward Stop To previous photo Rotat...

Страница 17: ...then switch the TV on Select the input mode to HDMI1 HDMI2 or HDMI3 p 14 and make sure that an image is displayed correctly Main Menu VIERA Link Picture Sound Setup Speaker control You can control the theatre speaker with TV s remote control This function is available when Panasonic Amplifier or Player theatre is connected If you cannot access the menu check the settings and the equipment p 32 TV ...

Страница 18: ...hield TMDS Data0 TMDS Data0 TMDS Data1 Shield TMDS Data2 TMDS Data2 5V Power SDA Reserved in cable but N C on device TMDS Clock TMDS Clock TMDS Data0 Shield TMDS Data1 TMDS Data1 TMDS Data2 Shield 19 17 15 13 11 9 7 5 3 1 18 16 14 12 10 8 6 4 2 HDMI terminal Connect the S VIDEO or VIDEO terminal when using AV1 AV4 IN terminals Connect the COMPONENT or VIDEO terminal when using AV2 AV3 IN terminals...

Страница 19: ...quipment that has HDAVI Control 2 function to the TV with HDMI cable the sound from DIGITAL AUDIO OUT terminal can be output as multi channel surround Easy playback is also available by using the remote control for Amplifier or Player theatre Read the manuals of the equipment If you connect the same kind of equipment at once for example one DIGA to HDMI1 another DIGA to HDMI2 VIERA Link is availab...

Страница 20: ...g PC set the colour display quality of PC to the highest position For details of the applicable PC signals see below Max display resolution D sub 15 pin connector signal Aspect 4 3 1 440 1 080 pixels 16 9 1 920 1 080 pixels Data format for Card browsing Note Format the card with the recording equipment The picture may not appear correctly on this TV depending on the recording equipment used Displa...

Страница 21: ... or audio distortion Use high quality quad shielded coaxial cable fly lead between TV and antenna wall socket to minimise impulse noise pickup If problem persists consult your local TV aerial installer When No Signal message is displayed check TV aerial connection The received signal may be too weak to allow the TV to reliably lock to the desired No Signal channel to generate a stable picture Repe...

Страница 22: ...ontrol 2 function PC Input HIGH DENSITY D SUB 15PIN R G B 0 7 V p p 75 Ω HD VD TTL Level 2 0 5 0 V p p high impedance Audio Input RCA PIN Type 2 0 5 V rms DIGITAL AUDIO OUT PCM Dolby Digital Fiber optic Card slot SD CARD slot 1 Dimensions W H D 1 609 mm 998 mm 142 mm Mass 82 0 k Net 42 43 Licence Trademark Credits DVB is a trademark of the DVB Digital Video Broadcasting Project 1991 to 1996 VGA is...

Отзывы: