background image

24

First-time Operation

E

4

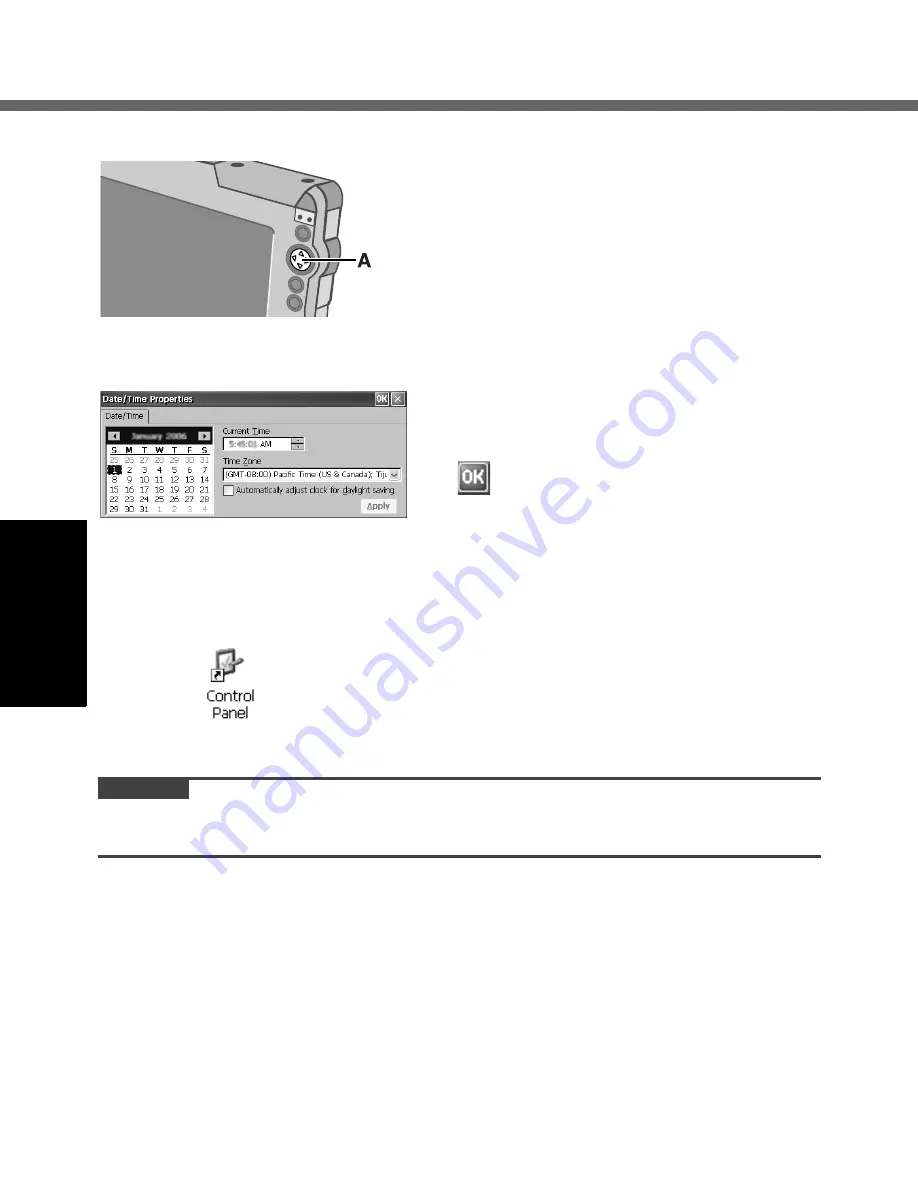
Calibrate the touchscreen.

Touch the “+” mark on the calibration screen with 
the stylus (included) for about one second.
After the calibration procedure is executed (e.g., 
after the twelve “+” marks are touched), the pro-
cedure ends when the center of the cursor key 
(A) is pressed.

5

Make the date and time setting.

The [Date/Time Properties] screen will 
appear automatically.
Set the current time and time zone, and then 

tap .

z

You can use the software keyboard when you set the time. 
For information about how to use the Software Keyboard: 

Î

page 37

„

If the [Date/Time Properties] screen does not appear automatically

Double-tap 

on the desktop, and double-tap [Date/Time].

The [Date/Time Properties] screen will appear.

CAUTION

z

To take effect this setting when you start the wireless display next time, you 
have to perform Flash Backup to save this setting. (

Î

page 31)

Содержание Toughbook CF08

Страница 1: ...fully before using this product and save this manual for future use E D F Wireless Display Model No CF 08 Read Me First 2 ENGLISH OPERATING INSTRUCTIONS Contents 13 DEUTSCH BEDIENUNGSANLEITUNG Inhalt 61 FRANÇAIS INSTRUCTIONS D UTILISATION Sommaire 110 ...

Страница 2: ...ver is connected z Consult the Panasonic Service Cen ter or an experienced radio TV tech nician for help Warning To assure continued compliance use only shielded interface cables when connecting to a wireless display or peripheral Also any changes or modi fications not expressly approved by the party responsible for compliance could void the user s authority to operate this equipment This device c...

Страница 3: ...le Pour L utilisation Dans Un Véhicule Motorisé Avertissement L ordinateur bloc notes peut être installé dans un véhicule motorisé et dans le champ de vision du conducteur uniquement en tant que dis positif d aide aux fonctions du véhicule comme par exemple pour fournir des informations sur le véhicule comme dis positif de contrôle de système pour l observation à l arrière ou sur les côtés du véhi...

Страница 4: ...is approved by ASTA or BSI to BS 1362 Check for the ASTA mark or the BSI mark on the body of the fuse If the plug contains a removable fuse cover you must ensure that it is refitted when the fuse is replaced If you lose the fuse cover the plug must not be used until a replacement cover is obtained A replacement fuse cover can be pur chased from your local Panasonic Dealer IF THE FITTED MOULDED PLU...

Страница 5: ...gned for connection to an IT power system An IT system is a system having no direct connections between live parts and Earth the exposed conducive parts of the electrical installation are earthed An IT system is not permit ted where the wireless display is directly connected to public supply systems in the U K z Disconnect the mains plug from the supply socket when the wireless dis play is not in ...

Страница 6: ...ion à l extérieur n est pas autorisée L utilisation de Bluetooth est interdite pour les communications extérieures N utilisez pas la technologie Bluetooth à l extérieur Utilisation dans un véhicule automobile Danger Vérifiez les recommandations de la Commission Européenne suivantes pour une installation et une utilisation adéquates de ce produit dans un véhicule automobile Recommandation de la Com...

Страница 7: ...is product prior to turning on the product Regulatory Information We are not responsible for any radio or television interference caused by unautho rized modification of this product The correction of interference caused by such unauthorized modification will be the responsibility of the user We and its autho rized resellers or distributors are not liable for damage or violation of government regu...

Страница 8: ...tem only in designated national waste elec tronic collection schemes and not in the ordinary dust bin For business users in the European Union If you wish to discard electrical and electronic equipment please contact your dealer or supplier for further information Information on Disposal in other Countries outside the European Union This symbol is only valid in the European Union If you wish to di...

Страница 9: ...ienste vermutet oder erkannt wurde Sollten Sie nicht sicher sein welche Richtlinien und Vorschriften für den Gebrauch von drahtlosen Geräten innerhalb einer bestimmten Organisation oder Umgebung z B in Flughäfen gelten empfehlen wir Ihnen sich vor dem Einschalten des Gerätes entsprechend zu informieren und gegebenenfalls eine Genehmigung einzuholen Regulierungsinformation Wir sind in keiner Weise ...

Страница 10: ...ische Produkte am Ende ihrer Lebensdauer vom Hausmüll getrennt entsorgt werden müssen Bringen Sie bitte diese Produkte für die Behandlung Rohstoffrückgewinnung und Recycling zu den eingerichteten kommunalen Sammelstellen bzw Wertstoffsammelhöfen die diese Geräte kostenlos entgegennehmen Die ordnungsgemäße Entsorgung dieses Produkts dient dem Umweltschutz und verhindert mögliche schädliche Auswirku...

Страница 11: ...es d interférence sur d autres appa reils ou services sont perçus ou identifiables comme dangereux Si vous n êtes pas sûr de la réglementation applicable à l utilisation d appareils sans fil dans une organisation ou un environnement spécifiques par exemple dans un aéroport nous vous invitons à demander l autorisation d utiliser ce pro duit avant sa mise en marche Informations concernant la régleme...

Страница 12: ...les points de collecte désignés où ils peuvent être déposés gratuitement Dans certains pays il est possible de renvoyer les produits au revendeur local en cas d achat d un produit équivalent En éliminant correctement ce produit vous contribuerez à la conservation des res sources vitales et à la prévention des éventuels effets négatifs sur l environnement et la santé humaine qui pourraient survenir...

Страница 13: ... Panel 27 Backing Up Deleting Copying Data 31 ROM Update 33 Buttons 34 Quick Menu 35 Software Keyboard 37 Signature Capture 42 Security Measures 43 SD Memory Card 47 Battery Power 48 Connecting to a Computer Server 50 Bluetooth 54 For Effective Use 55 LIMITED USE LICENSE AGREEMENT 56 Troubleshooting 58 Specifications 59 ...

Страница 14: ... Disclaimer Wireless display specifications and manuals are subject to change without notice Matsushita Electric Industrial Co Ltd assumes no liability for damage incurred directly or indirectly from errors omissions or discrepancies between the wireless display and the manuals Trademarks Microsoft Windows and the Windows logo are registered trademarks of Microsoft Corporation of the United States...

Страница 15: ...t Shock Avoid subjecting the wire less display to severe vibrations or impact Do not place the wireless display inside a car trunk Avoid Radio Fre quency Interference Do not place the wireless display near a television or radio receiver Avoiding Low tempera ture Burns Avoid more than casual contact with any heat producing area of the wireless display AC adaptor and any option or accessory you use ...

Страница 16: ... clips or other small objects into the wireless display Do Not Disassemble the Wireless Display Do not attempt to disas semble your wireless dis play Avoid Excessive Force on the Display Do not apply excessive downward force on the display especially when plugs and or cables are connected to the rear of the wireless display Battery Pack Avoid Heat Do not throw the battery pack into a fire or expos...

Страница 17: ...ur eyes with clear water and see a doctor for medical treatment as soon as possi ble Avoid Extreme Heat Cold and Direct Sun light Do not charge use or leave the battery pack for extended periods where it will be exposed to direct sunlight in a hot place in a car on a sunny day for example or in a cold place Do Not Use With Any Other Equipment The battery pack is rechargeable and was intended for t...

Страница 18: ...If the temperature is low the operat ing time is shortened Only use the equipment within the allowable tem perature range z The battery pack is a consumable item If the amount of time the equip ment can be run by using a particular battery pack becomes dramatically shorter and repeated recharging does not restore its performance the battery pack should be replaced with a new one z When transportin...

Страница 19: ...s LAN antenna C Bluetooth antenna D Power status E Power button F Battery status G DC IN jack H LAN port I Cursor key J Keyboard button K USB port L USER button M SD Card slot N SD memory card status CAUTION z During a thunderstorm disconnect the AC plug ...

Страница 20: ...s display does not fall by mistake and firmly hold the wireless display when using it C Battery pack D Microphone jack You can use a stereo condenser microphone Connecting another type of microphone may interrupt audio input or may cause a mal function E Headphone jack You can connect headphones or amplified speakers When they are connected audio from the internal speakers is not heard F Stylus pe...

Страница 21: ...ibed accessories contact Panasonic Technical Support B Read the LIMITED USE LICENSE AGREEMENT before breaking the seal on the wireless display s packaging Î page 56 1 Insert the battery pack AC adaptor 1 Model No CF AA1623AM AC Cord 1 Battery Pack 1 Model No CF VZSU44U Stylus 1 Operating Instructions This book 1 ...

Страница 22: ... step C B Open the battery cover as in step D C Pull the tab of the battery pack and remove it from the wireless display CAUTION z Be careful not to catch the tab when you close the battery cover z Make sure the cover is securely attached Otherwise the battery pack may fall when you carry the wireless display z Do not touch the terminals of the battery pack and the wireless display Doing so can ma...

Страница 23: ...r the wireless display When the DC plug is not connected to the wireless display disconnect the AC cord from your AC wall outlet Problems such as sudden voltage drops may arise during periods of thunder and lightning Since this could adversely affect your wireless display an unin terruptible power source UPS is highly recommended unless running from the battery pack alone 3 Turn on the wireless di...

Страница 24: ...ate Time Properties screen will appear automatically Set the current time and time zone and then tap z You can use the software keyboard when you set the time For information about how to use the Software Keyboard Î page 37 If the Date Time Properties screen does not appear automatically Double tap on the desktop and double tap Date Time The Date Time Properties screen will appear CAUTION z To tak...

Страница 25: ... item on the screen by holding the sty lus down over the item and then moving the stylus This operation is called a drag Tapping and Holding You can tap and hold the stylus on an item to see a list of actions available for that item On the pop up menu that appears tap the action you want to perform Handling the Stylus z Clean the stylus tip and screen prior to operation Foreign particles can scrat...

Страница 26: ...at can leave marks e g pencils and ball point pens z Do not operate the wireless display when such things as dust are on the LCD Do not allow substances such as oil to contact the LCD The cursor may not work properly in such cases Aligning the touchscreen Align the touchscreen if the cursor does not correctly move to the position where the stylus touches the touchscreen of the wireless display A D...

Страница 27: ...make the keyboard sound screen mouse and other devices easier to use Backlight Allows you to change the brightness of the screen s backlight Move the slider to the left to make the backlight darker and to the right to make it brighter Bluetooth Device Properties Controls Bluetooth connections Î page 54 Buttons Assigns applications to be launched when the keyboard button and USER button are pressed...

Страница 28: ... Reporting Reports software errors to Microsoft Flash Backup Î page 31 Flash Copy Î page 31 Flash Delete Î page 31 Input Panel Sets Input Panel properties for the soft ware keyboard etc Internet Options Sets Internet Explorer properties Keyboard Sets the key repeat intervals when a USB keyboard is connected Mouse Sets the double click interval when an external mouse is connected ...

Страница 29: ...con nected to the wireless display Quick Menu Sets the applications allocated to Quick Menu Î page 35 Remove Programs Allows you to uninstall programs that were installed earlier ROM Update Î page 33 Rotate Allows you to rotate the screen Using 0 degrees landscape as the standard you can rotate the screen 90 degrees 180 degrees or 270 degrees either clockwise or counterclockwise To take effect the...

Страница 30: ...copyrights for internal software and information unique to this wireless dis play Terminal Service Client Licenses Displays Terminal Service Client Licenses that have been acquired Volume Sounds Adjusts volume sets system sounds and adjusts microphone gain Wireless LAN Controls Wireless LAN connections ...

Страница 31: ...Delete B Connect your wireless display to a power outlet Î page 23 C Tap Delete Backup When the confirmation message appears tap Yes Deleting data will start D When the message Backup data has been deleted appears tap CAUTION z When you turn on the wireless display for the first time after deleting data cali brate the touchscreen Î page 24 To copy data from CF 08 RAM to the media SD Memory Card et...

Страница 32: ...age Copy successful appears tap How to update data Î page 33 To return the wireless display to the default condition Perform the following procedure z When turning on the wireless display turn it off A Connect your wireless display to a power outlet Î page 23 B Turn on the wireless display Î page 23 C Press and hold the keyboard button and USER button Î page 34 until the message Reset to device to...

Страница 33: ...your wireless display to a power outlet Î page 23 C Insert the media with pkg file copied and then tap Brouse D Select the file and tap E Tap Next F Tap Update Start G When the confirmation message appears tap Yes ROM Update will start When ROM Update terminates the wireless display will restart and the Date Time Properties screen will appear automatically Î page 24 ...

Страница 34: ...esktop and then double tap Buttons B When the Buttons screen appears tap and select the function name in accordance with the button positions and short long push that you want to set C Tap 1 To execute the right click operation A Tap Buttons in Control Panel and set Right Click according to the position and push length long short for the button that you want to use B Press the button that you set ...

Страница 35: ...t and change sound volumes Volume Sounds in Control Panel Î page 30 D Set and change display backlight brightness Backlight in Control Panel Î page 27 E Start up frequently used applica tions and functions At the time of purchase Right Click 1 Input Panel Selector Control Panel and Stylus Calibla tion are set in Quick Menu You can change these settings using the following procedure A Double tap on...

Страница 36: ...u Application Assignment screen B Launch Quick Menu and tap Right Click You can use the right click once Each time after this before using the right click once execute operation B above You can also execute the right click operation by pressing the keyboard button or USER button Î page 34 ...

Страница 37: ...ethod use any of the following methods z Press and hold the keyboard button or USER button Î page 34 or tap Input Panel Selector in the Quick Menu screen Î page 35 and select the input method that you want to use on the Input Panel Selector screen z Double tap Input Panel in Control Panel select Key board or Transcriber in Current Input Method and tap If you select Keyboard tap Options to change t...

Страница 38: ...38 Software Keyboard E ...

Страница 39: ...f the check mark is added you will hear a sound when the Transcriber starts up The volume of this sound will be the same as the volume set in Quick Menu Î page 35 or in Volume Sounds Î page 30 A Option settings Displays the Transcriber Options screen of Transcriber option set tings Î below B Change recognition mode Running hand block letter charac ter Alphabet symbol numeric C Display symbol input...

Страница 40: ...bbreviations e g Input xyz in handwriting J Displays I am a student z Function Allows you to display dates names or other information by inputting handwrit ten abbreviations e g Input ABC in handwriting J Displays company name z Run program Allows you to start up a program by inputting handwritten characters e g Input abc in handwriting J Starts up Control Panel Functions can be registered using t...

Страница 41: ...put ABC in handwriting on the screen ABC will be displayed in the Shorthand box B Tap in the Function box and a list of information will appear select one of these and tap Finish The screen will automatically return to step 2 To register shorthand in Run program A Input abc in handwriting on the screen abc will be displayed in the Shorthand box B Tap in the Run program box and a list of bootable p...

Страница 42: ...an set the wireless display to launch Signature Capture using the Quick Menu Î page 35 keyboard button or USER button Î page 34 You can set the thickness of the writing or the size of the bitmap data to be saved by tapping and then tapping Setting Tap Capture to temporarily save the handwritten image on the server computer clipboard To view the handwritten image while connected to the server A Tap...

Страница 43: ...isor or User tab D Enter your password in New Password z When the password has been set you need to enter your password in Current Password z To disable the password leave the input field empty E Enter your password again in Confirm Password and tap F At the confirmation message tap Yes When the message that recommends executing Flash Backup appears tap CAUTION z Do not forget your password If you...

Страница 44: ...d Auto Launch When you select an application that application will automatically start up when the wireless display is started For example if the connection settings for Remote Desktop Connection or ICA Client have been made in advance Î page 50 you can set these applications to start up automatically Wait Network Connec tion An application set in Auto Launch will launch after the network connecti...

Страница 45: ...settings after logging on Double tap on the desktop Control Panel When the User is using the wireless display items displayed in the Control Panel can be selected using the following procedure A Tap Permission to display the Permission screen B Add the check mark for only the items to be displayed in the Control Panel screen and tap Allow Change Auto Launch Allows users to change Auto Launch setti...

Страница 46: ...the User has logged on with out entering a password How to start up the Security Setting screen A Double tap on the desktop B Double tap Security User The following screen will be displayed User tab z If a User Password has not been set in the User tab of Security Settings Supervisor Î page 44 a password cannot be changed deleted or newly created here Item After the check mark is added Auto Launch...

Страница 47: ...emory card e g use as a storage unit on which files can be written Inserting Removing a Card 1 Open the SD Memory Card slot cover 2 Insert Remove a Card To insert the card Insert the SD Memory Card with the label side facing up and with the cut corner in front To remove the card A Press the card so it comes out of the slot B Draw it straight out 3 Close the SD card slot cover To insert the card To...

Страница 48: ...35 Battery Indicator Battery indicator Battery status Not lit The battery pack is not inserted or not being charged Pulsing orange Charging is in progress Green The battery is fully charged Red The remaining battery is approximately 9 or less Blinking red The battery pack or the charging circuit is not operating normally Blinking orange The battery cannot be charged temporarily due to the fol lowi...

Страница 49: ... zDouble tap on the desktop dou ble tap Power and tap Schemes tab Power consumption can also be mini mized with detailed settings for exam ple by reducing the time setting for Turn off LCD The battery pack is a consumable item so the replacement CF VZSU44 will be necessary If the battery operation time becomes noticeably short replace with a new battery How to remove insert the battery pack Î page...

Страница 50: ...e IP Address Subnet Mask and Default Gateway to match with the computer server connected D Tap 1 1 Connections When connecting to Microsoft Windows XP Professional Follow the instructions below to connect using Remote Desktop Connection z After completing the computer settings IP address subnet mask etc per form wireless display settings 1 Connect the necessary devices and turn the power on for th...

Страница 51: ... screen by double tapping the rdp file 5 Tap Connect The server desktop screen will be displayed Connecting multiple clients When connecting to a Microsoft Windows 2000 Server Microsoft Windows 2003 Server For information on how to connect using Remote Desktop Connection refer to step 1 5 of 1 1 Connections Î page 50 When connecting to a server computer running Citrix MetaFrame Pre sentation Serve...

Страница 52: ...Save The name entered above will be displayed in the Main screen of the ICA Cli ent 6 Select the name entered in step 5 and tap Edit 7 Tap Edit Logon Information enter Username and Pass word and Domain if required and tap Save 8 Tap Main at the top of the screen 9 Select the name entered in step 5 and tap Edit 10 Tap Edit Title add the check mark for Create a Desktop shortcut and tap Save then tap...

Страница 53: ...53 E z Only when using Remote Desktop Connection Tap then tap If you tap start Shut Down the power for the server itself will be turned off ...

Страница 54: ... for Bluetooth B Set the passkey used when connecting to the opposing Bluetooth device C Set the Bluetooth power status when the CF 08 starts up D Set whether the opposing Bluetooth device is able to detect the CF 08 when the Bluetooth device is detected To set operations in Serial Port Profile Tap Serial Port tab To set operations in DialUp Network Profile Tap DialUp Network tab To show informati...

Страница 55: ... with gentle force Then wipe with dry soft cloth used for cleaning glasses Areas excluding the LCD Wipe these areas with a soft cloth after applying water or detergent diluted with water to the soft cloth and firmly wringing out excess water CAUTION z Do not use benzene thinner or rubbing alcohol Doing so may adversely affect the surface e g discoloration In addition do not use commercially availa...

Страница 56: ...epts designs and ideas represented by or incorporated in the Programs and related documentation all of which title ownership and rights shall remain with MEI or its suppliers B You may use the Programs only on the single Product which was accompanied by the Programs C You and your employees and agents are required to protect the confidentiality of the Programs You may not distribute or otherwise m...

Страница 57: ...se will also terminate effective immediately upon occurrence of the conditions thereof set forth elsewhere in this Agreement or if you fail to comply with any term or condition contained herein Upon any such ter mination you agree to destroy at your expense the Programs and related docu mentation together with all copies thereof in any form YOU ACKNOWLEDGE THAT YOU HAVE READ THIS AGREEMENT UNDER S...

Страница 58: ... from the condition where the power of the display is off for energy conser vation purposes touch the screen An afterimage appears i e green red and blue dots remain on the display or there are dots not displaying the correct colors z High precision and advanced technologies are neces sary in the production of color liquid crystal displays color LCDs Therefore if 0 002 or less of the picture eleme...

Страница 59: ...hscreen Anti Reflection Stylus included touch capable Power Supply AC adaptor or Battery pack AC Adaptor 1 Input 100 V to 240 V AC 50 Hz 60 Hz Output 16 0 V DC 2 5 A Battery Pack Li ion 7 4 V 5 2 Ah Operating Time 2 Approx 4 hours to 10 hours Charging Time 2 Approx 4 hours Power Consumption 3 Approx 9 W 4 Approx 40 W Maximum when recharging in the ON state Physical Dimensions W H D 275 mm 214 mm 3...

Страница 60: ...power sources up to 240 V AC adaptor The wireless display is supplied with a 125 V AC compatible AC cord 2 Varies depending on the usage conditions 3 Approx 0 9 W when the battery pack is fully charged or not being charged and the wireless display is OFF 4 Rated power consumption ...

Страница 61: ... 2006 Matsushita Electric Industrial Co Ltd All Rights Reserved Printed in Japan FJ0306 0 DFQX5591ZA ...

Отзывы: