background image

F

76

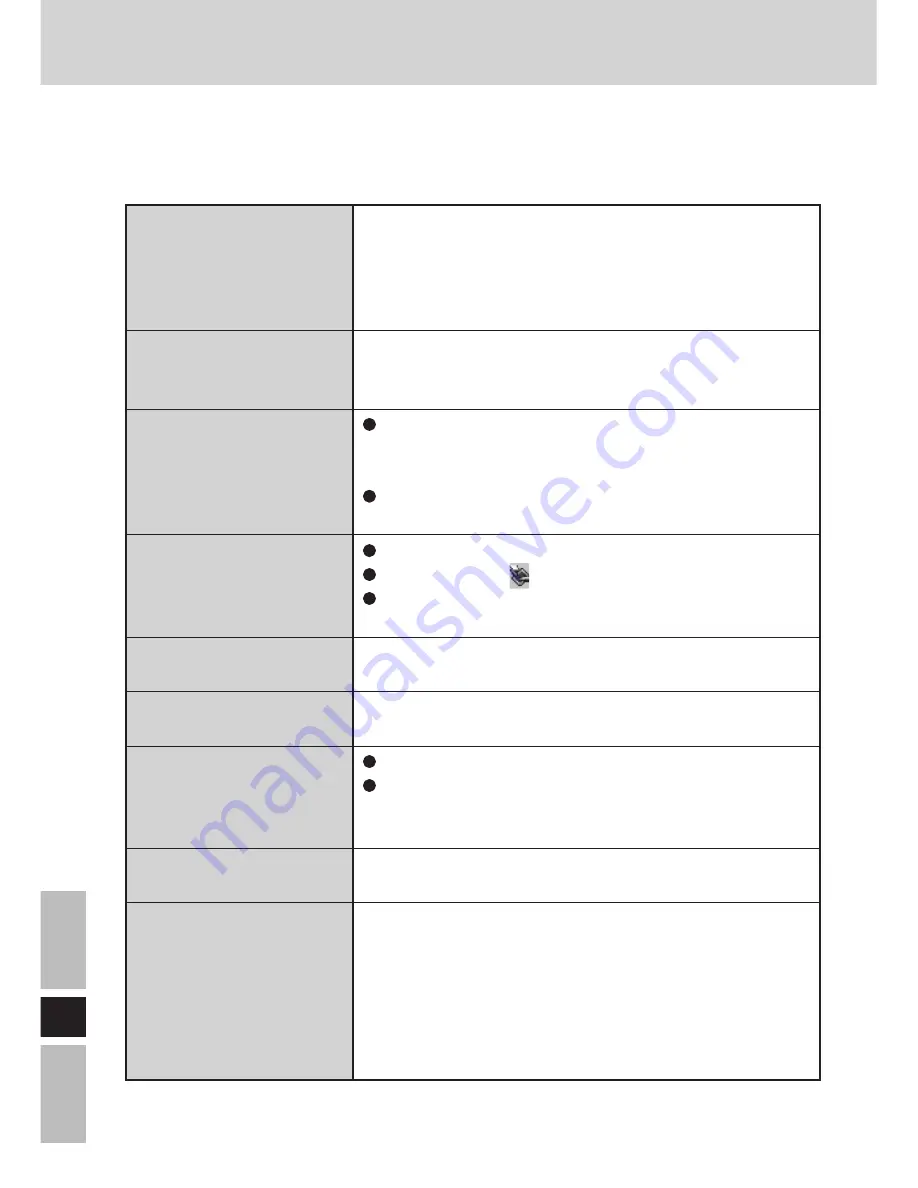
Aucun affichage après
la mise sous tension

U n e   i m a g e   l a t e n t e
apparaît

“Connection timeout”
est affiché

“No server found”  est
affiché

“Authentication failed”
est affiché
“Too many clients”  est
affiché
“Illegal data received”
o u   “ I n i t i a l   i m a g e
receiving timeout” est
affiché
Le clavier logiciel a été
fermé
U n e   i m a g e   l a t e n t e
apparaît (c.-à-d., des
points verts, rouges et
b l e u s   r e s t e n t   s u r
l’affichage) ou certains
points n’affichent pas les
bonnes couleurs

Dépannage

L’ordinateur ou l’écran déporté sans fil a-t-il été réglé en
mode économie d’énergie ?
Pour utiliser l’ordinateur depuis l’état d’affichage
désactivé (à des fins de conservation d’énergie), touchez
l’écran.
Si une image est affichée pendant une période de temps
prolongée, il est possible qu’une image latente apparaisse.
Activez l’écran de veille.

Confirmez l’adresse IP, le masque de sous-réseau, le
type de réseau et les paramètres SSID de l’ordinateur
et de l’écran déporté sans fil.
Confirmez le fonctionnement du LAN sans fil de
l’ordinateur.
Placez l’écran déporté sans fil près de l’ordinateur.
Confirmez que   se trouve sur la barre de tâches.
Confirmez l’adresse IP de l’ordinateur qui a été réglée
sur l’écran déporté sans fil.

Confirmez le mot de passe pour l’ordinateur et l’écran
déporté sans fil.
Déconnectez l’écran déporté sans fil pendant le
fonctionnement et rétablissez la connexion.

Confirmez si le réseau fonctionne correctement ou non.
Redémarrez l’ordinateur.

Sélectionnez [Démarrer] - [Programmes] - [Panasonic] -
[Software Keyboard].
La production d’affichages à cristaux liquides en couleurs
fait appel à des technologies évoluées de haute précision.
En conséquence, si 0,002% ou moins des éléments
d’image soit ne s’allument pas, soit restent constamment
allumés, (autrement dit, si plus de 99,998% des éléments
fonctionnent correctement), le fonctionnement est jugé
normal.

En cas de problème, référez-vous à cette page. Si le problème semble lié à une application
logicielle, lisez le manuel se rapportant au logiciel. Si vous n’arrivez toujours pas à remédier
au problème, contactez le Support technique Panasonic.

Содержание Toughbook CF-VDW07

Страница 1: ...oftware Keyboard 21 Battery Power 23 Setting the Wireless Display 27 Capturing the Screen 31 Troubleshooting 32 Specifications 33 OPERATING INSTRUCTIONS E DEUTSCH ENGLISH MODE D EMPLOI FRANÇAIS Noms et fonctions des pièces 58 Mise en marche Arrêt 60 Ecran tactile 62 Clavier logiciel 65 Alimentation par batterie 67 Configuration de l écran déporté sans fil 71 Capture de l écran 75 Dépannage 76 Spéc...

Страница 2: ... restricted by the propri etor of the building or responsible representatives of the organization These situations may for example include Using this product on board of airplanes or In any other environment where the risk of interference to other devices or services is perceived or identified as harmful If you are uncertain of the policy that applies on the use of wireless devices in a specific o...

Страница 3: ...den verantwortlichen Stellvertreter einer Organisation eingeschränkt werden Dies gilt möglicherweise in den folgenden Situationen Bei Verwendung dieses Produktes an Bord von Flugzeugen oder In anderen Umgebungen in denen der Gebrauch des Gerätes das Risiko von Funkstörungen anderer Geräte in sich birgt oder in denen der Gebrauch des Gerätes störend wirken kann Falls Sie nicht sicher sind welche Re...

Страница 4: ...eil peut être restreinte par le propriétaire du bâtiment ou les responsables de l organisation Par exemple ces situations peuvent inclure L utilisation de cet appareil à bord d un avion ou Dans un autre milieu où le risque d interférence avec d autres dispositifs ou services est perçu ou identifié comme nuisible Si vous n êtes pas sûr de la politique qui s applique à l utilisation de dispositifs s...

Страница 5: ...d by the party responsible for compliance could void the user s authority to operate this equipment For U S A For Canada Industry Canada This product complies with RSS210 of Industry Canada Operation is subject to the following two conditions 1 this device may not cause interference and 2 this device must accept any interference including interference that may cause undes ired operation of the dev...

Страница 6: ...th the following code Blue Neutral Brown Live As the colours of the wires in the mains lead of this apparatus may not correspond with the coloured markings identifying the terminals in your plug proceed as follows The wire which is coloured Blue must be connected to the terminal which is marked with the letter N or coloured BLACK The wire which is coloured Brown must be connected to the terminal w...

Страница 7: ...rminals on the battery pack The battery pack may no longer func tion properly if the contacts are dirty or damaged Do not expose the battery pack to water or allow it to become wet If the battery pack will not be used for a long period of time a month or more charge or discharge use the battery pack until the remaining battery level becomes 30 to 40 and store it in a cool dry place This computer p...

Страница 8: ...s Recharging takes longer than usual when the temperature is 10 C 50 F or less If the temperature is low the operating time is shortened Only use the computer within the allowable temperature range The battery pack is a consumable item If the amount of time the computer can be run off a particular battery pack becomes dramatically shorter and repeated recharg ing do not restore its performance the...

Страница 9: ...den Sollte ein Leck an der Batterie auftreten und Flüssigkeit gerät in Ihre Augen die Augen nicht reiben Die Augen sofort mit sauberem Wasser ausspülen und umgehend ärztliche Hilfe ersuchen In Bezug auf Folgendes ist mit Vorsicht vorzugehen um die Möglichkeit einer Überhitzung des Gerätes eines Brandes bzw einer Beschädigung des Gerätes zu vermeiden Hitze vermeiden Batteriepackungen nicht in ein o...

Страница 10: ...beträgt Wenn die Temperatur niedrig ist wird die Betriebszeit gekürzt Den Computer nur innerhalb des erlaubten Temperaturbereiches benutzen Die Batteriepackung ist ein Verbrauchsartikel Wenn die Zeitspanne innerhalb der der Computer anhand einer spezifischen Batteriepackung betrieben werden kann besonders kurz wird und wiederholtes Aufladen die Leistung nicht verbessert dann muß die Batteriepackun...

Страница 11: ... liquide entrait dans vos yeux ne frottez pas vos yeux Rincez immédiatement vos yeux à l eau claire et consultez un docteur le plus vite possible pour recevoir des soins médicaux Respectez attentivement les consignes suivantes afin d éviter la possibilité de surchauffe d incendie ou de dégât Tenez la batterie à l ácart de la chaleur Ne jetez pas la batterie au feu ou ne la soumettez pas à une chal...

Страница 12: ...est basse le temps de fonctionnement est plus court N utilisez l ordinateur que dans les limites de températures autorisées La batterie est un produit à durée de vie limitée Si le temps d utilisation de la batterie par l ordinateur se réduit considérablement et si les performances ne sont pas améliorées même après avoir rechargé à plusieurs reprises la batterie elle devra être remplacée par une no...

Страница 13: ... function which makes computer operation possible by simply touching the surface of the wireless display Operating Instructions 1 Wireless Display 1 ENGLISH Model No CF VZSU21 Model No CF AA1639A Battery Pack 1 AC Adaptor 1 AC Cord 1 The stylus is in the wireless display at the time of purchase page 19 Stylus 1 Soft Cloth 1 Strap 1 Screws 2 ...

Страница 14: ...icator page 18 R Button Attaching the strap R BUTTON CAPTURE page 27 MENU 1 Select two screw holes from the fol lowing four holes 2 Adjust the strap to its maximum length Attach one side of the strap and fasten the screw 3 Attach the other side of the strap and fasten the screw 4 Adjust the length of the strap as de sired outside part of the strap inside part of the strap ...

Страница 15: ... une batterie au lithium ion Pour des renseignements sur le recyclage de la batterie veuillez composer le 1 800 8 BATTERY Stylus page 25 Removing the stylus NOTE When using the serial port of the wireless display match the COM port number to the number that is displayed in WDSP COM Port COMx under Ports COM LPT in Start Settings Control Panel System Device Manager For example if WDSP COM Port COM6...

Страница 16: ...may change if the color mode is changed from 16 bit to 24 bit or vice versa If a change is made to the display mode of a computer connecting to the wireless display the connection will be cut All of the contents displayed on the wireless display may not be the same as what was displayed on the wireless display prior to an external display being con nected to the computer Some applications that use...

Страница 17: ...ries computer After confirming the display status indicator has lit turn on the wireless display When using except the CF 07 series computer After has been displayed on the taskbar turn on the wireless display Press the power switch and hold it for approximately one second until the power indicator turns on before releasing it 3 Select your application Power Switch Power Indicator NOTE After shutt...

Страница 18: ...g Double clicking Dragging Touch and hold the object i e file or icon move your stylus on the surface dragging the object to the desired location then release your stylus Two quick taps One tap Right Clicking Press R button 1 2 When R is displayed on the right lower corner R R Button The double clicking speed can be set by se lecting Start Settings Control Panel Mouse Buttons Double click speed NO...

Страница 19: ...tact the LCD The cursor may not work prop erly in such cases When the touchscreen becomes dirty Wipe lightly to remove dirty areas by using a dry soft cloth included Do not use benzene or thinner or disinfectant type alcohol For more information refer to Suggestions About Cleaning the LCD Surface that comes with the soft cloth Handling the Stylus Clean the stylus tip and screen prior to operation ...

Страница 20: ...the calibration setup when the cursor the stylus included touches do not appear to agree 1 Press Menu button 2 Select Option 3 Select Calibration Touch the five marks on the calibration screen Menu Button Touchscreen 1 2 3 4 5 ...

Страница 21: ...keyboard as an icon instead of closing the software keyboard when it is not being used The software keyboard will no longer start up automati cally if is selected to close the keyboard In this case it can be restarted by selecting Start Programs Panasonic Software Keyboard The action is the same as a right mouse button click The same function as the key Use as a short cut key The software keyboard...

Страница 22: ...a non text input application e g Windows ex plorer first display the software keyboard and then select the application Follow ing these steps you can use the keys of the software keyboard Before shutting down and then restarting Windows be sure to save all data If an attempt is made to shut down the computer while data is being edited a message will appear asking whether to save the current data o...

Страница 23: ...rature is outside the allowable range Once the allowable range requirement is satisfied charging begins automatically Battery is discharging to prescribed charging level in high temperature mode Battery pack is not connected or charging not being performed When the AC adaptor is connected Use the Battery Indicator to Check on the Battery Status This wireless display prevents overcharging of the ba...

Страница 24: ...or light remains red The battery remaining displays 99 and the indicator light is orange for a long period of time Low battery warning appears after a short pe riod of time Perform the Refresh Battery utility page 28 The actual remaining battery capacity and the displayed indication may differ Menu Button NOTE ...

Страница 25: ... first purchased Be sure to charge it before using it for the first time When the AC adaptor is connected to the wireless display charging begins automatically Use only the specified battery pack CF VZSU21 with your wireless display Be sure the power has been turned off before proceeding 1 Power off your wireless display page 17 Replace the battery pack with another one while the AC adaptor is con...

Страница 26: ...to the connector 2 Close the cover 3 Slide the latch to the left CAUTION For an improperly attached cover your battery pack may fall out while you are carrying around your computer Be sure the tab does not get caught when closing the cover Tab Connector Charging the Battery Pack Connect the wireless display to a power outlet Charging begins automatically CAUTION Battery Power 3 2 1 ...

Страница 27: ...eneral Menu By selecting General you can change between the mode setting and the backlight off low high setting Remaining battery charge Electronic wave conditions Excellent Good Poor Associated Scanning Default settings You can establish the settings for the wireless display The saved screen is displayed page 31 Mode Connect OfflineView Backlight OFF LOW HIGH ...

Страница 28: ... C 79 2 F Remain 100 Error None 100 Excellent OK Refresh Battery Cancel When the confirmation message is displayed select Yes The battery pack will be completely discharged the computer will power off automatically and then charging will commence It takes approximately 2 hours until the power automatically goes off through the complete dis charge of the battery from the fully charged state Allow t...

Страница 29: ...re sume or Quick resume then select OK Normal Resume The wireless connection is disabled during display off Quick Resume Only the screen is turned off during display off Set the high temperature mode function to Normal temperature or High temperature When using the wireless display in a high temperature environment be sure to set the wireless display in the high temperature mode If there is no inp...

Страница 30: ...e version information will be displayed General Wireless Battery Option Version Model No CF VDW07 Firmware Vx xxLxx Wireless Controller 00 08 03 00 Serial No xxxxxxxx 100 Excellent OK Cancel This screen is a sample Setting the Wireless Display ...

Страница 31: ... image data Displaying the next image high speed mode Displaying the next image The same operation is possible by pressing the Capture button Displaying the previous image The same operation is possible by pressing the R Button When the power is cut by an operation other than pressing the power switch e g when the wireless display is running on battery and the battery is inadvertently taken out or...

Страница 32: ...er and the wireless display Confirm the operation of the wireless LAN on the computer Put the wireless display close to the computer Confirm that is on the taskbar Confirm the IP address of the computer that has been set on the wireless display Confirm the password for both the computer and the wireless display Disconnect the wireless display during operation and reestablish the connection Confirm...

Страница 33: ...C 50 Hz 60 Hz Output 15 6 V DC 3 85 A Approx 9 W 4 Approx 20 W 5 In use Temperature 5 C to 35 C 41 F to 95 F Humidity 30 to 80 RH No condensation Not in use Temperature 20 C to 60 C 4 F to 140 F Humidity 30 to 90 RH No condensation 222 mm 162 mm 12 5 mm 29 5 mm 8 7 6 4 0 5 1 2 Approx 710 g 1 57 lb 1 Varies depending on the usage conditions 2 The AC adaptor is compatible with power sources up to 24...

Страница 34: ...34 E Memo ...

Страница 35: ...dienung des Comput ers einfach durch die Berührung des berührungsempfindlichen Bildschirms des drahtlosen Displays ermöglicht Bedienungsanleitung 1 Drahtloses Display 1 DEUTSCH Modell Nr CF VZSU21 Modell Nr CF AA1639A Batteriepackung 1 Netzadapter 1 Netzkabel 1 Stift 1 Tuch 1 Gurt 1 Schrauben 2 Der Stift befindet sich bei der Auslieferung im drahtlosen Display Seite 41 ...

Страница 36: ...te 40 R Taste Anbringen des Gurtes R BUTTON CAPTURE Seite 49 MENU 1 Wählen Sie die gewünschten zwei Schraubenlöchern aus den folgenden vier Löchern aus 2 Stellen Sie den Gurt auf seine maximale Länge ein Befestigen Sie eine Seite des Gurtes und ziehen Sie die Schraube fest 3 Befestigen Sie die andere Seite des Gurtes und ziehen Sie die Schraube fest 4 Stellen Sie die Gurtlänge wie gewünscht ein Au...

Страница 37: ...chlusses des drahtlosen Displays achten Sie darauf daß die Nummer des COM Anschlusses mit der Nummer übereinstimmt die in WDSP COM Port COMx unter Anschlüsse COM und LPT in Start Einstellungen Systemsteuerung System Geräte Manager angezeigt wird Falls beispielsweise WDSP COM Port COM6 angezeigt wird wählen Sie den seriellen Anschluß COM6 Windows 2000 System Hardware ...

Страница 38: ...hirm angezeigten Farben sich ändern falls der Farbmodus von 16 Bit auf 24 Bit und umgekehrt wechselt Falls der Displaymodus des Computers geändert wird während dieser mit dem drahtlosen Display verbunden ist wird die Verbindung unterbrochen Unter Umständen sind nicht alle auf dem drahtlosen Display angezeigten Inhalte den Inhalten gleich die auf dem drahtlosen Display angezeigt wurden bevor ein ex...

Страница 39: ...überzeugt haben dass die Displaystatusanzeige leuchtet schalten Sie das drahtlose Dis play ein Bei Verwendung eines Computers der nicht zur Reihe CF 07 gehört Nachdem im Aufgabenbalken angezeigt wurde schalten Sie das drahtlose Display ein Drücken Sie den Ein Aus Schalter und halten Sie ihn ungefähr eine Sekunde lang gedrückt bis die Stromanzeige sich einschaltet Lassen Sie den Schalter dann los 3...

Страница 40: ...al antippen Klicken mit der rechten Maus Drücken Sie die R Taste 1 2 Wenn R in der unteren rechten Ecke a n g e z e i g t wird R R Taste Die Doppelklick Geschwindigkeit kann durch die Wahl von Start Einstellungen Systemsteuerung Maus Tasten Doppelklickgeschwindigkeit eingestellt werden Cursor HINWEIS D e n S t i f t a u f d a s gewünschte Objekt z B Datei oder Symbol legen d e n S t i f t ü b e r ...

Страница 41: ...beitet der Cursor u U nicht einwandfrei Bei einer Verschmutzung des berührungsempfindlichen Bildschirms Die Schmutzflecken mit einem trockenen weichen Tuch oder einem Stück Gaze abreiben Auf keinen Fall Benzin Farbverdünner oder Desinfektionsmittel Alkohol zum Reinigen verwenden Für weitere Informationen siehe die Anleitungen unter Empfehlungen zur Reinigung der LCD Oberfläche die mit dem weichen ...

Страница 42: ...rsor und die Berührung durch den mitgelieferten Stift nicht übereinstimmen Menü Taste Berührungsempfindlicher Bildschirm 1 2 3 4 5 1 Drücken Sie die Menü Taste 2 Wählen Sie Option 3 Wählen Sie Calibration Berühren Sie die fünf x Markierungen auf dem Kalibrierungsbildschirm ...

Страница 43: ...att sie wieder zu schließen wenn sie nicht verwendet wird Das Software Tastatur wird nämlich nicht mehr automatisch gestartet falls sie durch Berühren von geschlossen wurde In diesem Fall muss sie durch die Wahl von Start Programme Panasonic Software Keyboard neu gestartet werden Das Berühren dieser Taste hat dieselbe Wirkung wie ein Klick auf die rechte Maustaste Dieselbe Funktion wie die Taste V...

Страница 44: ...en möchten z B für Windows Explorer bringen Sie zuerst die Software Tastatur zur Anzeige und wählen Sie dann die Anwendung Unter Durchführung dieser Schritte können Sie die Tasten der Software Tastatur verwenden Bevor Sie das Betriebssystem Windows ausschalten und dann erneut einschalten speichern Sie zuerst alle Daten Falls Sie versuchen den Computer auszuschalten während die Daten bearbeitet wer...

Страница 45: ...ht geladen werden da die Temperatur die zulässigen Grenzwerte überschritten hat Die Umgebungstemperatur liegt außerhalb des zulässigen Bereichs Sobald sich die Temperatur wieder innerhalb des zulässigen Bereichs befindet beginnt der Ladevorgang automatisch Im Hochtemperaturmodus wird die Batterie auf die vorgeschriebene Ladungsstufe entladen Die Batteriepackung ist nicht angeschlossen oder der Lad...

Страница 46: ...adung wird über einen längeren Zeitraum als 99 angezeigt und die Lampe leuchtet orangefarben Nach einem kurzen Zeitraum erscheint eine Warnanzeige für geringe Batterieladung F ü h r e n S i e d a s Verfahren Refresh Battery durch Seite 50 Die tatsächlich verbleibende Batterieladung und die angezeigte Ladung können verschieden sein Menü Taste HINWEIS Batteriestrom ...

Страница 47: ...ersten Inbetriebnahme des Computers zu laden Wenn ein Netzadapter an das drahtlose Display angeschlossen wird beginnt der Ladevorgang automatisch Verwenden Sie nur die angegebene Batteriepackung CF VZSU21 mit Ihrem drahtlosen Display Vergewissern Sie sich dass der Strom ausgeschaltet ist bevor Sie fortfahren 1 Schalten Sie das drahtlose Display aus Seite 39 Ersetzen Sie die Batteriepackung durch e...

Страница 48: ...e die Abdeckung 3 Schieben Sie die Sperrvorrichtung nach links Falls die Abdeckung nicht richtig angebracht ist kann die Batteriepackung herausfallen während Sie den Computer an einen anderen Ort tragen Achten Sie darauf dass die Lasche nicht eingeklemmt wird wenn Sie die Abdeckung schließen Lasche Anschlussstecker Laden der Batteriepackung Schließen Sie das drahtlose Display an eine Netzsteckdose...

Страница 49: ... zwischen der Modus Einstellung und einer der Einstellungen der Hintergrundbeleuchtung umschalten nämlich Aus Niedrig Hoch Restliche Batterieladung Zustand der elektronischen Wellen Excellent Good Poor Associated Scan ning Einstellungsvorgaben Sie können die Einstellungen für das drahtlose Display durchführen Der Speicherungsbildschirm wird angezeigt Seite 53 Mode Connect OfflineView Backlight OFF...

Страница 50: ...Wenn die Bestätigungsmeldung angezeigt wird wählen Sie Yes D i e B a t t e r i e p a c k u n g w i r d vollständig entladen der Computer schaltet sich automatisch aus und der Ladevorgang beginnt Es dauert ungefähr zwei Stunden bis die Batterie infolge ihrer vollständigen Entladung keinen Strom mehr liefert nachdem Sie voll geladen wurde Setzen Sie den Ladevorgang der Batterie fort bis die Batterie...

Страница 51: ...oder Quickresume ein wählen Sie OK Normal Resume Der drahtlose Anschluss wird unterbrochen wenn keine Anzeige erfolgt Quick Resume N u r d e r B i l d s c h i r m w i r d ausgeschaltet wenn keine Anzeige erfolgt Stellen Sie die Funktion für hohe Temperatur auf Normal temperatur oder auf High temperatur ein Wenn Sie das drahtlose Display in einer Umgebung mit hoher Temperatur verwenden stellen Sie ...

Страница 52: ... Versions Information angezeigt General Wireless Battery Option Version Model No CF VDW07 Firmware Vx xxLxx Wireless Controller 00 08 03 00 Serial No xxxxxxxx 100 Excellent OK Cancel Dieser Bildschirm dient als Muster Einstellen des drahtlosen Displays ...

Страница 53: ... Der gleiche Vorgang kann auch durch Drücken der Erfassungstaste durchgeführt werden Wenn die Stromversorgung durch einen anderen Vorgang als dem Drücken des Netzschalters unterbrochen wurde beispielsweise falls das drahtlose Display mit Strom von der Batterie betrieben wurde und die Batterie versehentlich herausgenommen wurde oder wenn ein Netzadapter versehentlich aus der Steckdose gezogen wurde...

Страница 54: ...Netzwerks auf dem Computer Stellen Sie das drahtlose Display näher zum Computer auf Bestätigen Sie dass im Aufgabenbalken angezeigt ist Bestätigen Sie die IP Adresse des Computers der an das drahtlose Display angeschlossen ist Bestätigen Sie das Passwort sowohl für den Computer als auch für das drahtlose Display Trennen Sie das drahtlose Display während des Betriebs ab und schließen Sie es dann er...

Страница 55: ...Aus Ca 2 0 Stunden Eingang 100 V 240 V Netzstrom 50 60 Hz Ausgang 15 6 V Gleichstrom 3 85 A Ca 9 W 4 Ca 20 W 5 In Betrieb Temperatur 5 C bis 35 C Luftfeuchtigkeit 30 bis80 RH ohneKondensation NichtinBetrieb Temperatur 20 C bis 60 C Luftfeuchtigkeit 30 bis90 RH ohneKondensation 222 mm 162 mm 12 5 mm 29 5 mm Ca 710 g 1 Ist je nach den Verwendungsbedingungen verschieden 2 Der Netzadapter ist mit Netz...

Страница 56: ...56 G Memo ...

Страница 57: ...an tactile qui permet une utilisation de l ordinateur en touchant simplement la surface de l écran déporté sans fil Mode d emploi 1 Ecran Déporté Sans Fil 1 FRANÇAIS N de modèle CF VZSU21 N de modèle CF AA1639A Batterie 1 Adaptateur Secteur 1 Cordon Secteur 1 Stylet 1 Chiffon doux 1 Courroie 1 Vis 2 Au moment de l expédition le stylet se trouve dans l écran déporté sans fil page 63 ...

Страница 58: ... Témoin à DEL page 62 Bouton R Fixation de la courroie R BUTTON CAPTURE page 71 MENU 1 Sélectionnez deux des quatre orifices de vis suivants 2 Ajustez la courroie à sa longueur maximum Mettez en place un côté de la courroie et serrez la vis 3 Mettez en place l autre côté de la courroie et serrez la vis 4 Ajustez la courroie sur la longueur désirée Partie extérieure de la courroie Partie intérieure...

Страница 59: ...des renseignements sur le recyclage de la batterie veuillez composer le 1 800 8 BATTERY Stylet page 69 Retrait du stylet REMARQUE Lorsque vous utilisez le port série de l écran déporté sans fil faites concorder le numéro du port COM avec le numéro qui est affiché dans WDSP COM Port COMx de Ports COM et LPT dans Démarrer Paramètres Panneau de configuration Système Gestionnaire de périphériques Par ...

Страница 60: ...hanger si le mode couleur est changé de 16 bits à 24 bits ou vice versa Si un changement est apporté au mode d affichage d un ordinateur connecté à l écran déporté sans fil la connexion s interrompt Tout le contenu affiché sur l écran déporté sans fil peut ne pas être identique à ce qui y était affiché avant la connexion d un écran externe à l ordinateur Certaines applications qui utilisent des fo...

Страница 61: ... témoin d état d écran est allumé mettez l écran déporté sans fil sous tension Lors de l utilisation d un ordinateur autre que de la série CF 07 Après que s est affiché sur la barre de tâches mettez l écran déporté sans fil sous tension Appuyez sur le commutateur d alimentation et maintenez le enfoncé pendant environ une seconde jusqu à ce que le témoin d alimentation s allume avant de le relâcher...

Страница 62: ...r le bouton R 1 2 Lorsque R est affiché dans le coin droit inférieur R Bouton R La vitesse du double clic peut être réglée en sélectionnant Démarrer Paramètres Panneau de configuration Souris Boutons Vitesse du double clic Curseur REMARQUE Deux tapotements rapides Tapotement simple Touchez l objet c à d un fichier ou une icône sans retirer le stylet et déplacez le stylet sur la surface ceci déplac...

Страница 63: ... écran tactile Le curseur risque alors de ne pas fonctionner correctement Quand l écran tactile est sale Nettoyer les parties souillées au moyen d un chiffon doux sec tel que de la gaze Ne pas utiliser de benzène de diluant ou d alcool du type désinfectant Pour plus d informations se reporter à Suggestions pour nettoyer la surface de l affichage à cristaux liquides LCD fourni avec le chiffon doux ...

Страница 64: ...lonnage lorsque le curseur et les touchers du stylet fourni paraissent ne pas coïncider 1 Appuyez sur le bouton Menu 2 Sélectionnez Option 3 Sélectionnez Calibration Touchez les cinq marques x sur l écran d étalonnage Ecran tactile 1 2 3 4 5 Bouton R ...

Страница 65: ...de laisser le clavier logiciel sous forme d icône au lieu de le fermer lorsqu il n est pas utilisé Le clavier logiciel ne démarre plus automatiquement si est sélectionné pour le fermer Dans ce cas il peut être redémarré en sélectionnant Démarrer Programmes Panasonic Software Keyboard L action est la même qu un clic droit de la souris La même fonction que la touche Utilisez comme touche de raccourc...

Страница 66: ...on d introduction autre que de texte Explorateur Windows par exemple affichez tout d abord le clavier logiciel puis sélectionnez l application Vous pouvez alors utiliser les touches du clavier logiciel Avant d arrêter puis de redémarrer Windows enregistrez toujours toutes les données Si vous essayez d arrêter l ordinateur pendant que des données sont en cours d édition un message apparaît demandan...

Страница 67: ...anasonic Recharge impossible du fait d une violation des limites de température La température ambiante est hors de la plage admissible Une fois que la condition de plage admissible est satisfaite la charge commence automatiquement La batterie se décharge jusqu au niveau de charge prescrit en mode température élevée La batterie n est pas connectée ou la charge n est pas en cours Utilisez le témoin...

Страница 68: ...uge L affichage de batterie restante est de 99 et la couleur du témoin est orange pendant une période de temps prolongée Un avertissement de batterie faible apparaît après une courte période de temps E x é c u t e z l e programme utilitaire Refresh Battery page 72 La capacité de batterie réelle restant et l indication affichée peuvent être différentes REMARQUE Bouton R ...

Страница 69: ...liser pour la première fois La charge commence automatiquement lorsque l adaptateur secteur est connecté à l écran déporté sans fil N utilisez que la batterie spécifiée CF VZSU21 avec l écran déporté sans fil Assurez vous que l alimentation a été coupée avant de continuer 1 Mettez hors tension votre écran déporté sans fil page 61 Remplacez la batterie par une autre pendant que l adaptateur secteur...

Страница 70: ...e couvercle 3 Faites glisser le verrou vers la gauche Si vous fermez mal le couvercle la batterie peut tomber pendant que vous transportez l ordinateur Faites attention de ne pas coincer la languette en fermant le couvercle Languette Connecteur Charge de la batterie Raccordez l écran déporté sans fil à une prise électrique La charge commence automatiquement ATTENTION ATTENTION Alimentation par bat...

Страница 71: ...nt General vous pouvez passer entre le paramètre de mode et le paramètre d éclairage arrière désactivé faible fort Charge restante de la batterie Conditions de l onde électronique Excellent Good Poor Associated Scan ning Paramètres par défaut Vous pouvez régler les paramètres pour l écran déporté sans fil L écran enregistré est affiché page 75 Mode Connect OfflineView Backlight OFF LOW HIGH Bouton...

Страница 72: ...main 100 Error None 100 Excellent OK Refresh Battery Cancel Lorsque le message de confirmation est affiché sélectionnez Yes La batterie sera complètement déchargée l ordinateur se mettra hors tension automatiquement puis la charge commencera Il faut environ 2 heures avant que l alimentation se coupe automatiquement par décharge complète de la batterie depuis l état de charge complète Laissez la ba...

Страница 73: ...ionnez OK Normal Resume La connexion sans fil est mise hors service pendant que l affichage est désactivé Quick Resume Seul l écran est éteint pendant que l affichage est désactivé Réglez la fonction du mode de température élevée sur Normal tem perature ou High temperature Lors de l utilisation de l écran déporté sans fil dans un milieu ambiant où la température est élevée réglez toujours l écran ...

Страница 74: ...ormations de version s afficheront General Wireless Battery Option Version Model No CF VDW07 Firmware Vx xxLxx Wireless Controller 00 08 03 00 Serial No xxxxxxxx 100 Excellent OK Cancel Cet écran est un exemple Configuration de l écran déporté sans fil ...

Страница 75: ...on est possible en appuyant sur le bouton Cap ture Affichage de l image précédente La même opération est possible en appuyant sur le bouton R Lorsque l alimentation est coupée par une opération autre qu une pression sur le commutateur d alimentation par exemple lorsque l écran déporté sans fil fonctionne sur batterie et que la batterie est retirée par inadvertance ou lorsque l adaptateur secteur e...

Страница 76: ...n déporté sans fil Confirmez le fonctionnement du LAN sans fil de l ordinateur Placez l écran déporté sans fil près de l ordinateur Confirmez que se trouve sur la barre de tâches Confirmez l adresse IP de l ordinateur qui a été réglée sur l écran déporté sans fil Confirmez le mot de passe pour l ordinateur et l écran déporté sans fil Déconnectez l écran déporté sans fil pendant le fonctionnement e...

Страница 77: ...h Entrée 100 V 240 V CA 50 Hz 60 Hz Sortie 15 6 V CC 3 85 A Environ 9 W 4 Environ 20 W 5 Utilisation Température 5 C à 35 C 41 F à 95 F Humidité 30 à80 RH sanscondensation Non utilisation Température 20 C à 60 C 4 F à 140 F Humidité 30 à80 RH sanscondensation 222 mm 162 mm 12 5 mm 29 5 mm Environ 710 g 1 Varie selon les conditions d utilisation 2 L adaptateur secteur est compatible avec des source...

Страница 78: ...F 78 Mémo ...

Страница 79: ...79 F ...

Страница 80: ... 2001 Matsushita Electric Industrial Co LTD All Rights Reserved Printed in Japan FJ0901 1101 DFQX5266ZB ...

Отзывы: