Panasonic TH-65PF9UK Скачать руководство пользователя страница 11

11

RS-232C Conversion cable


D-sub 9-pin female 

Details


R X D


T X D


GND


• 

Non use 

Shorted

 • 

NC

Connections

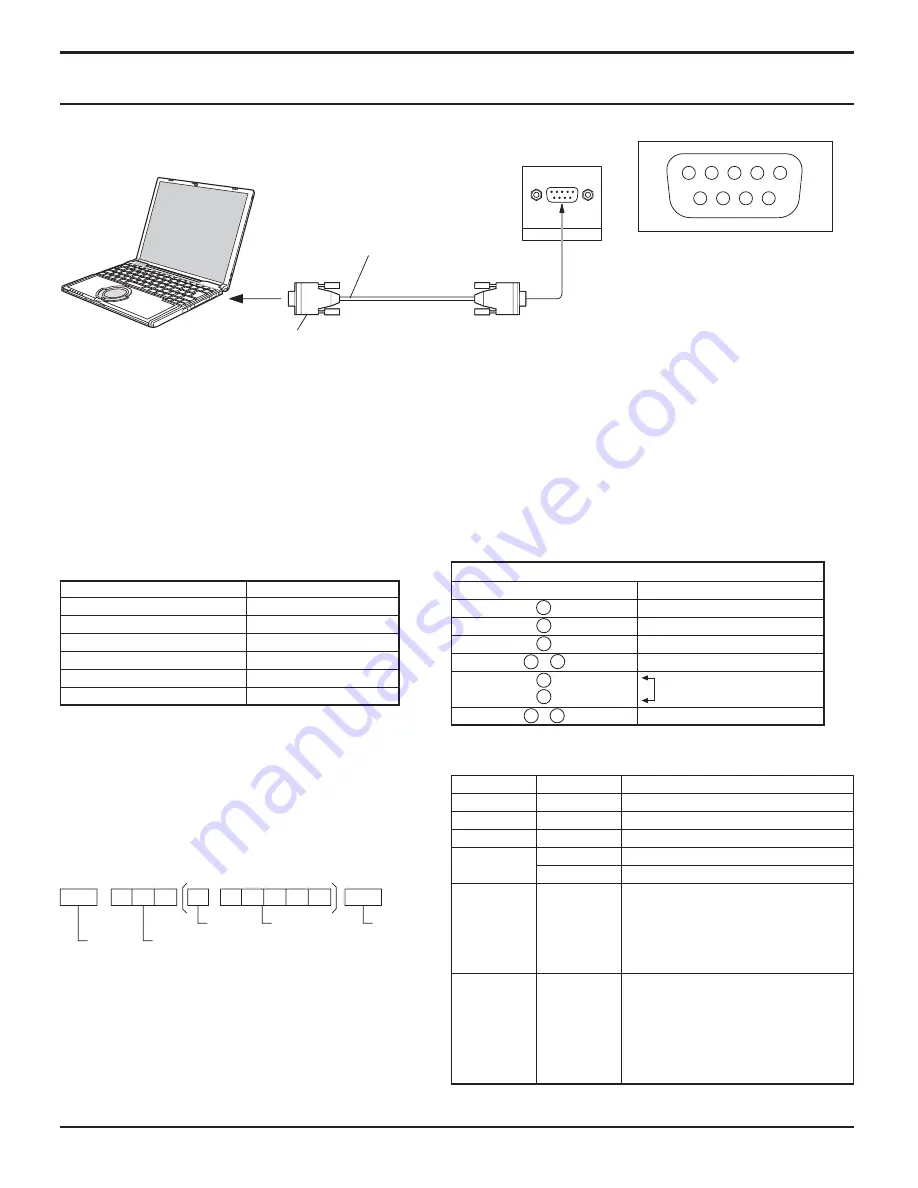
SERIAL Terminals connection

Notes:

•  Use the RS-232C cable to connect the computer to the Plasma Display.
•  The computer shown is for example purposes only.
•  Additional equipment and cables shown are not supplied with this set.

The SERIAL terminal conforms to the RS-232C interface specifi cation, so that the Plasma Display can be controlled by a 
computer which is connected to this terminal.
The computer will require software which allows the sending and receiving of control data which satisfi es the conditions 
given below. Use a computer application such as programming language software. Refer to the documentation for the 
computer application for details.

The SERIAL terminal is used when the Plasma Display is controlled by a computer.

Communication parameters

Basic format for control data

The transmission of control data from the computer 
starts with a STX signal, followed by the command, 
the parameters, and lastly an ETX signal in that order. 
If there are no parameters, then the parameter signal 
does not need to be sent.

Notes:

•  If multiple commands are transmitted, be sure to wait 

for the response for the fi rst command to come from 
this unit before sending the next command.

•  If an incorrect command is sent by mistake, this unit will 

send an “ER401” command back to the computer.

With the power off, this display responds to PON command only.

6

7

8

9

1

3

4

5

2

SERIAL

Pin layout for SERIAL Terminal

COMPUTER

RS-232C Straight cable

D-sub 9p

Start
(02h)

3-character
command (3 bytes)

Colon

Parameter(s)
(1 - 5 bytes)

End
(03h)

STX

C1 C2 C3

P1 P2 P3 P4

:

P5

ETX

Command

Command
PON
POF
AVL

AMT

IMS

DAM

Parameter
None
None

**
0
1
None
SL1
SL2
SL3
PC1
None
NORM
ZOOM
FULL
JUST
SELF

Signal level

Synchronization method

Baud rate

Parity

Character length

Stop bit

Flow control

RS-232C compliant

Asynchronous

9600 bps

None
8 bits

1 bit

-

2
3

4

5

6

7
8

9

1

Control details

Power ON
Power OFF
Volume 00 - 63
Audio MUTE OFF
Audio MUTE ON
Input select (toggle)
Slot1 input
Slot2 input
Slot3 input
PC input
Screen mode select (toggle)
NORMAL (4 : 3)
ZOOM
FULL
JUST
Panasonic AUTO

Содержание TH-65PF9UK

Страница 1: ...g operating or adjusting this product please read these instructions completely Please keep this manual for future reference TH 65PF9UK Model No Número de modelo La ilustración mostrada es una imagen Antes de conectar utilizar o ajustar este producto lea completamente este manual de instrucciones y guárdelo para consultarlo en el futuro en caso de ser necesario English Español ...

Страница 2: ... DO NOT OPEN WARNING To prevent damage which may result in fire or shock hazard do not expose this apparatus to rain or moisture Do not place containers with water flower vase cups cosmetics etc above the set including on shelves above etc WARNING 1 To prevent electric shock do not remove cover No user serviceable parts inside Refer servicing to qualified service personnel 2 Do not remove the groundi...

Страница 3: ...ment of the obsolete outlet 10 Protect the power cord from being walked on or pinched particularly at plugs convenience receptacles and the point where they exit from the apparatus 11 Only use attachments accessories specified by the manufacturer 12 Use only with the cart stand tripod bracket or table specified by the manufacturer or sold with the apparatus When a cart is used use caution when movin...

Страница 4: ...Screen Menu Displays 16 Initial selections 18 Selecting the input signal 18 Selecting the On Screen Menu Language 18 ASPECT Controls 19 Adjusting POS SIZE 20 MULTI PIP 22 Advanced PIP 23 PICTURE Adjustments 24 ADVANCED SETTINGS 25 SOUND Adjustment 26 MUTE 26 Digital Zoom 27 PRESENT TIME SETUP SET UP TIMER 28 PRESENT TIME SETUP 28 SET UP TIMER 29 SCREENSAVER For preventing after images 30 Setup of ...

Страница 5: ...ce may not cause harmful interference and 2 this device must accept any interference received including interference that may cause undesired operation FCC CAUTION Pursuant to 47CFR Part 15 21 of the FCC rules any changes or modifications to this monitor not expressly approved by Panasonic Corporation of North America could cause harmful interference and would void the user s authority to operate t...

Страница 6: ... it with a dry cloth This Plasma Display radiates infrared rays therefore it may affect other infrared communication equipment Install your infrared sensor in a place away from direct or reflected light from your Plasma Display Note Do not allow a still picture to be displayed for an extended period as this can cause a permanent after image to remain on the Plasma Display Examples of still pictures...

Страница 7: ...cause fire or damage to the Plasma Display Transport only in upright position Transporting the unit with its display panel facing upright or downward may cause damage to the internal circuitry If using the pedestal optional accessory leave a space of 3 15 16 10 cm or more at the top left and right 2 3 8 6 cm or more at the bottom and 2 3 4 7 cm or more at the rear If using some other setting up me...

Страница 8: ...mix battery types example Zinc Carbon with Alkaline 4 Do not attempt to charge short circuit disassemble heat or burn used batteries 5 Battery replacement is necessary when the remote control acts sporadically or stops operating the Plasma Display 3 Replace the cover Accessories Supplied Check that you have the Accessories and items shown Operating Instruction book Remote Control Transmitter EUR76...

Страница 9: ... block as shown in the figure While ensuring there is sufficient slack in cables to minimize stress especially in the power cord firmly bind all cables with the supplied fixing band From SERIAL Terminal on Computer see page 11 From EXTERNAL monitor terminal on Computer see page 10 AC cord connection see page 13 DVI D IN Terminals see page 12 To tighten To loosen Pull Pull Push the catch Note At factor...

Страница 10: ... use an adapter for computers with DOS V compatible Mini D sub 15P terminal The computer shown in the illustration is for example purposes only Additional equipment and cables shown are not supplied with this set Do not set the horizontal and vertical scanning frequencies for PC signals which are above or below the specified frequency range Component Input is possible with the pin 1 2 3 of the D su...

Страница 11: ...llowed by the command the parameters and lastly an ETX signal in that order If there are no parameters then the parameter signal does not need to be sent Notes If multiple commands are transmitted be sure to wait for the response for the first command to come from this unit before sending the next command If an incorrect command is sent by mistake this unit will send an ER401 command back to the co...

Страница 12: ...D S clock shield 11 T M D S data 1 3 shielded 23 T M D S clock 12 T M D S data 3 24 T M D S clock Notes Additional equipment cables and adapter plugs shown are not supplied with this set Refer to page 45 for applicable input signal Use the DVI D cable complying with the DVI standard Image deterioration may occur depending on the length or the quality of the cable Notes Change the COMPONENT RGB IN ...

Страница 13: ... on Power On Power Indicator Green Example The screen below is displayed for a while after the Plasma Display is turned on setting condition is an example Connecting the AC cord plug to the Plasma Display Fix the AC cord plug securely to the Plasma Display with the clamper see page 9 Press the button on the remote control to turn the Plasma Display off Power Indicator Red standby Press the button ...

Страница 14: ...own see page 16 Enter Aspect button see page 16 19 Remote control sensor ON OFF ON SURROUND Basic Controls N button see page 20 24 25 26 POS SIZE button see page 20 PICTURE button see page 24 INPUT button INPUT1 INPUT2 INPUT3 and PC selection Press to select INPUT1 INPUT2 INPUT3 and PC input SLOTS sequentially see page 18 Sound mute On Off see page 26 Numeric buttons see page 36 42 ASPECT button P...

Страница 15: ... this function is not the perfect solution to after image Channel Adjustment This button cannot be used for this model Volume Adjustment Press the Volume Up or Down button to increase or decrease the sound volume level OFF TIMER button The Plasma Display can be preset to switch to stand by after a fixed period The setting changes to 30 minutes 60 minutes 90 minutes and 0 minutes off timer cancelled...

Страница 16: ... SETUP SET UP TIMER PRESENT TIME SETUP from the unit 1 Press to select 1 2 PICTURE NORMAL NORMALIZE STANDARD 25 0 0 0 5 BRIGHTNESS SHARPNESS PICTURE MENU COLOR PICTURE TINT 2 2 ADVANCED SETTINGS COLOR TEMP COLOR MANAGEMENT NORMAL OFF ON PICTURE 1 Press to select 2 Press to access each adjust screen To POS SIZE adjust menu see page 20 To SOUND adjust menu see page 26 0 0 0 SOUND NORMAL NORMALIZE ST...

Страница 17: ...ESENT TIME OF DAY 99 99 Press the R button to return to SET UP menu Press to select START TIME FINISH TIME When TIME OF DAY is selected Press to select SHOW DURATION SAVER DURATION When INTERVAL is selected Press to set up To setup SCREENSAVER See page 30 32 To setup MULTIDISPLAY screen See page 34 INTERVAL SCREENSAVER START FUNCTION MODE WOBBLING PEAK LIMIT WHITE BAR SCROLL 6 15 12 30 OFF OFF SID...

Страница 18: ...select the input signal to be played back from the equipment which has been connected to the Plasma Display Input signals will change as follows Notes Selecting is also possible by pressing the INPUT button on the unit Input terminal will not be selected if the terminal board is not installed into the SLOT Select to match the signals from the source connected to the component RGB input terminals s...

Страница 19: ...AUTO Panasonic AUTO 4 16 3 9 The display will automatically become enlarged depending on the picture source allowing you to view the picture at its maximum size Notes Panasonic AUTO mode is designed to automatically adjust the aspect ratio to handle a mix of 16 9 and 4 3 program material Certain 4 3 program material such as stock market data screens may occasionally cause the image size to change ...

Страница 20: ...50p 24p 25p 30p 24sF 1250 1080 50i 750 720 60p 50p each and RGB PC Digital signals are memorized for each frequency If a Cue or Rew signal from a VCR or DVD player is received the picture position will shift up or down This picture position movement cannot be controlled by the POS SIZE function If adjusting the PICTURE V POS V SIZE in Panasonic AUTO with FULL mode the adjustment is not memorized W...

Страница 21: ...not be adjusted automatically Select NORMALIZE in POS SIZE and press the ACTION button when appropriate adjustment cannot be made H POS Adjust the horizontal position H SIZE Adjust the horizontal size V POS Adjust the vertical position V SIZE Adjust the vertical size DOT CLOCK During COMPONENT RGB and PC input signal Periodic striped pattern interference noise may occur when a striped pattern is d...

Страница 22: ...2 screen display the same input mode cannot be selected for the main picture and sub picture The main picture and sub picture are processed by different circuits resulting in a slight difference in the clarity of the pictures There may also be a difference in the picture quality of the sub picture depending on the type of signals displayed on the main picture and depending on the 2 picture display...

Страница 23: ...ictures cannot be shown in detail Computer screen picture is displayed in a simplified format and it may not be possible to discern details on them satisfactorily Following combinations of two analog signals cannot be displayed simultaneously Component Component Component PC RGB PC RGB Component PC RGB PC RGB Following signals are not applicable to this menu 1125 50p 60p 1152 864 60 Hz 1400 1050 60...

Страница 24: ...ment at a professional level see next page ADVANCED SETTINGS OFF Displays images with settings of the PICTURE menu Press to enter Advanced Settings 0 0 0 0 0 0 2 2 W B LOW B BLACK EXTENSION W B HIGH B W B LOW R AGC GAMMA INPUT LEVEL W B HIGH R ADVANCED SETTINGS NORMAL NORMALIZE OFF COLOR MANAGEMENT ON Enables vivid color adjustment automatically While the PICTURE menu is displayed if either the N ...

Страница 25: ...ts for natural flesh tones SHARPNESS Less More Adjusts picture sharpness Item Effect Details BLACK EXTENSION Less More Adjusts the dark shades of the image in gradation INPUT LEVEL Less More Adjustment of parts which are extremely bright and hard to see This cannot be adjusted when the input signal is Digital W B HIGH R Less More Adjusts the white balance for light red areas W B HIGH B Less More Ad...

Страница 26: ...t each item Useful when answering the phone or receiving unexpected visitors Press this button to mute the sound Press again to reactivate sound Sound is also reactivated when power is turned off or volume level is changed While the SOUND menu is displayed if either the N button on the remote control is pressed at any time or the ACTION button is pressed during NORMALIZE then all adjustment values...

Страница 27: ...e Picture and Picture operation see page 22 While Digital Zoom is in operation Adjusting POS SIZE cannot be used Following signals are not applicable to this menu 1125 50p 60p 1152 864 60 Hz 1400 1050 60 Hz 1600 1200 60Hz 1920 1200 60 Hz Select the magnification required for the enlarged display Each time this is pressed the magnification factor changes This is shown in the image being displayed 3 2...

Страница 28: ...up PRESENT TIME OF DAY button Forward button Back Notes Pressing or button once changes PRESENT TIME OF DAY 1minute Pressing or button continuously changes PRESENT TIME OF DAY by 15 minutes Press to select Set Press to store PRESENT TIME SETUP Note Set cannot be selected unless PRESENT TIME OF DAY is set Press to exit from PRESENT TIME SETUP 1 2 1 2 PC OFF STANDBY SAVE OFF POWER MANAGEMENT OFF AUT...

Страница 29: ... TIME POWER OFF TIME by 15 minutes Press to select POWER ON FUNCTION POWER OFF FUNCTION Press to select ON Press twice to exit from SET UP Note Timer function will not work unless PRESENT TIME OF DAY is set Display the SET UP TIMER SCREEN 1 2 3 0 00 0 00 SET UP TIMER POWER OFF FUNCTION POWER OFF TIME POWER ON TIME POWER ON FUNCTION OFF OFF PRESENT TIME OF DAY 99 99 0 00 0 00 SET UP TIMER POWER OFF...

Страница 30: ...ton Press to select the MODE Press to select each mode items OFF INTERVAL Operates when SHOW DURATION and SAVER DURATION are set up and those times arrive TIME OF DAY Operates when START TIME and FINISH TIME are set up and those times arrive ON Operates when START is selected and the ACTION button is pressed SCREENSAVER For preventing after images 2 2 SET UP SCREENSAVER MULTI DISPLAY SETUP SET UP ...

Страница 31: ... 3 1 Press to display the SET UP menu SCREENSAVER For preventing after images SCREENSAVER START FUNCTION MODE WOBBLING PEAK LIMIT FINISH TIME START TIME WHITE BAR SCROLL OFF 6 15 12 30 OFF OFF SIDE BAR ADJUST BRIGHT PRESENT TIME OF DAY 99 99 SCREENSAVER START FUNCTION MODE WOBBLING PEAK LIMIT WHITE BAR SCROLL 6 15 12 30 OFF OFF INTERVAL SIDE BAR ADJUST BRIGHT SAVER DURATION SHOW DURATION PRESENT T...

Страница 32: ...e operation guide steps 1 and 2 Notes To reduce the occurrence of after images set the SIDE BAR ADJUST to BRIGHT The side bar may flash alternate black white depending on the picture being shown on the screen Using Cinema mode will reduce such flashing side bars NORMAL mode after images Picture out Picture Picture and Picture Non picture area This function may be applicable to the non picture area O...

Страница 33: ...abel of the Input signal to be displayed Select the input signal which you would like to change its label before customizing the Input labels see page 15 18 Note While selecting a Input signal through Optional Terminal Board connected to Slot 1 Slot 2 and Slot 3 the Input label will depend on each Optional Terminal Board INPUT LABELS for Slot 1 Slot 2 Slot 3 and Mini D sub Slot1 Input INPUT1 VIDEO...

Страница 34: ...LAY SETUP menu Press to select the MULTI DISPLAY SETUP Press to select ON or OFF How to setup MULTI DISPLAY group of 16 4 4 group of 4 2 2 group of 9 3 3 1 2 3 2 2 SET UP SCREENSAVER MULTI DISPLAY SETUP SET UP TIMER PRESENT TIME SETUP 2 MULTI DISPLAY SETUP HORIZONTAL SCALE OFF OFF A1 LOCATION VERTICAL SCALE SEAM HIDES VIDEO 2 MULTI DISPLAY SETUP SET UP for MULTI DISPLAY Example see page 35 for mor...

Страница 35: ...TAL SCALE VERTICAL SCALE SEAM HIDES VIDEO 2 2 2 1 2 3 4 4 8 Press to select HORIZONTAL SCALE Press to select 1 2 3 4 Press to select LOCATION Press to select the required arrangement number A1 D4 Refer to the following 2 MULTI DISPLAY SETUP HORIZONTAL SCALE OFF OFF A1 LOCATION VERTICAL SCALE SEAM HIDES VIDEO 2 MULTI DISPLAY SETUP 5 Press to select VERTICAL SCALE Press to select 1 2 3 4 6 Press to ...

Страница 36: ...lation Press button on remote control This has the same effect as pressing the buttons at the same time Notes Set the Remote ID On to operate the ID remote control If remote ID is set to On you can use the remote control without identical ID number during option menu display see page 42 The ID remote control cannot be used when ID select is set to anything other than 0 and the remote control ID is...

Страница 37: ...ed Note When ON this setting only affects NTSC input signals Note Selection may not be possible depending on which optional board is installed 1 2 1 2 PC OFF STANDBY SAVE OFF POWER MANAGEMENT OFF AUTO POWER OFF OFF OSD LANGUAGE ENGLISH US COMPONENT RGB IN SELECT RGB INPUT LABEL SIGNAL POWER SAVE SET UP 1 2 PC OFF STANDBY SAVE OFF POWER MANAGEMENT OFF AUTO POWER OFF OFF OSD LANGUAGE ENGLISH US COMP...

Страница 38: ...NR cannot be adjusted while a PC signal is being applied 1 2 Press ACTION button Mode Function COLOR SYSTEM Set the color system to match the input signal If set to AUTO the color system is determined automatically AUTO SECAM M NTSC NTSC PAL Panasonic AUTO 4 3 Set to NORMAL to view 4 3 images in an unchanged format when Panasonic AUTO is selected If you would like to view 4 3 images in Just format...

Страница 39: ...is input from the G connector VBS Uses a synchronized signal of Composite Sync input which is input from the HD connector Displays the H Horizontal V Vertical frequencies This display is valid only for RGB PC and Digital input signal Display range Horizontal 15 110 kHz Vertical 48 120 Hz H FREQ kHz V FREQ Hz 1 2 PC OFF STANDBY SAVE OFF POWER MANAGEMENT OFF AUTO POWER OFF OFF OSD LANGUAGE ENGLISH U...

Страница 40: ...n Displays all the following on screen Power on display Input signal switch display No signal display Mute and the remaining time of off timer after was pressed Off Hides all the items above from view Initial INPUT Off PC INPUT1 INPUT2 INPUT3 Adjusts the input signal when TV is turned on Notes Only the adjusted signal is displayed see page 18 Signal can be displayed when the Terminal board is inst...

Страница 41: ...creen display mode if anything other than Off is set the value will be fixed as the value input in the single screen display mode Studio W B Off On Off Nullify all the settings adjusted On Sets the color temperature for TV studio Note Valid only when the low is set as color temperature on screen adjustment Advanced PIP Off On Off Sets normal two screen display mode see page 22 On Sets Advanced PIP ...

Страница 42: ...power when main power is on or in the standby state Note In some cases power is transmitted to the slot power when main power is on or in the standby state regardless of the slot power setting V Installation Off On Off Sets fan to the horizontal installation mode On Sets fan to the vertical installation mode Notes This functions when display is turned on Turn up the power switch for the upward dir...

Страница 43: ...ll the Setup menu is displayed 2 Press the Volume Up or Down button to select OSD LANGUAGE 3 Press and hold the ENTER button till the SHIPPING menu is displayed 4 Press the Volume Up or Down button to select YES 5 Press the ENTER button Note Press the R button to return to SET UP menu when SHIPPING menu is displayed 1 2 PC OFF STANDBY SAVE OFF POWER MANAGEMENT OFF AUTO POWER OFF OFF OSD LANGUAGE E...

Страница 44: ...y occur between image and audio depending on the type of input signal However this is not a malfunction Plasma Display panel Symptoms Check The screen darkens slightly when bright pictures with minimal movements are shown The screen will darken slightly when photos still images of a computer or other pictures with minimal movements are shown for an extended period This is done to reduce after imag...

Страница 45: ...50 00 17 640 400 70 Hz 31 46 70 07 18 640 480 60 Hz 31 47 59 94 2 25 18 19 640 480 72 Hz 37 86 72 81 20 640 480 75 Hz 37 50 75 00 21 640 480 85 Hz 43 27 85 01 22 800 600 56 Hz 35 16 56 25 23 800 600 60 Hz 37 88 60 32 40 0 24 800 600 72 Hz 48 08 72 19 25 800 600 75 Hz 46 88 75 00 26 800 600 85 Hz 53 67 85 06 27 852 480 60 Hz 31 47 59 94 2 34 24 28 1 024 768 50 Hz 39 55 50 00 51 89 29 1 024 768 60 H...

Страница 46: ...compliance with DVI Revision 1 0 Refer to page 12 for applicable signals Stereo mini jack M3 x 1 0 5Vrms Compatible with HDCP 1 1 COMPONENT RGB Y G BNC PB B BNC PR R BNC AUDIO IN RCA PIN JACK 2 Y or G with sync 1 0 Vp p 75 0 7 Vp p 75 0 5 Vrms PC HIGH DENSITY MINI D SUB 15PIN B PB CB R PR CR HD VD VBS use HD port AUDIO IN M3 JACK Y or G with sync 1 0 Vp p 75 Y or G without sync 0 7 Vp p 75 0 7 Vp ...

Страница 47: ... products not supplied by the warrantor or failures which result installation set up adjustments improper antenna inadequate signal pickup maladjustment of consumer controls improper operation power line surge improper voltage supply lighting damage or service by anyone other than an authorized repair facility or damaged this attributable to acts of God LIMITS AND EXCLUSIONS There are no express w...

Страница 48: ...ce of the product For products requiring routine preventive maintenance that maintenance must be performed in order to maintain warranty coverage Serial numbers that have been altered defaced or removed void this warranty This warranty does not cover replacements or repairs necessitated by loss or damage resulting from any cause beyond the control of PCI Marking or retained images sometimes called...

Страница 49: ...g operating or adjusting this product please read these instructions completely Please keep this manual for future reference TH 65PF9UK Model No Número de modelo La ilustración mostrada es una imagen Antes de conectar utilizar o ajustar este producto lea completamente este manual de instrucciones y guárdelo para consultarlo en el futuro en caso de ser necesario English Español ...

Страница 50: ... Para impedir los daños que podrían ser causados por una descarga eléctrica no exponga este aparato a la lluvia ni a la humedad No ponga recipientes con agua floreros tazas cosméticos etc encima del aparato incluyendo los estantes que estén encima de él etc ADVERTENCIA 1 Para impedir recibir descargas eléctricas no retire la cubierta En el interior no hay piezas que deba reparar el usuario Solicite...

Страница 51: ...e de alimentación para que no sea pisado ni pellizcado especialmente en las clavijas tomas de corriente y en el punto por donde sale del aparato 11 Utilice solamente los aditamentos accesorios que haya especificado el fabricante 12 Utilice el aparato sólo con el mueble con ruedas soporte trípode ménsula o mesa especificado por el fabricante o vendido con el aparato Cuando utilice un mueble con rueda...

Страница 52: ...pantalla 18 Controles de ASPECTO 19 Ajuste de Pos Tamaño 20 MULTI PIP 22 Advanced PIP PIP avanzado 23 Ajuste de imagen 24 Ajustes avanzados 25 Ajuste del sonido 26 Silenciamiento 26 Zoom digital 27 Puesta de HORA ACTUAL TEMPORIZADOR ajuste 28 Puesta de HORA ACTUAL 28 TEMPORIZADOR ajuste 29 Protec pantalla Para impedir las imágenes secundarias 30 Establecimiento del tiempo de activación de Protec P...

Страница 53: ...ntes 1 Este aparato no debe causar interferencias perjudiciales y 2 debe aceptar cualquier interferencia recibida incluyendo aquellas que puedan causar un funcionamiento no deseado AVISO DE LA FCC Cualquier cambio o modificación que se hiciera sin contar con la aprobación de Panasonic Corporation of North America podría causar interferencias perjudiciales y anularía la autorización que tiene el usu...

Страница 54: ...apeles de plástico para que los niños pequeños no jueguen ya que si lo hicieran corren un riesgo potencial de sofocación Cuando utilice la pantalla de plasma No acerque sus manos rostro u otros objetos cerca de los orificios de ventilación de la pantalla de plasma El aire que sale de los orificios de ventilación y de la parte superior de la pantalla de plasma está caliente No acerque sus manos cara ...

Страница 55: ...mente en posición vertical Transportar la unidad con su pantalla hacia arriba o hacia abajo puede dañar el sistema de circuitos interno Si se utiliza un pedestal accesorio opcional deje un espacio de 3 15 16 10 cm o más en la parte superior izquierda y derecha 2 3 8 6 cm o más en la parte inferior y 2 3 4 7 cm o más en la parte posterior Si se utiliza algún otro método de instalación deje un espac...

Страница 56: ...s de carbón de zinc con alcalinas 4 No intente cargar cortocircuitar desarmar calentar o quemar las pilas usadas 5 El reemplazo de las pilas es necesario cuando el mando a distancia funciona esporádicamente o no puede controlar la pantalla de plasma 3 Vuelva a colocar la tapa Accesorios suministrados Compruebe que ha recibido todos los accesorios indicados Manual de instrucciones Transmisor del ma...

Страница 57: ...ente flojos como para reducir al mínimo la tensión especialmente el cable de la alimentación una firmemente todos los cables con la banda de fijación suministrada Del terminal serial de una computadora vea la página 11 Del terminal de salida del monitor de una computadora vea la página 10 Conexión del cable de alimentación de CA vea la página 13 Te r m i n a l e s DVI D IN vea la página 12 Para apret...

Страница 58: ...D sub 15 patillas compatibles con DOS V Esta figura es sólo a modo de ejemplo Los equipos y cables adicionales de la figura no se suministran con este equipo No ajuste las frecuencias de exploración horizontal y vertical para las señales de PC a niveles que están por encima o por debajo de la gama de frecuencias especificada La entrada de componente es posible con las patillas 1 2 y 3 del conector D ...

Страница 59: ...aciones de control Cumple con RS 232C Asincrónico 9600 bps Ninguna 8 bits 1 bit 2 3 4 5 6 7 8 9 1 Cable de conversión RS 232C Hembra de 9 patillas D sub Detalles R X D T X D GND No se usa Cortocircuitado NC Formato básico para datos de control La transmisión de los datos de control del ordenador empieza con la señal STX seguida por el comando los parámetros y por último una señal ETX en ese orden ...

Страница 60: ...indado 23 Reloj T M D S 12 Datos T M D S 3 24 Reloj T M D S Notas El equipo cables y clavijas adaptadoras adicionales mostrados no se suministran con este aparato Consulte la página 45 para conocer la señal de entrada aplicable Utilice el cable DVI D que cumpla con la norma DVI La imagen puede deteriorarse dependiendo de la longitud o la calidad del cable Notas Cambie el ajuste Seleccione entrada ...

Страница 61: ...a pantalla de abajo se mostrará durante un rato después de encendida la pantalla de plasma La condición del ajuste es un ejemplo Conexión de la clavija del cable de alimentación de CA a la pantalla de plasma Fije firmemente la clavija del cable de alimentación de CA en la pantalla de plasma con el fijador vea la página 9 INPUT MENU ENTER VOL Indicador de alimentación Sensor del mando a distancia Pre...

Страница 62: ...a El ajuste del sonido ambiental se memoriza por separado para cada Modo de sonido Normal Dinámico Borrar Encendido Apagado Encendido Apagado de la pantalla MENÚ Cada vez que se pulsa el botón MENU la pantalla de menú se conmuta vea la página 16 Tecla INPUT Selección del modo de INPUT1 INPUT2 INPUT3 y PC vea la página 18 Piloto de encendido Se enciende el piloto de funcionamiento Desconectado Elin...

Страница 63: ... no es la solución perfecta para este efecto Ajuste del canal Este botón no puede utilizarse en este modelo Ajuste de volumen Presione la tecla de volumen arriba o abajo para hacer subir o bajar el nivel de volumen del sonido Tecla OFF TIMER La pantalla de plasma puede programarse para cambiar al modo de espera después de un intervalo predeterminado El ajuste cambia a 30 minutos 60 minutos 90 minu...

Страница 64: ...seleccionar 1 2 Imagen Normal Normalizar Normal 25 0 0 0 5 Modo de Imagen Color Contraste Brillo Nitidez Matiz 2 2 Imagen Temp de color Corrección de color Normal Apagado Encendido Ajuste avanzado 1 Pulse para seleccionar 2 Pulse para acceder a cada pantalla de ajuste Ala pantalla Pos Tamaño vea la página 20 Durante la señal de entrada COMPONENT RGB y PC Durantelaseñaldeentrada VIDEO S VIDEO Digit...

Страница 65: ...R ajuste Función de APAGADO Hora de APAGADO Función de ENCENDIDO 0 00 0 00 HORA ACTUAL 99 99 Apagado Apagado Hora de ENCENDIDO Pulse el botón R para volver al menú Configuración Pulse para seleccionar Hora de inicio Hora de finalización cuando se selecciona Designación de tiempo Pulse para seleccionar Tiempo periódico Tiempo de operación cuando se selecciona Intervalo Presione para configurar Para pr...

Страница 66: ...ccionar la señal de entrada que va a reproducirse desde el equipo que se ha conectado a la pantalla de plasma Las señales de entrada cambiarán de la forma siguiente Notas También se puede seleccionar mediante la tecla INPUT de la unidad El terminal de entrada no se seleccionará si la tarjeta de terminales no está instalada en la SLOT ranura Seleccione de forma que las señales procedentes de la fue...

Страница 67: ...16 3 9 La muestra de la imagen se ampliará automá ticamente dependiendo de la fuente de imagen Permitiéndole ver la imagen con su máximo tamaño Notas El modo Panasonic Auto ha sido diseñado para ajustar automáticamente la relación de aspecto y poder manipular una variedad de programas de 16 9 y 4 3 Ciertos programas de 4 3 como por ejemplo los datos del mercado de valores pueden hacer que el tamañ...

Страница 68: ...60p 50p 24p 25p 30p 24sF 1250 1080 50i 750 720 60p 50p y las señales RGB PC Digital se memorizan para cada frecuencia Si se recibe una señal de Localización progresiva o Localización regresiva de una videograbadora o de un reproductor DVD la posición de la imagen se desplazará hacia arriba o hacia abajo Este movimiento de posición de la imagen puede controlarse con la función Pos Tamaño Si ajusta ...

Страница 69: ...ar en Pos Tamaño y pulse la tecla de ACTION cuando no se pueda hacer el ajuste apropiado Pos horizontal Ajusta la posición horizontal Tamaño horizontal Ajusta el tamaño horizontal Posición vertical Ajusta la posición vertical Tamaño vertical Ajusta el tamaño vertical Reloj Durante la señal de entrada COMPONENT RGB y PC La interferencia periódica de patrón de franjas ruido se puede producir cuando ...

Страница 70: ... Vea la página 26 En la visualización de pantalla 2 se puede seleccionar el mismo modo de entrada para la imagen principal y la imagen secundaria La imagen principal y la imagen secundaria se procesan mediante circuitos distintos lo cual produce una ligera diferencia en la nitidez de las imágenes También puede producirse una diferencia en la calidad de la imagen secundaria en función del tipo de s...

Страница 71: ...e pantalla del ordenador aparece en un formato simplificado y tal vez no sea posible discernir sus detalles en forma satisfactoria Las siguientes combinaciones de dos señales análogas no pueden visualizarse simultáneamente Componente Componente Componente PC RGB PC RGB Componente PC RGB PC RGB Las señales siguientes no son aplicables a este menú 1125 50p 60p 1152 864 60 Hz 1400 1050 60 Hz 1600 1200...

Страница 72: ...tes finos de la imagen con un nivel profesional vea la página siguiente Ajuste avanzado Apagado Visualiza imágenes con ajustes del menú Imagen Presione para introducir Ajuste avanzado Normal Normalizar 0 0 0 0 0 0 2 2 Apagado W B Low B W B High B W B Low R Auto ganancia Gamma Extensión negro Nivel de entrada W B High R Ajuste avanzado Corrección de color Encendido Permite el ajuste de colores vivos...

Страница 73: ...Elemento Efecto Detalles Extensión negro Menos Más Ajusta las sombras oscuras de la imagen en gradación Nivel de entrada Menos Más Ajusta las partes que están sumamente brillantes y son difíciles de ver Esto no se puede ajustar cuando la señal de entrada es Digital W B High R Menos Más Ajusta el equilibrio del blanco para las zonas color rojo claro W B High B Menos Más Ajusta el equilibrio del bla...

Страница 74: ... para ajustar cada elemento Esto resulta muy útil cuando se contesta el teléfono o se reciben visitantes inesperados Presione esta tecla para silenciar el sonido Presiónela de nuevo para reactivar el sonido El sonido se reactiva también cuando se apaga la alimentación o se cambia el nivel del sonido Mientras se visualiza el menú Sonido si se presiona el botón N del mando a distancia en cualquier m...

Страница 75: ...agen al lado de la otra vea la página 22 Mientras está funcionando el zoom digital Ajuste de Pos Tamaño no se pueden utilizar Las señales siguientes no son aplicables a este menú 1125 50p 60p 1152 864 60 Hz 1400 1050 60 Hz 1600 1200 60Hz 1920 1200 60 Hz Seleccione el aumento requerido para la visualización ampliada Cada vez que se presione este botón el factor de aumento cambiará Esto se muestra e...

Страница 76: ...a poner la HORA ACTUAL botón Avance botón Retroceso Notas Al presionar una vez el botón o la HORA ACTUAL cambia en pasos de 1 minuto Al presionar continuamente el botón o la HORA ACTUAL cambia en pasos de 15 minutos Presione para seleccionar Ajustar Pulse para completar el ajuste HORA ACTUAL Nota No se puede seleccionar Ajustar a menos que la HORA ACTUAL esté puesta Presione para salir de Puesta d...

Страница 77: ...e APAGADO cambia en pasos de 15 minutos Pulse para seleccionar Función de ENCENDIDO Función de APAGADO Pulse para seleccionar ENCENDIDO Pulse dos veces para salir de Configuración Nota La función del temporizador no se activará si no se establece HORA ACTUAL Visualice la pantalla TEMPORIZADOR ajuste 1 2 3 TEMPORIZADOR ajuste Función de APAGADO Hora de APAGADO Función de ENCENDIDO 0 00 0 00 HORA ACT...

Страница 78: ...eleccionar Modo Pulse para seleccionar cada elemento del modo Apagado Intervalo Funciona cuando Tiempo periódico y Tiempo de operación están establecidos y llegan esas horas Designación de tiempo Funciona cuando Hora de inicio y Hora de finalización están establecidas y llegan esas horas Encendido Funciona cuando se selecciona inicio y se presiona ACTION Protec pantalla Para impedir las imágenes se...

Страница 79: ...o Autodesplazamiento Encendido o Apagado Limite de brillo 2 3 1 Presione para visualizar la pantalla de menú Configuración Protec pantalla Para impedir las imágenes secundarias Modo Autodesplazamiento función Límite de brillo Protec pantalla lnicio Panel lateral Hora de finalización Hora de inicio De barra blanca Apagado 6 15 12 30 Alto Apagado Apagado HORA ACTUAL 99 99 Modo Autodesplazamiento Prot...

Страница 80: ...1 y 2 de la guía de operaciones Notas Para disminuir la aparición de imágenes fantasma ajuste el Panel lateral a Alto Los paneles laterales pueden destellas en blanco y negro alternativamente dependiendo de la imagen que esté siendo mostrada en la pantalla Si se utiliza el modo de cine se reducirá el parpadeo Paneles lateralesl Visualización en el modo 4 3 Imágenes secundarias Imagen fuera de imag...

Страница 81: ...ción puede cambiar la etiqueta de la señal de entrada que va a ser visualizada Seleccione la señal de entrada cuya etiqueta quisiera cambiar antes de personalizar las etiquetas de entrada Vea las páginas 15 y 18 Nota Mientras selecciona una señal de entrada a través del tablero de terminales conectado a una de las ranuras comprendidas entre la 1 y la 3 Input label dependerá de cada tablero de term...

Страница 82: ...MULTI DISPLAY Pulse para seleccionar MULTI DISPLAY Pulse para establecer Encendido o Apagado Cómo preparar la MULTI DISPLAY Grupo de 16 4 4 Grupo de 4 2 2 Grupo de 9 3 3 1 2 3 2 2 Configuración Protec pantalla MULTI DISPLAY TEMPORIZADOR ajuste Puesta de HORA ACTUAL 2 MULTI DISPLAY Escala horizontal Apagado Apagado A1 Ubicación Escala vertical Franja oculta vídeo 2 MULTI DISPLAY Preparación para MU...

Страница 83: ...ULTI DISPLAY 2 1 2 3 4 4 8 Pulse para seleccionar Escala horizontal Pulse para seleccionar 1 2 3 4 Pulse para seleccionar Ubicación Pulse para seleccionar el número de disposición requerido A1 D4 Vea las explicaciones siguientes 2 MULTI DISPLAY Escala horizontal Apagado Apagado A1 Ubicación Escala vertical Franja oculta vídeo 2 MULTI DISPLAY 5 Pulse para seleccionar Escala vertical Pulse para sele...

Страница 84: ...ncia Esta acción tiene el mismo efecto que pulsar los botones al mismo tiempo Notas Configure el ID del mando a distancia en On para operar el ID del mando a distancia Si el ID remoto se fija en On usted puede utilizar el mando a distancia sin un número de ID idéntico durante la visualización del menú de opciones ver página 42 El mando a distancia del ID no puede utilizarse cuando el selector de ID ...

Страница 85: ... Nota Cuando está activado este ajuste sólo afecta a las señales de entrada NTSC Nota Puede que no sea posible seleccionar dependiendo de la tarjeta opcional que esté instalada 1 2 1 2 PC Apagado Ahorro en reposo Apagado Energía monitor Apagado Autoapagado Apagado Idioma de OSD Español Seleccione entrada componente RGB RGB Etiqueta de entrada Señal Ahorro de consumo Configuración 1 2 PC Apagado Ah...

Страница 86: ... Nota La P NR no se puede ajustar mientras se aplica una señal PC 1 2 Modo Función Sistema de color Ajusta el sistema del color para que concuerde con la señal de entrada Si lo pone en Auto el sistema de color se determina automáticamente Auto SECAM M NTSC NTSC PAL Panasonic Auto 4 3 Ajuste 4 3 para ver imágenes 4 3 en un formato sin cambiar cuando se seleccione Panasonic Auto Si desea ver imágene...

Страница 87: ...introduce desde el conector G BNC VBS Utiliza una señal sincronizada de la entrada de sincronización compuesta que entra por el conector HD Indica las frecuencias H horizontal V vertical Esta visualización sólo es válida para las señales de entrada RGB PC y Digital Gama de indicación Horizontal 15 110 kHz Vertica 48 120 Hz Frecuencia horizontal kHz Frecuencia vertical Hz 1 2 PC Apagado Ahorro en r...

Страница 88: ... On Off On Encendido Muestra la siguiente información en pantalla Visor de encendido Visor del interruptor de señal de entrada No aparece señal El silenciador Mute y el tiempo restante de off timer después de fue presionado Off Apagado Oculta todos los ítems de arriba de la vista Initial INPUT Off PC INPUT1 INPUT2 INPUT3 Ajusta la señal de entrada cuando está encendida la TV Notas Sólo se visualiz...

Страница 89: ... de entrada puede utilizarse cuando esté en Off En el modo de visor de dos pantallas si hay algo configurado aparte de Off el valor se fijará como el valor de entrada en el modo de visor de una pantalla Studio W B Off On Off Apagado Anula todas las configuraciones ajustadas On Encendido Configura la temperatura del color para un estudio de TV Nota Válido solamente cuando se configura el bajo como la ...

Страница 90: ...ndo éste se utiliza en Remote ID o en Serial ID Fije el rango de valor en 0 100 Valor estándar 0 Remote ID Off On Off Apagado Desactiva las funciones del ID del mando a distancia Usted puede utilizar las operaciones normales del mando a distancia On Encendido Activa las funciones del ID del mando a distancia Serial ID Off On Configura el Control de ID del panel Off Apagado Desactiva el control exte...

Страница 91: ...guración 2 Presione el botón de subida o bajada del volumen para seleccionar Idioma de OSD 3 Mantenga presionado la tecla ENTER hasta que aparezca el menú SHIPPING 4 Presione el botón de subida o bajada del volumen para seleccionar YES 5 Presione la tecla ENTER Nota Presione el botón R para volver al menú Configuración cuando aparezca el menú SHIPPING 1 2 Señal PC Apagado Ahorro en reposo Apagado E...

Страница 92: ...imagen y el sonido Sin embargo esto no indica ningún fallo en el funcionamiento Panel de pantalla de plasma Síntomas Verificaciones La pantalla se oscurece ligeramente cuando se muestran imágenes brillantes con movimientos mínimos La pantalla se oscurece ligeramente cuando se visualizan fotos imágenes fijas de un ordenador u otras imágenes con movimientos mínimos durante un período de tiempo prolong...

Страница 93: ... 34 24 28 1 024 768 50 Hz 39 55 50 00 51 89 29 1 024 768 60 Hz 48 36 60 00 65 0 30 1 024 768 70 Hz 56 48 70 07 31 1 024 768 75 Hz 60 02 75 03 32 1 024 768 85 Hz 68 68 85 00 33 1 066 600 60 Hz 37 88 60 32 53 94 34 1 152 864 60 Hz 53 70 60 00 81 62 35 1 152 864 75 Hz 67 50 75 00 36 1 280 960 60 Hz 60 00 60 00 37 1 280 960 85 Hz 85 94 85 00 38 1 280 1 024 60 Hz 63 98 60 02 108 0 39 1 280 1 024 75 Hz ...

Страница 94: ...de 24 contactos x 1 cumple con DVI Revision 1 0 Consulte la página 12 para conocer las señales aplicables Minitoma estéreo M3 x 1 0 5 Vrms Compatible con HDCP 1 1 COMPONENTE RGB Y G BNC PB B BNC PR R BNC AUDIO IN Toma de patilla RCA 2 Y o G con sincronización 1 0 Vp p 75 0 7 Vp p 75 0 5 Vrms PC ALTA DENSIDAD CONECTOR MINI D SUB DE 15 CONTACTOS B PB CB R PR CR HD VD VBS uso del puerto HD AUDIO IN M...

Страница 95: ... 90068 323 436 3500 Dallas Region 6226 Abington Way Houston TX 77008 713 802 2726 No CA Northwest Region 5870 Stone Ridge 3 Pleasanton CA 925 416 5108 Government Marketing Department 52 West Gude Drive Rockville MD 20850 301 738 3840 Panasonic Canada Inc 5770 Ambler Drive Mississauga Ontario L4W 2T3 Registro del cliente El número de modelo y número de serie de este producto están en la cubierta tr...

Отзывы: