background image

22

English

First time Auto 
Tuning

When the TV is turned on for the first time, it will 
automatically search for available TV channels and give 
options to set up the TV.

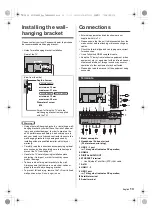
These steps are not necessary if the setup has been 
completed by your local dealer.

Please complete connections (p. 13 - 16) and settings 
(if necessary) of the connected equipment before 
starting Auto Tuning. For information about the 
settings for the connected equipment, read the 
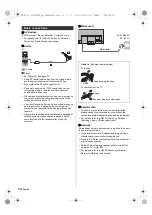
manual of the equipment.

1

Plug the TV into a live mains socket 
and turn the power on

Takes a few seconds to be displayed.

2

Select the following items

Set up each item by following the on-screen instructions.

Example:

How to use the remote control

Select the language
Select [Home]

Select [Home] for use in a home viewing environment.

[Shop] is for shop display.

To change the viewing environment later on, the set 
will need to have all settings initialised by accessing 
[Shipping Condition].

Set up the network connection

Tick the TV signal mode to tune, and then select 
[Start Auto Tuning]
Select your region (Satellite)

If tuning has failed check the Satellite cable, RF cable, 
and the network connection, and then follow the 
on-screen instructions.

The TV goes into Standby mode when no signal is 
received and no operation is performed for 10 minutes 
if [No signal Power off] in the Timer menu is set to [On] 
(factory setting).

To retune all channels

[Auto Tuning] in [Tuning Menu] ([Setup] menu)

If no satellite channel is found, set [LNB Band 
Frequency] to suit your environment.

[LNB Configuration] in [Satellite TV Tuning 
Menu] ([Setup] menu)

To add the available TV signal mode later

[Add TV Signal] in [Tuning Menu] ([Setup] 
menu)

To initialise all settings

[Shipping Condition] in [System Menu] ([Setup] 
menu)

Move the cursor

Access the item / store the setting

Return to the previous item (if available)

Please select your viewing environment.

Shop

Home

Auto Tuning is now complete and the 
TV is ready for viewing.

Note

TH-48_55_65JZ1000Z_Eng_TQB4GA0033.book  22 ページ  2021年4月2日 金曜日 午後1時1分

Содержание TH-48JZ1000Z

Страница 1: ...g this Panasonic product Please read these instructions carefully before operating this product and retain them for future reference Please carefully read the Safety Precautions of this manual before use The images shown in this manual are for illustrative purposes only F0521HN0 English TQB4GA0033 English image TH 65JZ1000Z image TH 48JZ1000Z TH 48_55_65JZ1000Z_Eng_TQB4GA0033 book 1 ページ 2021年4月2日 ...

Страница 2: ...ccessories 8 Installing the TV 8 Installing the wall hanging bracket 13 Connections 13 Identifying Controls 19 First time Auto Tuning 22 Watching TV 23 How to Use eHELP 23 FAQs 24 Maintenance 25 Specifications 26 TH 48_55_65JZ1000Z_Eng_TQB4GA0033 book 2 ページ 2021年4月2日 金曜日 午後1時1分 ...
Страница 3: ...os or title image etc Still or moving pictures viewed in 4 3 or 16 9 aspect ratio etc Video games To avoid image retention the screen saver may be activated OLED logo moves or the on screen message may move after a few minutes if no signals are sent or no operations are performed Set Logo Luminance Control to Max to avoid image retention eHELP Search by Purpose Settings Picture Screen Settings To ...

Страница 4: ...er Before repairing transferring or discarding this TV be sure to erase the information according to the terms and conditions etc of provider The recording and playback of content on this or any other device may require permission from the owner of the copyright or other such rights in that content Panasonic has no authority to and does not grant you that permission and explicitly disclaims any ri...

Страница 5: ... in an area visible on the TV e g within the screen Do not use an unapproved pedestal mounting equipment Be sure to ask your local Panasonic dealer to perform the setup or installation of approved wall hanging brackets Do not apply any strong force or impact to the display panel Ensure that children do not climb on the TV If you detect anything unusual immediately remove the mains plug Do not touc...

Страница 6: ... Do not subject the built in wireless LAN to high temperatures direct sunlight or moisture Data transmitted and received over radio waves may be intercepted and monitored The built in wireless LAN uses 2 4 GHz and 5 GHz frequency bands To avoid malfunctions or slow response caused by radio wave interference when using the built in wireless LAN keep the TV away from other devices that use 2 4 GHz a...

Страница 7: ...y When not in use for a long time This TV will still consume some power even in the Off mode as long as the mains plug is still connected to a live mains socket Remove the mains plug from the wall socket when the TV is not in use for a prolonged period of time Excessive volume If you hear a drumming noise in your ears turn down the volume or temporarily stop using the headphones Battery for the Re...

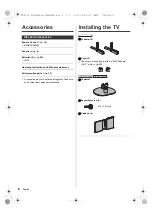
Страница 8: ...ories may not be placed all together Take care not to throw them away unintentionally Installing the TV A Pedestal 2 B Cover 2 The covers are used only with the With Pedestal OUT style p 10 C Pedestal D Assembly screw 4 E Cable cover Standard accessories M4 15 mm 48 inch model 55 inch model 65 inch model TH 48_55_65JZ1000Z_Eng_TQB4GA0033 book 8 ページ 2021年4月2日 金曜日 午後1時1分 ...
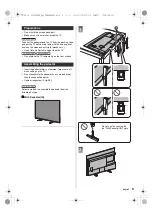
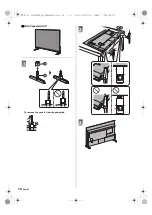
Страница 9: ...porarily on the floor or desk Insert the pedestal firmly otherwise it may come off when setting up the TV Do not assemble the pedestal by any method other than those specified below Cable arrangement p 16 Select a method to assemble the pedestal from the following 2 styles With Pedestal IN Preparations Assembling the pedestal 48 inch model 55 inch model 65 inch model 48 inch model A 1 Do not use t...

Страница 10: ...10 English With Pedestal OUT To remove the covers from the pedestals 1 B A A B 2 3 TH 48_55_65JZ1000Z_Eng_TQB4GA0033 book 10 ページ 2021年4月2日 金曜日 午後1時1分 ...
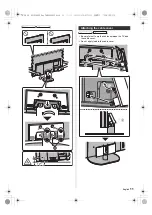
Страница 11: ...he cables between the TV and the cable cover Do not apply load to the cable cover 55 inch model 65 inch model C D Attaching the cable cover 55 inch model 65 inch model E TH 48_55_65JZ1000Z_Eng_TQB4GA0033 book 11 ページ 2021年4月2日 金曜日 午後1時1分 ...
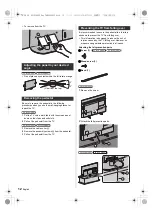
Страница 12: ...al to a furniture as shown to prevent the TV from falling over This information is designed to reduce the risk of injuries caused by the TV falling over However no measure can guarantee protection in all cases Attaching the fall prevention parts F Screw 1 G Wood screw 1 H Band 1 1 Remove the screw 2 Attach the fall prevention parts Adjusting the panel to your desired angle Removing the pedestal E ...

Страница 13: ...r in use Connections External equipment and cables shown are not supplied with this TV Please ensure that the unit is disconnected from the mains socket before attaching or disconnecting any cables Check the terminal type and cable plugs are correct for connection Use a fully wired HDMI compliant cable Keep the TV away from electronic equipment video equipment etc or equipment with an infrared sen...

Страница 14: ...sting systems or accessories required and the costs incurred are the responsibility of you the customer Mains lead Satellite dish To ensure your satellite dish is correctly installed please consult your local dealer Also consult the received satellite broadcasting companies for details For details refer to eHELP Search by Purpose Watching Basic Basic connection Network A broadband network environm...

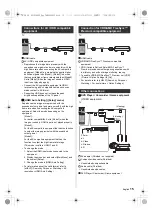
Страница 15: ...gamut Mode3 For the 4K compatible equipment that has the function to output the high frame rate image This mode is valid in HDMI 1 and 2 To change the mode 1 Select the HDMI input mode connected to the equipment 2 Display the menu bar and select Main Menu and then select Setup 3 Change the mode in HDMI Auto Setting For information about the valid format refer to eHELP Search by Purpose Watching 4K...

Страница 16: ...woofer output from the TV is the same for both L and R For information about the headphone terminal output settings refer to eHELP Search by Purpose Settings Sound USB HDD for recording Use USB 1 port for connecting the USB HDD For details refer to eHELP Search by Purpose Recording VIERA Link Use HDMI 1 4 for VIERA Link connection For details refer to eHELP Search by Purpose Functions VIERA Link H...

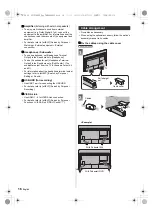
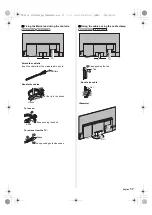
Страница 17: ... loosen To remove from the TV Fixing the cables using the cable clamp Bundle the cable Example 55 inch model 65 inch model Hole Set the tip in the hooks Hooks Keep pushing the knob Knob Snaps Keep pushing both side snaps 55 inch model 65 inch model Keep pushing the tab Tab Set TH 48_55_65JZ1000Z_Eng_TQB4GA0033 book 17 ページ 2021年4月2日 金曜日 午後1時1分 ...
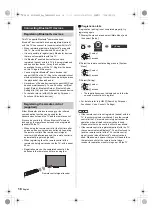
Страница 18: ...ol at the remote control signal receiver with batteries inserted the remote control is automatically registered paired When registering face the remote control at the remote control signal receiver on the TV within about 50 cm Registration may not be completed correctly if the batteries in the remote control are running low If registration fails If registration pairing is not completed properly tr...

Страница 19: ... information 10 OK Confirms selections and choices Press after selecting channel positions to quickly change channel Displays channel list 11 Option menu Displays optional settings 12 LIST Starts operator application or displays channel list 13 Voice control button Used for the voice control function 14 Sound Mute On Off 15 Volume Up Down 16 Numeric buttons Changes channel and teletext pages When ...

Страница 20: ...y not be available depending on the country area or broadcaster The TV needs to be connected to the internet in order to perform searches etc p 14 The effective range for voice controls depends on the viewing environment Operation may not be correct depending on the type of voice the person has and the way they speak as well as the surrounding environment and conditions When other Bluetooth device...

Страница 21: ... On Be sure to turn the TV off with the remote control to perform the panel maintenance During the panel maintenance LED turns to orange During panel maintenance avoid touching and exerting any pressure on the screen e g wiping the screen etc There are two types of the maintenance as following Normal maintenance automatically starts and it takes approx 10 minutes Regular maintenance takes approx 8...

Страница 22: ...sed by accessing Shipping Condition Set up the network connection Tick the TV signal mode to tune and then select Start Auto Tuning Select your region Satellite If tuning has failed check the Satellite cable RF cable and the network connection and then follow the on screen instructions The TV goes into Standby mode when no signal is received and no operation is performed for 10 minutes if No signa...

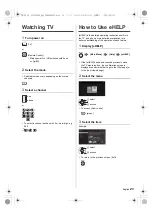
Страница 23: ...anding of the operation of each feature 1 Display eHELP If the eHELP has been accessed previously since the TV was turned on the confirmation screen is displayed to select whether to go to the First page or to the Last viewed page 2 Select the menu To access How to use 3 Select the item Example To return to the previous screen field TV Remote Control Mains power On Off switch should be on p 21 up ...

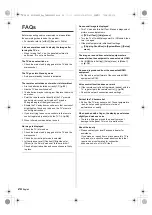
Страница 24: ...cture menu set to the minimum Check all required cables and connections are firmly in place An unusual image is displayed This TV has a built in Self Test Makes a diagnosis of picture or sound problems TV Self Test Help menu Turn the TV off with Mains power On Off switch then turn it on again If the problem persists initialise all settings Shipping Condition in System Menu Setup menu The image or ...

Страница 25: ...st remove the mains plug from the mains socket Regular care Gently wipe the surface of the display panel cabinet or pedestal by using a soft cloth to remove dirt or fingerprints For stubborn dirt 1 First clean the dust from the surface 2 Dampen a soft cloth with clean water or diluted neutral detergent 1 part detergent to 100 parts water 3 Wring out the cloth firmly Please note do not let liquid e...

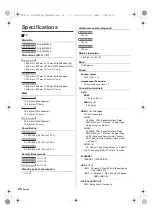
Страница 26: ...bwoofer 3 5 mm stereo mini jack 1 Connection terminals AV IN VIDEO 1 0 V p p 75 Ω AUDIO L R 0 5 V rms HDMI 1 2 3 4 input TYPE A Connectors HDMI 1 4K120Hz VRR Variable Refresh Rate AMD FreeSync Premium Content Type Deep Colour x v Colour HDMI 2 4K120Hz VRR Variable Refresh Rate AMD FreeSync Premium Content Type eARC Enhanced Audio Return Channel ARC Audio Return Channel Deep Colour x v Colour HDMI ...

Страница 27: ...2 11a n ac 5 GHz band IEEE802 11b g n 2 4 GHz band Security WPA3 SAE AES WPA2 PSK TKIP AES WPA PSK TKIP AES WEP 64 bit 128 bit Bluetooth wireless technology Standard Compliance and Frequency band Bluetooth 5 0 2 4 GHz band Not all the Bluetooth compatible devices are available with this TV Up to 5 devices can be used simultaneously Design and Specifications are subject to change without notice Mas...

Страница 28: ...ic Corporation 2021 English Printed in Malaysia Customer s Record The model number and serial number are located on the side of the unit or the model name plate on the rear of the unit You should note this serial number in the space provided below and retain this book plus your purchase receipt as a permanent record of your purchase to aid in identification in the event of theft or loss and for Wa...

Отзывы: