

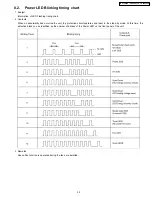
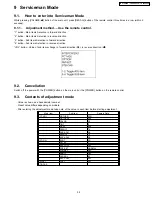
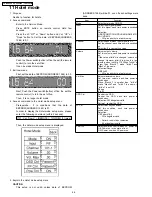


9 Serviceman Mode
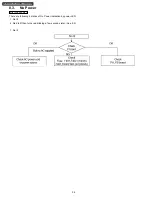
9.1. How to enter into Serviceman Mode
While pressing [VOLUME-
] button of the main unit, press [RECALL] button of the remote control three times in a row (within 2
seconds).
9.1.1. Adjustment method.....Use the remote control.
“1” button...Main items Selection in forward direction
“2” button...Main items Selection in reverse direction
“3” button...Sub items Selection in forward direction
“4” button...Sub items Selection in reverse direction
“VOL” button...Value of sub items change in forward direction (
), in reverse direction (
)
9.2. Cancellation
Switch off the power with the [POWER] button on the main unit or the [POWER] button on the remote control.
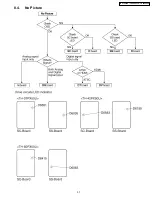
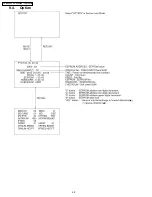
9.3. Contents of adjustment mode
·
Value is shown as a hexadecimal number.
·
Preset value differs depending on models.
·
After entering the adjustment mode, take note of the value in each item before starting adjustment.
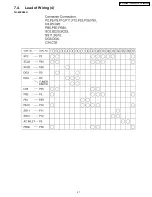
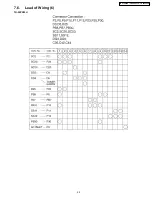
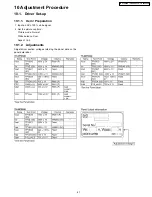
Main item
Sub item
Sample Data
PCT-ADJ
PICTUER
22D
PICTUER2
200
COLOR
30
TINT
0
S-BRT
800
RFAGC1
74
AGC-ADJ1
FIX
RFAGC2
74
AGC-ADJ2
FIX
OPTION
BOOT
SD
OPT00
1
ANT-POW
OFF
POF-SET
NORMAL
STB-SEC
SEC
EMGCY
OFF
CLK-ADJ
80
EEP COPY
ALL
RM-SET
COPY
ALL
STB-CAS
-
-
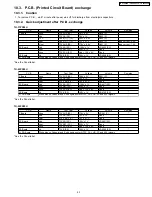
39
TH-37PX50U / TH-42PX50U / TH-50PX50U
Содержание TH-42PX50U
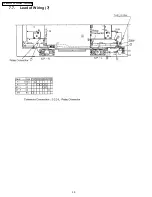
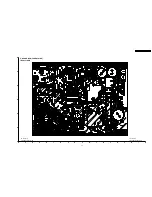
Страница 24: ...7 Location of Lead Wiring 7 1 Lead of Wiring 1 TH 37PX50U 24 TH 37PX50U TH 42PX50U TH 50PX50U ...
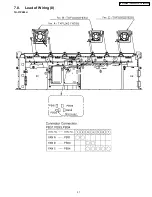
Страница 25: ...7 2 Lead of Wiring 2 TH 37PX50U 25 TH 37PX50U TH 42PX50U TH 50PX50U ...
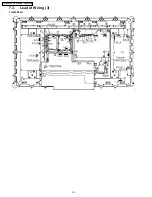
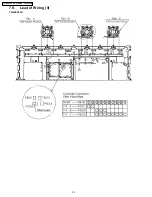
Страница 26: ...7 3 Lead of Wiring 3 TH 42PX50U 26 TH 37PX50U TH 42PX50U TH 50PX50U ...
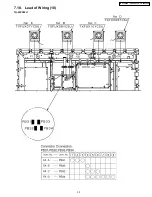
Страница 27: ...7 4 Lead of Wiring 4 TH 42PX50U 27 TH 37PX50U TH 42PX50U TH 50PX50U ...
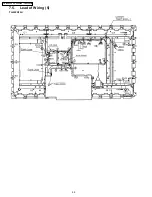
Страница 28: ...7 5 Lead of Wiring 5 TH 50PX50U 28 TH 37PX50U TH 42PX50U TH 50PX50U ...
Страница 29: ...7 6 Lead of Wiring 6 TH 50PX50U 29 TH 37PX50U TH 42PX50U TH 50PX50U ...
Страница 30: ...7 7 Lead of Wiring 7 30 TH 37PX50U TH 42PX50U TH 50PX50U ...
Страница 31: ...7 8 Lead of Wiring 8 TH 37PX50U 31 TH 37PX50U TH 42PX50U TH 50PX50U ...
Страница 32: ...7 9 Lead of Wiring 9 TH 42PX50U 32 TH 37PX50U TH 42PX50U TH 50PX50U ...
Страница 33: ...7 10 Lead of Wiring 10 TH 50PX50U 33 TH 37PX50U TH 42PX50U TH 50PX50U ...
Страница 37: ...8 4 No Picture 37 TH 37PX50U TH 42PX50U TH 50PX50U ...
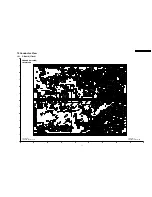
Страница 40: ...9 4 Option 40 TH 37PX50U TH 42PX50U TH 50PX50U ...
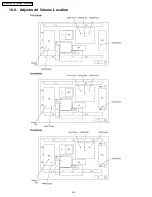
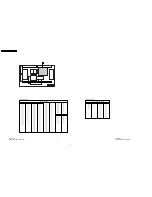
Страница 44: ...10 4 Adjustment Volume Location 44 TH 37PX50U TH 42PX50U TH 50PX50U ...
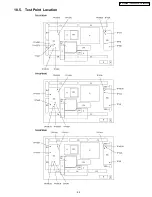
Страница 45: ...10 5 Test Point Location 45 TH 37PX50U TH 42PX50U TH 50PX50U ...
Страница 108: ...TH 37PX50U TH 42PX50U TH 50PX50U 108 ...
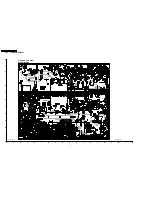
Страница 109: ...13 Block and Schematic Diagram 13 1 Schematic Diagram Notes TH 37PX50U TH 42PX50U TH 50PX50U 109 ...
Страница 227: ...14 Parts Location Mechanical Replacement Parts List 14 1 Parts Location 227 TH 37PX50U TH 42PX50U TH 50PX50U ...
Страница 228: ...14 2 Pcaking Exploded Views 1 228 TH 37PX50U TH 42PX50U TH 50PX50U ...
Страница 229: ...14 3 Pcaking Exploded Views 2 229 TH 37PX50U TH 42PX50U TH 50PX50U ...
Страница 230: ...14 4 Pcaking Exploded Views 3 230 TH 37PX50U TH 42PX50U TH 50PX50U ...
Страница 233: ...15 Electrical Replacement Parts List 15 1 Replacement Parts List Notes 233 TH 37PX50U TH 42PX50U TH 50PX50U ...


