28
29
Advanced
VIERA
Link
TM
“HDA
VI Control
TM
”
ANTENNA
Cable In
Y
P
R
P
B
R
L
AUDIO
R
L
AUDIO
VIDEO
HDMI 1
HDMI 2
COMPONENT IN
VIDEO IN 1
AUDIO IN
PC
DIGITAL
AUDIO OUT
ANTENNA
Cable In
Y
P
R
P
B
R
L
AUDIO
R
L
AUDIO
VIDEO
COMPONENT IN
AUDIO IN
PC
VIERA Link
TM
“HDAVI Control
TM
”
Simultaneously control all Panasonic “HDAVI Control” equipped components using one button on the TV remote.
Enjoy additional HDMI Inter-Operability with Panasonic products which have the “HDAVI Control” function.
This TV supports “HDAVI Control 4” function.
Connections to some Panasonic equipment (DVD recorder DIGA, HD Camcorder, Player theatre, RAM theater,
Amplifier, etc.) with HDMI cables allow you to interface with them automatically.
Equipment with the “HDAVI Control” function enables the following operations:
■
For the first time/When adding new equipment, reconnecting equipment or changing the setup
after the connection, turn the equipment on and then switch the TV on. Set the input mode to
HDMI1, HDMI2 or HDMI3 (p. 20), and make sure that the image is displayed correctly.
VIERA Link “HDAVI Control”, based on the control functions provided by HDMI which is an industry standard known
as HDMI CEC (Consumer Electronics Control), is a unique function that we have developed and added. As such, its
operation with other manufacturers’ equipment that supports HDMI CEC cannot be guaranteed.
Please refer to the individual manuals for other manufacturers’ equipment supporting the VIERA Link function.
Version
Operations
HDAVI Control or later
•
Automatic Input Switching (p. 31)
•
Power on link (p. 31)
•
Power off link (p. 31)
•
Default speakers (p. 31)
•
One-touch theater playback (p. 31)
•
Speaker control (p. 33)
HDAVI Control 2 or later
•
VIERA Link control only with the TV’s remote control(P. 33)
•
Auto power stand-by (for available equipment only) (p. 31)
•
Direct TV recording (p. 33)
HDAVI Control 3 or later
•
Providing the setting information (p. 31)
•
Automatic lip-sync function (p. 31)
HDAVI Control 4
•
Stand-by power save (with quick start mode) (p. 31)
■
HDMI cable
This function needs an HDMI compliant (fully wired) cable. Non-HDMI-compliant cables cannot be utilized.
It is recommended that you use Panasonic’s HDMI cable. Recommended part number:
RP-CDHF15 (4.9 ft/1.5 m), RP-CDHG15 (4.9 ft/1.5 m), RP-CDHF30 (9.8 ft/3.0 m),
RP-CDHG30 (9.8 ft/3.0 m), RP-CDHG50 (16.4 ft/5.0 m)
* For more details on the external equipment’s connections, please refer to the operating manuals for the equipment.
VIERA Link
TM
Connections
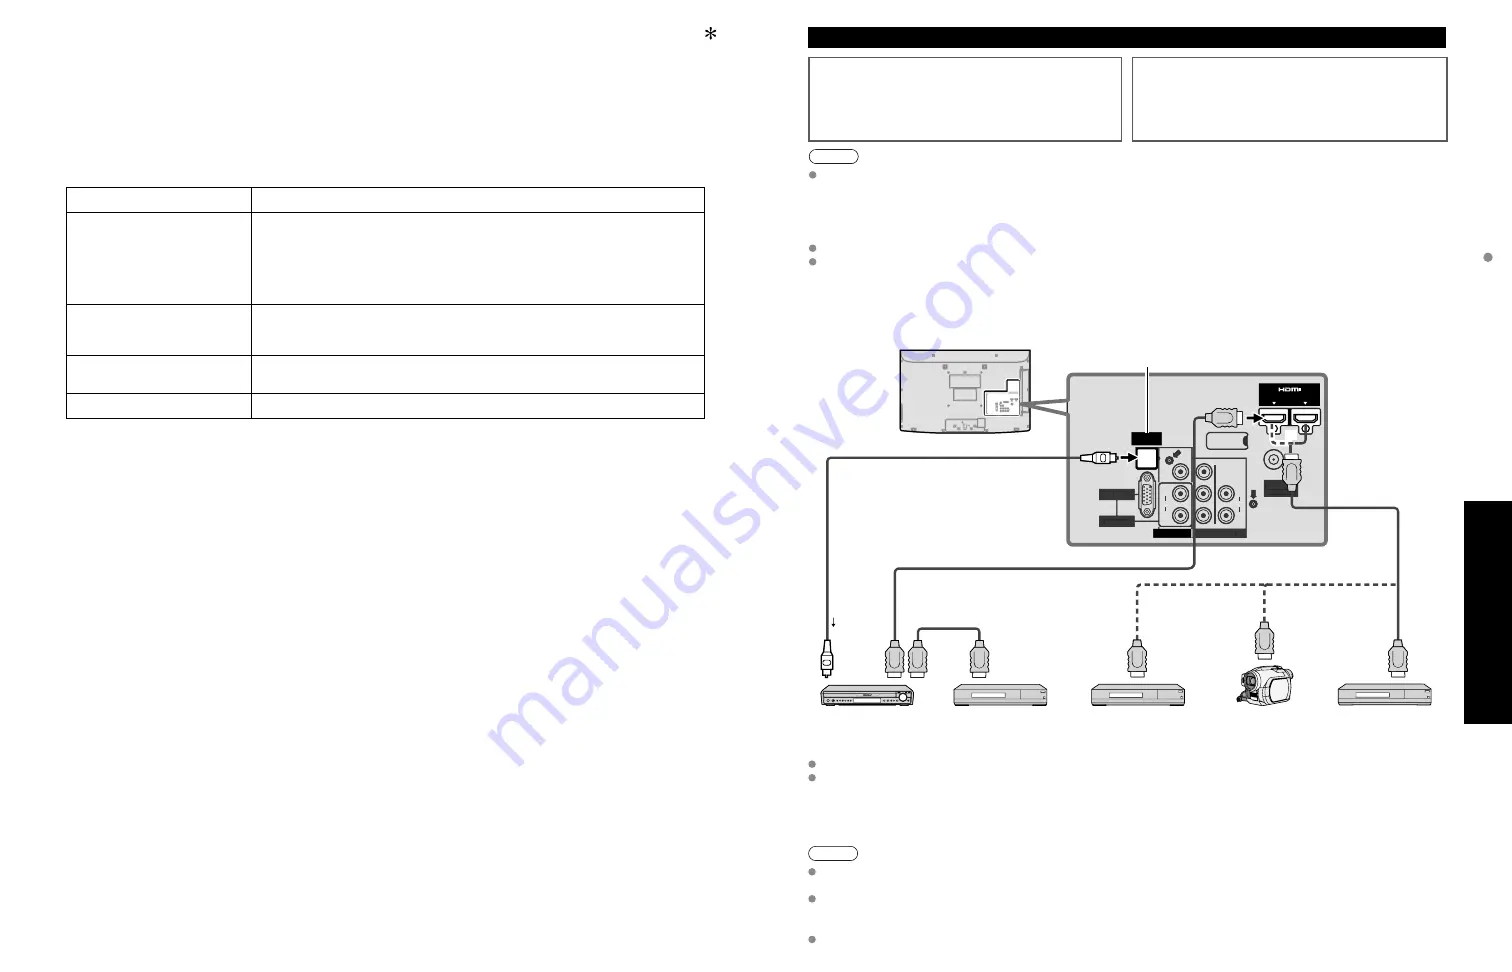
Follow the connection diagrams below for HDAVI control
of a single piece of AV equipment such as a DVD recorder
(DIGA), RAM theater, or Player theater system.
Refer to page 30-33 for Setup Menu settings and additional
control information.
•
Optional HDMI and/or optical cables are not included.
If connection (or setting) of equipment compatible with
HDAVI control is changed, switch the power of this unit Off
and On again while the power of all equipment is On (so that
the unit can correctly recognize the connected equipment)
and check that the DVD recorder (DIGA), RAM theater, and
Player theater playback operate.
Note
HDMI 1 is recommended.
When connecting to HDMI 2/HDMI 3, set the input mode to HDMI 2/HDMI 3 (p. 20) initially before connecting to
HDMI 2/HDMI 3. After connection, confirm the HDMI control functions (p. 30-33).
■
Connecting this unit to the DVD recorder (DIGA), RAM
theater, or Player theater
For DVD recorder (DIGA): Connect with HDMI cable
For RAM theater and Player theater:
Connect with the HDMI and audio cables.
If audio cable is not connected, you cannot listen to the TV program
through the theater system.
■
Connecting this unit to a DVD
recorder (DIGA) and AV amp
When using a “VIERA Link” audio-
video amplifier and a compatible DVD
recorder (DIGA) use a daisy chain
connection as shown below.
One AV amp and one DVD recorder (DIGA) can be operated with this unit.
Be sure to connect the AV amp between this unit and the DVD recorder (DIGA).
■
Setting of this unit after connection
After making connections as shown above, set “VIERA Link” (under “VIERA Link settings”) to “On” using the Setup
menu. (p. 21, 30-33).
Note
Individual HDMI equipment may require additional menu settings specific to each model. Please refer to their
respective operating instruction manuals.
When audio from other equipment connected to this unit via HDMI is output using “DIGITAL AUDIO OUT” of this
unit, the system switches to 2CH audio.
(When connecting to an AV amp via HDMI, you can enjoy higher sound quality.)
For details about HDMI cable for connecting Panasonic HD camcorder, read the manual for the equipment.
HDMI cable
HDMI
(AV OUT)
HDMI
(AV OUT)
Home Theater
Systems with VIERA
Link function
or
HDMI
(AV OUT)
AV amp with
VIERA Link function
DVD recorder (DIGA)
with VIERA Link
function
HD Camcorder
with VIERA Link
function
HDMI
(AV IN)
Digital Audio out
HDMI
(AV OUT)
DVD recorder (DIGA)
with VIERA Link
function
Back of the TV
or
or
or


