Settings
32
32
32
32
ª
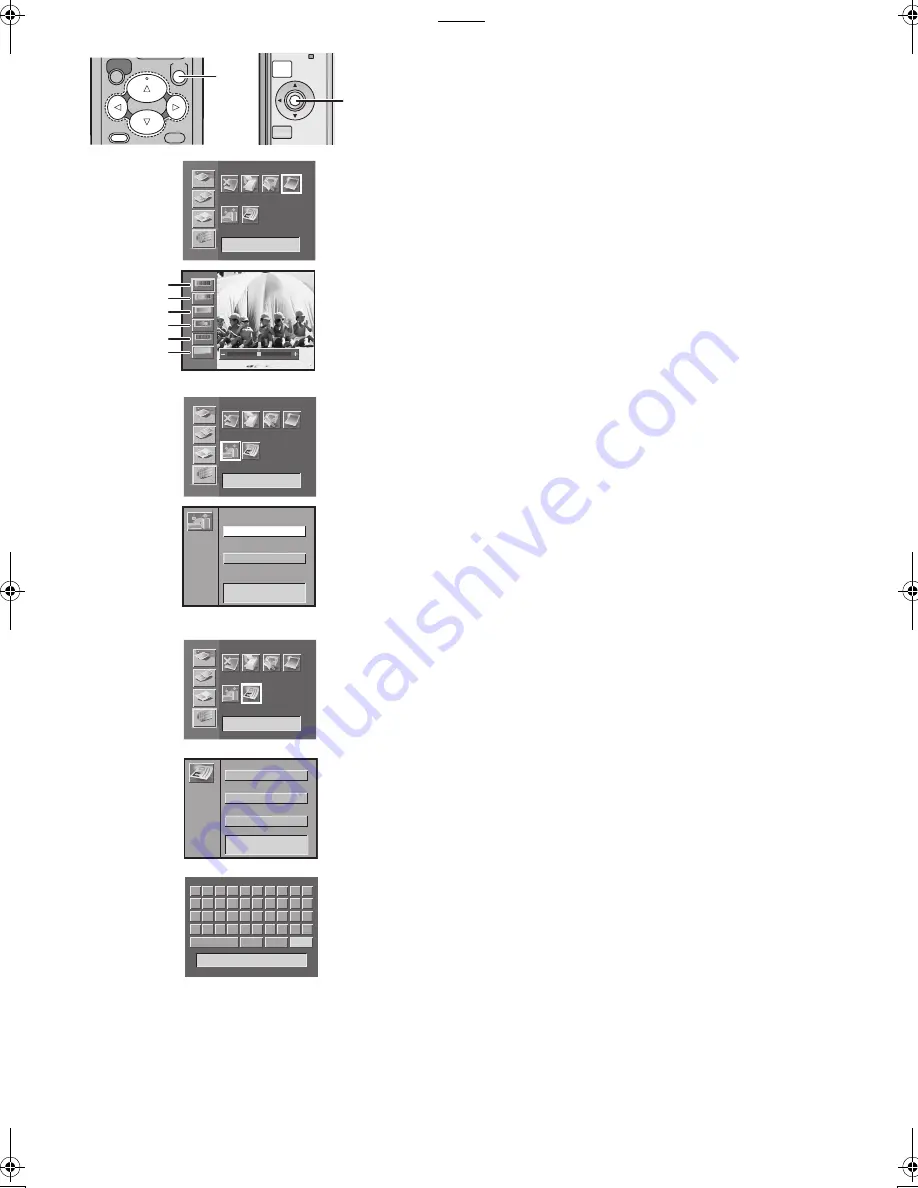
Adjusting Print Picture Quality
≥
Select the INPUT method.
≥
Select the picture you wish to adjust, and make the Single Screen
Display appear.
1
Select [Picture] under [OPTION] on the MENU screen,
and press
A
.
2
Adjust the quality, and press
A
.
34
Buttons: Item Selection
21
Buttons: Adjust
1
Adjust the depth of the colour.
2
Adjust the tint of the colour.
3
Clarify dark portions.
4
Adjust picture brightness and shade.
5
Sharpen outline.
6
Adjust white balance.
≥
Adjustments on the TV Screen are approximations.
≥
Adjustment on the TV Screen does not affect the printing image.
≥
Adjustment of [SHARP] and [AWB] does not change on the TV Screen.
≥
Adjustment is not recorded on the card.
≥
The colour does not become black and white even if adjusting the
depth of the colour to [
j
].
Setting the Layout
When selecting the same setting as the layout, MENU moves as the
Cursor Buttons of the main unit are pushed.
1
1
1
1
Select [Layout] under [OPTION] on the MENU screen,
and press
A
.
2
2
2
2
Select [Vertical] or [Horizontal], and press
A
.
Setting the Owner ID
You can register your name and address in your Photo Printer to identify
the owner.
1
Select [Owner ID] under [OPTION] on the MENU screen,
and press
A
.
2
Press
A
to change Owner ID.
3
Input a PIN Number. Select desired numbers or
characters and press
A
.
≥
You can input 4 characters.
4
Select
[Next] and press
A
.
5
Repeat Steps 3–4 to input desired numbers or
characters for [Your name]>>[House No.]>>[Postcode].
≥
You can input up to 12 characters in [Your name], and up to
11 characters in [House No.] and [Postcode].
6
Select [Next] and press
A
to finish the setup.
To verify Owner ID
≥
Select [Owner ID] under [OPTION] on the MENU screen and verify
Owner ID.
To Check Owner ID
≥
If Owner ID has already been set, carrying out Step1 above will display
[SET: Change Owner ID.] or [CANCEL: Return to main menu.] on the
screen. Input the PIN Number you have already selected. If the
number is not correct, the screen will not change. If the number is
correct, the contents of the setup will be displayed. (By repeating Steps
3 to 4 above, you can change the contents.)
MENU
SET
DISPLAY/
CANCEL
A
SET
DISPLAY/
CANCEL
MENU
A
1
Trim
A
BASIC
FUNCTION
EFFECT
OPTION
Number Date
5
7
7
5
3
3
2
Picture
Layout Owner ID
COLOUR
BRIGHT
CONTRAST
SHARP
AWB
C·BALANCE
1
2
3
4
5
6
2
Trim
A
BASIC
FUNCTION
EFFECT
OPTION
Number Date
5
7
7
5
3
3
2
Picture
Layout Owner ID
Vertical
Horizontal
Layout
1
2
Trim
A
BASIC
FUNCTION
EFFECT
OPTION
Number Date
5
7
7
5
3
3
2
Picture
Layout Owner ID
Your name:
Postcode :
House No.:
Owner ID
1
2
3
Delete All
Delete
Space
Next
A
B
C
D
E
F
G
H
I
J
K
L
M N
O
P
R
S
T
U
V W X
Y
Z
r
s
8
0
1
2
3
4
5
Q
6
7
9
SV‑AP10B.book 32 ページ 2002年9月18日 水曜日 午前8時55分
Содержание SV-AP10E
Страница 55: ...55 55 55 55 ...


