background image

8

9

Usage

Cooking Rice

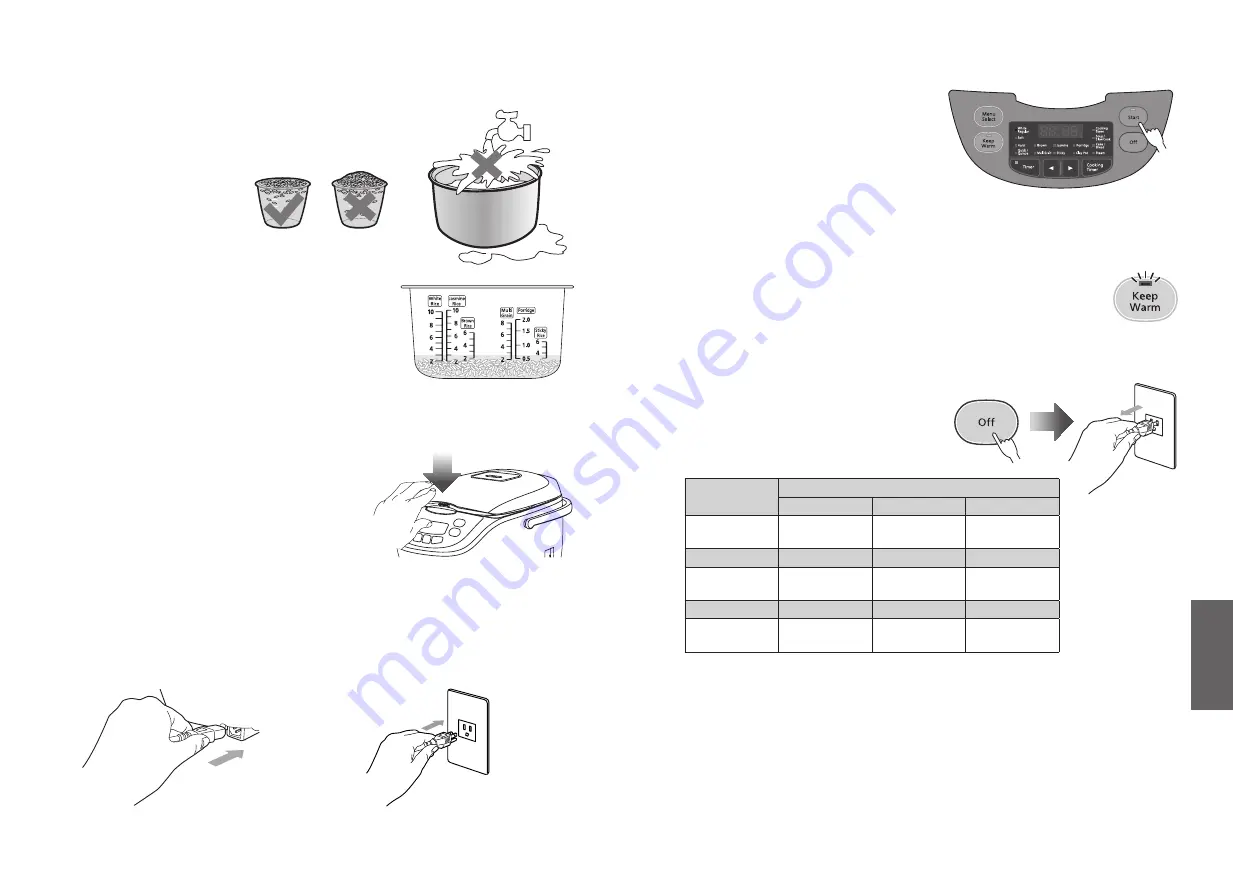
Weigh out required rice (A Measuring Cup of rice is about 150 

g

);

O

O

Wash rice in another 

container and make sure 

to wash it clean.

O

O

It is better not to wash rice 

directly inside the Inner 

Pan in order to avoid 

scuffing the Inner Pan.

Put the cleaned rice into the Inner Pan and 

fill it with water to a corresponding water 

level (e.g. if cooking 3 cups of white rice, 

water should be added to Mark 3 of the 

Water Level (White Rice)). The water 

quantity can be increased or decreased 

reasonably according to personal 

preference.

O

O

Never exceed the highest Water Level.

Wipe up the external surface of Inner 

Pan with dry cloth, putting it into the 

Rice Cooker. Then press down the 

Outer Lid until a sound of “click” is 

heard.

O

O

Never heat the Inner Pan on other stoves to 

avoid deformation caused by high 

temperatures; it is not allowed to use any 

other container, instead of the Inner Pan, on 

the Heating Plate.

Connect the Instrument Plug to the body first and then connect the 

Power Plug.

O

O

Make sure that both plugs are firmly connected.

The Inner Pan in the 

illustration is the 1.8 L 

model.

Press the “Start” button to enter the 

working process of a corresponding 

menu. The “Start” indicator lights 

up.

O

O

By default, “White Regular” is selected. 

When changing it, see page 11.

O

O

When using the timer, see page 11.

O

O

Entering state of stewing rice. The display 

shows remaining stewing time in countdown.

O

O

According to the judgment of rice and water quantity by the computer program 

during cooking rice, the stewing time is automatically set to 5 min or 10 min.

After cooking, automatically switches to the keep warm 

function.

O

O

To prevent the rice from sticking together and reducing its 

taste, it is best to loosen the rice immediately.

O

O

Please use the attached Rice Scoop to fill rice instead of metal spoon which 

may cause scratch to the Inner Pan.

After the use, press the “Off” button to 

enter state of standby, and then 

unplug the Rice Cooker.

Periods of cooking rice for various functions 

(only for reference):

Menu

White

Regular

Soft

Hard

Approximate 

cooking time

40 min

50 min

38 min

Menu

Quick/Quinoa

Brown

Multi Grain

Approximate 

cooking time

30 min

2 h

1 h

Menu

Jasmine

Sticky

Clay Pot

Approximate 

cooking time

40 min

40 min

1 h

The cooking time in the above table may vary with different voltage, water quantity, 

rice quantity, water temperature and rice quality.

Содержание SR-CP108

Страница 1: ...re safe and correct operation before use O OBefore use be sure to read Safety Precautions Pages 2 4 O OKeep the operating instructions and the warranty for future use Warranty appended Contents Safety Precautions 2 Notes on Use 5 Part Names Accessories 6 Preparation Cooking Rice 8 Using the Settings Correctly 10 Using Different Settings 11 O OTimer Usage Cleaning 12 Troubleshooting 14 O OError Ind...

Страница 2: ...The instrument plug and power plug must be inserted into the Socket and power outlet thoroughly to avoid fire electric shock or short circuit When the power cord or power plug is damaged or the power plug is loosely connected to the power outlet never use the appliance to avoid fire electric shock or short circuit Never pull off the power plug with a wet hand to avoid electric shock and injury Dur...

Страница 3: ...use the Rice Cooker may generate tiny sound of click or sizz which is a normal sound of operation and do not panic Never have the Rice Cooker to operate again immediately after cooking Wait at least for 15 minutes so as to have the Heating Plate cool down Never cook rice with hot water as this may affect the temperature judgment by the thermostat thus degrade cooking effect In operation never cove...

Страница 4: ...m indicator Timer indicator Menu Select button O O This button is used to select the desired menu Keep Warm button O O After cooking the Keep Warm indicator automatically turns on O O This button is used to start the keep warm function Timer button O O This button is used to set the timer Cooking Timer button O O When selecting Porridge this button is used after pressing Timer button to go back to...

Страница 5: ...n is the 1 8 L model 5 Press the Start button to enter the working process of a corresponding menu The Start indicator lights up O O By default White Regular is selected When changing it see page 11 O O When using the timer see page 11 O O Entering state of stewing rice The display shows remaining stewing time in countdown O O According to the judgment of rice and water quantity by the computer pr...

Страница 6: ...ng the Timer indicator turns off and the Start indicator turns on Menu Water Level of Inner Pan Keep Warm Function 1 Timer Setting Restriction 2 Cook white rice in different textures White Regular White Rice From 60 min before done Soft White Rice From 60 min before done Hard White Rice From 60 min before done Quick cooking or cook quinoa Quick White Rice Quinoa 3 Cook brown rice Brown Brown Rice ...

Страница 7: ...it Button Open while pressing the button OPEN CLOSE Turn it in the direction of the arrow and pull it Q QAttaching In the reverse order to removing Close it Shaft Insert the shaft and close firmly until it clicks OPEN CLOSE Fold and press it firmly When a clear sound is heard it indicates completion of assembly Attach on the Outer Lid Packing Packing Accessories Wash with a mild washing up liquid ...

Страница 8: ...anel Whether power cut off The rice was not loosened after cooking was completed Whether the Steam Cap has been fixed properly Excessive long hours on preset timer Whether the Outer Lid has been closed properly Did not wash the rice fully Grain of rice or foreign objects stayed at the Packing Inner Pan border areas Excessive long hours on keep warm function Symptom Probable cause Cooking rice prob...

Страница 9: ...oo long Inadequate mixing or mixed too long Wrong ingredient quantity Please send to an authorized service center for repair if the unit is found to be defective after the inspection carried out on the table above Troubleshooting Others Symptom Probable cause Strange sound occurs Sound occurs because of water that has stuck to the Inner Pan No power Pull out the Power Plug and check the power outl...

Страница 10: ...RZ19VK87 F1118T0 Specifications Model Rated Voltage Rated Power W Cooking Capacity L Rice Quantity Cup Heating Model L W H mm Weight kg SR CP108 220 V 50 Hz 640 1 0 5 5 Direct Heating 349 245 209 3 4 SR CL108 3 0 SR CX188 765 1 8 10 384 274 249 4 5 SR CP188 384 274 246 4 4 SR CL188 3 8 ...

Страница 11: ...OTrươ c khi sư du ng ha y chă c chă n đo c phâ n Ca c biê n pha p sử dụng an toa n Trang 2 4 O OGiữ hướng dẫn sử dụng và giâ y bảo hành để sử dụng sau này Đa đo ng dâ u ba o ha nh Mu c lu c Các biện pháp sử dụng an toàn 2 Lưu y trong qua tri nh sư du ng 5 Tên bô phâ n Phu kiê n 6 Chuẩn bị Nâ u cơm 8 Sư du ng ca c cài đặt mô t ca ch chi nh xa c 10 Sư du ng ca c chức năng kha c nhau 11 O OHẹn Giờ Sử...

Страница 12: ... cắm điện đều phải được làm sạch kịp thời để tránh hỏa hoạn Cần phải gắn dụng cụ cắm điện và ổ cắm điện vào ổ cắm và ổ điện thật chắc chắn để tránh hỏa hoạn điện giật hoặc châ p mạch Khi dây điện hoặc ổ cắm điện bị hỏng hoặc ổ cắm điện được kết nối lỏng lẻo với ổ điện tuyệt đối không sử dụng thiết bị để tránh hỏa hoạn điện giật hoặc châ p mạch Không được rút ổ cắm điện bằng tay ướt để tránh bị điệ...

Страница 13: ... Điện có thể phát ra tiếng rất bé click hoặc sizz đó là âm thanh khi hoạt động bình thường và không cần phải sợ hãi Tuyệt đối không để Nồi Cơm Điện hoạt động trở lại ngay sau khi nấu Hãy đợi ít nhất 15 phút để làm nguội Bộ gia nhiệt đúc Tuyệt đối không nấu cơm bằng nước nóng bởi điều này có thể ảnh hưởng đến việc xác định nhiệt độ của bộ điều nhiệt do đó làm giảm hiệu quả nấu cơm Khi vận hành tuyệ...

Страница 14: ...ng Đèn báo Timer Hẹn Giờ Nút Menu Select Lựa Chọn Menu O O Nút này được sử dụng để chọn menu mong muốn Nút Keep Warm Ủ Nóng O O Sau khi nấu đèn báo Keep Warm Ủ Nóng sẽ tự động bật O O Nút này được sử dụng để bắt đầu chạy chức năng ủ nóng Nút Timer Hẹn Giờ O O Nút này được sử dụng để cài đặt hẹn giờ Nút Cooking Timer Hẹn Giờ Nấu O O Khi chọn các chế độ Porridge Nấu cháo nút này được sử dụng sau khi...

Страница 15: ...o Start Bắt Đầu sẽ bật sáng O O Theo mặc định White Gạo Trắng Regular Nấu Thông Thường sẽ được chọn Để thay đổi chế độ này xem trang 11 O O Khi sư du ng chê đô he n giơ xem trang 11 O O Vào chế độ nấu cơm Màn hình sẽ hiển thị thời gian nấu cơm còn lại dạng đếm ngược O O Tùy theo phán đoán về lượng gạo và nước của bộ vi xử lý trong quá trình nấu cơm thời gian nấu sẽ tự động được đặt trong 5 phút ho...

Страница 16: ...Khi Nồi Cơm Điện bắt đầu nấu đèn chỉ báo Timer Hẹn Giờ sẽ tắt và đèn chỉ báo Start Bắt Đầu sẽ bật Ca c menu Mực Nước của Lòng Nồi Chư c năng Ủ Nóng 1 Giới hạn cài đặt hẹn giờ 2 Nấu gạo trắng thành các loại cơm khác nhau White Gạo Trắng Regular Nấu Thông Thường White Rice Tư 60 phu t trươ c khi xong Soft Nấu cơm dẻo White Rice Tư 60 phu t trươ c khi xong Hard Nấu cơm khô White Rice Tư 60 phu t trươ...

Страница 17: ...n đê tha o ra Mở nó ra Nút Mở trong khi bấm nút OPEN CLOSE Xoay nó theo hướng mũi tên và kéo nó Q QLă p va o Theo thư tư ngươ c la i vơ i tha o rơ i Đóng nó lại Tru c Lắp trục vào và đóng chặt cho đến khi kêu click OPEN CLOSE Gấp lại và nhấn mạnh Khi nghe thấy tiếng rõ ràng đó là cho biết đã lắp ráp xong Gă n ke m trên Nắp Ngoài Vòng cao su Vòng cao su Phu kiê n Lau rư a bă ng dung di ch rư a ba t...

Страница 18: ...ều khiển hay không Nguồn điện có bị ngắt hay không Cơm không được đảo đều sau khi nấu Nắp Hơi đã được cố định đúng cách hay chưa Vượt quá nhiều giờ trên hẹn giờ đã đặt trước Nắp Ngoài đã được đóng đúng cách hay không Không vo gạo đầy đủ Có hạt gạo hoặc ngoại vật kẹt ở vùng nằm giữa Vòng cao su và Lòng Nồi Vượt quá nhiều giờ khi sử dụng chức năng ủ nóng Triê u chư ng Nguyên nhân có thể Sự cố khi nấ...

Страница 19: ... Nồi Để bánh bánh mì trong Lòng Nồi quá lâu Trộn không đủ hoặc trộn quá lâu Sai số lượng nguyên liệu Vui lòng gửi thiết bị đến trung tâm bảo hành được ủy quyền để sửa chữa nếu phát hiện thiết bị có lỗi sau khi tiến hành kiểm tra theo bảng trên Xử lý sự cố Kha c Triê u chư ng Nguyên nhân có thể Phát ra âm thanh lạ Phát ra âm thanh do nước đã bị kẹt trong Lòng Nồi Không có điện Rút Ổ Cắm Điện ra và ...

Страница 20: ...118T0 Thông sô ky thuâ t Model Điện áp định mức Công suất định mức W Dung ti ch nâ u L Lượng gạo Cô c Chế độ làm nóng L W H mm Tro ng lươ ng kg SR CP108 220 V 50 Hz 640 1 0 5 5 Làm nóng trực tiếp 349 245 209 3 4 SR CL108 3 0 SR CX188 765 1 8 10 384 274 249 4 5 SR CP188 384 274 246 4 4 SR CL188 3 8 ...

Отзывы: