2
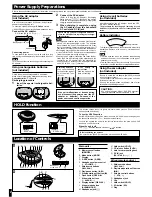
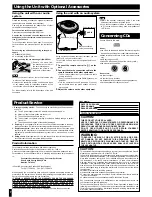
Power Supply Preparations
Refer to the specifications (page 8) for information on operating times when using rechargeable batteries or dry cell batteries.
Using the AC adaptor
(not included)
Use only the recommended AC adaptor. Using other AC
adaptors can damage the unit.
To order the optional AC adaptor RP-AC46 contact
1-800-332-5368 or web site (http://www.panasonic com).
Connect the AC adaptor.
2
Connect the AC adaptor.
(Refer to “Using the AC adaptor”.) Recharging
starts and the “ ” flashes on the display.
When the rechargeable batteries fully recharge the
charging indicator disappears.
3
When charging is complete, unplug
the AC adaptor from the household
AC outlet and DC IN jack.
Note
!
≥
Rechargeable batteries have a service life of approxi-
mately 300 charge-discharge cycles. The batteries
have reached the end of their operational life if they
last for a noticeably shorter time after recharging, or if
they cannot be recharged at all. Replace the batteries.
≥
Recharging may only be performed when the unit is off.
≥
It is normal for the AC adaptor and rechargeable bat-
teries to become warm during recharging.
≥
Leaving the AC adaptor connected can cause the bat-
teries to go flat. After recharging the batteries and dis-
connecting the AC adaptor from the household AC
outlet, ensure you disconnect the AC adaptor from the
unit’s [DC IN 4.5 V
K
] terminal.
Battery indicator
This indicator flashes when the batteries are almost fully
discharged. Replace with fresh dry cell batteries or
recharge.
Note
!
≥
The time between when the indicator starts flashing
and when the power is cut off depends on the type of
batteries you are using.
≥
This indicator may not function correctly if you use bat-
teries other than the specified rechargeable batteries.
Using the car adaptor
(not included)
Be sure to obtain the car adaptor (SH-CDC9) available
as an optional accessory.
The car adaptor can be used to recharge the unit’s bat-
teries while in the car.
Use only the recommended car adaptor. Use of other
car adaptors can damage the unit.
Removing batteries
Push up on the battery
in the direction indicat-
ed by the arrow. Then
lift it out.
If the battery lid
comes loose
Slide the lid back into
place horizontally.
If the unit malfunctions or freezes during
use, disconnect the power source (the AC
adaptor or batteries). Re-connect the
power source and continue operation.
DC IN 4.5 V
K
DC IN jack (DC IN 4.5 V
K
)
Back panel of the unit
Household
AC outlet
AC adaptor
OP
EN
OP
EN
TRACK
ALB
UM
MP
3
M
1
RND
S-XBS
Battery indicator
Conserving power
To save power when the unit is not to be used for a long
time, unplug the AC adaptor from the household AC outlet.
Note
!
Turn the unit off before connecting or disconnecting the
AC adaptor.
OPE
N
GH
F
E
A B
D E
C
L
J
J K
F
I
M
N
HOL
D
A
B
H
EQ
HOLD
VOL
A B C
D
E
G F
DC IN 4.5 V
K
P
Q
OPEN
HOLD
O
Using rechargeable batteries
(not included)
Obtain the optional rechargeable Ni-Cd batteries.
Make sure to recharge the batteries before using them.
Optional batteries: P-3GAVA/2B
Recharging procedure
1
Insert the special rechargeable bat-
teries.
Using dry cell batteries
(not included)
After disconnecting the AC adaptor, insert two “LR6,
AA, UM-3” alkaline batteries.
The procedure for inserting and removing dry cell
batteries is identical to that for rechargeable bat-
teries.
CAUTION:
Use only car adaptor, Model: SH-CDC9 manufac-
tured by Matsushita Electric Industrial Co., Ltd.
OP
EN
1
OP
EN
+
-
2
3
Back panel
of the unit
≥
Never mix dry cell and rechargeable batteries.
≥
Turn the unit off before replacing the recharge-
able batteries.
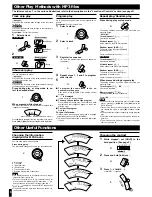
HOLD Function
This function causes the unit to ignore accidental button presses. (The disc lid can
still be opened and closed.)
To use the HOLD function
Set [HOLD] to the HOLD position. When the unit is in HOLD mode, pressing any but-
ton causes the indication “ ” to appear on the display.
You still can operate the unit with the remote control when the main unit’s HOLD
function is on and vice versa.
When the unit is off
The “ ” indication appears only when [
1
/
;
] is pressed.
Before operating the buttons
Be sure to move [HOLD] to release the unit from the HOLD mode.
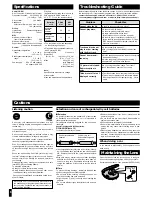
Main unit
A
A
Memory/recall button
(MEMORY)
B
Mode button (MODE)
C
Display
D
S-XBS button (S-XBS)
E
Headphone volume control
(
i
, VOLUME,
j
)
F
Skip/search buttons
(
:
,
9
)
G
Play/pause button (
1
/
;
)
H
Stop/operation off button (
∫
)
I
Open switch (OPEN
1
)
J
Album skip buttons
(
M
ALBUM
L
)
K
Display button (DISPLAY)
L
Album mode button
(ALBUM MODE)
M
Headphone jack (
Ë
)
N
Hold switch (HOLD)
O
CD release button (PUSH)
P
Hole for car mounting base
Q
DC IN jack
(DC IN 4.5 V
K
)
Wired remote control
B
A
Skip/search buttons
(
:
,
9
)
B
Play/stop/operation off button
(
∫
/
1
)
C
Volume control buttons
(
j
, VOL,
i
)
D
Headphone jack
E
Clip
F
Hold switch (HOLD)
G
EQ button (EQ)
H
Plug
OPE
N
HOLD
EQ
HOLD
HOLD
HOLD
HOLD mode
HOLD mode
Location of Controls


