background image

10

CQ-RXBT490U

English

Preparation

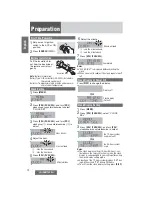
First Time Power On 

1

Set your car’s ignition 
switch to the ACC or ON 
position.

2

Press

[SOURCE] (

PWR

)

.

Battery Installation 

Pull the insulation film 
out from the backside of 
the remote control unit 
gently. 

Insulation film

Note

: Battery Information: 

Battery Type: Lithium battery (CR2025) (Included in 

the remote control unit) 

Battery Life:  Approximately 6 months under normal 

use (at room temperature) 

Clock Setting 

1

Press

[MENU]

.

2

Press

[VOL] (PUSH SEL),

 and turn 

[VOL]

clockwise or counterclockwise to select 
“CLOCK SET”. 

3

Press

[VOL] (PUSH SEL),

 and turn 

[VOL]

clockwise (

q

) or counterclockwise (

w

) to 

adjust.

Hour blinks.

4

Adjust the hour.

Hour entered

: sets the hour ahead. 

: sets the hour back. 

5

Press

[VOL] (PUSH SEL)

.

Minute blinks.

6

Adjust the minute.

Minute entered

: sets the minute ahead. 

: sets the minute back. 

7

Press

[VOL] (PUSH SEL)

.

Completed

Notes

:

¡

“CLK ADJUST” is displayed before adjusting the 
clock.

¡

When you want to readjust the clock, repeat steps 

1

to

7

.

Clock Display at Power Off 

Press

[DISP]

 to change the display. 

Display off 

 cd

Clock display 
(Default)

Clock Display Setting

1

Press

[MENU]

.

2

Press

[VOL] (PUSH SEL)

, select “CLOCK 

SEL”.

3

Press

[VOL] (PUSH SEL),

 and turn 

[VOL]

clockwise or counterclockwise to select.

the 12-hour system 
used (default)


 cd

the 24-hour system 
used

Notes

:

¡

The clock display setting (12-hour/24-hour) is ac-
tivated once the rotary selection is made, the clock 
display is corresponded to your setting after exiting 
the clock display setting mode.

¡

Selection of the 12-hour system displays “AM” dur-
ing AM hours and “PM” during PM hours.

¡

To exit from the clock display setting, press 

[DISP]

.

Содержание SiriusXM CQ-RXBT490U

Страница 1: ...ructions including Limited Warranty and Customer Services Directory carefully before using this product and keep this manual for future reference Pri re de lire attentivement ces instructions y compri...

Страница 2: ...is smoking or smells turn it off immediately and consult your dealer or an authorized Panasonic Servicen ter R The remote control unit should not lie about in the car If the remote control unit lies...

Страница 3: ...ck the air vent or the cooling plate of the unit Blocking these parts will cause the interior of the unit to overheat and will result in fire or other damage R Do not install the product where it is e...

Страница 4: ...to comply with the limits for a Class B digital device pursuant to part 15 of the FCC Rules These limits are designed to provide reasonable protection against harmful interference in a residential in...

Страница 5: ...phone with Bracket 5 m Lock Cancel Plate Mounting Bolt 5 mm Rubber Bushing Operating Instructions Installation Instructions Q ty 1 Installation kit Instruction kit Q ty 1 set Q ty 1 Q ty 1 L0FBBB00000...

Страница 6: ...to products purchased and serviced in the United States or Puerto Rico This warranty is extended only to the original purchaser of a new product which was not sold as is A purchase receipt or other pr...

Страница 7: ...3 1 3 iPod classic 160 GB only ver 2 0 4 iPod classic 120 GB only ver 2 0 1 iPod classic ver 1 1 2 iPod with video ver 1 3 iPod nano 6th generation ver 1 2 iPod nano 5th generation ver 1 0 2 iPod nan...

Страница 8: ...for iPhone mean that an electronic accessory has been designed to connect specifically to iPod or iPhone and has been certified by the developer to meet Apple performance standards Apple is not respon...

Страница 9: ...for remote control unit Battery replacement 1Remove the battery holder from the remote control unit placed on a flat sur face qStick your thumbnail into the groove and push the holder in the directio...

Страница 10: ...ack 5Press VOL PUSH SEL Minute blinks 6Adjust the minute Minute entered q sets the minute ahead w sets the minute back 7Press VOL PUSH SEL Completed Notes CLK ADJUST is displayed before adjusting the...

Отзывы: