background image

10

LSQT1361

Before using

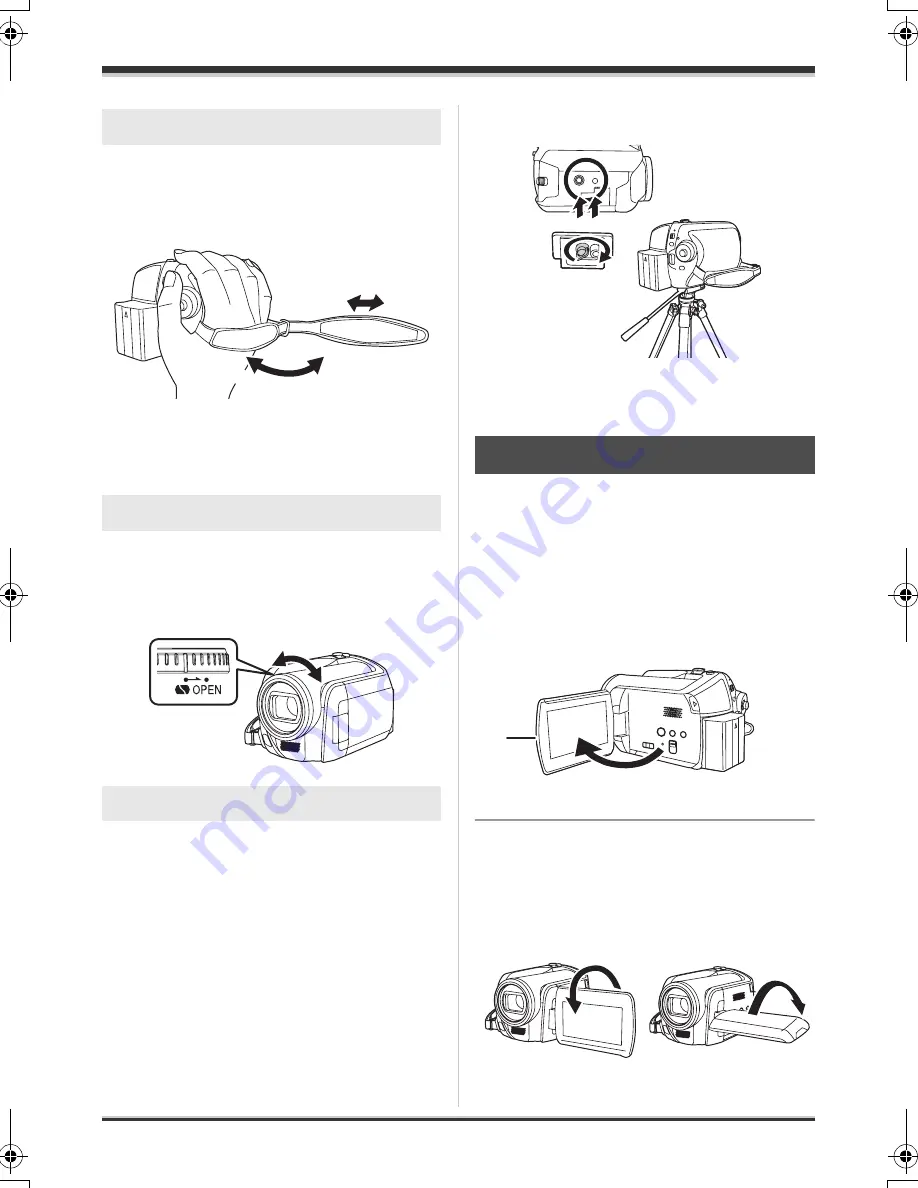
Adjust the belt length so it fits your hand.

Adjust the belt length and the pad 
position.

1

Flip the belt.

2

Adjust the length.

3

Replace the belt.

For the lens protection, be sure to close the lens 
cover when not in use.

Rotate the lens cover open/close 
ring.

This is a hole for attaching the unit to the optional 
tripod. 

(Please carefully read the operating instructions 
for how to attach the unit to the tripod.)

When the tripod is used, the card slot cover 
cannot be opened. Insert an SD card before 
attaching this unit to the tripod. (

l

20)

You can record the image while viewing it on the 
LCD monitor.

1

Place your finger on the LCD 
monitor open part 

A

 and pull the 

LCD monitor out in the direction 
of the arrow.

It can open up to 90

o

.

2

Adjust the angle of the LCD 
monitor as desired.

It can rotate up to 180

o


A

 towards the lens or 

90

B


towards the opposite direction.

Using grip belt

Using the lens cover

Tripod receptacle

3

1

2

Using the LCD monitor

A

A

B

LSQT1361_EP(ENG).book  10 ページ  2008年3月14日 金曜日 午後3時44分

Содержание SDR-H280

Страница 1: ...ns Instrukcja obsługi SD Card Hard Disk Video Camera Model No SDR H280 Before use please read these instructions completely Przed pierwszym włączeniem kamery prosimy o dokładne przeczytanie instrukcji obsługi LSQT1361 B EP ...

Страница 2: ...BOOKCASE BUILT IN CABINET OR IN ANOTHER CONFINED SPACE ENSURE THE UNIT IS WELL VENTILATED TO PREVENT RISK OF ELECTRIC SHOCK OR FIRE HAZARD DUE TO OVERHEATING ENSURE THAT CURTAINS AND ANY OTHER MATERIALS DO NOT OBSTRUCT THE VENTILATION VENTS DO NOT OBSTRUCT THE UNIT S VENTILATION OPENINGS WITH NEWSPAPERS TABLECLOTHS CURTAINS AND SIMILAR ITEMS DO NOT PLACE SOURCES OF NAKED FLAMES SUCH AS LIGHTED CAN...

Страница 3: ...istered trademarks or trademarks of the Intel Corporation in the United States and other countries Macintosh and Mac OS are either registered trademarks or trademarks of Apple Inc in the United States and or other countries Other names of systems and products mentioned in these instructions are usually the registered trademarks or trademarks of the manufacturers who developed the system or product...

Страница 4: ...arious recording functions 39 Zoom in out function 39 Recording yourself 40 Recording with the video light 40 Backlight compensation function 41 Fade in fade out function 41 Soft skin mode 42 Tele macro function 43 Colour night view function 43 Self timer recording 44 Recording guideline function 44 Wide mode 45 Image stabilizer function 45 Wind noise reduction function 45 Manual recording functio...

Страница 5: ...nstalling the software 78 Connection and recognition 79 Connection and recognition procedures 79 About the PC display 79 To disconnect USB cable safely 80 Using VideoCam Suite 81 Reading the operating instructions of the software 81 DVD COPY function 82 If using a Macintosh 83 Others Menus 84 Menu list 84 Other menus 85 Indications 87 Indications 87 Messages 89 Functions that cannot be used simult...

Страница 6: ...B internal HDD You can also record motion pictures and still pictures on an SD card Easy recording l 32 No need to search for the recording start position The new recording will not overwrite any previously recorded scene Easy playback l 51 Recorded scenes are displayed as thumbnails You can easily search for the scenes you want to watch HDD HDD HDD ...

Страница 7: ...ting together your favourite scenes recorded on the HDD Using with a computer l 73 If you use the supplied software you can create a backup DVD of the scenes recorded on this unit with just one button You can also make an original DVD Video by exporting the scenes to a computer and then editing them ...

Страница 8: ... 12 5 Microphone built in stereo 6 Terminal cover 7 Menu button MENU l 25 Battery pack CGA DU12 AC adaptor VSK0651B DE 974GC DC cable K2GJ2DC00015 or K2GJ2DC00011 AV S cable K2KZ9CB00001 AC cable K2CR2DA00004 Remote control N2QAEC000023 Button type battery CR2025 USB cable K1HA05CD0019 or K1HA05CD0016 CD ROM Optional accessories AC adaptor VW AD11E Battery pack lithium CGA DU12 1150 mAh Battery pa...

Страница 9: ...ot button l 35 23 Illumination LED l 86 24 Card slot l 20 25 Tripod receptacle l 10 26 Battery release lever BATTERY l 17 27 LCD monitor l 10 28 Card slot open lever l 20 29 DVD COPY button DVD COPY l 82 30 Speaker 31 Power LCD plus button POWER LCD PLUS l 29 32 Video light button LIGHT l 40 33 Reset button RESET l 97 34 Mode select switch AUTO MANUAL FOCUS l 31 46 47 35 Card slot cover SD CARD l ...

Страница 10: ...ions for how to attach the unit to the tripod When the tripod is used the card slot cover cannot be opened Insert an SD card before attaching this unit to the tripod l 20 You can record the image while viewing it on the LCD monitor 1 Place your finger on the LCD monitor open part A and pull the LCD monitor out in the direction of the arrow It can open up to 90o 2 Adjust the angle of the LCD monito...

Страница 11: ... A pull out the battery holder 2 Set the button type battery with its r mark facing upward and then put the battery holder back in place Concerning the button type battery When the button type battery runs down replace it with a new battery part number CR2025 The battery should normally last about 1 year however this depends on how frequently the unit is used Keep the button type battery out of th...

Страница 12: ... the remote control and the unit s remote control sensor A Within approx 5 m Angle Approx 10o up and 15o down left and right The remote control is intended for indoor operation Outdoors or under strong light the unit may not operate properly even within the usable ranges A A ...

Страница 13: ...s and SDHC Memory Cards formatted in FAT32 system Concerning the internal HDD and cards that can be used on this unit Internal HDD Hard Disk Drive SD Memory Card SDHC Memory Card Display on the screen Indication in these instructions HDD SD Capacity 30 GB 1 8 MB 16 MB 32 MB 64 MB 128 MB 256 MB 512 MB 1 GB 2 GB 4 GB Functions Recording motion pictures 2 Recording still pictures Creating playlists a...

Страница 14: ... SD cards jSD cards from 32 MB to 128 MB jSD cards from 256 MB to 4 GB other than the ones mentioned above Please confirm the latest information on the following website This website is in English only http panasonic jp support global cs e_cam Handling precautions Do not touch the terminals on the back of the card Do not expose the terminals of the card to water garbage or dust Do not place the ca...

Страница 15: ...emperature is detected l 89 Do not use the unit in a low pressure area The HDD may be damaged if you use this unit where the altitude is more than 3000 m Back up important recorded data to protect it Save recorded data periodically on a computer DVD disc etc for backup purposes If the HDD fails the recorded data cannot be repaired ACCESS PC lamp When this unit accesses the HDD reading recording pl...

Страница 16: ...ccess lamp lights up If the following operations are performed when the access lamp is lit then the SD card or the recorded data may be damaged or this unit may malfunction sOpening the card slot cover sRemoving the SD card sOperating the OFF ON switch or the mode dial sRemoving the battery or disconnecting the AC adaptor ...

Страница 17: ...atus indicator is off It has been found that counterfeit battery packs which look very similar to the genuine product are made available to purchase in some markets Some of these battery packs are not adequately protected with internal protection to meet the requirements of appropriate safety standards There is a possibility that these battery packs may lead to fire or explosion Please be advised ...

Страница 18: ...time will become shorter when you use this unit with the LCD monitor lit up by pressing the POWER LCD PLUS button The batteries heat up after use or charging This unit will also heat up while being used This is not a malfunction Be aware that the operating time of the battery will become shorter in low temperatures We recommend charging a spare battery for use when recording CAUTION Danger of expl...

Страница 19: ...justment l 102 may not function properly Set the OFF ON switch to ON The status indicator A lights and the power turns on When the unit is turned on for the first time a message asking you to set the date and time will appear Select YES and set the date and time l 27 When the unit is turned on for the first time a selection screen will appear to select the recording destination for motion pictures...

Страница 20: ...to OFF to turn off the power Check that the status indicator has gone off 2 Open the LCD monitor and then slide the card slot open lever A to open the card slot cover 3 Insert remove the SD card into from the card slot When inserting an SD card face the label side B upwards and press it straight in as far as it goes When removing the SD card press the centre of the SD card and then pull it straigh...

Страница 21: ...ct an item or scene and then press the joystick to set it Menu screen operations l 25 Rotate the mode dial to select or 1 Press the centre of the joystick and icons will be displayed on the screen The indication disappears when the centre of the joystick is pressed again The indication changes each time the joystick is moved down Video recording mode l 32 Use this to record motion pictures Video p...

Страница 22: ...ght to select the scene to be played back and press the joystick The selected scene is played back on the full screen The operation icon is automatically displayed on the screen 2 Move the joystick up down left or right to operate The operation icon appears or disappears each time the centre of the joystick is pressed Operations during playback ...

Страница 23: ...view 43 2 Soft skin mode 42 1 Tele macro 43 In manual mode 3 3 3 White balance 47 2 Iris or gain value 49 1 Shutter speed 49 In manual focus mode 4 4 21 Manual focus adjustment 47 Icon Direction Function Page 1 3 Playback pause 51 4 Stop playback and show thumbnails 51 2 Skip 51 6 Rewind 52 2 Reverse slow frame playback during pause 52 9 1 Skip 51 5 Fast forward 52 1 Forward slow frame playback du...

Страница 24: ...ode 3 3 3 White balance 47 2 Iris or gain value 49 1 Shutter speed 49 In manual focus mode 4 4 21 Manual focus adjustment 47 Icon Direction Function Page 1 3 Slide show start pause 55 4 Stop playback and show thumbnails 55 E 2 Playback previous picture during pause 55 D 1 Playback next picture during pause 55 1 2 1 2NEXT NEXT 1 2NEXT 2 2 2 2NEXT NEXT 2 2NEXT 3 3 3 3NEXT NEXT 3 3NEXT 4 4 4 4NEXT NE...

Страница 25: ...s the MENU button or select EXIT When the help mode is used functions cannot be set When the help mode is used motion pictures and still pictures cannot be recorded Switching the language You can switch the language on the screen display or the menu screen 1 Press the MENU button then select LANGUAGE and press the joystick 2 Select English and press the joystick Using the menu screen Refer to Menu...

Страница 26: ...oystick 6 Move the joystick up or down in order to select the desired item 7 Press the joystick to enter the selection To get back to the previous screen Move the joystick left To exit the menu screen Press the MENU button The menu screen does not appear during recording or playing You cannot start other operations while the menu screen appears The menu screen transition is the same as when the bu...

Страница 27: ...item to be set Then move the joystick up or down to set the desired value The year will change as follows 2000 2001 2099 2000 The 24 hour system is used to display the time 3 Press the joystick to enter the selection The clock function starts at 00 seconds when the joystick is pressed After pressing the MENU button to finish the setting check the date and time display Changing the date and time di...

Страница 28: ... hours and the battery will save the date and time for approx 6 months Even if the OFF ON switch is set to OFF the battery is still being recharged Adjusting the LCD monitor 1 Press the MENU button then select SETUP LCD SET YES and press the joystick 2 Move the joystick up or down to select the item to be adjusted Then move the joystick left or right to make the adjustment The bar display moves BR...

Страница 29: ...Darker 5 Dark This will not affect the images to be recorded If you turn on the unit when the AC adaptor is used this function will automatically be Bright The LCD monitor will become a little darker when the video light is lit Increasing and decreasing the brightness of the entire LCD monitor POWERLCD PLUS 1 2 3 5 4 1 2 1 2 ...

Страница 30: ...sors with your hands 4 Keep your arms near your body 5 Slightly open your legs When you are outdoors record pictures with the sunlight behind you If the subject is backlit it will become dark in the recording When recording make sure your footing is stable and there is no danger of colliding with another person or an object Basic camera positioning 4 5 1 2 3 ...

Страница 31: ...s function prevents unnecessary recording when you forget to pause recording and walk with the unit tilted upside down while recording continues If the unit continues to be tilted upside down from the normal horizontal position while recording motion pictures it is automatically set to recording pause Rotate the mode dial to select Press the MENU button then select SETUP AGS ON and press the joyst...

Страница 32: ...to 16 9 for recording images compatible with a wide screen TV To watch images on a regular TV 4 3 change the aspect ratio setting l 45 before recording the images or when watching them on the connected TV l 68 Open the lens cover before turning the unit on If the unit is turned on with the lens cover closed the automatic white balance adjustment may not function properly 1 Turn the unit on 2 Rotat...

Страница 33: ...VE A Recording mode B Selected recording destination C Remaining time left for recording When the remaining time is less than 1 minute R 0h00m flashes red D Recording time elapsed Sound is recorded from the internal stereo microphone on the front of the unit Take care not to block this microphone If the write protection switch on the SD card is set to LOCK it cannot be used for recording l 14 Each...

Страница 34: ...s a complicated pattern in the background jWhen the unit is moved too much or too fast jWhen a subject with sharp movements has been recorded Particularly if it has been recorded in LP mode If you record still pictures on the HDD or an SD card the recordable time available for the motion picture will become shorter Recording modes and recordable time available for the motion picture Recording mode...

Страница 35: ...ng before recording l 38 Open the lens cover before turning the unit on If the unit is turned on with the lens cover closed the automatic white balance adjustment may not function properly 1 Turn the unit on 2 Rotate the mode dial to select 3 Open the LCD monitor 4 Press the MENU button then select MEDIA SELECT HDD or SD CARD to select the recording destination and press the joystick 5 Press the P...

Страница 36: ...agnification of 4k or higher it is difficult to reduce the slight shaking from holding this unit by hand We recommend decreasing the zoom magnification and approaching the subject when recording When recording still pictures hold the unit firmly with your hands and keep your arms stationary at your side so as not to shake the unit You can record stable pictures without shaking by using a tripod an...

Страница 37: ...n the subject stands in front of a light source jWhen close subjects and far subjects are included in the same scene jWhen the scene is dark jWhen there is a bright part in the scene jWhen the scene is filled with only horizontal lines jWhen the scene lacks contrast Concerning the focusing area When there is a contrasting object ahead or behind the subject in the focus area the subject may not be ...

Страница 38: ...k before printing PICT QUALITY Selecting the picture quality Press the MENU button then select BASIC PICT QUALITY desired item and press the joystick Number of pixels and picture quality for still picture recording Icon Aspect Number of pixels 4 3 2048k1512 4 3 1280k960 4 3 640k480 16 9 1920k1080 Still pictures with a high picture quality are recorded Priority is given to the number of still pictu...

Страница 39: ...ontrol When the zoom speed is high the subject may not be focused easily If you take your finger off the zoom lever during zoom operation the operation sound may be recorded When returning the zoom lever to the original position move it quietly HDD SD If the zoom magnification exceeds 10k then the digital zoom function will be activated The maximum magnification provided by the digital zoom can be...

Страница 40: ...ou press the joystick Only some indications will appear on the screen When appears return the direction of the LCD monitor to normal position and check the warning alarm indication l 89 HDD SD Gain up mode works with the video light to enhance the light s brightness and brighten the natural colours in a scene Gain up mode cannot be used in picture recording mode Rotate the mode dial to select or P...

Страница 41: ...rk Rotate the mode dial to select or 1 Press the joystick Then move the joystick down to display the icon shown in the illustration 2 Move the joystick up to select ª The image on the screen will become brighter To return to normal recording Select ª again If you turn off the power or operate the mode dial the backlight compensation function is cancelled HDD SD Fade in The image and audio graduall...

Страница 42: ...image when you start recording It also takes several seconds to pause recording The thumbnails of scenes recorded using fade in become black or white HDD SD This is more effective if you record a person closely from the torso up Rotate the mode dial to select or 1 Press the joystick Then move the joystick down to display the icon shown in the illustration 2 Move the joystick left to select To canc...

Страница 43: ...out against the background Attach this unit to a tripod and you can record images free from vibration Minimum required illumination approx 1 lx Recorded scene is seen as if frames were missed Rotate the mode dial to select 1 Press the joystick Then move the joystick down to display the icon shown in the illustration 2 Move the joystick up to select If it is difficult to focus adjust the focus manu...

Страница 44: ...fore recording To stop the timer midway through Press the MENU button The self timer setting is cancelled If you turn off the power the self timer standby mode is cancelled Depending on the time taken to bring the subject into focus the recording may take longer than the set time before the picture is taken HDD SD You can check if the image is level while recording by using the lines displayed on ...

Страница 45: ...ick To cancel the image stabilizer function Press the MENU button then select ADVANCED O I S OFF and press the joystick This function s default setting is ON In the picture recording mode pressing the Photoshot button halfway increases the effect of the image stabilizer function MEGA optical image stabilizer In the following cases the image stabilizer function may not work effectively jWhen the di...

Страница 46: ...the AUTO MANUAL FOCUS switch to MANUAL 2 Press the MENU button then select BASIC SCENE MODE desired item and press the joystick 5 Sports To record sports scenes or scenes where there are quick motions Portrait To make people stand out against the background Low light To make the scene brighter in dark conditions Spotlight To make the subject under a spotlight look more attractive Surf snow To reco...

Страница 47: ... the recorded image may become whitish HDD SD If auto focusing is difficult due to the conditions then manual focusing is available Rotate the mode dial to select or 1 Set the AUTO MANUAL FOCUS switch to MANUAL 2 Move the switch down and set it to FOCUS position The manual focus indication MF and the icon shown in the illustration appear 3 Move the joystick left or right to bring the subject into ...

Страница 48: ...white balance sensor A The white balance sensor detects the type of light source during recording Do not cover the white balance sensor during recording or it may not function properly About the black balance adjustment This is one of the 3CCD system functions that automatically adjusts the black when the white balance is set in the manual adjustment mode When the black balance is adjusted the scr...

Страница 49: ...rect adjustment When setting both the white balance and the iris gain set the white balance first HDD SD Shutter Speed Adjust it when recording fast moving subjects Aperture Adjust it when the screen is too bright or too dark Rotate the mode dial to select or 1 Set the AUTO MANUAL FOCUS switch to MANUAL The icon shown in the illustration is displayed automatically 2 Move the joystick left or right...

Страница 50: ...olour and brightness of the playback image may change If you increase the shutter speed manually the gain value will increase automatically depending on how much the sensitivity lowers and the noise on the screen may increase You may see vertical lines of light in the playback image of a brightly shining subject or highly reflective subject but this is not a malfunction During normal playback imag...

Страница 51: ...re scenes have been recorded the next or previous page is displayed by moving the joystick If you move and hold the joystick up or down you can fast forward or fast rewind the pages The screen will not change at this time but the scene numbers and scroll bar display will change Release the joystick when you have arrived at the page with the scene you want to display 4 Press the joystick The select...

Страница 52: ... until fast forward starts Move and hold the joystick left to rewind Move the joystick again to increase the speed Normal playback is restored when you move the joystick up Operating with the remote control Press the 6 or 5 button 1 Move the joystick up during playback to pause the playback 2 Move and hold the joystick right Slow motion pictures will be played back in reverse when you move and hol...

Страница 53: ...the E or D button Adjust the speaker volume during playback Move the volume lever to change the volume level The further the indicator moves to the right the higher the volume level becomes When the adjustment is completed the volume setting display will disappear Recorded scenes are grouped by date on this unit Frame by frame playback To adjust the volume Towards r increases the volume Towards s ...

Страница 54: ...re displayed as thumbnails 4 Select the scene to be played back Even if scenes are recorded on the same day they are grouped separately when the number of scenes exceeds 99 Press the MENU button then select PLAY SETUP RESUME PLAY ON and press the joystick If playback of a motion picture is stopped R appears on the thumbnail view of the stopped scene The resume position on the HDD and the SD card i...

Страница 55: ...ystick If you move and hold the joystick up or down you can fast forward or fast rewind the pages The screen will not change at this time but the file numbers and scroll bar display will change Release the joystick when you have arrived at the page with the file you want to display 4 Press the joystick The selected file is played back on the full screen The operation icon is automatically displaye...

Страница 56: ...hile this unit accesses the SD card the access lamp is lit do not remove the SD card It takes time to display the file depending on the number of pixels of the file When a file is displayed as on the thumbnail display playback is not possible If you attempt to play back a file recorded in a different format or file data is defective an error message may appear The time displayed may be different f...

Страница 57: ...he selected medium except the locked scenes jWhen PLAY MODE is set to BY DATE All the scenes selected by date except the locked scenes 3 Only when SELECT is selected in step 2 Select the scene to be deleted then press the joystick The selected scene is encircled by a red frame When the joystick is pressed again the selected scene will be cancelled Up to 50 scenes can be set in succession 4 Only wh...

Страница 58: ...ile deleting scenes recorded on an SD card The deletion will stop The locked scenes cannot be deleted HDD SD Motion picture scenes can be locked so that they are not deleted by mistake However please be aware that if a medium is formatted then all the data on the medium will be erased Rotate the mode dial to select Select HDD or SD CARD in MEDIA SELECT 1 Press the MENU button then select PLAY SETU...

Страница 59: ...elect Select HDD in MEDIA SELECT 1 Press the MENU button then select PLAY SETUP PLAYLIST CREATE and press the joystick 2 Select the scene to be added to the playlist then press the joystick The selected scene is encircled by a red frame When the joystick is pressed again the selected scene will be cancelled Up to 50 scenes can be set in succession The scenes are registered in the playlist in the o...

Страница 60: ...k HDD Editing scenes on a playlist will not affect the original scenes Select playlist playback mode l 60 Playing back a playlist steps 1 and 2 1 Press the MENU button then select EDIT ADD YES and press the joystick 2 Select the scene to be added then press the joystick The selected scene is encircled by a red frame When the joystick is pressed again the selected scene will be cancelled Up to 50 s...

Страница 61: ...shown by a yellow bar 3 Select the position to insert the scene then press the joystick To continue moving other scenes in the playlist Repeat steps 2 to 3 To complete editing Press the MENU button Deleting scenes on a playlist will not affect the original scenes Deleting scenes one at a time Select playlist playback mode l 60 Playing back a playlist steps 1 and 2 1 Press the button during playbac...

Страница 62: ...e scenes that have already been deleted when the deletion is cancelled cannot be restored To complete editing Press the MENU button You can also delete scenes by pressing the MENU button selecting EDIT DELETE and then selecting ALL or SELECT Deleting scenes on a playlist will not increase the remaining capacity for recording The playlist itself is deleted if you delete all the scenes in it When a ...

Страница 63: ...d cannot be restored To complete editing Press the MENU button Deleting still picture files recorded on an SD card by other products A still picture file other than JPEG that cannot be played back on this unit may be erased You can also delete files by pressing the MENU button selecting DELETE and then selecting ALL or SELECT In case of ALL the deletion may take time if there are many files Do not...

Страница 64: ...ess the joystick The number of prints set to be in DPOF is displayed 3 Move the joystick up or down to select the number of prints then press the joystick You can select from 0 to 999 The selected number of pictures can be printed with the printer supporting DPOF To cancel the setting set the number of prints to 0 You can also select multiple files in succession To complete the settings Press the ...

Страница 65: ...the order that they were selected 4 Only when SELECT is selected in step 2 Press the MENU button 5 When the confirmation message appears select YES then press the joystick Copying of the file starts Only when SELECT is selected in step 2 To continue copying other files Repeat steps 3 to 5 To cancel copying halfway Press the MENU button To complete editing Press the MENU button The copied files are...

Страница 66: ... formatting do not turn this unit off When you format the HDD use a battery with sufficient battery power or the AC adaptor During formatting do not cause any vibrations or impacts to this unit HDD Information concerning the space used and remaining on the HDD is displayed Rotate the mode dial to select Select HDD in MEDIA SELECT Press the MENU button then select SETUP HDD STATUS YES and press the...

Страница 67: ...matting is complete press the MENU button to exit the message screen Use this unit to format SD cards If an SD card is formatted on other products such as a computer the time spent for recording may become longer and you may not be able to use the SD card Depending on the type of SD card being used it may take time to format During formatting do not turn this unit off When you format the SD card u...

Страница 68: ...ng input switch For more information please read the operating instructions for the TV If you have a TV with an SD card slot the motion pictures and still pictures recorded on an SD card may be played back on the TV Refer to the operating instructions of the TV for details about TV compatibility If the images are not displayed correctly on a wide screen TV adjust the aspect setting on the TV Refer...

Страница 69: ...r with the AV S cable supplied and then dub l below Insert the SD card into the SD card slot on the DVD recorder then dub the contents onto the hard disk or a disc For details on how to dub the images refer to the operating instructions of the DVD recorder With a VCR HDD SD You can dub images played back on this unit onto other video devices You can create a playlist by gathering the scenes on the...

Страница 70: ...evice See the operating instructions of the video device for details To stop dubbing Stop recording on the connected device Then stop playback on this unit If the date and time display and function indication are unnecessary cancel them before dubbing l 27 69 With a printer PictBridge HDD SD To print pictures by directly connecting this unit to the printer use a printer compatible with PictBridge ...

Страница 71: ...ctBridge by disconnecting the USB cable after the pictures have been printed When you want to stop printing halfway Move the joystick down A confirmation message appears If YES is selected the number of prints set is cancelled and the screen returns to step 3 If NO is selected all the settings are kept and the screen returns to step 3 Avoid the following operations during printing These operations...

Страница 72: ...oducts You may not be able to print still pictures recorded with other products When the unit is connected directly to the printer the DPOF settings cannot be used Connect the printer directly to this unit Do not use a USB hub ...

Страница 73: ...he supplied software Adobe Reader To view the installed operating instructions Adobe Reader Adobe Acrobat Reader 5 0 or later is required If the Adobe Reader Adobe Acrobat Reader is not already installed on your PC you can install it from the CD ROM Click the desired language in Setup Menu and follow the on screen messages to install The following system requirements are necessary in order to inst...

Страница 74: ...ls or more Video card supporting DirectX 9 0c supports overlay of DirectDraw Free hard disk space DMA transfer effective at Ultra DMA 33 or more Ultra DMA 100 or higher recommended For installing the application 150 MB or more When creating discs DVD Video 5 GB or more for the work folder 10 GB or more in the case of dual layer discs If compression setting is enabled errors may occur during record...

Страница 75: ... software Operation cannot be guaranteed on all DVD drives DVD discs authored with this software are not guaranteed to play in all DVD players Depending upon the environment of your PC if it does not support Hi Speed USB USB 2 0 for example frame dropout may occur the audio may be intermittent or the software may run slowly when you play back recorded images If your PC does not satisfy the above s...

Страница 76: ...ompiling or Disassembly Licensee may not reverse engineer decompile or disassemble the Software except to the extent either of them is permitted under law or regulation of the country where Licensee resides Matsushita or its distributors or dealers will not be responsible for any defects in the Software or damage to Licensee caused by Licensee s reverse engineering decompiling or disassembly of th...

Страница 77: ...drive icon in My Computer Computer 2 Click VideoCam Suite 1 0 3 Click Next 4 Select where the application is to be installed then click Next 5 Select Yes or No to create shortcut 6 Select the country or region where you live then click Next If the country or region cannot be selected select PAL Area When the confirmation message appears click Yes 7 Click Install to start the installation process 8...

Страница 78: ...ired For Windows Vista 1 Select Start Control Panel Uninstall a program 2 Select VideoCam Suite 1 0 then click Uninstall For Windows XP 1 Select start Control Panel Add or Remove Programs 2 Select VideoCam Suite 1 0 then click Remove For Windows 2000 1 Select Start Settings Control Panel Add Remove Programs 2 Select VideoCam Suite 1 0 then click Change Remove Uninstalling the software ...

Страница 79: ...he USB cable before turning this unit off l 80 Do not disconnect the USB cable or AC adaptor while the access lamp is on or access icon or appears on the LCD monitor Doing so may damage the data on the HDD or SD card The HDD and SD card cannot be accessed simultaneously It may be necessary to reboot the PC after connecting this unit to it for the first time When the unit is connected to a PC it is...

Страница 80: ...d can be used as an external drive still pictures on the drive can be copied to the PC with Windows Explorer or other programmes 1 Double click the folder that contains the files on the drive 100CDPFP etc 2 Drag and drop the files onto the destination folder on the PC hard disk Do not delete the SD card s folders Doing so may make the SD card unusable in this unit Always use this unit to format SD...

Страница 81: ...oCam Suite log on to your PC as Administrator or with a login name equally authorized If you log on with a login name other than Administrator the software cannot be used Select start All Programs Programs Panasonic VideoCam Suite 1 0 VideoCam Suite Refer to the operating instructions of the software PDF file for details on how to use it You will need Adobe Reader to read the PDF operating instruc...

Страница 82: ... for details on how to use it After copying is complete a message appears If OK is clicked the USB function will be set to PC CONNECT Before turning this unit off disconnect the USB cable l 80 The order of the motion pictures on a disc are set automatically when the disc is created with the DVD COPY function In order to designate the order in which the motion pictures are copied to a disc import t...

Страница 83: ...s unit to a PC via the supplied USB cable The USB function selection screen will appear 2 Select PC CONNECT HDD or SD CARD then press the joystick 3 Double click HDD_CAMERA or NO NAME displayed on the desktop Files are stored in 100CDPFP folder etc in the DCIM folder 4 Drag and drop the files onto destination folder on the PC hard disk To disconnect USB cable safely Drag HDD_CAMERA or NO NAME disk...

Страница 84: ...EEP SOUND l 86 LCD SET l 28 INITIAL SET l 86 ILLUMINATION l 86 DEMO MODE l 86 LANGUAGE l 25 Still picture recording menus BASIC SCENE MODE l 46 GUIDE LINES l 44 PICTURE SIZE l 38 PICT QUALITY l 38 CLOCK SET l 27 ADVANCED O I S l 45 SHTR EFFECT l 37 MEDIA SELECT HDD l 35 SD CARD l 35 SETUP DISPLAY l 85 DATE TIME l 27 DATE FORMAT l 27 FORMAT CARD 2 l 67 POWER SAVE l 85 BEEP SOUND l 86 LCD SET l 28 I...

Страница 85: ...63 DPOF SET 2 l 64 COPY l 65 MEDIA SELECT HDD l 55 SD CARD l 55 SETUP DISPLAY l 85 DATE TIME l 27 DATE FORMAT l 27 FORMAT CARD 2 l 67 POWER SAVE l 85 BEEP SOUND l 86 LCD SET l 28 TV ASPECT l 68 ILLUMINATION l 86 LANGUAGE l 25 1 Only when MEDIA SELECT is set to HDD 2 Only when MEDIA SELECT is set to SD CARD DISPLAY The screen indications are selected as shown in the illustration below POWER SAVE OF...

Страница 86: ...itial shipping condition ILLUMINATION This allows operations to be signaled by the lighting of the illumination LED on the top of the unit 1 Flash When you turn on the power When in a recording mode in orange When in a playback mode in blue 2 Flashes When you switch the mode to a recording mode in orange When you switch the mode to a playback mode in blue Lights During motion picture recording in ...

Страница 87: ...1 100 OPEN 0dB MNL 2 MEGA AWB 1 100 OPEN 0dB MNL 15 12 2007 15 30 R 10000 1 16 9 AUTO MNL Soft skin mode Tele macro Fade White Fade Black Colour night view function Video light Zoom microphone Wind noise reduction Power LCD plus function Motion picture recording mode 5 Sports mode Portrait mode Low light mode Spotlight mode Surf snow mode Auto white balance Indoor mode recording under incandescent...

Страница 88: ...or a card When connected to a computer 1 DPOF already set to more than 1 Locked motion pictures and still pictures Number of recording pixels for still pictures 2048k1512 1920k1080 1280k960 640k480 The picture size is not displayed for still pictures recorded with other products that have different picture sizes from the sizes shown above Time display The built in battery is low l 28 The warning a...

Страница 89: ...RD IN VIDEO MODE An 8 MB or 16 MB SD card has been inserted in video recording mode CHECK CARD This card is not compatible or it cannot be recognised by the unit CARD LOCKED The write protection switch on the SD card is set to LOCK l 14 CARD FULL The SD card is full or the number of scenes has reached the maximum limit so no further data can be recorded Delete unnecessary scenes l 57 62 or insert ...

Страница 90: ...XCESSIVE SHOCK DETECTED PLEASE TRY AGAIN AFTER A WHILE The unit has detected that it is being dropped so the operation has stopped INTERNAL TEMPERATURE TOO HIGH PLEASE TURN UNIT OFF AND WAIT A WHILE The internal temperature of this unit is high so it cannot be operated Turn off the power wait until the temperature falls and then turn on the power again OPERATION STOPPED TEMPERATURE TOO LOW The int...

Страница 91: ...e colour night view function is used When the video light is on gain up mode When the iris gain is set Soft skin mode Set and cancel While recording Tele macro Set and cancel Help mode Video light on gain up mode In picture recording mode Scene mode When setting the AUTO MANUAL FOCUS switch to AUTO When the colour night view function is used When the video light is on When in video recording mode ...

Страница 92: ...is possible l 65 Copying motion pictures is not possible Is it possible to play back an SD card recorded with this unit on other products Motion pictures These can be played back on any device which supports motion pictures based on the SD Video standard the MPEG 2 video format and the MPEG 1 Audio Layer 2 audio format Still pictures These can be played on any device which supports DCF Design rule...

Страница 93: ... to copy motion pictures recorded on SD cards onto DVD discs as well No you cannot You can use the DVD COPY function to copy only the motion pictures recorded on the HDD If you want to copy motion pictures from an SD card to a DVD disc copy the motion pictures to a PC first and then copy them to a DVD disc l 81 ...

Страница 94: ...with the AC adaptor l 17 Are you using the battery in an extremely cold place The battery is affected by ambient temperature In cold places the operating time of the battery becomes shorter Has the battery worn out The battery has a limited life If the operating time is still too short even after the battery is fully charged the battery has worn out and can no longer be used This unit cannot be op...

Страница 95: ...may not operate normally Close the card slot cover Recording starts but stops immediately The playback picture breaks up for a moment The unit is hot Follow the messages on the display To use the unit again turn the unit off and leave it for a while The unit arbitrarily stops recording Is the AGS function activated Record in the normal horizontal position or set AGS to OFF l 31 Can the SD card be ...

Страница 96: ... the TV Please read the operating instructions of your TV and select the channel that matches the input used for the connection Is the TV ASPECT setting correct Change the setting to match the aspect ratio of the TV Press the MENU button then select SETUP TV ASPECT 16 9 or 4 3 and press the joystick Scenes or files cannot be deleted or edited Are the scenes or the files locked Locked scenes or fil...

Страница 97: ...ill appear repeatedly If so this unit needs repair Detach the power connected and consult the dealer who you purchased this unit from Do not attempt to repair the appliance by yourself If the SD card is inserted in this unit it is not recognised Is the SD card formatted on a computer inserted Use this unit to format SD cards Please be aware that if an SD card is formatted then all the data recorde...

Страница 98: ...ubsequent time Import the motion pictures onto the PC and then write them on the DVD disc It takes a long time to create a DVD Creating a DVD may take some time even if the size of the motion picture files are small The amount of free space on the HDD or SD card does not increase even when the images are backed up on the computer or DVD discs The unit s image data is not automatically deleted even...

Страница 99: ...cords and the cables supplied with them Do not extend the cords and the cables Do not spray insecticides or volatile chemicals onto the unit If the unit is sprayed with such chemicals its body may be marred and the surface finish may peel off Do not leave rubber or plastic products in contact with the unit for a long time When you use the unit in a sandy or dusty place such as a beach do not let s...

Страница 100: ...ding Prepare batteries enough to last for 3 to 4 times the period during you want to record pictures in In cold places such as a ski resort the period during which you can record pictures is shortened When you travel do not forget to bring an AC adaptor so that you can recharge the batteries at your destination If you drop the battery accidentally check to see if the terminals are damaged Attachin...

Страница 101: ...oes form take the actions described below Causes of condensation Condensation takes place when the ambient temperature or humidity is changed as follows When this unit is brought inside from the cold e g a ski slope to a warm room When this unit is moved from an air conditioned car to outside When a cold room has been warmed up quickly When cool wind from an air conditioner is directly blown onto ...

Страница 102: ...h under the influence of certain light sources To avoid such phenomena adjust the white balance White balance adjustment determines the white colour under different light sources By recognising which is the white colour under sunlight and which is the white colour under a fluorescent light the unit can adjust the balance among the other colours Since the white colour is the reference for all the c...

Страница 103: ...ving subject As the focus lens inside moves mechanically it cannot keep up with a fast moving subject When for example recording a sports event with fast moving subjects the focus may lose its sharpness Recording a subject with little contrast It is easy to bring subjects with a sharp contrast or vertical lines or stripes into focus This means that a subject with little contrast such as a white wa...

Страница 104: ...cro Full range AF Zoom 10k optical zoom 25 700k digital zoom Monitor 2 7z wide LCD monitor approx 123 K pixels Microphone Stereo with a zoom function Speaker 1 round speaker 20 mm Standard illumination 1 400 lx Minimum required illumination 12 lx Low light mode 1 50 approx 1 lx with the colour night view function Video output level 1 0 Vp p 75 S Video output level Y 1 0 Vp p 75 C 0 3 Vp p 75 Audio...

Страница 105: ...ression MPEG 2 Recording mode and transfer rate XP 10 Mbps VBR SP 5 Mbps VBR LP 2 5 Mbps VBR Recordable time Refer to page 34 Audio compression SD card MPEG 1 Audio Layer 2 16 bit 48 kHz 2 ch HDD Dolby Digital 16 bit 48 kHz 2 ch Maximum number of recordable folders and scenes SD card 99 foldersk99 scenes 9801 scenes HDD 999 foldersk99 scenes 98901 scenes When the date changes a new folder is creat...

Страница 106: ...our safety Specifications may change without prior notice Power source Power consumption DC output AC 110 V to 240 V 50 60 Hz 19 W DC 7 9 V 1 4 A Unit operation DC 8 4 V 0 65 A Battery charging Dimensions 61 mm W k 32 mm H k 91 mm D Mass Approx 110 g ...

Страница 107: ...icture quality HDD 30 GB 19160 29950 24960 39230 SD 8 MB 2 4 3 6 16 MB 7 12 10 16 32 MB 18 28 23 37 64 MB 38 61 50 80 128 MB 75 120 98 155 256 MB 155 250 210 320 512 MB 310 490 410 640 1 GB 630 990 820 1290 2 GB 1280 2010 1670 2630 4 GB 2520 3950 3290 5170 Picture size 1280k960 640k480 Picture quality HDD 30 GB 47070 74890 99999 99999 SD 8 MB 7 12 37 75 16 MB 20 32 92 185 32 MB 45 73 200 410 64 MB...

Страница 108: ...ZAPEWNIENIA DOBREJ WENTYLACJI NALEËY SIČ UPEWNIĂ ËE ZASĚONY I INNE MATERIAĚY NIE ZASĚANIAJŔ OTWORÓW WENTYLACYJNYCH TAK ABY ZAPOBIEC RYZYKU PORAËENIA PRŔDEM LUB POËARU W WYNIKU PRZEGRZANIA NIE ZASĚANIAJ OTWORÓW WENTYLACYJNYCH URZŔDZENIA GAZETAMI OBRUSAMI ZASĚONAMI I PODOBNYMI PRZEDMIOTAMI NIE UMIESZCZAJ NA URZŔDZENIU ŚRÓDEĚ OTWARTEGO OGNIA TAKICH JAK ZAPALONE ŘWIECE POZBYWAJ SIČ ZUËYTYCH BATERII W ...

Страница 109: ...ktu zbiórki gdzie będzie przyjęte bezpłatnie W niektórych krajach produkt można oddać lokalnemu dystrybutorowi podczas zakupu innego urządzenia Prawidłowa utylizacja urządzenia umożliwia zachowanie cennych zasobów i uniknięcie negatywnego wpływu na zdrowie i środowisko które może być zagrożone przez nieodpowiednie postępowanie z odpadami Szczegółowe informacje o najbliższym punkcie zbiórki można u...

Страница 110: ...ej inżynierii lub dezasemblacji Wyprodukowano na licencji firmy Dolby Laboratories Dolby oraz symbol podwójnego D są znakami handlowymi firmy Dolby Laboratories LEICA jest zastrzeżonym znakiem towarowym firmy Leica Microsystems IR GmbH a DICOMAR jest zastrzeżonym znakiem towarowym firmy Leica Camera AG Microsoft Windows Windows Vista DirectDraw DirectSound DirectX i Internet Explorer są albo zarej...

Страница 111: ...grywanie samego siebie 149 Nagrywanie przy użyciu lampy 149 Funkcja kompensacji tylnego oświetlenia obiektu 150 Funkcja stopniowego pojawiania się zanikania 150 Tryb wygładzania skóry 151 Funkcja tele makro 152 Funkcja kolorowego obrazu podczas nagrywania w ciemności 152 Nagrywanie z samowyzwalaczem 153 Funkcja linii pomocniczych 154 Tryb panoramiczny 154 Funkcja stabilizacji obrazu 154 Funkcja re...

Страница 112: ...acja 188 Instalacja VideoCam Suite 188 Deinstalowanie oprogramowania 189 Podłączenie i rozpoznanie 190 Procedury połączenia i rozpoznania 190 Wyświetlacz komputera 190 Bezpieczne odłączanie kabla USB 191 Używanie VideoCam Suite 192 Czytanie instrukcje obsługi oprogramowania 192 Funkcja KOPIOW DVD 193 Jeżeli używasz Macintosh 194 Inne Menu 195 Lista menu 195 Inne menu 196 Symbole i wskaźniki 198 Sy...

Страница 113: ...około dwudziestu dwóch płyt DVD o średnicy 8 cm Można również nagrywać filmy oraz zdjęcia na karcie SD Łatwe nagrywanie l 141 Nie trzeba wyszukiwać miejsca rozpoczęcia nagrywania Nowe nagranie nie zastąpi żadnej z poprzednio nagranych scen Łatwe odtwarzanie l 160 Nagrane sceny są wyświetlane w formie miniatur Można łatwo szukać scen które chce się obejrzeć HDD HDD HDD ...

Страница 114: ... razem ulubione sceny zapisane na twardym dysku Połączenie z komputerem l 184 Używając załączonego oprogramowania można utworzyć na płycie DVD kopię zapasową scen nagranych na tej kamerze poprzez naciśnięcie tylko jednego przycisku Można również utworzyć oryginalną płytę DVD Video wysyłając sceny na komputer i ich późniejszą edycję ...

Страница 115: ...bieli l 158 Odbiornik sygnałów z pilota l 119 5 Mikrofon wbudowany stereofoniczny Akumulator CGA DU12 Zasilacz sieciowy VSK0651B DE 974GC Kabel zasilania prądem stałym K2GJ2DC00015 lub K2GJ2DC00011 Kabel AV S K2KZ9CB00001 Kabel sieciowy K2CR2DA00004 Pilot zdalnego sterowania N2QAEC000023 Bateria guzikowa CR2025 Kabel USB K1HA05CD0019 lub K1HA05CD0016 CD ROM Akcesoria opcjonalne Zasilacz sieciowy V...

Страница 116: ...m W T l 148 Podczas odtwarzania Suwak głośności sVOLr l 163 22 Przycisk fotografowania l 144 23 Dioda sygnalizacyjna l 197 24 Gniazdo karty l 128 25 Gniazdo statywu l 117 26 Suwak zwalniania akumulatora BATTERY l 124 27 Ekran LCD l 118 28 Suwak otwierający gniazdo na kartę l 128 29 Przycisk DVD COPY DVD COPY l 193 30 Głośnik 31 Przycisk zmiany jasności ekranu LCD POWER LCD PLUS l 138 32 Przycisk l...

Страница 117: ...obiektywu należy zawsze nakładać na niego pokrywę gdy nie jest używany Obróć pierścieniem otwierania zamykania pokrywy obiektywu Jest to otwór pozwalający na podłączanie do kamery opcjonalnego statywu Proszę uważnie przeczytać instrukcję obsługi aby dowiedzieć się jak dołączyć statyw do kamery Podczas korzystania ze statywu nie można otworzyć pokrywy gniazda karty pamięci Kartę SD należy włożyć do...

Страница 118: ...k wyświetlania informacji na ekranie EXT DISPLAY l 180 3 Przycisk czasu daty DATE TIME l 136 4 Przyciski sterowania odtwarzaniem l 161 5 Przycisk usuwania 6 Przyciski strzałek 3 4 2 1 l 135 7 Przycisk rozpoczęcia zatrzymania nagrywania START STOP 8 Przycisk powiększenia głośności ZOOM VOL 9 Przycisk menu MENU l 135 10 Przycisk akceptacji ENTER l 135 oznacza że te przyciski funkcjonują w taki sam s...

Страница 119: ...nikiem pilota w kamerze A Około 5 m Kąt Około 10o z góry i 15o z dołu z lewej i z prawej strony Pilot jest przeznaczony do użytku w pomieszczeniach Pilot używany na zewnątrz pomieszczeń lub w silnym świetle może nie działać prawidłowo nawet będąc w odpowiedniej odległości od kamery UWAGA Gdy bateria zostanie wymieniona na nieprawidłowy typ baterii może zaistnieć niebezpieczeństwo wybuchu Należy wy...

Страница 120: ...rta SD została sformatowana w innych urządzeniach np w komputerze czas nagrywania może być dłuższy i możliwe że z karty SD nie będzie można korzystać l 178 Dyski twarde i karty które można używać w tej kamerze Wewnętrzny dysk twardy Twardy dysk Karta pamięci SD Karta pamięci SDHC Symbol na ekranie Oznaczenie w tej instrukcji HDD SD Pojemność 30 GB 1 8 MB 16 MB 32 MB 64 MB 128 MB 256 MB 512 MB 1 GB...

Страница 121: ... można uzyskać na następującej stronie Strona jest dostępna jedynie w języku angielskim http panasonic jp support global cs e_cam Środki ostrożności Nie dotykaj styków z tyłu karty Nie wystawiaj końcówek karty na działanie wody brudu lub kurzu Nie należy pozostawiać kart w następujących miejscach jW miejscu silnie nasłonecznionym jW miejscu mocno zapylonym lub wilgotnym jW pobliżu grzejnika jW mie...

Страница 122: ... odtwarzanie może zostać zatrzymane Należy obserwować temperaturę kamery Nie będzie można zapisywać ani odtwarzać jeśli temperatura kamery będzie zbyt niska lub zbyt wysoka Na ekranie LCD pojawi się komunikat ostrzegawczy jeśli zostanie wykryta nieprawidłowa temperatura l 200 Nie używaj kamery w środowisku o niskim ciśnieniu powietrza Używanie kamery na wysokościach ponad 3000 m może spowodować us...

Страница 123: ...erzanie kamery sUżywanie przełącznika OFF ON lub pokrętła wyboru trybu sWyjmowanie akumulatora lub odłączanie zasilacza Lampka odczytu karty Kiedy kamera uzyskuje dostęp do karty SD odczyt nagrywanie odtwarzanie kasowanie itp zapala się kontrolka dostępu do karty Jeśli zostaną wykonane poniższe czynności kiedy świeci się kontrolka karta SD albo nagrane dane mogą ulec uszkodzeniu lub kamera może ni...

Страница 124: ...aj akumulator Przytrzymaj akumulator ręką aby nie wypadł Stwierdzono że na niektórych rynkach dostępne są podróbki akumulatorów zbliżone wyglądem do oryginalnych produktów Część z nich nie ma odpowiedniego zabezpieczenia wewnętrznego i w związku z tym nie spełnia odnośnych norm bezpieczeństwa Korzystanie z nich może grozić pożarem lub wybuchem Nie ponosimy odpowiedzialności za jakiekolwiek wypadki...

Страница 125: ...ednich promieni słonecznych z zamkniętymi drzwiami i oknami Uwaga dotycząca baterii nadających się do ponownego ładowania Baterie te są przeznaczone do utylizacji Naleźy postępować zgodnie z lokalnymi zaleceniami dotyczącymi utylizacji UWAGA Gdy bateria zostanie wymieniona na nieprawidłowy typ baterii może zaistnieć niebezpieczeństwo wybuchu Należy wymienić baterię tylko na taki sam typ lub odpowi...

Страница 126: ...świetlony używając przycisku POWER LCD PLUS Akumulatory nagrzewają się podczas pracy i ładowania Podczas pracy kamera również się nagrzewa Nie jest to usterka Należy zwrócić uwagę że czas działania akumulatora skraca się w niskich temperaturach Podczas nagrywania zaleca się posiadanie zapasowego naładowanego akumulatora Czas ładowania i czas nagrywania Numer modelu akumulatora Napięcie pojemność C...

Страница 127: ...mera zostanie włączona z założoną pokrywą obiektywu automatyczna regulacja balansu bieli l 213 może nie działać poprawnie Ustaw przełącznik OFF ON na położenie ON Włączy się wskaźnik stanu A i zasilanie Po włączeniu kamery po raz pierwszy pojawi się prośba o ustawienie godziny i czasu Wybierz TAK i ustaw czas i datę l 136 Po włączeniu kamery po raz pierwszy będzie można wybrać gdzie będą zapisywan...

Страница 128: ...k OFF ON w położeniu OFF aby wyłączyć zasilanie Sprawdź czy zgasł wskaźnik stanu 2 Otwórz ekran LCD a następnie przesuń suwak otwierania gniazda na kartę A aby otworzyć pokrywę gniazda na kartę 3 Włóż kartę SD do gniazda karty lub wyjmij kartę z gniazda Wkładając kartę SD należy ją obrócić naklejką B do góry i wcisnąć do gniazda do oporu Aby wyjąć kartę SD wciśnij jej środek a następnie wyciągnij ...

Страница 129: ... lub w prawo aby wybrać element lub scenę i wciśnij go aby wybrać dany element Obsługa ekranu menu l 134 Obróć pokrętło wyboru trybu na lub 1 Naciśnij środek joysticka aby na ekranie pojawiły się ikony Ikony znikną po ponownym naciśnięciu środka joysticka Ikony zmieniają się po każdym przesunięciu joysticka w dół Tryb nagrywania filmów l 141 Użyj tego trybu do nagrywania filmów Tryb odtwarzania fi...

Страница 130: ...w lewo lub w prawo aby wybrać scenę do odtworzenia i naciśnij joystick Wybrana scena zostanie odtworzona na całym ekranie Na ekranie automatycznie pojawi się ikona obsługi 2 Przesuń joystick w górę w dół w lewo lub w prawo aby wykonać różne operacje Ikony obsługi znikają lub pojawiają się po każdym naciśnięciu joysticka Operacje możliwe podczas odtwarzania ...

Страница 131: ...a obiektu 150 2 Stopniowe pojawianie się i zanikanie obrazu 150 1 Tryb pomocy 134 2 2 3 Tryb kolorowego obrazu podczas nagrywania w ciemności 152 2 Tryb wygładzania skóry 151 1 Tele makro 152 W trybie ręcznym 3 3 3 Balans bieli 157 2 Przysłona lub wartość wzmocnienia 159 1 Czas naświetlania 159 W trybie ręcznego ustawiania ostrości 4 4 21 Ręczna regulacja ostrości 156 1 2 1 2NEXT NEXT 1 2NEXT 2 2 ...

Страница 132: ...rzymanie 160 4 Zatrzymanie odtwarzania i wyświetlenie miniatur 160 2 Pomiń 160 6 Przewiń do tyłu 161 2 Wolne cofanie odtwarzanie poklatkowe podczas wstrzymania nagrywania 162 9 1 Pomiń 160 5 Przewiń do przodu 161 1 Wolne przewijanie do przodu odtwarzanie poklatkowe podczas wstrzymania nagrywania 162 ...

Страница 133: ... wartość wzmocnienia 159 1 Czas naświetlania 159 W trybie ręcznego ustawiania ostrości 4 4 21 Ręczna regulacja ostrości 156 Ikona Kierunek Funkcja Strona 1 3 Rozpoczęcie wstrzymanie pokazu slajdów 165 4 Zatrzymanie odtwarzania i wyświetlenie miniatur 165 E 2 Wyświetlenie poprzedniego zdjęcia podczas wstrzymania nagrywania 165 D 1 Wyświetlenie następnego zdjęcia podczas wstrzymania nagrywania 165 1...

Страница 134: ...ię opis wybranej ikony Ikony zmieniają się po każdym przesunięciu joysticka w dół Wyjście z trybu pomocy Naciśnij przycisk MENU lub wybierz EXIT W trybie pomocy nie można ustawiać funkcji Gdy włączony jest tryb pomocy nie można filmować ani fotografować Zmiana języka Można zmienić język używany w komunikatach na ekranie i w menu 1 Naciśnij przycisk MENU wybierz LANGUAGE i naciśnij joystick 2 Wybie...

Страница 135: ...Przesuń joystick w górę lub w dół aby wybrać element menu niższego poziomu 5 Przesuń joystick w prawo lub naciśnij joystick 6 Przesuń joystick w górę lub w dół aby wybrać żądany element 7 Wciśnij joystick aby otworzyć wybrany element Cofanie się do poprzedniego ekranu Przesuń joystick w lewo Wyjście z ekranu menu Naciśnij przycisk MENU Ekran menu nie pojawia się podczas nagrywania lub odtwarzania ...

Страница 136: ...ZEG TAK i naciśnij joystick 2 Przesuń joystick w lewo lub prawo aby wybrać element do ustawienia Następnie przesuń joystick w górę lub w dół aby ustawić żądaną wartość Lata zmieniają się następująco 2000 2001 2099 2000 Czas jest wyświetlany w systemie 24 godzinnym 3 Wciśnij joystick aby otworzyć wybrany element Zegar rozpoczyna odliczanie od 00 sekund po naciśnięciu joysticka Aby zakończyć konfigu...

Страница 137: ...towej Pozostaw kamerę na około 24 godziny Po naładowaniu bateria będzie podtrzymywać ustawienia daty i czasu przez około 6 miesięcy Bateria będzie się ładować nawet jeśli przełącznik OFF ON zostanie ustawiony w położeniu OFF Regulacja ekranu LCD 1 Naciśnij przycisk MENU wybierz USTAWIENIA USTAW LCD TAK i naciśnij joystick 2 Przesuń joystick w górę lub w dół aby wybrać element do ustawienia Następn...

Страница 138: ... 3 Jaśniejszy 4 Ciemniejszy 5 Ciemny Ustawienie to nie ma wpływu na nagrywane obrazy Gdy kamera zostanie włączona z podłączonym zasilaczem sieciowym funkcja ta automatycznie przyjmie wartość Jasny Monitor LCD zostanie trochę ściemniony po włączeniu lampy Zwiększanie i zmniejszanie jasności całego ekranu LCD POWERLCD PLUS 1 2 3 5 4 1 2 1 2 ...

Страница 139: ... ręce blisko ciała 5 Stań w lekkim rozkroku Będąc na dworze należy nagrywać obrazy tak aby słońce znajdowało się za plecami użytkownika kamery Jeśli nagrywany obiekt jest oświetlony od tyłu na nagraniu będzie on zbyt ciemny Podczas nagrywania należy sprawdzić czy podłoże jest pewne oraz czy nie ma niebezpieczeństwa zderzenia się z inną osobą lub obiektem Sposób trzymania kamery 4 5 1 2 3 ...

Страница 140: ...ć l 156 Zabezpieczenie przed przypadkowym filmowaniem AGS Funkcja ta zapobiega przypadkowemu nagrywaniu gdy użytkownik zapomni wstrzymać nagrywanie i będzie niósł kamerę odwróconą do góry nogami Nagrywanie zostanie automatycznie wstrzymane jeśli kamera zostanie odwrócona do góry nogami Obróć pokrętło wyboru trybu na Naciśnij przycisk MENU wybierz USTAWIENIA SAMOWYŁĄCZ WŁĄCZ i naciśnij joystick Fun...

Страница 141: ...brazów przeznaczonych do odtwarzania w telewizorach panoramicznych Aby oglądać obrazy na zwykłym telewizorze 4 3 zmień format obrazu l 154 przed rozpoczęciem nagrywania lub przed oglądaniem ich na podłączonym telewizorze l 179 Zdejmij pokrywę obiektywu przed włączeniem kamery Jeśli kamera zostanie włączona z założoną pokrywą obiektywu automatyczna regulacja balansu bieli może działać nieprawidłowo...

Страница 142: ...CZ ENERG A Tryb nagrywania B Wybrane miejsce zapisu C Pozostały czas nagrywania Kiedy pozostały czas wynosi mniej niż 1 minutę wskaźnik R 0h00m miga na czerwono D Czas nagrania który upłynął Dźwięk jest nagrywany poprzez wbudowany mikrofon stereo umieszczony z przodu kamery Należy uważać by nie blokować mikrofonu Na karcie nie można nagrywać jeśli blokada zapisu na karcie SD jest ustawiona w położ...

Страница 143: ...ch wypadkach jKiedy w tle znajduje się złożony wzór jKiedy kamera była zbyt mocno poruszana lub zbyt szybko jGdy został nagrany szybko poruszający się obiekt Szczególnie jeśli był nagrany w trybie LP Dostępna ilość miejsca na filmy zmniejszy się w przypadku nagrywania zdjęć na twardym dysku lub karcie SD Dostępne tryby nagrywania i czas nagrywania filmów Tryb nagrywania XP Wysoka jakość SP Normaln...

Страница 144: ...ywu przed włączeniem kamery Jeśli kamera zostanie włączona z założoną pokrywą obiektywu automatyczna regulacja balansu bieli może działać nieprawidłowo 1 Włącz kamerę 2 Obróć pokrętło wyboru trybu na 3 Otwórz ekran LCD 4 Naciśnij przycisk MENU wybierz WYB NOŚNIKA DYSK TWARDY lub KARTA SD aby wybrać miejsce zapisu i naciśnij joystick 5 Naciśnij do połowy przycisk fotografowania aby ustawić ostrość ...

Страница 145: ...owanego obiektu o 4k lub więcej trudno uniknąć drgania obrazu spowodowanego ruchami ręki użytkownika Zalecamy redukcję stopnia przybliżenia i zbliżenie się do fotografowanego obiektu podczas robienia zdjęć Podczas fotografowania należy trzymać pewnie kamerę i trzymać ręce nieruchomo przy tułowiu aby nie powodować drgań kamery Można wykonać ostre zdjęcia bez drgań używając statywu lub pilota A Wska...

Страница 146: ...a jednym ujęciu znajdują się dalekie obiekty i bliskie obiekty jNagrywana scena jest ciemna jW ujęciu znajduje się jasny obszar jW ujęciu znajdują się tylko poziome linie jW ujęciu nie ma kontrastu Informacje dotyczące pola ustawiania ostrości Gdy kontrastowy obiekt znajduje się przed lub za głównym obiektem w polu ustawiania ostrości główny obiekt może być nieostry W takim przypadku należy usunąć...

Страница 147: ...odczas druku Należy to sprawdzić przed drukowaniem JAKOŚĆ OBR Wybieranie jakości obrazu Naciśnij przycisk MENU wybierz PODSTAWOWE JAKOŚĆ OBR oraz żądany element i naciśnij joystick Liczba pikseli a jakość obrazu w trybie fotografowania Ikona Format obrazu Liczba pikseli 4 3 2048k1512 4 3 1280k960 4 3 640k480 16 9 1920k1080 Zapisywane będą zdjęcia o wysokiej jakości Ważniejsza jest duża ilość zapis...

Страница 148: ... się dużą szybkość funkcji zoom ustawienie ostrości na nagrywanym obiekcie może być utrudnione Dźwięk przesunięcia suwaka może zostać nagrany przy ustawianiu funkcji zoom Dlatego należy cicho przesuwać suwak funkcji zoom do wyjściowego położenia HDD SD Jeśli wartość funkcji zoom będzie większa niż 10k włączona zostanie funkcja cyfrowego zoomu Można określić maksymalne powiększenie uzyskiwane przez...

Страница 149: ...y nie będą wyświetlane nawet po naciśnięciu joysticka Na ekranie będą pojawiać się tylko niektóre informacje Kiedy na ekranie pojawi się ustaw ekran LCD w normalnym położeniu i sprawdź ostrzeżenie alarm l 200 HDD SD Tryb wzmocnienia zwiększa natężenie światła lampy i rozjaśnia naturalne kolory obrazu Tej funkcji nie można użyć w trybie fotografowania Obróć pokrętło wyboru trybu na lub Naciśnij prz...

Страница 150: ...y nagrywany obiekt jest oświetlony z tyłu i wydaje się być ciemny Obróć pokrętło wyboru trybu na lub 1 Naciśnij joystick Następnie przesuń joystick w dół aby wyświetlić ikonę pokazaną na ilustracji 2 Przesuń joystick w górę aby wybrać ª Obraz na ekranie rozjaśni się Aby powrócić do normalnego nagrywania Wybierz ponownie ª Funkcja kompensacji tylnego oświetlenia obiektu jest wyłączana po wyłączeniu...

Страница 151: ...ania się obrazu Naciśnij przycisk MENU wybierz ZAAWANSOW WYGAŚ KOL BIAŁY lub CZARNY i naciśnij joystick Po wyłączeniu zasilania funkcja stopniowego pojawiania się zanikania zostanie wyłączona Jeśli wybrano funkcję pojawiania się zanikania po rozpoczęciu nagrywania obraz pojawi się po kilku sekundach Wstrzymanie pauza nagrywania również trwa kilka sekund Miniatury scen nagranych przy użyciu tej fun...

Страница 152: ...y jest ustawiane automatycznie na wartość 10k Aby anulować funkcję tele makro Wybierz ponownie Jeśli nie można uzyskać ostrości ustaw ostrość ręcznie l 156 Funkcja tele makro jest anulowana w poniższych przypadkach jGdy powiększenie będzie miało niższą wartość niż 10k jGdy zostanie wyłączone zasilanie lub obrócone pokrętło wyboru trybu HDD SD Dzięki tej funkcji można nagrywać kolorowe obiekty w ci...

Страница 153: ...jscu ekran może przez chwilę świecić na biało HDD SD Można zapisywać zdjęcia używając samowyzwalacza Obróć pokrętło wyboru trybu na 1 Naciśnij joystick Następnie przesuń joystick w dół aby wyświetlić ikonę pokazaną na ilustracji 2 Przesuń joystick w lewo aby wybrać Ø 3 Naciśnij przycisk fotografowania Zdjęcie zostanie zapisane gdy symbol Ø będzie migał przez ok 10 sekund Po zrobieniu zdjęcia samow...

Страница 154: ...ck Linie pomocnicze nie są nagrywane Linie pomocnicze nie są wyświetlane gdy ekran LCD jest obrócony do tyłu w celu nagrania użytkownika HDD SD Funkcja ta pozwala na nagrywanie obrazów zgodnych z telewizorami panoramicznymi 16 9 i zwykłymi 4 3 Nagrywanie obrazów w formacie 16 9 Obróć pokrętło wyboru trybu na Naciśnij przycisk MENU a następnie wybierz PODSTAWOWE FORMAT 16 9 i naciśnij joystick Nagr...

Страница 155: ...pokrętło wyboru trybu na Naciśnij przycisk MENU wybierz ZAAWANSOW ANTYWIATR WŁĄCZ i naciśnij joystick Aby wyłączyć funkcję redukcji szumu wiatru Naciśnij przycisk MENU wybierz ZAAWANSOW ANTYWIATR WYŁĄCZ i naciśnij joystick Domyślnie ta funkcja jest ustawiona na WŁĄCZ Funkcja redukcji szumu wiatru zależy od siły wiatru Jeśli funkcja zostanie włączona przy silnym wietrze może to spowodować zmniejsze...

Страница 156: ... Podczas normalnego odtwarzania film może wydawać się mało płynny Unikaj nagrywania w świetle świetlówek lamp rtęciowych lub sodowych ponieważ może to zmienić kolory i jasność nagrywanego obrazu Podczas nagrywania mocno oświetlonego obiektu lub obiektu silnie odbijającego światło na nagraniu mogą pojawić się pionowe linie światła Jeśli jasność jest niewystarczająca tryb sport nie będzie działać Sy...

Страница 157: ...wnie w położenie FOCUS Można również przywrócić automatyczną regulację ostrości ustawiając przełącznik AUTO MANUAL FOCUS w położenie AUTO HDD SD Korzystając z funkcji automatycznego balansu bieli można nie uzyskać naturalnych kolorów z uwagi na oświetlenie lub rodzaj ujęcia W tym wypadku można ustawić balans bieli ręcznie Obróć pokrętło wyboru trybu na lub 1 Ustaw przełącznik AUTO MANUAL FOCUS na ...

Страница 158: ...zez chwilę czarny kolor Nie można ustawić ręcznie balansu czerni 1 Trwa ustawianie balansu czerni Miga 2 Trwa ustawianie balansu bieli Miga 3 Regulacja zakończona Zapala się Gdy kamera zostanie włączona z założoną pokrywą obiektywu automatyczna regulacja balansu bieli może nie działać poprawnie Należy włączać kamerę po zdjęciu pokrywy obiektywu Wcześniej ustawiony ręczny balans bieli zostaje zapis...

Страница 159: ...lania i wartości wzmocnienia przysłony najpierw ustaw czas naświetlania Ręczna regulacja czasu naświetlania Unikaj nagrywania w świetle świetlówek lamp rtęciowych lub sodowych ponieważ może to zmienić kolory i jasność nagrywanego obrazu Gdy użytkownik ręcznie skróci czas naświetlania wartość wzmocnienia wzrośnie automatycznie w zależności od tego jak bardzo zmniejszy się czułość a na ekranie mogą ...

Страница 160: ...anie oznaczona żółtą ramką Jeśli nagrano 9 lub więcej scen następną lub poprzednią stronę ze scenami można wyświetlić przesuwając joystick w odpowiednim kierunku Wciśnięcie i przytrzymanie joysticka w górę lub w dół pozwala na szybkie przewijanie stron w przód i w tył Ekran nie zmieni się zmienią się tylko numery scen i pasek przewijania Zwolnij joystick gdy zostanie wyświetlona strona ze sceną kt...

Страница 161: ...ach wyświetlany czas może się różnić od rzeczywistego czasu nagrania a wyświetlenie miniatur może dłużej trwać Przesuń i przytrzymaj w tej pozycji joystick podczas odtwarzania dopóki nie rozpocznie się przewijanie do przodu Naciśnij i przytrzymaj joystick w lewo aby przewijać wstecz Przesuń joystick ponownie aby zwiększyć szybkość Po przesunięciu joysticka w górę przywracane jest normalne odtwarza...

Страница 162: ...twarzany klatka po klatce 1 Przesuń joystick w górę podczas odtwarzania aby wstrzymać odtwarzanie 2 Przesuń joystick w prawo Klatki będą odtwarzane wstecz po przesunięciu joysticka w lewo Po przesunięciu joysticka w górę przywracane jest normalne odtwarzanie Korzystanie z pilota 1 Naciśnij przycisk 2 Naciśnij przycisk E lub D Odtwarzanie w zwolnionym tempie Odtwarzanie klatka po klatce PLAY STOP S...

Страница 163: ...odtwarzane są filmy z twardego dysku Przejdź do kroku numer 3 gdy odtwarzasz z karty SD Po ustawieniu funkcji TRYB ODTW na WSZYSTKO wszystkie nagrane filmy zostaną odtworzone po kolei 2 Tylko gdy odtwarzasz filmy z dysku twardego Przesuwaj joystick w lewo lub w prawo aby wybrać miesiąc 3 Przesuń joystick w górę lub w dół aby wybrać datę odtwarzania i naciśnij joystick Sceny nagrane tego samego dni...

Страница 164: ...sku i karty SD Jeśli odtwarzanie filmu zostało zatrzymane gdy funkcja WZNÓW ODTW jest ustawiona na WYŁĄCZ film będzie odtwarzany od początku przy następnym odtworzeniu Pozycja wznawiania zapamiętana przez kamerę jest usuwana po obróceniu pokrętła wyboru trybu itp Ustawienie WZNÓW ODTW pozostaje włączone WZNÓW ODTW Funkcja jest ustawiona na wartość WYŁĄCZ jeśli włożono kartę SD z blokadą zapisu w p...

Страница 165: ...no 9 lub więcej plików następną lub poprzednią stronę ze zdjęciami można wyświetlić przesuwając joystick w odpowiednim kierunku Wciśnięcie i przytrzymanie joysticka w górę lub w dół pozwala na szybkie przewijanie stron w przód i w tył Ekran nie zmieni się zmienią się tylko numery plików i pasek przewijania Zwolnij joystick gdy zostanie wyświetlona strona z plikiem który chcesz wyświetlić 4 Naciśni...

Страница 166: ...ość lub nie odtworzyć danych nagranych na tej kamerze Podczas pokazu slajdów nie należy zmieniać położenia pokrętła wyboru trybu Podczas uzyskiwania dostępu do karty SD świecąca kontrolka dostępu do karty nie należy wyjmować karty SD Czas potrzebny na wyświetlenie pliku zależy od ilości pikseli w pliku Nie będzie można odtwarzać pliku który w widoku miniatur jest przedstawiany jako W przypadku pró...

Страница 167: ...y na wybranym nośniku oprócz zablokowanych scen jKiedy element TRYB ODTW jest ustawiony na PO DACIE Wszystkie sceny wybrane według daty oprócz zablokowanych scen 3 Tylko gdy wybrano element WYBIERZ w kroku 2 Wybierz scenę do usunięcia i naciśnij joystick Wybrana scena jest oznaczona czerwoną ramką Po ponownym naciśnięciu joysticka wybór sceny zostanie anulowany Można wybrać 50 scen po kolei 4 Tylk...

Страница 168: ...amięci podczas usuwania scen z karty SD Proces usuwania zostanie zatrzymany Nie można usunąć zabezpieczonych scen HDD SD Można zabezpieczyć sceny filmów aby nie można ich było pomyłkowo usunąć Jednakże należy pamiętać że podczas formatowania nośnika usuwane są z niego wszystkie dane Obróć pokrętło wyboru trybu na Wybierz DYSK TWARDY lub KARTA SD w funkcji WYB NOŚNIKA 1 Naciśnij MENU wybierz USTAW ...

Страница 169: ...u na Wybierz DYSK TWARDY w WYB NOŚNIKA 1 Naciśnij przycisk MENU wybierz USTAW ODTW LISTA ODTW UTWÓRZ i naciśnij joystick 2 Wybierz scenę do dodania do listy odtwarzania i naciśnij joystick Wybrana scena jest oznaczona czerwoną ramką Po ponownym naciśnięciu joysticka wybór sceny zostanie anulowany Można wybrać 50 scen po kolei Sceny są zapisywane na liście odtwarzania w kolejności ich wybierania Po...

Страница 170: ...n Naciśnij przycisk MENU wybierz KONIEC i naciśnij joystick HDD Edytowanie scen na liście odtwarzania nie ma wpływu na oryginalne sceny Wybierz tryb odtwarzania listy l 170 Odtwarzanie listy kroki 1 i 2 1 Naciśnij przycisk MENU wybierz EDYT LISTY DODAJ TAK i naciśnij joystick 2 Wybierz scenę do dodania i wciśnij joystick Wybrana scena jest oznaczona czerwoną ramką Po ponownym naciśnięciu joysticka...

Страница 171: ... Wybrana scena jest otoczona czerwoną ramką a miejsce w które ma być przeniesiona oznaczone jest żółtym paskiem 3 Wybierz miejsce do wstawienia sceny i naciśnij joystick Aby przenosić kolejne sceny na liście odtwarzania Powtórz czynności w punktach 2 do 3 Aby zakończyć edycję Naciśnij przycisk MENU Usuwanie scen na liście odtwarzania nie wpływa na oryginalne sceny Usuwanie pojedynczych scen Wybier...

Страница 172: ...ości w punktach 3 do 5 Anulowanie usuwania po rozpoczęciu usuwania Naciśnij przycisk MENU Sceny są usuwane począwszy od ostatniej sceny w widoku miniatur Nie można odzyskać scen które już zostały usunięte przed anulowaniem usuwania Aby zakończyć edycję Naciśnij przycisk MENU Można również usunąć sceny naciskając przycisk MENU wybierając EDYT LISTY USUŃ lub WSZYSTKO lub WYBIERZ Usuwanie scen na liś...

Страница 173: ...w Powtórz czynności w punktach 3 do 5 Anulowanie usuwania po rozpoczęciu usuwania Naciśnij przycisk MENU Pliki są usuwane począwszy od ostatniego pliku w widoku miniatur Nie można odzyskać plików które już zostały usunięte przed anulowaniem usuwania Aby zakończyć edycję Naciśnij przycisk MENU Usuwanie plików nagranych na karcie SD w innych urządzeniach Można usunąć plik zdjęcia innego formatu niż ...

Страница 174: ... dane dotyczące druku zdjęć oraz ilość wydruków dane DPOF Obróć pokrętło wyboru trybu na Wybierz KARTA SD w WYB NOŚNIKA 1 Naciśnij MENU wybierz KONF OBRAZU UST DPOF USTAW i naciśnij joystick 2 Wybierz pliki do dodania ustawień DPOF i wciśnij joystick Wyświetlona zostanie liczba kopii do wydrukowania zapisana w ustawieniu DPOF 3 Przesuń joystick w górę lub w dół aby wybrać liczbę kopii i naciśnij j...

Страница 175: ...MENU wybierz KONF OBRAZU KOPIUJ oraz żądany kierunek kopiowania i naciśnij joystick 2 Wybierz element WYBIERZ lub WSZYSTKO i naciśnij joystick Po wybraniu opcji WSZYSTKO skopiowane zostaną wszystkie zdjęcia znajdujące się na twardym dysku lub karcie SD Przejdź do kroku 5 3 Tylko gdy wybrano element WYBIERZ w kroku 2 Wybierz plik do skopiowania i naciśnij joystick Wybrany plik jest oznaczony czerwo...

Страница 176: ...lnych plików Ustawienia zabezpieczeń plików oraz ustawienia DPOF nie mogą być skopiowane W przypadku wybrania opcji WSZYSTKO proces kopiowania może potrwać dłużej niż zwykle gdy na nośniku znajduje się dużo plików Podczas kopiowania plików nie wyłączaj kamery Podczas kopiowania plików korzystaj z wystarczająco naładowanego akumulatora lub z zasilacza sieciowego Nie należy otwierać pokrywy gniazda ...

Страница 177: ... Podczas formatowania twardego dysku należy korzystać z wystarczająco naładowanego akumulatora lub z zasilacza sieciowego Podczas formatowania nie należy uderzać kamery lub wystawiać jej na działanie wibracji HDD Wyświetlana jest informacja o wykorzystanym i wolnym miejscu na twardym dysku Obróć pokrętło wyboru trybu na Wybierz DYSK TWARDY w WYB NOŚNIKA Naciśnij MENU wybierz USTAWIENIA INFORMACJE ...

Страница 178: ... MENU aby wyjść z ekranu komunikatu Do formatowania kart SD należy używać tej kamery Jeśli karta SD została sformatowana w innych urządzeniach np w komputerze czas nagrywania może być dłuższy i możliwe że z karty SD nie będzie można korzystać Czas formatowania karty SD zależy od jej rodzaju Podczas formatowania nie wyłączaj kamery Podczas formatowania kart SD korzystaj z wystarczająco naładowanego...

Страница 179: ...ne do oporu Sprawdź podłączone wtyczki Sprawdź ustawienia wejścia telewizora przełącznik źródła Aby uzyskać więcej informacji przeczytaj instrukcję obsługi telewizora Jeśli posiadasz telewizor z gniazdem na karty pamięci SD można na nim odtworzyć filmy i zdjęcia nagrane na karcie SD Więcej informacji o kompatybilności telewizora znajduje się w instrukcji obsługi telewizora Jeśli obrazy nie są praw...

Страница 180: ...iowania z karty SD lub chcesz kopiować na twardy dysk kamery podłącz kamerę do nagrywarki DVD kablem AV S w zestawie i zacznij kopiować l poniżej Włóż kartę SD do gniazda na karty SD w nagrywarce DVD a następnie skopiuj zawartość na dysk twardy lub płytę Aby dowiedzieć się więcej o kopiowaniu obrazów na dysk twardy przeczytaj instrukcję obsługi nagrywarki DVD Współpraca z magnetowidem HDD SD Można...

Страница 181: ...ę 5 Rozpocznij odtwarzanie na kamerze Następnie włącz nagrywanie na podłączonym urządzeniu wideo Aby uzyskać szczegółowe informacje przeczytaj instrukcję obsługi magnetowidu lub innego urządzenia wideo Aby przerwać kopiowanie Zatrzymaj nagrywanie na podłączonym urządzeniu Następnie zatrzymaj odtwarzanie na kamerze Jeśli wyświetlanie daty czasu oraz funkcji nie jest potrzebne należy je wyłączyć prz...

Страница 182: ...enie będzie niedostępne 7 Wybierz ustawienie rozmiaru papieru w menu ROZM PAPIERU Nie można wybrać rozmiarów papieru nie obsługiwanych przez drukarkę 8 Wybierz ustawienie układu strony w menu UKŁAD STR Nie można wybrać układu strony nie obsługiwanego przez drukarkę 9 Wybierz DRUKUJ TAK i naciśnij joystick Rozpocznie się drukowanie zdjęć Wyjdź z trybu PictBridge odłączając kabel USB po zakończeniu ...

Страница 183: ... nagranych zdjęć mogą być ucięte podczas druku gdy ustawiono wartość Należy to sprawdzić przed drukowaniem W przypadku korzystania z drukarki z funkcją skracania wydruku lub druku bez ramek należy wyłączyć tę funkcję przed drukiem Więcej informacji znajduje się w instrukcji obsługi drukarki Może nie być możliwe drukowanie zdjęć nagranych w innych urządzeniach Kiedy kamera jest bezpośrednio podłącz...

Страница 184: ...u innego oprogramowania niż dodane w wyposażeniu Adobe Reader Do przeglądania zainstalowanych instrukcji działania potrzebny jest Adobe Reader Adobe Acrobat Reader 5 0 lub późniejsza wersja Jeżeli w twoim komputerze nie jest jeszcze zainstalowany Adobe Reader Adobe Acrobat Reader możesz zainstalować go z CD ROM Kliknij pożądany język w Setup Menu po czym wykonaj wyświetlane na ekranie instrukcje b...

Страница 185: ... 9 0c obsługuje nakładkę interfejsu DirectDraw Ilość wolnego miejsca na dysku Transfer DMA skuteczny przy Ultra DMA 33 lub więcej Zalecany Ultra DMA 100 lub wyżej Do zainstalowania aplikacji 150 MB lub więcej Przy tworzeniu dysków DVD Video 5 GB lub więcej dla roboczego foldera 10 GB lub więcej w przypadku dysków dwuwarstwowych Jeżeli załączone jest ustawienie kompresowania w czasie zapisu mogą wy...

Страница 186: ... Nie może być zagwarantowane działanie na wszystkicj napędach DVD Nie jest gwarantowane że wszystkie odtwarzacze DVD będą w stanie odtwarzać dyski DVD wykonane przy pomocy tego programu W zależności od środowiska w twoim komputerze jeżeli na przykład nie obsługuje ono Hi Speed USB USB 2 0 może nastąpić utrata porcji danych dźwięk może być przerywany lub program może działać powoli w czasie odtwarz...

Страница 187: ... Wsteczna Dekompilacja lub Dezasemblacja Licencjobiorca nie ma prawa dokonywania inżynierii wstecznej dekompilacji lub dezasemblacji Oprogramowania z wyjątkiem dokonywania tego w takim stopniu w jakim jest to dozwolone prawem lub ustawami kraju w którym zamieszkuje Licencjobiorca Matsushita lub jego dystrybutorzy lub dealerzy nie ponoszą odpowiedzialności za jakikolwiek defekt w Oprogramowaniu lub...

Страница 188: ... Continue 1 Włóż CD ROM do komputera Pojawi się ekran Setup Menu Jeżeli ekran Setup Menu nie pojawi się kliknij dwukrotnie ikonę napędu CD ROM w My Computer Computer 2 Kliknij VideoCam Suite 1 0 3 Kliknij Next 4 Wybierz miejsce gdzie należy zainstalować aplikację po czym kliknij Next 5 Wybierz Yes albo No aby utworzyć ikonę skrótu 6 Wybierz kraj lub region w którym zamieszkujesz po czym kliknij Ne...

Страница 189: ...ta komputera Wykonaj następujące kroki aby deinstalować program gdy jest on już niepotrzebny Dla Windows Vista 1 Wybierz Start Control Panel Uninstall a program 2 Wybierz VideoCam Suite 1 0 po czym kliknij Uninstall Dla Windows XP 1 Wybierz start Control Panel Add or Remove Programs 2 Wybierz VideoCam Suite 1 0 po czym kliknij Remove Dla Windows 2000 1 Wybierz Start Settings Control Panel Add Remo...

Страница 190: ...łącz kabel USB przed wyłączeniem kamery l 191 Nie odłączaj kabla USB lub adaptera AC podczas gdy lampka sygnalizacyjna dostępu świeci się lub pojawia się ikona dostępu albo na monitorze LCD gdyż może to uszkodzić dane na twardym dysku HDD lub na karcie SD Nie można odczytywać danych jednocześnie z HDD i karty SD Po pierwszym podłączeniu kamery do komputera może być konieczne wykonanie restartu kom...

Страница 191: ...D lub karta SD mogą być używane jako napęd zewnętrzny fotografie z napędu mogą być skopiowane na PC przy pomocy Windows Explorer lub innych programów 1 Kliknij dwukrotnie folder zawierający pliki na napędzie 100CDPFP itp 2 Przeciągnij i upuść pliki do foldera docelowego na twardy dysk komputera Nie kasuj folderów na karcie SD gdyż może to sprawić że karta będzie niezdatna do użytku na tej kamerze ...

Страница 192: ... używania VideoCam Suite zarejestruj się w twoim komputerze jako Administrator lub pod imieniem z ekwiwalentnymi uprawnieniami Jeżeli zarejestrujesz się pod innym imieniem niż Administrator nie będziesz mógł używać oprogramowania Wybierz start All Programs Programs Panasonic VideoCam Suite 1 0 VideoCam Suite Patrz instrukcję obsługi oprogramowania plik PDF odnośnie dokładnego opisu używania progra...

Страница 193: ...programowania plik PDF odnośnie dokładnego opisu używania programu Po zakończeniu kopiowania pojawia się komunikat Po kliknięciu OK funkcja USB zostanie ustawiona na POŁ PC Przed wyłączeniem kamery odłącz kabel USB l 191 Kolejność filmów na płycie ustawiona jest automatycznie podczas tworzenia płyty przy pomocy funkcji KOPIOW DVD Aby przydzielić porządek kopiowania filmów na płycie importuj filmy ...

Страница 194: ...ie do komputera przy pomocy dostarczonego kabla USB Pojawi się ekran wyboru funkcji USB 2 Wybierz POŁ PC DYSK TWARDY lub KARTA SD po czym naciśnij joystick 3 Kliknij dwukrotnie HDD_CAMERA lub NO NAME widoczne na pulpicie Pliki są przechowywane w folderze 100CDPFP itd w folderze DCIM 4 Przeciągnij i upuść pliki do foldera docelowego na twardy dysk komputera Aby odłączyć bezpiecznie kabel USB Przeci...

Страница 195: ...40 DŹW BIP l 197 USTAW LCD l 137 UST WST l 197 SYGN ŚWIETL l 197 F CJA DEMO l 197 LANGUAGE l 134 Menu fotografowania PODSTAWOWE F CJA SCENY l 155 LINIE POMOCY l 154 ROZM OBR l 147 JAKOŚĆ OBR l 147 UST ZEG l 136 ZAAWANSOW STAB DRGAŃ l 154 EFEKT MIGAWKI l 146 WYB NOŚNIKA DYSK TWARDY l 144 KARTA SD l 144 USTAWIENIA WYŚWIETL l 196 DATA CZAS l 136 FORMAT DATY l 137 FORM KARTY 2 l 178 OSZCZ ENERG l 196 ...

Страница 196: ...4 KOPIUJ l 175 WYB NOŚNIKA DYSK TWARDY l 165 KARTA SD l 165 USTAWIENIA WYŚWIETL l 196 DATA CZAS l 136 FORMAT DATY l 137 FORM KARTY 2 l 178 OSZCZ ENERG l 196 DŹW BIP l 197 USTAW LCD l 137 FORMAT TV l 179 SYGN ŚWIETL l 197 LANGUAGE l 134 1 Tylko gdy element WYB NOŚNIKA jest ustawiony na DYSK TWARDY 2 Tylko gdy element WYB NOŚNIKA jest ustawiony na KARTA SD WYŚWIETL Symbole i wskaźniki na ekranie są ...

Страница 197: ...ywanych operacjach kamery poprzez diodę znajdującą się na górze kamery 1 mignięcie Przy włączeniu kamery Tryb nagrywania kolor pomarańczowy Tryb odtwarzania kolor niebieski 2 mignięcia Po przełączeniu na tryb nagrywania kolor pomarańczowy Po przełączeniu na tryb odtwarzania kolor niebieski Ciągłe światło Podczas nagrywania filmów kolor pomarańczowy Podczas odtwarzania oraz gdy kamera jest podłączo...

Страница 198: ...15 12 2007 15 30 R 10000 1 16 9 AUTO MNL OPEN F2 0 Numer F 0dB Wartość wzmocnienia Tryb wygładzania skóry Tele makro Pojawianie się zanikanie obrazu białe Pojawianie się zanikanie obrazu czarne Funkcja kolorowego obrazu podczas nagrywania w ciemności Lampa Zoom mikrofonu Funkcja redukcji szumu wiatru Funkcja wzmocnienia jasności ekranu LCD Tryb nagrywania filmów 5 Sport Portret Słabe oświetlenie O...

Страница 199: ...u drukarki zgodnej ze standardem PictBridge Uzyskiwanie dostępu do twardego dysku lub karty Gdy kamera jest podłączona do komputera 1 Ustawiono już DPOF na więcej niż 1 Zabezpieczone filmy i zdjęcia Liczba pikseli rozdzielczość zdjęć 2048k1512 1920k1080 1280k960 640k480 Rozmiar zdjęć nie jest wyświetlany w przypadku zdjęć nagranych w innych urządzeniach które mają inne rozmiary niż podane powyżej ...

Страница 200: ...SAĆ NA KARCIE W TRYBIE WIDEO Włożono kartę SD o pojemności 8 MB lub 16 MB w trybie nagrywania filmów SPRAWD KARTĘ Ta karta nie jest kompatybilna lub nie można jej rozpoznać ZABLOKOWANA KARTA Blokada zapisu na karcie pamięci SD jest ustawiona w położeniu LOCK l 121 KARTA ZAPEŁNIONA Karta SD jest pełna lub liczba nagranych scen przekroczyła limit dlatego nie można już nic więcej nagrywać Usuń niepot...

Страница 201: ...CĄ WYŁĄCZ LAMPĘ WIDEO OPERACJA NIEUDANA Z POWODU WYKR BŁĘDU SPRÓBUJ PONOWNIE ZA CHWILĘ Wykryto upuszczenie kamery i dlatego została ona wyłączona NIE DZIAŁA ZBYT WYSOKA TEMPERATURA WYŁĄCZ I POCZEKAJ CHWILĘ Wewnętrzna temperatura kamery jest zbyt wysoka i nie można z niej korzystać Wyłącz kamerę poczekaj aż temperatura się obniży i ponownie ją włącz DZIAŁANIE NIEMOŻLIWE Z POWODU NISKIEJ TEMPERATURY...

Страница 202: ...tu Gdy używana jest funkcja nagrywania koloru w ciemności Gdy włączona jest lampa tryb wzmocnienia Po ustawieniu przysłony wzmocnienia Tryb wygładzania skóry Włączenie i wyłączenie Podczas nagrywania Tele makro Włączenie i wyłączenie Tryb pomocy Gdy włączona jest lampa tryb wzmocnienia W trybie fotografowania Tryb scen Po ustawieniu przełącznika AUTO MANUAL FOCUS w położenie AUTO Gdy używana jest ...

Страница 203: ...sk i kartę SD w tej kamerze Można kopiować zdjęcia l 175 Nie można kopiować filmów Czy można odtwarzać w innych urządzeniach kartę SD nagraną w tej kamerze Filmy Filmy można odtworzyć na dowolnym urządzeniu obsługującym filmy w standardzie SD Video w formacie video MPEG 2 i formacie audio MPEG 1 Audio Layer 2 Zdjęcia Zdjęcia można wyświetlać na dowolnym urządzeniu obsługującym system DCF Design ru...

Страница 204: ... edytowanie na komputerze Użyj VideoCam Suite Czy można używać funkcji KOPIOW DVD również do kopiowania zapisanych na kartach SD filmów na dyski DVD Nie nie można Funkcji KOPIOW DVD można użyć tylko do skopiowania filmów zapisanych na twardym dysku Jeżeli chcesz skopiować filmy z karty SD na płytę DVD najpierw zapisz filmy w komputerze a następnie skopiuj je na płycie DVD l 192 ...

Страница 205: ...liknięcie podczas wyłączania zasilania Jest to dźwięk poruszającego się obiektywu i nie jest to usterka Akumulator szybko się wyładowuje Czy akumulator jest w pełni naładowany Naładuj akumulator korzystając z zasilacza sieciowego l 124 Czy korzystasz z akumulatora w skrajnie niskiej temperaturze Na akumulator ma wpływ temperatura otoczenia W zimnym otoczeniu czas działania akumulatora ulega skróce...

Страница 206: ...m dysku lub na karcie nie ma już miejsca należy uwolnić miejsce usuwając niepotrzebne pliki l 167 172 lub użyć nowej karty Czy w kamerze włączono tryb nagrywania filmów czy tryb fotografowania Nagrywanie jest niemożliwe jeśli pokrętło wyboru trybu nie jest ustawione w położeniu lub Czy pokrywa gniazda karty jest otwarta Kamera nie będzie działać prawidłowo gdy pokrywa płyty jest otwarta Zamknij po...

Страница 207: ...unkcja automatycznej regulacji ostrości nie działa poprawnie l 214 W takim wypadku użyj trybu ręcznej regulacji ostrości l 156 Wbudowany głośnik kamery nie odtwarza dźwięku Czy ustawiono zbyt niski poziom głośności Podczas odtwarzania przesuń suwak głośności aby wyświetlić skalę głośności i ustaw ją l 163 Mimo poprawnego podłączenia kamery do telewizora na telewizorze nie widać odtwarzanych obrazó...

Страница 208: ...awidłowo odłącz zasilanie i skontaktuj się ze sprzedawcą od którego zakupiono kamerę NACIŚ PRZYC ZEROW pojawi się na wyświetlaczu Kamera automatycznie wykryła błąd Wyjmij kartę SD i naciśnij przycisk RESET aby ponownie uruchomić kamerę Naciśnij przycisk RESET wystającą częścią paska na rękę A Jeśli nie naciśniesz przycisku RESET kamera wyłączy się po około minucie Komunikaty mogą się pojawiać nawe...

Страница 209: ...ROM l 188 Nie udaje mi się kopiować filmów przy użyciu funkcji KOPIOW DVD Czy obrazy te zostały skopiowane używając funkcji KOPIOW DVD Po skopiowaniu filmów przy użyciu funkcji KOPIOW DVD nie można ich skopiować drugi czy kolejny raz Importuj filmy do komputera po czym zapisz je na płycie DVD Tworzenie DVD jest długotrwałe Tworzenie DVD może zająć pewien czas nawet jeżeli rozmiar filmu jest niewie...

Страница 210: ...cia może mieć negatywny wpływ na nagrywany obraz i dźwięk Zawsze stosuj tylko przewody i kable które były dostarczone razem z kamerą Jeśli stosujesz akcesoria opcjonalne używaj tylko oryginalnych przewodów i kabli Nie przedłużaj kabli ani przewodów Nie spryskuj kamery środkami owadobójczymi ani innymi lotnymi substancjami chemicznymi Po spryskaniu kamery takimi substancjami chemicznymi jej obudowa...

Страница 211: ...res użytkowania akumulatora W przypadku przechowywania akumulatora w wysokiej temperaturze wysokiej wilgotności lub zadymionym i zatłuszczonym miejscu końcówki mogą zardzewieć i wywołać usterkę W przypadku długiego przechowywania akumulatora zalecamy jego naładowanie raz do roku i ponowne przechowywanie po jego całkowitym wyładowaniu Należy usuwać kurz brud i inne nieczystości z końcówek akumulato...

Страница 212: ... w kamerze Może to prowadzić do usterki kamery Jeśli ekran LCD zostanie zabrudzony należy go wytrzeć miękką i suchą szmatką W miejscu z dużymi zmianami temperatur na ekranie LCD może skraplać się para Zetrzyj ją suchą i miękką szmatką Kiedy kamera jest bardzo zimna bo np znajdowała się w niskiej temperaturze po włączeniu kamery ekran LCD będzie przez pewien czas ciemniejszy niż zwykle Kiedy wzrośn...

Страница 213: ...nieważ w kamerze są przechowywane informacje o bieli w pewnych rodzajach oświetlenia automatyczna regulacja balansu bieli nie działa poprawnie przy innych źródłach oświetlenia Powyższa ilustracja przedstawia zakres w którym balans bieli działa poprawnie 1 Skuteczny zakres regulacji balansu bieli w kamerze 2 Niebieskie niebo 3 Zachmurzone niebo deszcz 4 Ekran telewizora 5 Światło słoneczne 6 Białe ...

Страница 214: ...stronie drogi ze znacznym natężeniem ruchu samochodowego ostrość może zostać ustawiona na przejeżdżającym pojeździe Nagrywanie obiektów otoczonych błyszczącymi obiektami lub obiektami silnie odbijającymi światło Ponieważ ostrość jest automatycznie ustawiana na błyszczących lub migoczących obiektach trudno ustawić ostrość na obiekcie który chcemy nagrać Obraz może być nieostry podczas nagrywania ob...

Страница 215: ...atycznego ustawiania ostrości Zoom Zoom optyczny 10k zoom cyfrowy 25 700k Ekran Ekran LCD o przekątnej 2 7z około 123 K pikseli Mikrofon Stereofoniczny z funkcją zoom Głośnik 1 okrągły głośnik 20 mm Standardowe natężenie oświetlenia 1 400 lx Minimalne wymagane natężenie oświetlenia 12 lx Tryb słabego oświetlenia 1 50 około 1 lx przy włączonej funkcji kolorowego obrazu w ciemności Poziom wyjścia wi...

Страница 216: ... możliwości wyjmowania Kompresja MPEG 2 Tryby nagrywania i prędkość przesyłania danych XP 10 Mbps VBR SP 5 Mbps VBR LP 2 5 Mbps VBR Czas nagrywania Patrz strona 143 Metoda kompresji dźwięku Karta SD MPEG 1 Audio Layer 2 16 bit 48 kHz 2 kanały Dysk twardy Dolby Digital 16 bit 48 kHz 2 kanały Maksymalna liczba folderów i scen Karta SD 99 folderówk99 scen 9801 scen Dysk twardy 999 folderówk99 scen 98...

Страница 217: ...ane techniczne mogą ulegać zmianie bez powiadomienia Źródło zasilania Pobór energii Wyjściowe napięcie prądu stałego AC 110 V do 240 V 50 60 Hz 19 W DC 7 9 V 1 4 A Praca urządzenia DC 8 4 V 0 65 A Ładowanie baterii Rozmiary 61 mm szer k 32 mm wys k 91 mm gr Waga Około 110 g ...

Страница 218: ...kość zdjęć HDD 30 GB 19160 29950 24960 39230 SD 8 MB 2 4 3 6 16 MB 7 12 10 16 32 MB 18 28 23 37 64 MB 38 61 50 80 128 MB 75 120 98 155 256 MB 155 250 210 320 512 MB 310 490 410 640 1 GB 630 990 820 1290 2 GB 1280 2010 1670 2630 4 GB 2520 3950 3290 5170 Rozdzielczość zdjęć 1280k960 640k480 Jakość zdjęć HDD 30 GB 47070 74890 99999 99999 SD 8 MB 7 12 37 75 16 MB 20 32 92 185 32 MB 45 73 200 410 64 MB...

Страница 219: ...219 LSQT1361 ...

Страница 220: ...48 L Matsushita Electric Industrial Co Ltd Web site http panasonic net Pursuant to at the directive 2004 108 EC article 9 2 Panasonic Testing Centre Panasonic Marketing Europe GmbH Winsbergring 15 22525 Hamburg Germany EU ...

Отзывы: