


5
You can confirm your XM Satellite Radio ID necessary for activating XM Satellite Radio
as follows.
Connect the XM Connect & Play antenna, or XM Mini-Tuner and Home Dock. (
➡
page 3)
Press [TUNER/BAND] repeatedly to select “XM”.
“ANTENNA” blinks on the display if no XM antenna is detected.
Press [0] to select channel “0” to display the Radio ID.
“RADIO ID” is indicated in the display briefly, followed by an 8-digit alphanumeric ID.
Record your XM Satellite Radio ID here for reference:
To avoid ambiguity, the letters I, O, S and F are not used in the ID.
There is no sound output when “RADIO ID” is displayed.
XM channel 0 is for “RADIO ID” and channel 1 is for “PREVIEW”.
You can still listen to the preview channels XM1, XM174 and XM247 without activating
the XM services.
•
•
Displaying the XM Satellite Radio ID
The main unit has a signal strength indicator function that allows you to optimize the
XM signal reception.
Press [TUNER/BAND] repeatedly to select “XM”.
Ensure the antenna is connected. (
➡
page 3)
Press and hold [DISPLAY] until the XM signal status is displayed.
Signal strength:
4 (strong)
3 (good)
2 (marginal)
1 (weak)
0 (no signal)
Position the antenna for the best possible satellite signal reception.
As you position the antenna, the display changes depending on the signal strength.
If the satellite signal is weak or not available, you can optimize for the terrestrial
signal (where available).
Press [DISPLAY] to return to the previous display.
Tips for optimizing reception
To prevent interference with wireless equipment, place the antenna away from other
equipment that emits radio waves (such as radio equipment and microwave ovens).
Place the antenna near a south-facing window with an unobstructed view of the sky
for the best satellite signal reception.
Refer also to the operating instructions of your XM Connect & Play antenna, or XM
Mini-Tuner and Home Dock.
•
•
•
Positioning the XM Connect & Play antenna, or XM Mini-
Tuner and Home Dock for optimal reception
Press [TUNER/BAND] repeatedly to select “XM”.
Press [PLAY MODE] to select “MANUAL”.
Each time you press the button:
MANUAL PRESET
Press [
2
/
u
] or [
1
/
i
] to select a channel.
Press and hold [
2
/
u
] or [
1
/
i
] to scan through quickly.
OR
Press the numbered buttons for direct access to an XM channel.
For two-digit channel, press [
≧
10] once, and then the two digits.
For three-digit channel, press [
≧
10] twice, and then the three digits.
You can enter a channel number between 0 to 255.
If you enter a number that is not valid or selected an unauthorized channel “XM - - -”
is displayed and the previous channel is selected.
If you change the playmode for XM, FM, and AM playmodes are also set to the
newly select playmode, vice versa.
•
•
•
Manual Tuning
XM channels are organized into categories such as Rock, Classical, Country and
Dance to make browsing and selecting broadcast content easier.
Press [PLAY MODE] to select “MANUAL”.
Press [XM CATEGORY < or >] to select a category.
“CAT ON” (CATEGORY ON) is displayed briefly, and then the category of the
current XM channel flashes on the display.
Press and hold [XM CATEGORY < or >] to scan through quickly.
Press [
2
/
u
] or [
1
/
i
] to select a channel within the category.
Press and hold [
2
/
u
] or [
1
/
i
] to scan through quickly.
Press [ALBUM ENTER] to exit category mode.
“CAT OFF” (CATEGORY OFF) is displayed briefly on the display.
Category mode will cancel automatically after approximately 15 seconds if there is
no user input.
XM channel selection by category enables you to narrow down your choices to channels
belonging to a broadcasting category of your choice and then to select a favourite
channel from the chosen category. Available categories vary according to broadcasting
hours. The unit does not display categories with no broadcasting XM channel.
Each XM channel may belong to two categories (Category 1 and Category 2). Both
categories are used for channel selection by category.
•
•
•
Selecting XM channels by category
Channel presetting
Channel presets allow you to quickly and conveniently select your favourite XM
channels. Up to 15 XM channels can be stored as channel presets.
Press [PLAY MODE] to select “MANUAL”.
Press [
2
/
u
] or [
1
/
i
] or numbered buttons to select a channel.
Press [PGM, -AUTO PRESET].
Press the numbered buttons to select a channel.
The station occupying a channel is erased if another station is preset in that
channel.
Repeat steps 2 to 4 to preset more stations.
You can only preset XM stations which you can receive.
XM channel 0 (RADIO ID) cannot be stored as a channel preset.
Selecting a preset station
Press [PLAY MODE] to select “PRESET”.
Press [
2
/
u
] or [
1
/
i
] or numbered buttons to select a channel.
•
•
Memory preset
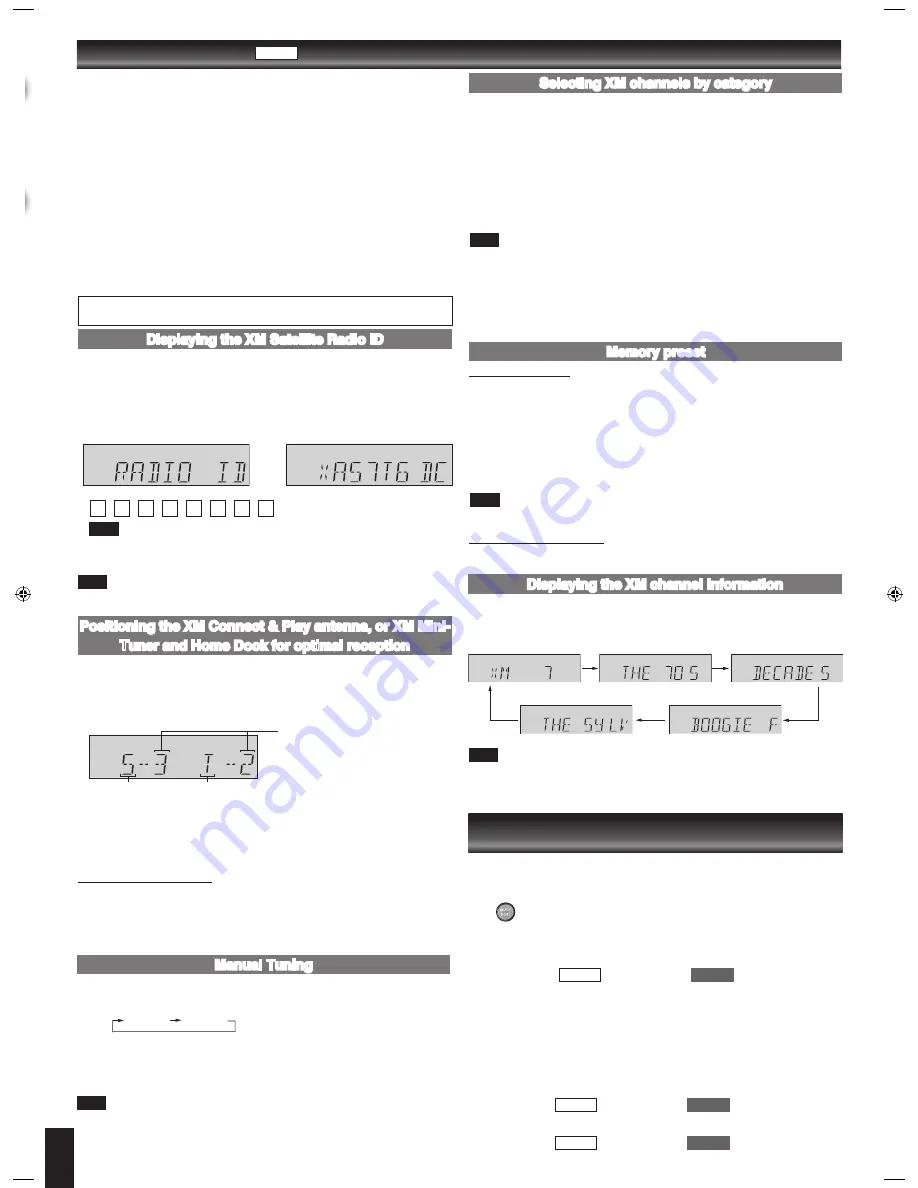
The display mode setting can be changed to display information about the broadcast
content such as the category, song title or artist’s name.
Press [DISPLAY] repeatedly to display.
Example:
If there is no text information for the current XM broadcast, “---” is displayed.
For text information more than 8 characters long (Title or Artist only), after the text
has scrolled, press [DISPLAY] to scroll the text again. Press [DISPLAY] while the
text is scrolling to change the display mode.
•
•
Displaying the XM channel information
XM
®
Satellite Radio
Introducing XM Satellite Radio
XM Satellite Radio is the provider of satellite radio with more than 6 million subscribers.
XM offers more than 170 digital radio channels with music, talk, news, sports, comedy,
traffic and weather reports.
For more information, visit XM on the Web at www.xmradio.com.
How to Subscribe
XM monthly service subscription sold separately. XM Connect & Play antenna, or XM
Mini-Tuner and Home Dock (includes home antenna) required to receive XM service
(sold separately). Installation costs and other fees and taxes, including a one-time
activation fee may apply. Subscription fee is consumer only. All fees and programming
subject to change. Channels with frequent explicit language are indicated with an
XL. Channel blocking is available for XM radio receivers by calling 1-800-XMRADIO
(1-800-967-2346). Subcriptions subject to Customer Agreement available at xmradio.
com. XM service only available in the 48 contiguous United States. XM Ready is a
trademark of XM Satellite Radio Inc. © 2006 XM Satellite Radio Inc. All rights reserved.
To subscribe, visit XM on the Web at www.xmradio.com or call XM’s Listener Care
at 1-800-XMRADIO (1-800-967-2346). You should have your Radio ID ready; the
Radio ID can be found by selecting channel 0 on the radio.
•
The XM name and related logos are registered trademarks of XM Satellite Radio Inc.
All rights reserved.
SAMPLE
➡
Satellite signal
Terrestrial signal
Channel number
Channel name
Category name
Title
Artist
SC-EN35
➡
Page 2 for the position of remote control buttons.
The remote control and main unit are factory-set to “REMOTE 1” mode.
If your remote control affects other equipment during operation, you can switch to
operate in “REMOTE 2” mode.
To switch to “REMOTE 2” mode
(While pressing and hold [MUSIC PORT] on the main unit)
Press and hold [2] until “REMOTE 2” appears on the main unit display.
Press and hold
[ALBUM ENTER]
/
[ENTER] and [2] for at
least 2 seconds.
The main unit and remote control are now set to operate in “REMOTE 2” mode.
To return to “REMOTE 1” mode
Perform steps 1 and 2 above but use [1] instead of [2] for both steps. (“REMOTE 1”
appears on the main unit during step 1.)
The remote control cannot work with the main unit if their modes are different.
“REMOTE 1” or “REMOTE 2” appears on the main unit when you operate the remote
control.*
* If “REMOTE 1” appears (The main unit is in “REMOTE 1” mode.)
Press and hold
[ALBUM ENTER]
/
[ENTER]
and [1] on the
remote control for at least 2 seconds.
If “REMOTE 2” appears (The main unit is in “REMOTE 2” mode.)
Press and hold
[ALBUM ENTER]
/
[ENTER]
and [2] on the
remote control for at least 2 seconds.
Changing the main unit and remote control
mode
Note
Note
Note
Note
Note
Note
SC-EN35
SC-EN33
SC-EN35
SC-EN33
SC-EN35
SC-EN33
SC-EN35_3P.indd 5
22/03/2007 17:23:45


