background image

RQT7796

4

(R)

(L)

2


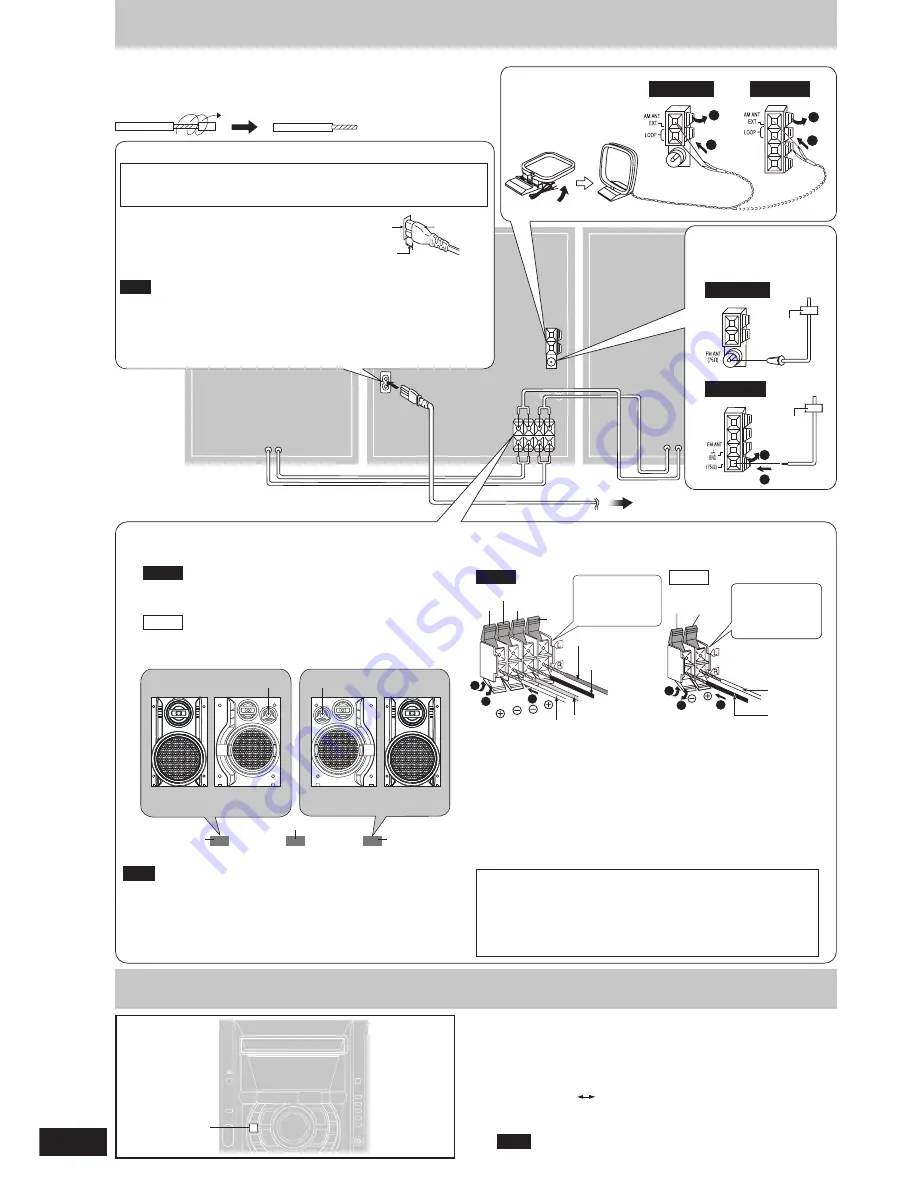
AM loop antenna

Stand the antenna 
up on its base.

1

2

1

2

4


AC mains lead

1


FM indoor antenna

Tape the antenna where
reception is best.

1

2

Adhesive 
tape

Adhesive 
tape

For Europe

For others

For Europe

For others

Connector

Appliance 
inlet

Approx. 6 mm

FOR THE UNITED KINGDOM ONLY
READ THE CAUTION FOR THE AC MAINS LEAD ON PAGE 2 
BEFORE CONNECTION.

 Note

The included AC mains lead is for use with this unit only. 
Do not use it with other equipment.

For your reference

To save power when the unit is not to be used for a long time, unplug it 
from the household mains socket. You will need to reset some memory 
items after plugging in the unit.

Insertion of connector

Even when the connector is perfectly 
inserted, depending on the type of 
inlet used, the front part of the 
connector may jut out as shown in 
the drawing. However there is no problem using the unit.

Set-up

Connect the AC mains lead only after all other connections have been made.
Optional antenna connections (

page 11).

Preparation

Twist and pull off the vinyl tip of the antenna wires and speaker cords.

When the unit is first plugged in, a demonstration of its functions may
be shown on the display.
If the demo setting is off, you can show a demonstration by selecting
“DEMO ON”.

Press and hold [DISP, –DEMO].

The display changes each time the button is held down.
NO DEMO (off) 

 DEMO ON (on)

While in the standby mode, select “NO DEMO” to reduce power
consumption.

Note

DEMO function cannot be turned on when Dimmer is on.

Turning the demo function on/off

Use only the supplied speakers.

The combination of the main unit and speakers provide the best sound.
Using other speakers can damage the unit and sound quality will be
negatively affected.

Notes on speaker use

You can damage your speakers and shorten their useful life if you
play sound at high levels over extended periods.

Reduce the volume in the following cases to avoid damage.
– When playing distorted sound.
– When adjusting the sound quality.

Connection

3

Speakers

Placement

AK330

Place the front speakers so that the super tweeter is on the
inside.

AK230

Speakers are designed identically so that no left or right channel
orientation is necessary.


Note

Keep your speakers at least 10 mm away from the system for
proper ventilation.

These speakers do not have magnetic shielding. Do not place
them near televisions, personal computers or other devices easily
influenced by magnetism.

You cannot take the front net off the speakers.

Caution

Use the speakers only with the recommended system. Failure
to do so may lead to damage to the amplifier and/or the
speakers, and may result in the risk of fire. Consult a qualified
service person if damage has occurred or if you experience
a sudden change in performance.

Do not attach these speakers to walls or ceilings.

H.BASS

DISP, –DEMO

AK330

Gray

2

1

3

Connect the
left (L) side in
the same way.

Gray (+) Blue (–)

Red (+)

Black (–)

Blue

Black

Red

AK230

1

3

2

Red (+)

Black (–)

Connect the
left (L) side in
the same way.

Red

Black

To household mains socket

Super tweeter

Super tweeter

Main unit

Front speaker
(left)

Front speaker
(right)

(SB-AK230) (SB-AK330)

(SB-AK330)

(SB-AK230)

Содержание SCAK330 - MINI HES W/CD PLAYER

Страница 1: ...cs 6 Basic play 6 Album skip play 7 CD display 7 To listen to specific discs and tracks Play Mode function 7 Program play 8 Repeat play 8 Marking a track 8 INTRO function Album scan 9 Title search function 9 Radio 10 Cassettes 11 Setting the time 12 Timers 12 Sound quality sound field 13 Other functions 13 External unit connections 13 Using an external unit 13 Using headphones not included 13 Auto...

Страница 2: ...REEN YELLOW THIS PLUG IS NOT WATERPROOF KEEP DRY Before use Remove the connector cover How to replace the fuse The location of the fuse differ according to the type of AC mains plug figures A and B Confirm the AC mains plug fitted and follow the instructions below Illustrations may differ from actual AC mains plug 1 Open the fuse cover with a screwdriver Caution for AC Mains Lead Fuse 5 ampere Fus...

Страница 3: ...d to the remote control even when held close to the front panel Use R6 LR6 AA UM 3 The remote control Supplied accessories Sales and Support Information Customer Care Centre For UK customers 08705 357357 For Republic of Ireland customers 01 289 8333 Visit our website for product information E mail customer care panasonic co uk Direct Sales at Panasonic UK Order accessory and consumable items for y...

Страница 4: ...cannot be turned on when Dimmer is on Turning the demo function on off Use only the supplied speakers The combination of the main unit and speakers provide the best sound Using other speakers can damage the unit and sound quality will be negatively affected Notes on speaker use You can damage your speakers and shorten their useful life if you play sound at high levels over extended periods Reduce ...

Страница 5: ...e pressing SHIFT press the corresponding button For buttons AUTO OFF CLOCK TIMER and rPLAY REC Dimmer Play timer record timer button DIMMER rPLAY REC 12 13 _ For Europe CD display RDS display Clock timer button CD RDS DISP CLOCK TIMER 7 10 12 For others CD display Clock timer button CD DISP CLOCK TIMER 7 12 Numbered character buttons X X X X X10 1 9 0 A Z SPACE 7 10 CD skip search tape fast forwar...

Страница 6: ...e condition of the disc or recording Recordings will not necessarily be played in the order you recorded them Lower case letters will be displayed as upper case MP3 information CD Do not use irregularly shaped discs attach extra labels and stickers use discs with labels and stickers that are coming off or with adhesive exuding from under labels and stickers attach scratch proof covers or any other...

Страница 7: ...he album 3 Press the numbered buttons to select the track in the current album To select a 2 digit track press 10 once then the two digits To select a 3 digit track press 10 twice then the three digits Play starts from the selected track To stop play Press L CLEAR When playback ends The current play mode will be retained in memory until it is changed even if the unit is turned off Final disc For e...

Страница 8: ...o start play MP3 Preparation 1 Press DISC and then 1 5 to select the disc 2 Press L CLEAR 1 Press PROGRAM PGM appears 2 Press ALBUM or to select the album To select an album directly press the numbered buttons after pressing ALBUM or To select a 2 digit album press 10 once then the two digits To select a 3 digit album press 10 twice then the three digits 3 Press g REW 3 or f 4 FF to select the tra...

Страница 9: ...ack of all albums in the current disc for 10 seconds each Remote control only Preparation Press J CD and then L CLEAR 1 Press INTRO INTRO function starts INTRO function is cancelled after playing the first track in the last album on the current disc 2 While your desired album is playing press J CD Play continues from the first track of the album To stop during the process press INTRO or L CLEAR No...

Страница 10: ...X10 then the two digits AK330 AK230 OR 1 Press PLAY MODE to select PRESET 2 Press g REW 3 or f 4 FF to select the channel Remote control only There are two methods of pre setting stations Automatic presetting All the stations the tuner can receive are preset Manual presetting You can select the stations to preset and the order they are preset in Up to 15 stations each can be set in the FM and AM b...

Страница 11: ...ECK1 or DECK2 c and insert the cassette Insert with the side to be played facing towards you and the exposed tape facing down Close the holder by hand Cassettes Playback 3 Press TAPE to start playback To play on the other side of the tape turn the tape over and press TAPE To stop tape playback Press L STOP To fast forward or rewind Press g REW 3 rewind or f FF 4 fast forward To select between load...

Страница 12: ...the volume muted To cancel the timer Press SHIFT rPLAY REC to clear the timer indicator from the display The timer comes on at the set time everyday if the timer is on To change the settings when the unit is on To change the play record times Do steps 1 2 and 4 To change the source or volume 1 Press SHIFT rPLAY REC to clear the timer indicator from the display 2 Make changes to the source or volum...

Страница 13: ...xternal unit s instruction manual External unit connections An analogue player with a built in phono equalizer can be connected For details refer to the instruction manual of the units which are to be connected When units other than those described above are to be connected please consult your audio dealer Analogue player not included Rear panel of this unit L R R L Auto off function Remote contro...

Страница 14: ...doesn t work Check that the batteries are inserted correctly 3 Replace the batteries if they are worn Before requesting service make the checks below If you can t fix the system as described below or if something not listed here occurs refer to the enclosed directory to locate an Authorized Service Center convenient to you or contact your dealer Reference pages are shown as black circled numbers 4...

Страница 15: ...ations are subject to change without notice Mass and dimensions are approximate 2 Total harmonic distortion is measured by the digital spectrum analyzer 3 AK330 The labels HIGH and LOW on the rear of the speakers refer to High frequency and Low frequency If the surfaces are dirty To clean this unit wipe with a soft dry cloth Never use alcohol paint thinner or benzine to clean this unit Before usin...

Страница 16: ...ISIIN YLIKUUMENE MISESTA JOHTUVA SÄHKÖISKU TAI TULIPALOVAARA ÄLÄ PEITÄ LAITTEEN TUULETUSAUKKOJA SANOMALEH DELLÄ PÖYTÄLIINALLA VERHOLLA TAI MUULLA VASTAAVALLA ESINEELLÄ ÄLÄ ASETA PALAVAA KYNTTILÄÄ TAI MUUTA AVOTULEN LÄHDETTÄ LAITTEEN PÄÄLLE HÄVITÄ PARISTOT LUONTOA VAHINGOITTAMATTOMAL LA TAVALLA VAROITUS LAITTEEN KÄYTTÄMINEN MUULLA KUIN TÄSSÄ KÄYT TÖOHJEESSA MAINITULLA TAVALLA SAATTAA ALTIS TAA KÄYT...

Отзывы: