background image

32

RQTV0239

LANG - 5

LANG - 4

FRANÇAIS

DANSK

ENGLISH

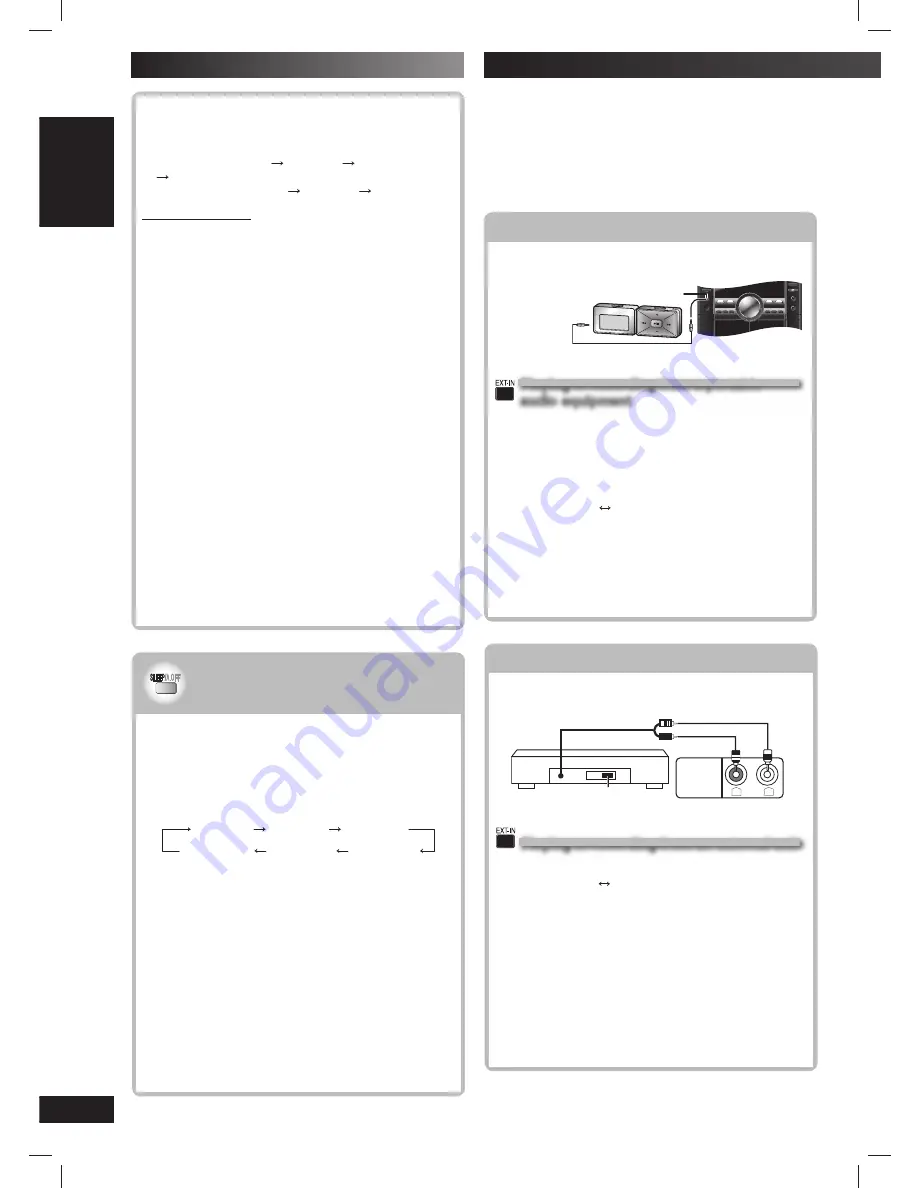
Connecting to a portable audio equipment

Connecting to a portable audio equipment

This feature enables you to enjoy music from a portable 
audio equipment.

Portable audio equipment 
(not included)

Audio cord 

(not included)

MUSIC PORT jack


Playing or recording from a portable 

Playing or recording from a portable 
audio equipment

audio equipment

Switch off the equalizer function (if there is any) of 
the portable audio equipment before you plug into the 
MUSIC PORT jack. Otherwise, sound from the speaker 
may be distorted.

1

Plug the audio cord into the MUSIC PORT jack and 
press [EXT-IN] to select “MUSIC PORT”.

MUSIC PORT


 AUX

2

For listening  : 

Proceed to step 3.

For recording : 

Press [

, RECORD] on the main 

unit to start recording.

3

Start playback from the portable audio 
equipment. (See the portable audio equipment’s 
instruction manual.)

Connecting to other external unit

Connecting to other external unit

You can connect to an analog player with a built-in 
phone equalizer.

(R)

(L)

“LINE OUT” 

position

L

R

AUX IN

Analog player
(not included)

Rear panel of this unit


Playing or recording from an external unit

Playing or recording from an external unit

1

Press [EXT-IN] repeatedly until “AUX” is displayed.

MUSIC PORT 


AUX

2

For listening  : 

Proceed to step 3.

For recording : 

Press [

, RECORD] on the main 

unit to start recording.

3

Start playback from the external source.

Note:

•  For details, refer to the instruction manual of the unit which 

is to be connected.

•  When units other than those described above are to be 

connected, please consult your audio dealer.

•  Sound distortion may occur when you use an adaptor other 

than the one supplied.

Before connection

•  Disconnect the AC power supply cord.
•  Turn off all equipment and read the appropriate operating 

instructions.

•  The equipment connections described are examples 

only.

•  Peripheral equipment and optional cables are sold 

separately unless otherwise indicated.

Using other equipment

Using the sleep timer

Using the sleep timer

This function enables you to turn off the unit 
automatically after the set time.

While enjoying the desired source

Press [SLEEP/A.OFF] successively to select the time 
(minutes).

Every time you press the button:

SLEEP 30

SLEEP 60

SLEEP 90

SLEEP OFF

AUTO OFF

SLEEP 120

To change the settings

Press [SLEEP/A.OFF] successively to select a new 
setting.

To confi rm the remaining time

Press [SLEEP/A.OFF] to show the remaining time.

To cancel the sleep timer

Press [SLEEP/A.OFF] successively to select 
“SLEEPOFF”.

Note:

•  The play and sleep timer or the record and sleep timer can 

be used together.

•  The sleep timer always has priority. Be sure not to overlap 

timer settings.

•  The sleep timer turns off when you perform the record 

function.

To check the settings

Press [CLOCK / TIMER] while the unit is on to select 

˚

PLAY or 

˚

REC.

The setting are shown in the following order.
–  Play timer: start time


fi nish time


source 


volume

–  Record timer: start time


fi nish time


source

When the unit is off

1

Press  [CLOCK / TIMER].

2

During the clock display, press [CLOCK / TIMER] 
again.

To cancel the timer

Press [ 

˚

PLAY/REC] to clear the timer indicator from 

the display.
(The timer comes on at the set time everyday if the timer 
is on)

If you use the unit after the timers are set

After using, check that the correct tape or disc are 
loaded before turning the unit off.

Note:

•  The play timer will start at the preset time with volume 

increasing gradually to preset level.

•  The record timer will start 30 seconds before the set time 

with the volume muted.

•  The timer comes on at the set time every day if the timer is 

on.

•  The unit must be in the standby mode for the timer to 

function.

•  If you turn the unit off and on again while a timer is 

functioning, the fi nish time setting will not be activated.

•  If MUSIC PORT is selected as the source when the timer 

comes on, the system turns on and engages MUSIC PORT 
as the source. If you wish to playback or record from the 
portable audio equipment, just activate the equipment’s play 
mode and increase the volume. (See the portable audio 
equipment’s instruction manual.)

Using the timers (continued)

RQTV0239_1L.indd   32

RQTV0239_1L.indd   32

6/12/07   12:36:46 PM

6/12/07   12:36:46 PM

Содержание SC-VK760

Страница 1: ...ing this product please read the instructions completely Please keep this manual for future reference Operations in these instructions are described using the remote control but you can perform the operations on the main unit if the controls are the same Unless otherwise indicated illustrations in these operating instructions are for the Southeast Asia Your unit may not look exactly the same as il...

Страница 2: ...S VENTILATION OPENINGS WITH NEWSPAPERS TABLECLOTHS CURTAINS AND SIMILAR ITEMS DO NOT PLACE SOURCES OF NAKED FLAMES SUCH AS LIGHTED CANDLES ON THE UNIT DISPOSE OF BATTERIES IN AN ENVIRONMENTALLY FRIENDLY MANNER The socket outlet shall be installed near the equipment and easily accessible The mains plug of the power supply cord shall remain readily operable To completely disconnect this apparatus fr...

Страница 3: ...osoft Corporation in the United States and or other countries This product is licensed under the MPEG 4 Visual patent portfolio license for the personal and non commercial use of a consumer for i encoding video in compliance with the MPEG 4 Visual Standard MPEG 4 Video and or ii decoding MPEG 4 Video that was encoded by a consumer engaged in a personal and non commercial activity and or was obtain...

Страница 4: ...ssette tapes 26 Enjoying karaoke 28 Using sound effects 29 Using the timers 31 Using other equipment 32 REFERENCE Glossary 34 Maintenance 34 When moving the unit 34 Troubleshooting guide 35 Specifications 38 SUPPLIED ACCESSORIES SUPPLIED ACCESSORIES Please check and identify the supplied accessories 1 x AC power supply cord For Southeast Asia For Australia and N Z 1 x Video cable 1 x AM loop anten...

Страница 5: ... strange noise howling from a microphone or record player noise from FM broadcasts or continuous signals from an oscillator test disc or electronic instrument When adjusting the sound quality When turning the unit on or off Caution Use the speakers only with the recommended system Failure to do so can damage the amplifier and speakers and can cause fire Consult a qualified service person if damage...

Страница 6: ...peaker left Surround speaker right Center speaker Connecting center and surround speakers R L Blue Gray Blue Gray Surround speaker left Surround speaker right Center speaker Connecting front speakers and subwoofer R L Red Black Red Front speaker left Black Front speaker right Subwoofer VK960 VK860 Connecting front speakers and subwoofers R L R L R L Blue Black Gray Red Red Blue Gray Black Red Fron...

Страница 7: ...ort a weight of at least 10 kg Consult the contractor in charge of the work A screw which is at least 30 mm long see above is used when installing the speaker on a wooden post or pillar In all other cases use a screw which is strong enough to support a weight of at least 10 kg VK960 VK860 Surround speaker Center speaker 190 mm VK760 Center and Surround speaker 200 mm VK760 Connecting center and su...

Страница 8: ...idelity in reproducing colors The description of the component video input terminals depends on the television or monitor example Y PB PR Y B Y R Y Y CB CR Connect to terminals of the same color To enjoy progressive video 1 Connect to the component video input terminals on a 480p or 576p compatible television Video will not be displayed correctly if connected to an incompatible television 2 Select...

Страница 9: ... outdoor antenna not included 75Ω coaxial cable not included Rear panel of this unit Disconnect the FM indoor antenna The antenna should be installed by a competent technician AM outdoor antenna Rear panel of this unit AM outdoor antenna not included 5 12 m AM loop antenna included White Red Black Run a piece of vinyl wire horizontally across a window or other convenient location Leave the loop an...

Страница 10: ...abic 6582 Armenian 7289 Assamese 6583 Aymara 6589 Azerbaijani 6590 Bashkir 6665 Basque 6985 Bengali Bangla 6678 Bhutani 6890 Bihari 6672 Breton 6682 Bulgarian 6671 Burmese 7789 Byelorussian 6669 Cambodian 7577 Catalan 6765 Chinese 9072 Corsican 6779 Croatian 7282 Czech 6783 Danish 6865 Dutch 7876 English 6978 Esperanto 6979 Estonian 6984 Faroese 7079 Fiji 7074 Finnish 7073 French 7082 Frisian 7089...

Страница 11: ...D video cameras using DVD Video Format 5 Recorded using a format different from DVD Video Format therefore some functions cannot be used 6 A process that allows play on compatible equipment To play a disc that is displayed as Necessary on this unit the disc must first be finalized on the device it was recorded on 7 Closing the session will also work 8 MPEG4 data recorded with the Panasonic SD mult...

Страница 12: ...0 DECK 1 2 26 RECORD 27 MULTI CHANGE 15 6 TAPE 26 5 DVD CD 14 STOP 14 Disc skip search tape fast forward rewind tuning time adjustment REW FF 14 26 31 USB port 33 The QUICK SETUP screen assists you to make necessary settings Turn on the television and select the appropriate video input on the television 1 2 3 Press and hold 4 5 6 Switch on the unit Select DVD CD Shows the QUICK SETUP screen Follow...

Страница 13: ... the source AUTO OFF turns off It comes on again when you select disc or tape Remote control Remote control Buttons labeled such as function in exactly the same way as the buttons on the main unit Overview of controls continued 1 CLOCK TIMER 31 3 SOUND 30 Disc skip tape fast forward rewind preset channel selection time adjustment REW FF 15 26 31 DIRECT NAVIGATOR TOP MENU 14 18 19 4 Television oper...

Страница 14: ...ile RESUME is on the display Press DVD CD to resume Press again to clear the position Pause Press DVD CD to resume play Handling of the disc trays and discs Handling of the disc trays and discs Not doing the following will cause damage to the unit Removing the power plug Press I to turn off the unit and then remove the power plug only after all the displays have disappeared Tray caution Always pre...

Страница 15: ...ll not open If the player is stopped all trays will open To close the remaining trays simultaneously press OPEN CLOSE Changing a single disc by main unit only SINGLE CHANGE 1 2 3 4 5 While one disc is playing you can change the discs in other trays Press SINGLE CHANGE again to close the tray If you select a disc which is being played play stops and the tray opens Disc menus while stopped Shows a d...

Страница 16: ...ion CD DVD VR Unchecked No Disc DVD Video Track 10 Time 60 15 Not yet read 2 Press the numeric buttons 1 5 to select and play the disc To clear the screen Press DISC Repeat play Repeat play Only when the elapsed play time can be displayed Works with all JPEG contents During play Press REPEAT several times to select an item to be repeated Example Example Functions Repeat Off Chapter Title Off Off C...

Страница 17: ...meric buttons to select the items then press ENTER Repeat steps 1 and 2 to program other items 3 Press DVD CD To select an item using the cursor buttons Press ENTER and to select an item then press ENTER again to confirm the number To change the selected program a Press to select an item b Repeat above steps 1 and 2 To clear the selected program a Press to select an item b Press and hold CANCEL or...

Страница 18: ...ently selected Group Content To enjoy listening to WMA MP3 contents while showing a JPEG image on the screen Select a JPEG file first and then select audio contents The opposite order is not effective To exit the screen Press MENU or RETURN Using the sub menu 1 While the Navigation Menu is displayed Press FUNCTIONS Items shown differ depending on the type of disc Multi List Tree Thumbnail Next gro...

Страница 19: ...TIONS The background changes to the one recorded on the disc To exit the screen Press Selecting from the list Selecting from the list 1 Press MENU Example Playlist 1 Love Me Do 2 From Me to You 3 She Loves You 4 I Want to Hold Your Hand 5 Canʼt Buy Me Love No Content title Group Content Playlist RETURN to exit 0 9 to select ENTER to play All by Artist The Beatles 2 Press then to switch among Playl...

Страница 20: ...ront right 3 Front left Front right Center It may take some time for play to start if you change the audio on a DivX video disc To display the current bitrate or sampling frequency Thumbnail To show thumbnail images Subtitle with multiple subtitles SVCD only To select subtitle language On R RW a subtitle number may be shown for subtitles that are not displayed On or Off appears only with discs tha...

Страница 21: ...essive see left select the method of conversion for progressive output to suit the type of material When playing PAL discs MPEG4 or DivX video contents Auto Automatically detects the film and video content and appropriately converts it Video Select when using Auto and the content is distorted Film Select this if the edges of the film content appear jagged or rough when Auto is selected However if ...

Страница 22: ...lay a HighMAT disc without using HighMAT function Select Play as Data Disc Player settings Player settings Disc tab Audio Choose the audio language English Language options 1 Original 2 Other 3 Subtitle Choose the subtitle language Automatic 4 English Language options 1 Other 3 Menus Choose the language for disc menus Changing the menu language in QUICK SETUP also changes this setting English Lang...

Страница 23: ... not blurred but picture quality is lower Frame 4 Overall quality is high but the picture may appear blurred NTSC Disc Output Choose PAL 60 or NTSC output when playing NTSC discs page 11 Video systems For Southeast Asia PAL60 NTSC For Australia and N Z PAL60 When connected to a PAL television NTSC When connected to an NTSC television Picture Video Output Change the video signal format to be output...

Страница 24: ...set number of times When you play this content the remaining number of plays is displayed You cannot play this content when the number of remaining plays is zero Rented Movie Expired or Rental Expired is displayed When playing this content The number of remaining plays is reduced by one if you press or press and hold SETUP you press Press pause to pause play you press 4 skip or 1 search etc and ar...

Страница 25: ... a digital camera that conform to DCF Standard Design rule for Camera File system Version 1 0 are displayed Files that have been altered edited or saved with computer picture editing software may not be displayed This unit cannot display moving pictures MOTION JPEG and other such formats and still pictures other than JPEG Example TIFF or play pictures with attached audio Extension ASF or asf You c...

Страница 26: ...resetting 1 Press or to tune to the required station 2 Press ENTER 3 Press the numeric buttons to select a channel For channels 10 to 20 press 10 then the two digits The station occupying a channel is erased if another station is preset to that channel Selecting a preset station Selecting a preset station Press the numeric buttons to select the channel OR Press REW or FF to select the channel Basi...

Страница 27: ...on of tapes for recording Use normal position tapes High position and metal position tapes can be used but this unit will not be able to record or erase them correctly Preparation Wind up the leader tape so recording can begin immediately Press TAPE and then 7 1 Press OPEN 0 on the main unit for DECK 2 and insert the cassette to be recorded The tape direction is automatically set to F Insert with ...

Страница 28: ...ith other sources sources You can also perform karaoke with discs other than those described and also in USB mode 1 Start play Refer to the pages for the source When singing along with discs Insert the desired disc page 14 When singing along with cassette tape Press 0 OPEN on the main unit for DECK 1 and insert the desired cassette tape page 26 When singing along with radio Select your desired sta...

Страница 29: ...ds punch to rock CLEAR Clarifies higher sounds SOFT For background music DISCO Reverberates sound to make you feel like you are in a disco LIVE Makes vocals more alive HALL Expands sound to make you feel like you are in a hall EQ OFF Canceled no effect is added MANUAL EQ see below To check the current setting Press SOUND main unit SOUND EQ To record your karaoke To record your karaoke performance ...

Страница 30: ...f Cancel Note This function is also available for USB mode You can adjust the volume of the surround speakers to get the best surround effect see right Super Surround does not work when playing a DVD recorded with 5 1 channel When Super Surround is on Dolby Pro Logic II turns off SURROUND ENHANCER Using the Surround Enhancer Using the Surround Enhancer Press SURROUND ENHANCER The SRD ENH indicator...

Страница 31: ... REW or FF to set the ON time 3 Press CLOCK TIMER to confirm 4 Repeat steps 2 to 3 to set the OFF time To activate the timer 5 Press PLAY REC to display the timer s indicator Every time you press the button PLAY off REC PLAY to turn the play time on REC to turn the record timer on The indicator does not appear if the start and finish times or the clock has not been set 6 Press y to turn off the un...

Страница 32: ...ing the sleep timer This function enables you to turn off the unit automatically after the set time While enjoying the desired source Press SLEEP A OFF successively to select the time minutes Every time you press the button SLEEP 30 SLEEP 60 SLEEP 90 SLEEP OFF AUTO OFF SLEEP 120 To change the settings Press SLEEP A OFF successively to select a new setting To confirm the remaining time Press SLEEP ...

Страница 33: ...ly transfer Preparation Before connecting any USB mass storage device to the unit ensure that the data stored therein has been backed up It is not recommended to use a USB extension cable The USB device is not recognised by this unit 1 Connect the USB mass storage device not included 3 4 5 MIC VOL MIC 1 MIC 2 STOP FF REW TAPE DVD CD RECORD DECK 1 2 DISPLAY TUNER EXT IN SUBWOOFER SOUND EQ SUPER SOU...

Страница 34: ... of a frame still so picture quality is lower Progressive Interlace The PAL video signal standard has 576 interlaced i scan lines whereas progressive scanning called 576p uses twice the number of scan lines For the NTSC standard these are called 480i and 480p respectively Using progressive output you can enjoy the high resolution video recorded on media such as DVD Video Your television must be co...

Страница 35: ...t Check that the disc has something recorded in it 8 9 You have forgotten your ratings password Reset all the settings to Factory Preset While stopped and DVD CD is the source press and hold STOP on the main unit and 10 on the remote control until Initialized or Initialised disappears from the television Turn the unit off and on again All settings will return to the default values Other products r...

Страница 36: ...r viewing on a PAL television NTSC Disc Output in Video tab 23 Menu is not displayed correctly Restore the zoom ratio to x1 00 Manual Zoom in Display Menu Set Subtitle Position in Display Menu to 0 22 21 Auto zoom function does not work well Turn off television zoom function Use the other preset aspect ratios or manual adjustment Zoom function may not work well especially in dark scenes and may no...

Страница 37: ... be played in your region You can only play DVD Video if their region number is the same or includes the same region number as the unit or if the DVD Video is marked ALL Confirm the region number for the unit on the back of the main unit Cover No on screen display Select On in On Screen Messages in Display tab 23 The operation is prohibited by the unit or disc Cannot display group xx content xx Yo...

Страница 38: ...ETTE DECK SECTION Type 1 way Auto Reverse Track system 4 Track 2 Channel Heads Record playback Solid permalloy head Erasure Double gap ferrite head Motor DC servo motor Recording system AC bias 100 kHz Erasing system AC erase 100 kHz Tape speed 4 8 cm s Overall frequency response 3 6 dB at DECK OUT Normal 35 Hz to 14 kHz S N ratio 50 dB A weighted Wow and flutter 0 18 WRMS Fast forward and rewind ...

Страница 39: ...6 kHz Frequency range 40 Hz to 29 kHz 16 dB 54 Hz to 28 kHz 10 dB Dimensions WxHxD 250 mm x 429 5 mm x 298 5 mm Mass 6 1 kg VK860 Surround speakers SB PS860 Type 2 way 3 speaker system Bass reflex Speaker unit s Impedance 3 Ω 1 Full range 8 cm Cone type 2 Full range 8 cm Cone type 3 Super tweeter Piezo type Input power IEC 110 W Max Output sound pressure 82 dB W 1 0 m Cross over frequency 10 kHz F...

Страница 40: ...sound pressure 80 dB W 1 0 m Frequency range 28 Hz to 173 Hz 16 dB 33 Hz to 148 Hz 10 dB Dimensions WxHxD 220 mm x 330 mm x 303 mm Mass 3 7 kg Specifications continued GENERAL Power supply For Southeast Asia AC 110 to 127V 220 to 240V 50 60 Hz For Australia and N Z AC 230 to 240V 50 Hz Power consumption VK960 360 W VK860 VK760 290 W Dimensions WxHxD 250 mm x 330 mm x 334 6 mm Mass 5 5 kg Operating...

Отзывы: