background image

16

RQ

TX02

10

Getting S

tarted

Playing

 Discs

Ot

her Op

era

tions

Reference

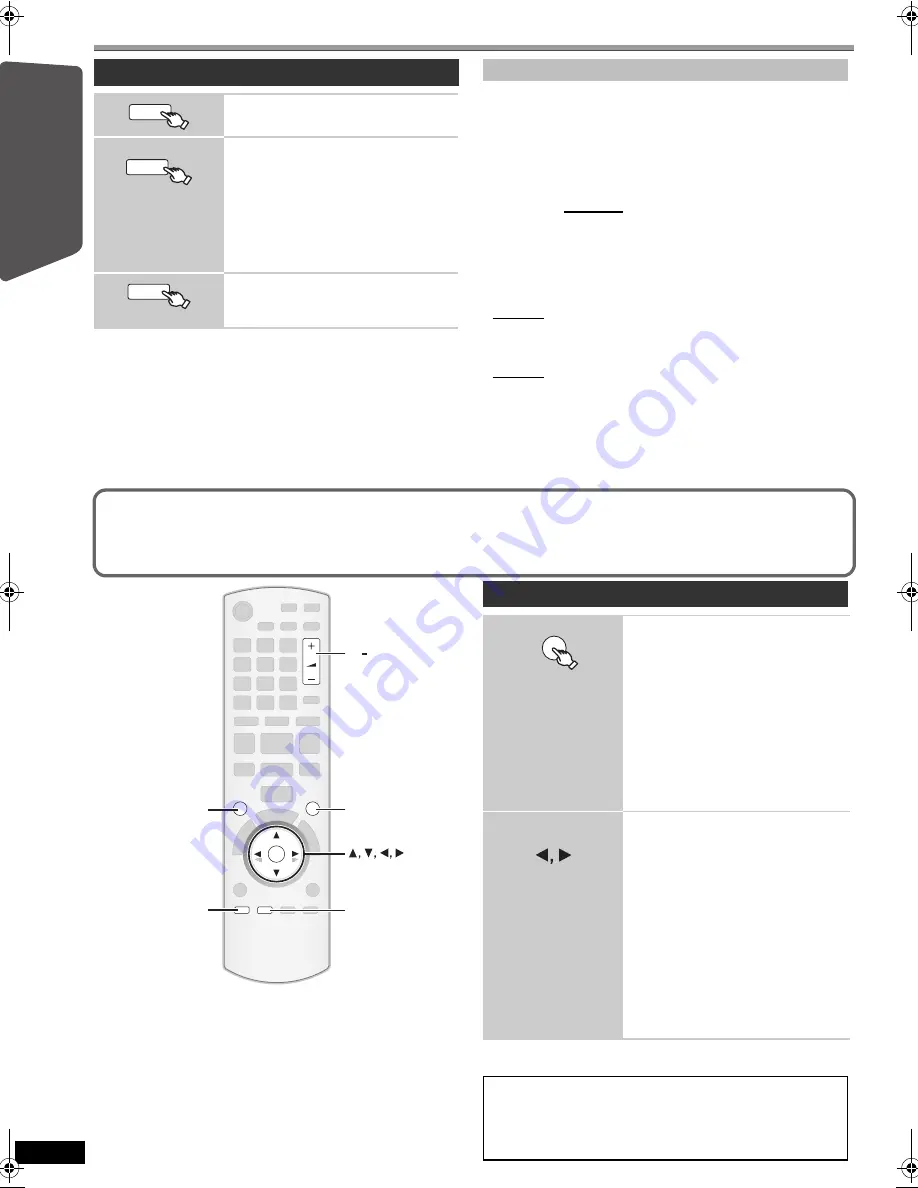
Selecting the playback source (continued)

Press [SELECTOR] on the main unit to select source from the main unit. 
(

B

39)

[Note]

Confirm the audio connection to the AUX or OPTICAL IN terminal on the 
main unit when you select the corresponding sources (

B

9). Reduce the 

volume on the TV to its minimum and then balance the TV volume with 
the volume setting on the main unit. Refer also to the operating 
instructions for your TV to balance the sound.

Select to suit the type of audio from the OPTICAL IN terminal on the main 
unit.

(When receiving true 5.1-channel surround sound, select “PCM OFF”.)

[Note]

Audio that is input through the OPTICAL IN terminal is not output from 
the HDMI terminal.

Underlined items in the above paragraphs are factory settings.

The following sound effects may not be available or may have no effect 
with some sources, or when headphones are used (

B

39).

You may experience a reduction in sound quality when these sound 
effects are used with some sources. If this occurs, turn the sound effects 
off.

§

Î

PL

II

” lights in the main unit’s display when there is effect.

Selecting the source by the remote control

DVD/CD (

B

12, 13)

Each time you press the button:

FM (

B

14)

AM (

B

14)

AUX

§

:

For audio input through the AUX 
terminal.

D-IN

§

:

For audio input through the 
OPTICAL IN terminal. (

B

right)

§

“(TV)” will appear beside “AUX” or “D-IN”, 
indicating the TV audio setting for VIERA 
Link “HDAVI Control” (

B

24).

iPod (

B

26)

DVD

EXT-IN

RADIO

iPod

Making settings for digital audio input

1 While in “D-IN” mode

Press [SETUP] to select “MAIN/SAP”, “DRC” or “PCM FIX”.

2 While the selected mode is displayed

Press [

3

,

4

] to make the setting.

MAIN/SAP mode

 (Only works with Dolby Dual Mono):

MAIN, SAP

§

,


MAIN+SAP

§

 (stereo audio)

§

“SAP” = Secondary Audio Program

Dynamic Range Compression

DRC ON:

Adjust for clarity even when the volume is low by 
compressing the range of the lowest sound level and the 
highest sound level. Convenient for late night viewing. 
(Only works with Dolby Digital)

DRC OFF:

The full dynamic range of the signal is reproduced.

PCM FIX mode

PCM ON:

Select when receiving only PCM signals.

PCM OFF:

Select when receiving Dolby Digital and PCM signals.

Enjoying sound from all speakers and various 
sound effects

VOL

SOUND

SURROUND

-CH SELECT

SETUP

W.SRD

OK

OK

+,    VOL

SETUP,

─CH SELECT

SURROUND

SOUND

W.SRD

Enjoying surround sound effects

SURROUND OUTPUT indicator on the main 
unit will light up when there is surround 
sound effect.

Each time you press the button:

STANDARD:

Sound is output as it was recorded/encoded.
Speaker output varies depending on the 
source.

MULTI–CH:

You can enjoy sound from the front 
speakers, as well as the surround speakers 
even when playing a 2-channel sound or 
non-surround sound.

MANUAL: 

(

B

below)

While “MANUAL” is 
displayed

Select other surround modes.

Each time you press 

[

2

,

1

]

:

PL

II 

MOVIE

 §

Suitable for movie software, or softwares 
recorded in Dolby Surround.

PL

II 

MUSIC

 §

Adds 5.1-channel effects to stereo 
sources.

S.SRND

You can enjoy sound from all speakers 
with stereo sources. (Surround output will 
be in mono.)

STEREO

Sound will only be output to the front 
speakers and the subwoofer from any 
source.

Recommended modes to enjoy TV audio or stereo 
sources from all speakers:

PL

II 

MOVIE

PL

II 

MUSIC

S.SRND

SURROUND

RQTX0210-1P_670-673_Eng.book  Page 16  Friday, April 3, 2009  2:48 PM

Содержание SC-PT670

Страница 1: ... adjusting this product please read the instructions completely Please keep this manual for future reference If you have any questions contact In the U S A and Puerto Rico 1 800 211 PANA 7262 In Canada 1 800 561 5505 Region number The player plays DVD Video marked with labels containing the region number 1 or ALL Example 1 ALL 2 4 1 As an ENERGY STAR Partner Panasonic has determined that this prod...

Страница 2: ...le is intended to alert the user to the presence of important operating and maintenance servicing instructions in the literature accompanying the appliance RISK OF ELECTRIC SHOCK DO NOT OPEN The socket outlet shall be installed near the equipment and easily accessible The mains plug of the power supply cord shall remain readily operable To completely disconnect this apparatus from the AC Mains dis...

Страница 3: ...Accessory Purchases United States and Puerto Rico on page 36 For other areas To order accessories call the dealer from whom you made your purchase FCC Note This equipment has been tested and found to comply with the limits for a Class B digital device pursuant to Part 15 of the FCC Rules These limits are designed to provide reasonable protection against harmful interference in a residential instal...

Страница 4: ...cture quality considering the degree of compression Linear PCM pulse code modulation These are uncompressed digital signals similar to those found on CDs MP3 MPEG Audio Layer 3 An audio compression method that compresses audio to approximately one tenth of its size without any considerable loss of audio quality Playback control PBC If a Video CD has playback control you can select scenes and infor...

Страница 5: ...rol 19 Other modes of play 20 Playing CDs sequentially CD Mode 20 Repeat play 20 Program and Random play 20 Using navigation menus 21 Playing data discs 21 Playing RAM and DVD R RW DVD VR discs 21 Using on screen menus 22 Other Operations Using the VIERA LinkTM HDAVI ControlTM 24 One touch play 24 Auto input switching 24 Power off link 24 Speaker control 25 VIERA Link Control only with TV s remote...

Страница 6: ...ll the indicated components before starting assembly setup and connection Keep the screws out of reach of children to prevent swallowing For optional wall mount refer to page 27 2 Bases 8 Screws 2 Front speakers 2 Stands with cable 1 2 2 1 Tighten securely Slide into the groove Position the cable between the ridges Tighten securely Press into the groove Insert the wire fully i White j Blue Push Le...

Страница 7: ...When adjusting the sound quality When turning the unit on or off Caution Do not touch the front netted area of the speakers Hold by the sides e g Center speaker step 2 Positioning 120 60 60º To allow for proper ventilation and to maintain good airflow around the main unit position it with at least 5 cm 2q of space on all sides Main unit Center speaker Put on a rack or shelf Vibration caused by the...

Страница 8: ...able connections step 3 Connections 1 Speaker connections Main unit CENTER SUBWOOFER FRONT 6 5 2 1 4 3 L R L R SURROUND 1 2 Y PB PR L R AV OUT COMPONENT VIDEO OUT VIDEO OUT OPTICAL IN AUX CENTER SUBWOOFER FRONT 6 5 2 1 4 3 L R L R SURROUND Main unit Lch SURROUND 3 WHITE FRONT L BLUE SURROUND L GRAY SURROUND R RED FRONT R GREEN CENTER PURPLE SUBWOOFER Be careful not to cross short circuit or revers...

Страница 9: ...the VIDEO menu B 28 To enjoy progressive video Connect to a progressive output compatible TV Set VIDEO OUT I P in VIDEO menu to PROGRESSIVE and then follow the instructions on the menu screen B 28 Audio connection TV or external equipment terminal Cable required not included Main unit terminal Features Do not bend sharply when connecting OPTICAL IN This is the preferred connection for best sound a...

Страница 10: ... a vinyl wire not included Run a piece of vinyl wire horizontally across a window or other convenient location 5 0 m to 12 m 16 ft to 39 ft FM outdoor antenna Using a TV antenna not included The antenna should be installed by a competent technician 75 coaxial cable not included Antenna plug not included Use outdoor antenna if FM AM radio reception is poor Disconnect the antenna when the unit is no...

Страница 11: ... time take apart or short circuit attempt to recharge alkaline or manganese batteries use batteries if the covering has been peeled off Mishandling of batteries can cause electrolyte leakage which can severely damage the remote control Remove the batteries if the remote control is not going to be used for a long period of time Store in a cool dark place Aim at the remote control signal sensor B 39...

Страница 12: ...level automatically Auto speaker setup The speaker level settings can be optimized to accommodate your room s listening conditions so that you can enjoy the ideal surround sound experience Place the Auto speaker setup microphone at actual seating position At ear level when seated The test signal is output from each speaker Note Auto speaker setup can be activated through Smart setup only step 6 PT...

Страница 13: ...is connected to a HDAVI Control 2 compatible TV via HDMI cable the menu language information will be retrieved via VIERA Link Settings in the Easy setup can also be changed in the player settings e g language TV aspect speaker level and TV audio B 28 step 6 PT673 EASY SETUP Preparation Turn on your TV and select the appropriate video input mode e g VIDEO 1 AV 1 HDMI etc to suit the connections to ...

Страница 14: ...n unit Press and hold MEMORY The tuner starts to preset all the stations it can receive into the channels in ascending order PLAY MODE 1 2 3 4 5 6 7 8 0 9 10 SEARCH SEARCH EXT IN RADIO F U N C T I O N S MENU OK SKIP SKIP SEARCH Numbered buttons FUNCTIONS RADIO OK PLAY MODE MENU VOLUME SELECTOR TUNE MEMORY TUNE MODE FM MODE EXT IN RADIO MENU PLAY LIST OK W P Confirming the preset channels 1 Select ...

Страница 15: ...Pod B 26 TV will appear beside AUX or DIGITAL IN indicating the TV audio setting for VIERA Link HDAVI Control B 24 When a disc is loaded you can also access playback or menus from the START menu e g DVD V When the on screen control panel appears e g DVD V when Playback Disc is selected from the START menu You can operate the playback with the indicated controls Presetting stations manually 1 While...

Страница 16: ... 1 While in D IN mode Press SETUP to select MAIN SAP DRC or PCM FIX 2 While the selected mode is displayed Press 3 4 to make the setting MAIN SAP mode Only works with Dolby Dual Mono MAIN SAP MAIN SAP stereo audio SAP Secondary Audio Program Dynamic Range Compression DRC ON Adjust for clarity even when the volume is low by compressing the range of the lowest sound level and the highest sound level...

Страница 17: ... or when ÎPLII lights in the main unit display You can make the sound of the center speaker seem like it is coming from within the TV C FOCUS ON C FOCUS OFF Whisper mode Surround lights when there is effect Each time you press the button WHISPER MODE SRD ON WHISPER MODE SRD OFF SOUND W SRD Adjusting the speaker output level manually 1 Enter test tone mode Test tone will be output to each channel i...

Страница 18: ...ng up Press EXCHANGE to load discs one by one For DVD RAM remove the disc from its cartridge before use Do not Load more than one disc per tray Push or pull out the tray by hand Label facing up Start play Turn i VOLUME to adjust the volume Select DVD CD Turn on the unit Press to skip Press and hold to search during play start slow motion play during pause Press 1 Play to start normal play Open all...

Страница 19: ... PAUSE STOP OK RETURN DISC MENU PLAY LIST FL DISPLAY TOP MENU DIRECT NAVIGATOR Numbered buttons VOL PLAY STOP PAUSE SKIP SKIP SEARCH SLOW SEARCH OK OK Select Confirm Selecting a disc Disc information screen is displayed To exit the screen press DISC e g DVD V Enter number DVD VR DVD V VCD CD e g To select 12 S10 B 1 B 2 VCD with playback control Press STOP to cancel the PBC function and then press...

Страница 20: ...her source is selected 1 Disc random VCD CD You can playback all the items on a disc in the selected tray in random order DVD V WMA MP3 JPEG You can playback selected item s on a disc in the selected tray in random order All Disc random when CD Mode is on VCD CD You can playback all the items on all the discs in random order Playing CDs sequentially CD Mode VCD CD WMA MP3 While stopped press and h...

Страница 21: ...G A T O R MENU OK RETURN SKIP SKIP SKIP OK RETURN MENU PLAY LIST TOP MENU DIRECT NAVIGATOR DATA DISC ROOT OK Perfume My favorite1 My favorite2 My favorite3 Underwater Fantasy planet Starpersons1 Starpersons2 Group Folder Content File WMA MP3 JPEG OK 1 While picture is displayed e g 2 Select a picture Press 9 SKIP to skip page by page Playing RAM and DVD R RW DVD VR discs DVD VR Playing the program...

Страница 22: ...vocal selections Actual operations depend on the disc Read the disc s instructions for details Signal type data LPCM PPCM D DTS MP3 MPEG Signal type kHz Sampling frequency bit ch Number of channels PLAY SPEED DVD VR DVD V To change play speed from k0 6 to k1 4 in 0 1 unit steps Press 1 PLAY to return to normal play After you change the speed Dolby Pro Logic II has no effect Audio output switches t...

Страница 23: ...higher with the dialogue recorded in the center channel OFF ON Menu 4 HDMI HDMI STATUS To show HDMI information B below Confirming HDMI information HD ENHANCER This works when the HDMI connection is being used with VIDEO PRIORITY B 29 HDMI menu set to ON To sharpen the 720p 1080i and 1080p picture quality OFF 1 weakest to 3 strongest VIDEO FORMAT This works when the HDMI connection is being used w...

Страница 24: ...s only when the source is DVD CD AUX or D IN When using DVD CD as the source set TIME DELAY in VIDEO menu to 0 ms AUTO B 28 You can turn on this unit and the TV and start playing the disc with a single press of a button Note Playback may not be immediately displayed on the TV If you miss the beginning portion of playback press or 6 to go back to where playback started When you switch the TV input ...

Страница 25: ... TV s remote control When operating the TV s remote control refer to the below illustration for operation buttons You can operate the playback with the indicated controls The on screen control panel can also be shown by using a button on the TV s remote control e g SUB MENU This works only during DVD CD playback and resume modes or while the iPod music playback screen is displayed on the TV Note D...

Страница 26: ...ck Shuffle mode For music playback only Press PLAY MODE several times SONGS ALBUMS OFF Repeat mode Press and hold REPEAT and then press the button several times within a few seconds During the music video playback ONE ALL OFF PLAY PAUSE iPod PLAY MODE REPEAT F U N C T I O N S STOP OK RETURN SKIP SKIP OK RETURN iPod STOP PLAY SKIP PAUSE PLAY MODE REPEAT FUNCTIONS iPod Dock for iPod Main unit e g Pu...

Страница 27: ... To use the iPod touch features 1 Press the Home button on the iPod touch 2 Select the iPod touch features on the touch screen to operate Speaker installation options You can attach all of the speakers except subwoofer to a wall The wall or pillar on which the speakers are to be attached should be capable of supporting 10 kg 22 Ibs per screw Consult a qualified building contractor when attaching t...

Страница 28: ...ER 2 SUBTITLE Choose the subtitle language AUTO 3 ENGLISH FRENCH SPANISH OTHER 2 MENUS Choose the language for disc menus ENGLISH FRENCH SPANISH OTHER 2 SETUP OK RETURN OK RETURN SETUP CHSELECT SETUP SET MAIN DISC VIDEO AUDIO DISPLAY HDMI OTHERS EXIT SETUP RETURN Menu OK SET RETURN DISC EXIT SETUP SETTING STATE AUDIO SUBTITLE MENUS RATINGS PASSWORD ENGLISH AUTO ENGLISH 8 NO LIMIT Item Setting Disp...

Страница 29: ...AGE Choose the language for the on screen messages ENGLISH FRANÇAIS ESPAÑOL HDMI menu VIDEO PRIORITY ON When using the HDMI AV OUT terminal for video output The resolution of the video output from the HDMI AV OUT terminal is optimized according to the capability of the connected equipment e g TV OFF When not using the HDMI AV OUT terminal for video output Video output will not depend on the connec...

Страница 30: ...d Photo CD DVD RAM that cannot be removed from their cartridge 2 6 GB and 5 2 GB DVD RAM and Chaoji VCD available on the market including CVD DVCD and SVCD that do not conform to IEC62107 Do not attach labels or stickers to discs This may cause disc warping rendering it unusable Do not write on the label side with a ball point pen or other writing instrument Do not use record cleaning sprays benzi...

Страница 31: ...utes may result in fire electric shock or other hazards 4 Safety check After repairs or service ask the servicer to perform safety checks to confirm that the unit is in proper working condition The servicer will require all components to service your system Therefore should service ever be necessary be sure to bring the entire system For product information or assistance with product operation In ...

Страница 32: ...jack PT670 NOISY Excessive ambient noise in the room Perform the setup again and keep quiet during the Auto speaker setup No response when any buttons are pressed This unit cannot play discs other than the ones listed in these operating instructions B 30 The unit may not be operating properly due to lightning static electricity or some other external factor Turn the unit off and then back on Alter...

Страница 33: ...layed correctly When using the HDMI AV OUT terminal ensure that an incompatible video output with the connected TV is not selected Press and hold CANCEL until the picture is displayed correctly The output will return to 480p B 23 Video images converted to 1920k1080 resolution may look different from the true native 1080p full HD sources This is not a malfunction of the main unit Picture size does ...

Страница 34: ... Root folder Pick up Wavelength DVD CD 655 785 nm Laser power DVD CD U S A Others CLASS II CLASS I CLASS 1 CLASS 1M Audio output Disc Number of channels 5 1 ch FL FR C SL SR SW VIDEO SECTION Video system NTSC Composite video output Output level Terminal 1 Vp p 75 Pin jack 1 system Component video output Y output level PB output level PR output level Terminal 1 Vp p 75 0 7 Vp p 75 0 7 Vp p 75 Pin j...

Страница 35: ...ights Reserved U S Patent Nos 6 836 549 6 381 747 7 050 698 6 516 132 and 5 583 936 This product incorporates copyright protection technology that is protected by U S patents and other intellectual property rights Use of this copyright protection technology must be authorized by Macrovision and is intended for home and other limited viewing uses only unless otherwise authorized by Macrovision Reve...

Страница 36: ...MAGES RESULTING FROM THE USE OF THIS PRODUCT OR ARISING OUT OF ANY BREACH OF THIS WARRANTY As examples this excludes damages for lost time travel to and from the servicer loss of media or images data or other memory content The items listed are not exclusive but are for illustration only ALL EXPRESS AND IMPLIED WARRANTIES INCLUDING THE WARRANTY OF MERCHANTABILITY ARE LIMITED TO THE PERIOD OF THE L...

Страница 37: ...ANTABILITY AND FITNESS FOR A PARTICULAR PURPOSE IN NO EVENT WILL PANASONIC CANADA INC BE LIABLE FOR ANY SPECIAL INDIRECT OR CONSEQUENTIAL DAMAGES In certain instances some jurisdictions do not allow the exclusion or limitation of incidental or consequential damages or the exclusion of implied warranties so the above limitations and exclusions may not be applicable WARRANTY SERVICE IF YOU SHIP THE ...

Страница 38: ...ons for play B 18 19 6 Select preset radio stations B 14 7 Select surround sound effects B 16 8 Show a disc top menu or program list B 19 21 9 Select or confirm menu items Frame by frame B 19 Show a disc menu or play list B 19 21 Show setup menu or select speaker channel B 17 28 Turn Whisper mode Surround on off B 17 TV operations Aim the remote control at the Panasonic TV and press the button Í T...

Страница 39: ... loss Language code list Abkhazian 6566 Afar 6565 Afrikaans 6570 Albanian 8381 Ameharic 6577 Arabic 6582 Armenian 7289 Assamese 6583 Aymara 6589 Azerbaijani 6590 Bashkir 6665 Basque 6985 Bengali Bangla 6678 Bhutani 6890 Bihari 6672 Breton 6682 Bulgarian 6671 Burmese 7789 Byelorussian 6669 Cambodian 7577 Catalan 6765 Chinese 9072 Corsican 6779 Croatian 7282 Czech 6783 Danish 6865 Dutch 7876 English...

Страница 40: ...____________________________________ DEALER NAME _________________________________________________ DEALER ADDRESS _____________________________________________ __________________________________________________________________ TELEPHONE NUMBER _________________________________________ The model number and serial number of this product can be found on either the back or the bottom of the unit Pleas...

Отзывы: