background image

RQT9834

3

Precautions

NORSK

Produkt

For å redusere faren for brann, elektrisk støt 
eller skade på apparatet:

j

Utsett ikke produktet for regn, fukt, drypping 
eller sprut.

j

Ikke plasser objekter som er fylt med væske, 
som vaser, på apparatet.

j

Bruk kun anbefalt tilbehør.

j

Fjern ikke deksler.

j

Reparer ikke denne enheten selv, overlat 
service til kvalifisert servicepersonell.

Vekselstrømnett

Nettstøpselet er trukket ut fra denne enheten.
Installer denne enheten slik at nettstøpselet 
umiddelbart kan trekkes fra stikkontakten.

Produkt

Plasser ikke åpen ild, slik som levende lys, oppå 
apparatet.

Dette apparatet er beregnet for bruk under 
moderate klimaforhold.

Plassering

For å redusere faren for brann, elektrisk støt 
eller skade på apparatet:

j

Ikke plasser apparatet i en bokhylle, et 
innebygget kabinett eller et annet lukket sted. 
Pass på at produktet er godt ventilert.

j

Apparatets ventilasjonsåpninger må ikke 
dekkes til med aviser, duker, gardiner eller 
lignende.

Caution for AC Mains 

Lead

(For the AC mains plug of three pins)

For your safety, please read the following text 
carefully.

This appliance is supplied with a moulded three 
pin mains plug for your safety and convenience.
A 5-ampere fuse is fitted in this plug.
Should the fuse need to be replaced please ensure 
that the replacement fuse has a rating of 5-ampere 
and that it is approved by ASTA or BSI to BS1362.
Check for the ASTA mark 

Ï

 or the BSI mark 

Ì

 on 

the body of the fuse.

If the plug contains a removable fuse cover you 
must ensure that it is refitted when the fuse is 
replaced.
If you lose the fuse cover the plug must not be 
used until a replacement cover is obtained.
A replacement fuse cover can be purchased from 
your local dealer.

Before use

Remove the connector cover.

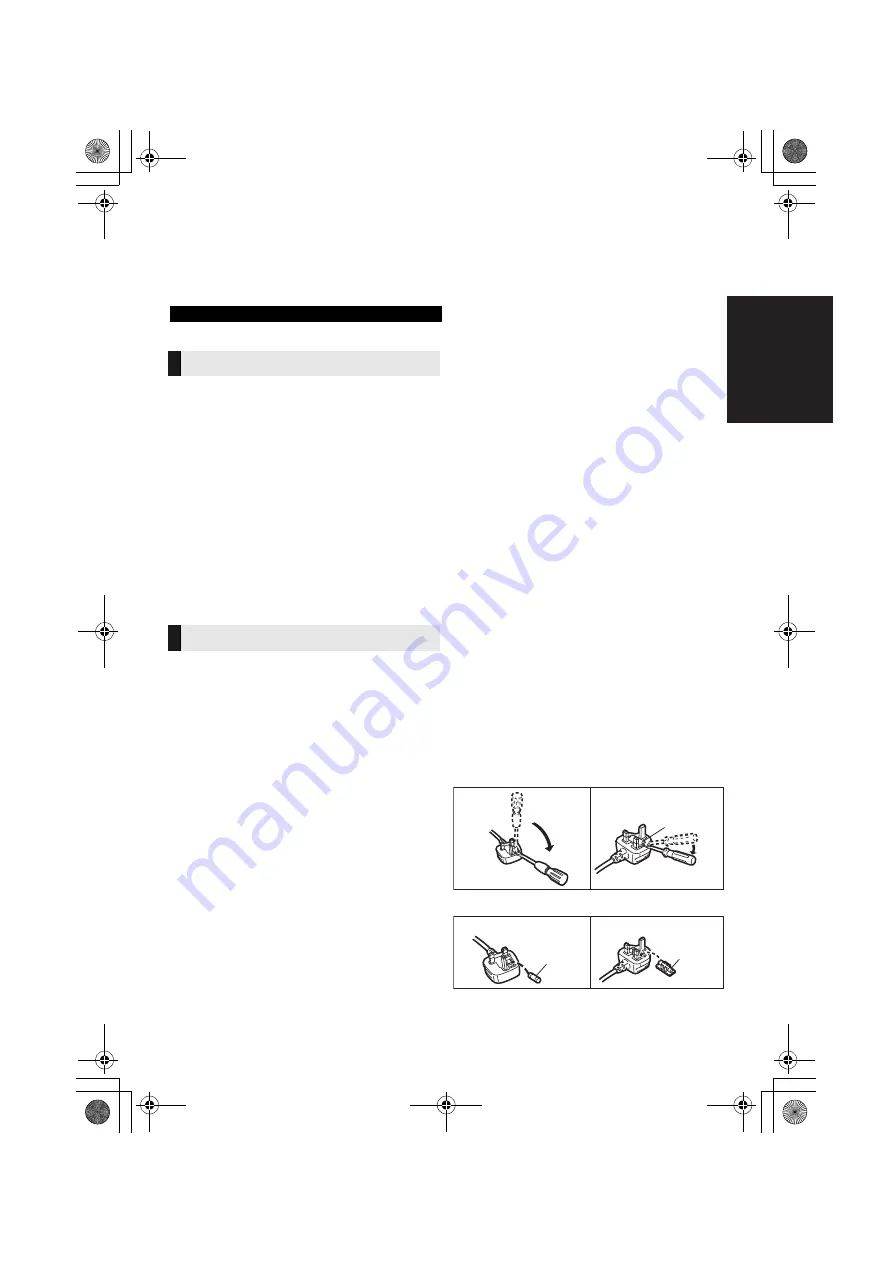
How to replace the fuse

The location of the fuse differ according to the type of 
AC mains plug (figures A and B). Confirm the AC 
mains plug fitted and follow the instructions below.
Illustrations may differ from actual AC mains plug.

1. Open the fuse cover with a screwdriver.

2. Replace the fuse and close or attach the fuse cover.

Safety information for customers in Norway

ADVARSEL

FORSIKTIG

Figure A

Figure B

Fuse cover

Figure A

Figure B

Fuse
(5 ampere)

Fuse
(5 ampere)

SC-HTB527EGEB_RQT9834-B.book  3 ページ  2012年12月10日 月曜日 午前11時29分

Содержание SC-HTB527

Страница 1: ...number suffix EB denotes UK model Included Installation Instructions The installation work should be done by a qualified installation specialist 8 to 13 Before commencing work carefully read these installation instructions and the operating instructions to ensure that installation is performed correctly Please keep these instructions You may need them when maintaining or moving this unit SC HTB527...

Страница 2: ...s lighted candles on this unit This unit may receive radio interference caused by mobile telephones during use If such interference occurs please increase separation between this unit and the mobile telephone This unit is intended for use in moderate climates Placement Place this unit on an even surface To reduce the risk of fire electric shock or product damage jDo not install or place this unit ...

Страница 3: ...afety please read the following text carefully This appliance is supplied with a moulded three pin mains plug for your safety and convenience A 5 ampere fuse is fitted in this plug Should the fuse need to be replaced please ensure that the replacement fuse has a rating of 5 ampere and that it is approved by ASTA or BSI to BS1362 Check for the ASTA mark Ï or the BSI mark Ì on the body of the fuse I...

Страница 4: ...n placing the main unit in a rack or on a table 10 When attaching the main unit to a wall 11 Step 3 Connections 14 Connection with the TV 14 Connection from an HDMI compatible device 15 Digital transmitter connection 15 AC mains lead connection 16 Active subwoofer wireless connection 16 Operations Using this system 17 3D sound 18 Audio output modes 18 Linked operations with the TV VIERA Link HDAVI...

Страница 5: ...ations in these operating instructions are of the model for the United Kingdom and Ireland Operations in this operating instructions are described mainly with the remote control but you can perform the operations on the main unit if the controls are the same This system SC HTB527 1 Main unit speaker SU HTB527 1 Active subwoofer SB HWA527 1 Digital transmitter Supplied with the active subwoofer Acc...

Страница 6: ...7 6 Audio format indicators 17 C Dolby Digital indicator Lights when Dolby Digital is the current audio format D DTS indicator Lights when DTS is the current audio format E PCM indicator Lights when PCM 2ch Multi channel is the current audio format 7 WIRELESS LINK indicator 16 1 AC IN terminal 16 2 Digital transmitter dock 15 3 OPTICAL DIGITAL AUDIO IN terminal 14 4 HDMI OUT terminal ARC compatibl...

Страница 7: ...ove the insulation sheet A To replace a button type battery Battery type CR2025 Lithium battery Set the button type battery with its i mark facing upward Keep the button type battery out of reach of children to prevent swallowing Remote control operation range The remote control signal sensor is located on the main unit Use the remote control within the correct operation range BD DVD D B Remote co...

Страница 8: ...cialist PANASONIC DISCLAIMS ANY PROPERTY DAMAGE AND OR SERIOUS INJURY INCLUDING DEATH RESULTING FROM IMPROPER INSTALLATION OR INCORRECT HANDLING Be sure to install the main unit as indicated within this operating Instructions Attach using techniques suited to the structure and materials of the installation location Caution This system is to be used only as indicated in these instructions Failure t...

Страница 9: ...r away from the TV Keep magnetised items away Magnetised cards watches etc can be damaged if placed too close to the main unit and active subwoofer When placing the main unit in front of the TV The main unit may block or interfere with the TV s various sensors C A T S Contrast Automatic Tracking System sensor remote control sensor etc and the 3D Eyewear transmitters on a 3D compatible TV Move the ...

Страница 10: ...m Attach the cord to the safety holder Attach the safety holder to the main unit Screw tightening torque 80 N0cm to 120 N0cm When placing the main unit in a rack or on a table 2 Safety holders 2 Screws with washer A Safety holder supplied B Cord C Thread the cord through the holes Refer to the operating instructions of the cord for details D Screw with washer supplied Tighten securely E Safety hol...

Страница 11: ...asurements indicated below to identify the screwing positions on the wall Position the main unit with at least 50 mm of space above it If not it may not be possible to access the buttons The position on the wall where the screw is to be attached as well as the screw should be capable of supporting over 33 kg Be sure to use a spirit level to ensure that both screwing positions are horizontal to eac...

Страница 12: ...e safety holder to the main unit Screw tightening torque 80 N0cm to 120 N0cm B Wall mount bracket supplied C Screws Tighten securely D At least 30 mm E 4 0 mm F 7 5 mm to 9 4 mm G Wall H Wall mount bracket supplied I Rear pads supplied J Safety holder supplied K Cord L Thread the cord through the holes Refer to the operating instructions of the cord for details M Screw with washer supplied Tighten...

Страница 13: ... is minimal Check the strength of the installation location The position should be capable of supporting over 33 kg If the strength at any of these positions is lacking provide sufficient reinforcement P Wall mount bracket supplied Q Gently move the main unit down onto the wall mount bracket R Screw without washer supplied Tighten securely S Safety holder supplied T Wall mount bracket supplied U W...

Страница 14: ...DMI ARC on the TV the optical digital audio cable that is usually required in order to listen to sound from a TV is no longer required and TV pictures and sound can be enjoyed with a single HDMI cable Make the connection A HDMI cable A HDMI cable B Optical digital audio cable Be sure to place the cable under the projecting part When you use the optical digital audio cable insert the tip correctly ...

Страница 15: ... click Connection from an HDMI compatible device HDMI IN B HDMI OUT A HDMI standby pass through Even if the main unit is in standby mode the audio and or video signal from the device connected to the HDMI IN terminal will be sent to the TV connected to the HDMI OUT terminal the sound will not be output from this system 3D compatibility Compatible with FULL HD 3D TV and Blu ray Disc player The main...

Страница 16: ...s turned off B Í Check that the wireless link is activated WIRELESS LINK indicator lights Red The wireless link is not activated Green The wireless link is activated AC mains lead connection For customers in United Kingdom and Ireland BE SURE TO READ THE CAUTION FOR THE AC MAINS LEAD ON PAGE 3 BEFORE CONNECTION Saving energy The main unit is designed to conserve its power consumption and save ener...

Страница 17: ... Subwoofer levels 1 to 4 A The indicators blink from left to right i or from right to left s while adjusting The indicators will not blink when it has reached the maximum or minimum Press MUTE A The indicators blink simultaneously while muting To cancel press the button again or adjust the volume Muting is cancelled if the main unit is turned off Press the button for the current audio source TV or...

Страница 18: ...dio signal s sampling frequency is greater than 48 kHz 3D sound Dolby Virtual Speaker With this effect you can enjoy a surround sound effect similar to 5 1ch 3D surround effect Adding to the Dolby Virtual Speaker effect Panasonic has applied its own sound field controlling technology to expand the sound field forwards backwards upwards and downwards providing a sound with depth and force that bett...

Страница 19: ...ilability and function of the settings may vary depending on the TV Refer to the operating instructions for the TV for details Speaker control You can select whether audio output is from this system or the TV speakers by using the TV menu settings Home cinema This system is active When the main unit is in standby mode changing the TV speakers to this system in the VIERA Link menu will automaticall...

Страница 20: ...off the 3D surround effect and the clear mode dialog effect Press and hold TV for more than 2 sec While the indicator is blinking press TV to change the setting A 3D surround effect and clear mode dialog effect is on B 3D surround effect and clear mode dialog effect is off The indicator for the selected setting flashes for 10 seconds and then exits the setting mode This setting will be reset to on...

Страница 21: ...setting return to the factory preset right Reference Troubleshooting Before requesting service make the following checks If you are in doubt about some of the check points or if the solutions indicated in the following guide do not solve the problem consult your dealer for instructions No power Insert the AC mains lead securely 16 After turning the main unit on if the indicators blink and the main...

Страница 22: ...main unit and the TV are connected with the HDMI cable turn on the TV and then remove the main unit s AC mains lead cord and reconnect it again The first few seconds of audio cannot be heard when using the HDMI connection This may occur during DVD Video chapter playback Change the digital audio output setting on the connected device from Bitstream to PCM When operating an HDMI compatible device of...

Страница 23: ...red There is no link between the main unit and the active subwoofer jCheck that the main unit is turned on jEnsure that the digital transmitter is fully inserted into the digital transmitter dock on the main unit 15 jTurn the active subwoofer off and then back on Alternatively turn the active subwoofer off disconnect the AC mains lead and then reconnect it Consult your dealer if the problem persis...

Страница 24: ...N Type 2 way 2 speaker system Bass Reflex Woofer 6 5 cm Cone typek2 Tweeter 2 5 cm Semi dome typek2 ACTIVE SUBWOOFER Type 1 way 1 speaker system Bass Reflex Woofer 16 cm Cone type Frequency range 30 Hz to 180 Hz s16 dB 35 Hz to 160 Hz s10 dB GENERAL Power consumption Main unit 30 W Active subwoofer 23 W Digital transmitter 1 2 W Power consumption in standby mode Main unit When the other connected ...

Страница 25: ...bout collection and recycling of old products and batteries please contact your local municipality your waste disposal service or the point of sale where you purchased the items Penalties may be applicable for incorrect disposal of this waste in accordance with national legislation For business users in the European Union If you wish to discard electrical and electronic equipment please contact yo...

Страница 26: ...EE ES FI FR GR HU IS IT LT LU LV MT NL NO PL PT RO SE SI SK Este produto destina se ao consumador geral Categoria 3 Lietuviškai Atitikties deklaracija AD Bendrovė Panasonic Corporation patvirtina kad šis gaminys tenkina direktyvos 1999 5 EB esminius reikalavimus ir kitas taikytinas nuostatas Mūsų R TTE gaminių originalios atitikties deklaracijos kopiją klientai gali atsisiųsti iš mūsų AD serverio ...

Страница 27: ...E SI SK Този продукт е предназначен за обща употреба Категория 3 Român Declaraţie de Conformitate DoC Prin prezenta societatea Panasonic Corporation declară că produsul este conform cu cerinţele esenţiale şi cu alte norme corespunzătoare Directivei 1999 5 EC Clienţii pot descărca o copie a DoC ului original al produselor noastre R TTE de la adressa noastră DoC din Internet http www doc panasonic d...

Страница 28: ... product please visit our website www panasonic co uk Direct Sales at Panasonic UK Order accessory and consumable items for your product with ease and confidence by phoning our Customer Communications Centre Monday Friday 9 00 am 5 00 pm Excluding public holidays Or go on line through our Internet Accessory ordering application at www pas europe com Most major credit and debit cards accepted All e...

Отзывы: